Barbecue, grill, barbecue favorably distinguish life in the country or in your own home from living in a city apartment. Meat, fish or vegetables cooked over coals or an open fire, without adding oil, seem much tastier. And even though nutritionists talk about the dangers of carcinogens in the crust, which is formed from the heat of a natural fire, the aroma of such food outweighs such arguments. But, like any fireplace, a barbecue has its own characteristics of use.
What types of barbecue areas are there?
Let's look at the most popular types of barbecue areas, which are quite different from each other, primarily in terms of the type of design:
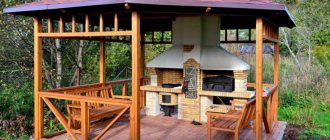
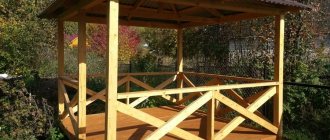
1. Closed - looks like a separate small building with a roof; The advantage of this option is the possibility of preparing fried dishes at any time of the year, not excluding the cold season, when it is raining, snowing or hailing outside, a closed grill area allows you not only to shelter from bad weather, but also to warm up near the fireplace.
Closed barbecue area made of round timber in the form of a gazebo with a grill inside
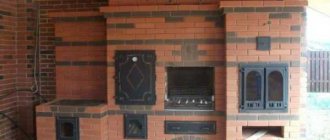
2. Open - can be located on any area without a roof, but, as a rule, it finds its place somewhere near the house or on a specially equipped recreation area; More often than not, the brazier itself looks like a metal fence, a forged barbecue, or a simple oven, so it’s cheapest to equip an open barbecue area.
Open round grill area with a stone brazier in a summer cottage
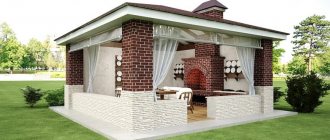
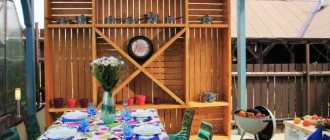
3. Semi-closed - a combined type of barbecue with a canopy, which you can make with your own hands or purchase in a store; the area may not have a roof, but be fenced with pillars or fabric (film) sheets, which serve a mostly decorative function.
The semi-closed grill area always looks amazing
An enclosed barbecue area is most often located in a gazebo, on a veranda or terrace. If this is a separate gazebo, then the fireplace can easily be located in the recreation area, combined with a children's playroom, swing benches, a swimming pool, a summer kitchen or a bathhouse. If the barbecue is based on the terrace, then it has the form of a portable or collapsible structure, which is dismantled for the winter; Light wicker rattan furniture or plastic sun loungers with umbrellas to block the sun are suitable here. A warm veranda is a completely different matter, since it is part of a winter house; a large stove with a fireplace, which acts as a brazier, is most often installed on it; such a place is decorated with massive furniture in the Alpine or excellent classical style, which never goes out of style.
Designer tips for organizing a summer kitchen
The organization of the summer kitchen and its design occupy the final aspect of the arrangement of the premises.
In a kitchen without walls, it is practical to use wicker furniture made of wood that is resistant to moisture.
The main principle of the aspect is harmony. Everything should visually complement each other and match colors. The general direction of the style should be thought through at the initial stage of construction - this will avoid many problems.
The appearance of the kitchen should match the design of the house. The path from it to the kitchen can be designed, for example, in the form of a winding path, on both sides of which there are low bushes, or a straight road of stones laid out in the shape of patterns.
A structure that has one or two solid walls, along which a stove or work area with household appliances will be located, will be convenient.
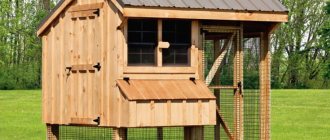
A separate mini-house for the work area will allow you to hide equipment from bad weather and serve as a storage place in the winter
Internal organization - water and electricity supply, connection of instruments and equipment must also comply with the principle of harmony. At the registration stage, you need to remember the main recommendations:
- The design of the dining area should be as comfortable as possible. The main thing is compliance with the principle of harmony and practical usefulness.
- For open kitchens, wicker or plastic can be used. For a closed type, upholstered furniture is suitable.
- An installed fireplace will add a feeling of comfort and warmth.
It is important to think about the lighting of the summer kitchen, and several options should be provided that provide both functional light and decorative lighting
Instructions: how to choose the right area for a grill or barbecue
If the grill or barbecue area is not located in a part of the building, but somewhere on the street, then you need to carefully select a suitable place for it, which should be:
a) Fireproof.
It is better to install the barbecue as far as possible from flammable objects: a residential building or outbuildings made of, for example, wood or lumber.
b) Protected from the weather.
A light wind will not prevent the fire from burning well, but a strong gusty wind can extinguish the flame. Therefore, it is better to place the barbecue area at the dacha under a special canopy with a fence or simply find a place on the site that is protected from whirlwinds.
c) Convenient .
The barbecue area at the dacha should, on the one hand, be located far enough from household facilities, and on the other hand, close to the water supply, so that you can wash your hands at any time, and in an emergency, quickly put out the fire.
d) Scenic.
If the barbecue is located in the summer kitchen or dining area, then the place for these objects should be selected in advance in such a way that you would like to spend a lot of time there, enjoying the most beautiful landscape that you can see from the garden plot.
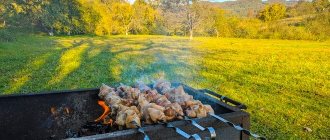
A beautiful barbecue area in a picturesque place is mesmerizing
Barbecue area in the country: features of projects with photos, drawings and dimensions
Open and semi-closed
Open and semi-closed barbecue areas should be located on the ground with or without supports in the most convenient place of the summer cottage, which, as noted above, would correspond to fire safety, protection from the wind, proximity to water supply and, what is not so important, but adds aesthetics and beauty natural landscape.
Diagram with dimensions for building a brazier on a semi-closed grill area
Brick barbecue project for DIY assembly in an open area
Closed
Closed types of barbecue areas require a more professional approach, since their construction will require a significant amount of time and much more finance: you need to lay a foundation and install a supporting structure, and then put up walls, build a roof, etc. Such barbecue areas can take different forms. The site, as a rule, is selected based on the size of the brazier and the available free land on the summer cottage (usually about 10 acres): the fireplace can be either small (about 3 sq. m.) or huge (more than 50 sq. m.), especially if the project combines it with a kitchen, dining room or other rooms.
Project of a small barbecue area in a gazebo
Winter garden gazebo with barbecue area is equipped with panoramic windows
Semi-closed barbecue area with timber supports and a canopy, made by yourself
Outdoor barbecue area made of wood: a budget option
Work order
This kind of masonry is called “on the bed”. Bricks laid transversely provide support for the brazier sheets and mesh. If you place it “on a spoon” (the narrow part of the brick), then the sheet of the roasting pan will be slightly higher. The area underneath can be used for firewood.
- The rows are laid with half a brick offset (in a bandage). The first six rows are the roasting pan and the table. From the 7th row comes the laying for the barbecue itself. Each row is measured with a level or a rope is pulled, and a plumb line (rope with a weight) is used to check the evenness of the vertical walls. Next, you can see how to cover a barbecue with bricks at the dacha and make a vertical protective wall.
- When pouring the working solution, the thickness of the seam should be no more than 5-8 mm.
- The finished grill takes 3-4 days to dry. Then you can slowly melt it. After 5-7 days, you can prepare the first portion of kebab.
Is a foundation always needed?
A brazier can be either a regular oven or a specialized grill. Both types can weigh much more than a hundred kg. Of course, such a mass requires a well-created foundation so that over time the structure does not fall underground, become deformed, or even break completely. It is best to create a separate foundation: a monolithic concrete slab for the hearth, and a lightweight one, such as a columnar one, for the walls. This, firstly, is more budget-friendly, since filling the entire surface will be much more expensive, and secondly, it is completely impractical, because the load will be uneven; the main thing is that the brazier itself is located under a securely made foundation, which should protrude 5-10 cm beyond the perimeter of the oven.
The barbecue area on a high foundation made of natural stone guarantees the stability and durability of the brazier
What is the difference between barbecues and barbecues: classification of types
A barbecue is a Middle Eastern type of device for cooking over coals; a barbecue is most likely of African origin (Haiti), but has found its widespread use in America.
The grill has a simpler design and cooking method: a box made of fire-resistant material is filled with hot coals, on which meat, fish, poultry, mushrooms or vegetables are subsequently fried, put on skewers or placed on a grate (inside it). A barbecue is, one might say, a grill.
A wrought-iron gazebo in the country with a barbecue is a convenient option for a small area
Barbecues have a different configuration: inside the (usually round) box there is a pair of grates (the lower one for coals and the upper one for food), thanks to this design, the dishes are richly saturated with smoke, acquiring a special aroma.
Semi-closed area made of untreated wood with barbecue
Braziers and their types:
1. Stationary - constructed from durable materials and must be installed on a good foundation; such a grill can look like an oven.
Stationary brick grill similar to a Russian stove
2. Mobile - portable roasters with light weight, which most often have a collapsible base.
Mobile outdoor grill of non-standard type
3. Collapsible - the cheapest barbecues with very low weight, made of metal elements that are easily attached to each other, becoming a small box on legs as a result of assembly; usually used once or a couple of times.
A collapsible type of barbecue for reusable use, which is attached to the railing
Barbecues and their types:
2. Stationary - they are a large brazier made of brick or stone; often combined with a stove or cooking platform.
The stationary outdoor barbecue has a monumental appearance, as it is made of stone
2. Cauldron-shaped - equipped with a vaulted, streamlined lid, which allows you to bake well not only small pieces of meat, but also whole poultry (for example, turkey, as Americans like to do on Thanksgiving Day).
The pot-shaped barbecue is ideal for the garden area
3. Mobile - they cannot be disassembled, but they move perfectly thanks to the wheels; usually equipped in the lower part (under the brazier) with a cabinet or tray where provisions, coals, lighter fluid and kitchen utensils can be placed.
Mobile barbecues move perfectly around the dacha area
4. Folding - portable barbecues of small format and light weight; Designed for outdoor picnics.
Portable types of barbecues can be taken with you outdoors in any weather
Advice! To create something similar to a barbecue out of a barbecue, you don’t have to buy a new design; you can simply purchase a double grate with clips, which will give the meat, fish or vegetables the desired “smoky” effect.
Brick, masonry mortar, other materials
When building a barbecue, you will need two types of bricks: fireclay and regular. Fireclay is needed for laying the firebox and chimney.
Firebox made of fireclay bricks
The furnace body is made of ordinary brick. And this circumstance must be taken into account when calculating the amount of brick.
Ordinary ceramic bricks come in only one size - 250x120x65 mm (not counting one-and-a-half or double formats). And fireclay (or stove) bricks can be of different sizes.
The brand of fireclay brick ShB-8 (250x124x65 mm) is closest to a regular ceramic block, and this “extra” 4 mm of bed width is compensated for by the different thickness of the masonry joint. In other cases, the sizes differ quite significantly.
How to cover a barbecue or barbecue area in the open air?
For barbecue areas in the country, you need not only to create a reliable foundation, but also to choose a good covering material both for comfortable walking around the site and for the aesthetic component, so that everything looks even more comfortable and modern. The facing covering can be stone, clinker, tile, etc.
The most popular types of coverings for a recreation area with a barbecue or barbecue in the country are:
- tiled (like paving slabs);
- wooden (garden parquet, decking or decking);
Tile covering for streets
Street tiles or, as they are often called, paving slabs have a wide variety of shapes and color nuances, so they can be used for a large or small garden plot with any design. The material has high wear resistance, does not melt in the heat, does not crack from frost and does not allow water to pass through, while it dries quickly and almost does not change its appearance over time, and, what is extremely important, is in the budget segment.
Paving slabs in the barbecue area - a universal option for covering the area
Brief step-by-step instructions on how to lay paving slabs yourself:
- Preparatory: remove the turf layer, remove debris, protruding branches and large stones from the area, install pegs around the perimeter of the area and pull a rope or elastic band over them.
- Leveling: level and thoroughly compact the soil, create drainage (you can use crushed stone with sand or sand-cement mortar).
- Facing: start laying tiles along a stretched rope or elastic band, starting from the farthest row (protruding edges need to be trimmed in advance, but it is better to calculate everything in such a way as not to use a tile cutter at all), adjust the finished sheet to the level.
- Final: fill the seams with sand-cement mortar and fill them with water, after drying, rub with quartz sand.
Wooden covering
Various decking boards, special garden parquet or decking are also often used to improve recreation areas with barbecues, especially if it is located on a veranda, terrace or on an area prepared for this. Wooden surfaces for streets only at first glance seem short-lived. In fact, they tolerate frost and rain well.
Decking is made using a technology where moisture is completely removed from the wood and replaced with a protective impregnation, which gives the boards strong resistance to changing climatic conditions. It is also not at all afraid of any kind of mold and mildew, is easy to install and has good design qualities.
Decking on a barbecue area combined with a place to relax
Terrace boards have somewhat similar properties to decking, but are not of the tiled type and are more similar to parquet modules. Installation occurs in this way: logs are installed on a leveled surface, on top of which the boards themselves are screwed onto self-tapping screws, which are subsequently secured to each other using a joint-groove system.
Decking board on the patio with a roasting pan for cooking in the summer
Garden parquet is also ideal for a barbecue area in a country house, as it does not dry out due to drought and does not swell after rainfall. The boards are laid on a flat surface: either on compacted soil, or on one consisting of gravel, crushed stone, or even on poured concrete. Parquet modules are connected to each other using the locking method.
Garden parquet is well suited for a barbecue or barbecue area in the country
Required Tools
To work you will need:
- shovel;
- Master OK;
- a trough for mixing mortar or a concrete mixer;
- buckets;
- building level, tape measure, plumb line;
- Bulgarian;
- reinforcing mesh;
- cement, crushed stone, sand, clay;
- fireclay brick;
- boards, plywood (for formwork assembly);
- metal corners, doors, grates, grates;
- hammer;
- mallet;
- rope and pegs (for marking under the foundation).
In order to save money, it is allowed to purchase fireclay bricks only for laying the firebox. For other areas of the oven that will not be exposed to high temperatures, you can take regular brick (not necessarily new).
We will analyze step by step the process of independently erecting a small outdoor barbecue, and clarify the nuances of each action.
Schemes and drawings
The work process reflected in the drawings
is developed at the planning stage. The drawing is a visual representation on paper of the future structure, where the shape, dimensions, and cross-sectional view are clearly visible. Created on a scale with a reduction several times from the actual dimensions.
For example, when specifying a scale of 1:10, it means that the design drawing is reduced by 10 times. For every 1 mm of drawing there is 1 cm in reality.
Corner barbecue diagram
It is customary to use a thick solid line to show the outline of the product. Thinner lines indicate the sizes of the elements.
Block barbecue diagram
Conventional shading in the drawing indicates the raw materials used for construction. For example, under an ordinary red brick, hatching is drawn at an angle; fireclay (fireproof) is marked with a check.
The drawing description includes the following details:
- general view of the product;
- outside view - facade;
- structure in a vertical section, where the internal structure is visible;
- horizontal section showing the principle of masonry.
Recommended oven dimensions
The width of the grill when folded should correspond to the width of the skewers - 47-62 cm. The height of the frying platform is made slightly higher than the waist, so it will be more convenient to cook. The length of the firebox should be such as to simultaneously accommodate from 8 to 10 skewers.
Preparatory work
They consist of clearing the construction site of debris, vegetation, and marking. For the last step, rope and wooden pegs are used.
Foundation installation
A brick barbecue is a heavy structure, so it is recommended to pour a monolithic concrete slab under it.
Briefly, the procedure for constructing the foundation looks like this:
- A hole is dug with a depth of 30 cm. The dimensions should be 20 cm larger on each side than the future product.
- The bottom is carefully compacted.
- A 15 cm thick cushion is poured from layers of sand and gravel. It's being compacted. Moisturized with water.
- The formwork is assembled from boards. The knocked down frame is placed around the perimeter of the dug hole.
- The bottom of the pit is reinforced with metal mesh.
- Cement mortar is being poured. The M500 brand is best suited for cooking.
- The poured mixture is pierced with a piece of reinforcement to remove air bubbles.
- The slab should extend above the ground level.
- Curing time is up to 4 weeks.
- In dry weather, to avoid cracks, the surface is moistened with water.
The frozen slab is covered with waterproofing (dense polyethylene, roofing felt) on top.
While the foundation hardens, you need to soak the clay for the solution. The finished solution should not crack when compressed.
You can get acquainted with other types of foundations for the furnace by clicking on the link.
It is important to think through the supply of communications even before the foundation is poured.
The day before laying, the brick should also be prepared. It is thoroughly watered so that it does not absorb moisture from the solution. The adhesion to the surface will be better.
Order of brickwork
The order should be carried out in the following sequence:
- It’s better to start by laying out the first row dry. This will allow you to adjust each brick to size if you need to trim it. The gap between the elements is 1 cm. The evenness of the diagonals is checked.
- Laying facing bricks can be done using a solution of cement and sand (in a ratio of 1:3). To improve the plasticity of the mixture, you can add a little lime. The recommended seam size is from 8 to 10 mm.
- In areas where bricks pass without dressing, it is necessary to carry out reinforcement with metal wire.
- Each subsequent row is shifted by half a brick. To adjust the elements to size, use a grinder.
- Every 3 rows, compliance with the masonry level is checked, and preferably more often.
- After 8 rows you need to create jumpers for the grill and countertop. To do this, take metal corners measuring 45*45 mm and set them up like an inverted letter T. Half of the shelf is sawed off. The metal should not come into close contact with the brickwork.
- Afterwards you can start laying the firebox. Fireclay bricks are connected to each other with clay-sand mortar. The thickness of the seams is no more than 4 mm.
- Metal corners are also used to form support for the bottom.
- The second row of bricks for the firebox completely covers the first. This way the seams will not burn through. Some craftsmen replace the first two rows of masonry with a concrete slab, but the creation will cost many times more, although it will be no less reliable.
- Parallel laying of the firebox and facing bricks is allowed. But between the lining and the firebox there is always a gap of 1 cm so that they do not touch.
To improve the decorative appearance, stove makers resort to constructing a combustion arch. To do this, a wooden blank is first made in the form of a semicircle and placed in the barbecue portal. Next is the masonry. Bricks are cut to the required sizes using a grinder.
The arch made of facing bricks must be covered from the inside with a fire-resistant lintel. Placed on a metal corner.
How to build a support structure and canopy?
Supports
The supporting structure is important not only for solid buildings, but also for aesthetics. With the help of a beautifully equipped barbecue area, you can give the site an attractive look, especially when there is no dynamic country house on it. Supports are usually constructed from stone, clinker and brick, if the site will be of a long-term nature; untreated wood and low-quality metal materials are considered simpler and more cost-effective options. One of the most beautiful supports with a canopy is a pergola.
The metal support structure together with the canopy looks more comfortable
Canopy
Sheds for the barbecue area vary in degree of rigidity: they can be soft (any flexible materials), applied to the frame by melting, and hard (such as slate, tiles, metal profiles, copper sheets, etc.), which are usually laid on a truss.
DIY hard canopy over the brazier
There are three types of soft coverings for creating a canopy:
- Bitumen.
- Polymer-bitumen.
- Polymer.
The latter are considered the most inexpensive, especially if you take a material such as polycarbonate. If you need something simpler and more budget-friendly, then you should use tarpaulin coverings or similar water-repellent fabrics.
Zoning a large barbecue area with your own hands
If there is a lot of space for a barbecue, then you need to follow certain zoning rules in order to correctly distribute the spacious area into several convenient areas. In the classic version there will be two of them:
- A roasting pan with a work area for cooking.
- A place for dining and comfortable relaxation.
Zoning of the area for the lounge and the hearth itself is most often done with the help of furniture. It is appropriate to place a large table with chairs on one side, and behind it a sofa with armchairs, in order to visually separate one functional area from another. You can go another way: construct a high or low decorative partition from scrap materials: wooden beams, dry branches, climbing plants, etc.
Zoning the area for the lounge and the hearth itself using furniture
Furniture for open and closed barbecue areas
Open barbecue area
If the site is located directly in the open air and is not protected even by a small canopy, then it is definitely worth choosing outdoor (country) furniture, which is characterized by high wear resistance: it does not fade in the sun, practically does not absorb moisture and dries quickly (this is wicker furniture made from natural rattan or made of cheaper materials - polymers), even better if it does not need to be removed for the winter (such types include wooden and forged sets).
Forged furniture for the open barbecue area is durable and beautiful
Closed barbecue area
For barbecue areas located on a closed veranda, universal furniture sets are suitable, suitable for all interior spaces. But if you want to make the place special, then it is better to choose massive wooden exhibits in the classic, chalet, Provence, country or Scandinavian style. A cozy place near the fire always attracts attention.
Stylistic design
Italian, Greek and Spanish ethnic styles are suitable for decorating a patio. They are characterized by the presence of stone in the decoration, light wooden partitions made of slats, compact furniture, plain textiles and exotic flowers in pots. In the modern interior of the barbecue area, metal surfaces and glass prevail. If you add brickwork and spot decorative lighting, complete with simple but stylish furniture, you will get a loft. The barbecue areas combined with the bathhouse are decorated in a traditional Russian style with carved elements, large tables and benches made of solid wood with rough surfaces. For the country style, wood, forged elements, and checkered textiles with thematic patterns are used in decoration and decor. The ease of decoration in the Provence style is emphasized by well-worn furniture painted in light colors, small sculptures, chaotic green spaces in pots and home textiles used to decorate the recreation area.
What kind of lighting should surround the roaster?
Lighting for the grill and barbecue area should be carefully selected, since most often people cook over a fire in the evening or, moreover, at night, when there is no sunlight at all. It is better to choose several types of lamps with unequal power or one backlight with different intensities so that you can adjust the illumination. Garden lanterns, fixed to the site or somewhere on supports, and street sconces, and LED strips, and other types of lamps suitable for open areas are also used.
Advice! The ideal option would be to install several additional samples of street lamps powered by a solar battery: economical, safe and does not require laying wires.
Lighting the barbecue area with LED street lamps
Illumination of a semi-closed barbecue area with street lamps