How nice it is to have a house with a garden! After all, in the morning, throwing on a robe, you can go out into your yard and take a breath of fresh air. It’s also nice to drink a cup of tea or aromatic coffee while enjoying the view of the beautiful garden, or sit comfortably in a chair on the terrace while reading the morning newspaper. In the evening, as soon as the shadows begin to lurk in different corners of the garden, you can add light fairy lighting using lamps, which will help create a relaxed, calm and romantic atmosphere. Today Dekorin will tell you how to make an original garden lamp with your own hands using scrap materials, and will also show 49 photos with various options.
Types of street lamps
Street lamps that you plan to install on the territory of a country house or cottage must perform the following functions:
- illuminate the local area so that residents are not afraid to move around it at night;
- fit into the overall design concept of the yard and home.
Lamps for outdoor dachas are divided into the following types:
- wall lanterns. They are best suited as lighting fixtures at the entrance to the house and on the platform in front of it. As an option - lighting next to the gate or wicket. They can be different in shape and design; most often they choose “antique”;
- floor lamps - they are installed directly on the ground or on the veranda. A classic floor lamp is a flat stand with a round ball at the top, but there are more modernized models that differ from each other in height, shape and number of shades;
- ground lamps - they are mounted directly into the ground, and they can serve as illumination for green spaces, as well as illuminate pedestrian alleys in a summer cottage. In addition, they complement swings, summer pavilions and other buildings on the site well. Lanterns of this type most often have a rectangular or round shape;
- hanging lanterns - they are attached on verandas to ceiling beams or even to trees, if this does not impede the connection to the network. As a rule, they are a long and strong chain that ends in a lampshade.
In the photo you can see some types of country lamps, which can be purchased ready-made , or you can make them yourself.
What materials are suitable
When choosing a purchased copy, you should pay attention to the material. It is important that it be moisture resistant, so wood is not suitable in this case. It can only be used in summer varieties and must be well processed. The same goes for ceramics. The best option is metal, but impact-resistant plastic will also work.
Silumin receives not very good reviews, which, according to many, deteriorates too quickly. If this is a lamp for a pond or swimming pool, then, of course, it must be waterproof.
Chicken feederCapers - what are they? How to choose, cook and tips on which dishes to use (110 photos and videos)
- Order shaft production
Light sources for street lamps
For country lamps, different light sources , for example:
- classic incandescent lamps. They are inexpensive, but as outdoor lighting they are not always economical, since they consume a lot of energy and are too bright;
- halogen lamps. Such light sources are more economical and will last much longer than conventional ones. They also differ from incandescent lamps in their reasonable light intensity. Their disadvantage is strong heating and sensitivity to sudden changes in voltage and dirt on the bulb;
- LED bulbs. They will save up to one hundred percent of electricity compared to previous options. Such lamps are not cheap, but they will last as long as possible. In addition, they do not contain mercury or other harmful components. And the durable body of such a lamp is almost impossible to break;
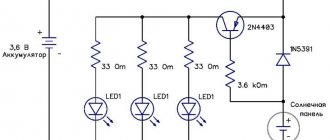
- solar panels. Lanterns based on them can be installed even where it is not possible to lay electrical wiring. They operate using a battery that absorbs natural energy. When fully charged, the lamp will operate continuously for 12 hours. However, they can only be installed where the sun provides maximum heat during most of the daylight hours.
Project preparation
In order not to become the owner of chaotically placed lamps throughout the site, you should carefully consider the lighting scheme for the paths on the site. To do this, it is not enough to simply select several lamps and place them in the necessary areas of the yard. It is important to think through a detailed lighting plan, including:
- marking the location of all light sources and laying underground cables;
- lamp connection points. It is also important to consider installing waterproof sockets and switches;
- type, size and design of lighting fixtures.
What can you make your own lamp from?
Very often, homemade street lamps are made of plastic , but this solution is not the best, since the plastic product is easily damaged and broken. It is best to make a metal lantern with your own hands:
- brass;
- copper;
- bronze
It is worth noting that the steel model will be maximally resistant to precipitation and other external influences, but its appearance leaves much to be desired.
But copper lamps will harmoniously complement the retro-style exterior, but do not forget that over time, copper on the street oxidizes and acquires an unsightly greenish tint. A bronze lamp tends to darken, so it will have to be cleaned regularly.
The most optimal material for a lamp is brass, which is durable and visually attractive.
We decorate the garden and yard with handmade lamps - 7 photos
In this section, you will find 7 photos of other (not discussed above) options for making garden and street lamps with your own hands.
Making a homemade lantern
To make a lantern using metal raw materials with your own hands, you will have to prepare the following tools:
- drill;
- drills;
- screws and so on.
Very often, do-it-yourself lanterns are made from scrap materials , for example:
- wood chips;
- glass and tin jars;
- clay;
- plastic bottles and cups that serve as lampshades for the garland;
- PVC pipes;
- cardboard drink bags;
- old kitchen utensils;
- unused building materials.
Such products will be especially original, and making them with your own hands will not be difficult. However, they will be fragile and have a short service life.
Recent Entries
Chainsaw or electric saw - what to choose for the garden? 4 mistakes when growing tomatoes in pots that almost all housewives make Secrets of growing seedlings from the Japanese, who are very sensitive to the soil
When making a lamp for a dacha with their own hands, many do not hesitate to use their imagination to the maximum. Modifications can be quite varied. Below we will look at the manufacturing features of some options.
DIY glass bottle lantern
It is very easy to make a lampshade based on a glass bottle or jar with your own hands, while transparent glass will allow light to easily pass through the walls and create wonderful special effects.
To work you will need:
- bottle or jar;
- pliers;
- cartridge;
- insulating tape;
- knife for stripping insulation;
- indicator;
- decorative elements.
The work flow is as follows:
- install the electrical wiring, connect the wires in the socket and screw the light bulb into it;
- We take a bottle with a narrow neck, preferably an original shape and color, and put small beads, transparent balls that reflect color, or ground glass on its bottom;
- we wrap a thin colored wire around our finger so that it takes on a spiral shape, and also put it in the bottle;
- lower the socket with the light bulb into the lampshade and fix it with silicone.
DIY forged lantern
A forged lamp for a summer cottage is a more reliable and durable option . To make it you will need:
- steel rods;
- corner;
- stripes;
- welding machine.
The manufacturing work will look like this:
- from 4 steel frames we make a body in the form of a rectangle or trapezoid;
- We cover the outside of the frame with bars. They are made from steel rods;
- cover the body from above with an iron cap;
- We make a bracket from a square-shaped steel bar that will serve as a fastening to the wall;
- the lower curls are made of thin steel strips;
- the ends of the curls are welded and connected by interceptions.
An easy way to craft
Apart from their external differences, street decorations can have a simple or complex design. Simple figures assume a flat shape. It’s easier to do, and the effect will be just as memorable.
- To do this, you will need a piece of plywood, onto which you must first transfer the contours of the workpiece or attach it to the surface using buttons.
- Afterwards, you need to drive small nails or screw in screws around the entire perimeter of the workpiece.
- Then we secure the end of the wire by winding it at the bottom of the future craft, or rather, where the connection will be less noticeable.
- Give the shape an outline.
The product can be made from a single piece of wire or from separate parts for each part. For the last option, wire cutters will come in handy. After completing the blanks, the figures are simply connected to each other with tape, thread or thinner wire.
Features of connecting the flashlight to the network
When you make lanterns for a summer cottage, you need to pay due attention to the wiring connection procedure. To connect the lamp to the network, we need:
- electric cable VVG;
- terminal blocks for fixing connections;
- metal hose or corrugated pipe for protection.
, a cable with two cores 1.5 mm thick is most often used . It is better to immediately purchase a bay where the length of the wire will be equal to 100 meters. And the diameter of the corrugated pipe should be from 18 to 25 mm. It will be needed to protect the cable from rodents or damage when digging in the soil.
The holes in the terminal blocks should have a diameter of 2.5 to 4 mm and consist of one or two strips, it all depends on the number of connections and lampshades. The pads must be selected based on the current strength from 5 to 10 A.
Installation involves the following steps:
- we dig a trench for laying the cable with a depth of about 80 cm and a distance from the ditch to the house of a maximum of 60 cm;
- When installing floor lamps, you first need to install metal knives and then pull the cable through them one by one. Where it is placed in the trench, we place it in a corrugated sleeve. After passing through all the devices, the cable is cut so that the length of its tail is a maximum of 15 cm;
- we prepare the second piece of wire and also pass it through the pipe and at the top of the device we connect the two cables with terminals;
- if the lights are placed on a wall or facade, you need to reliably insulate the junction boxes. It is best to connect the wires in the boxes with clamping nuts; you can also use pliers, but then each connection must be soldered. Wrap the twisted areas with electrical tape;
- installing the electrical circuit. Since it has two wires, one “zero” and the other “phase”, you need to make sure that the switch can open the phase wire. Then, in the off position when changing a burnt-out lamp, there will be no risk of electric shock. The phase wire is determined using a special indicator;
- A simple socket will also work as a connection point, then you can turn off the power to the entire system quickly by just pulling out the plug. The cables can also be connected directly to the terminals on the switchboard, which is equipped with an automatic fuse that cuts off the voltage in case of an emergency;
- when installing the switch, you need to check whether its specified power corresponds to the load in this network;
- Before digging a trench, make sure all lights are working and reinforce the posts by tamping around the clay or small crushed stone. If the soil is light, then it is better to fill the supports for the devices with concrete.
History of a beautiful tradition
America should rightfully be considered the forefather of bright and luminous street decorations. The tendency to create a real show out of any insignificant detail is in the blood of the American people. This is where Hollywood action-packed films, extravagant fashion looks and, of course, colorful unusual decorations for the holidays come from.
While we are just learning how to build New Year's compositions for the street, Americans are competing with each other at their best. Zealous Christmas fans spare no time or money for this. And in 2013, the official television show “Great Christmas Battle” even appeared, in which anyone can take part, and the owner of the most beautiful house in America can win.
There is nothing surprising in such borrowing of traditions. Few people know that we also started decorating the Christmas tree thanks to our foreign neighbors. The event was originally observed by the pagans of Germany, who decorated fir trees to ward off evil spirits. Subsequently, this ritual was transferred to the Christian religion, but had a slightly different context.
On our lands, the legislator of the New Year's tradition was none other than Peter the Great. The famous reformer issued a decree on the street decorations of spruces, pines and junipers in 1700 after returning from Europe. Since there were no Christmas decorations and other decorative items known today, the trees were decorated with fruits, sweets and gingerbread. Subsequently, toys began to appear, carved from wood or sewn from colored scraps.
Light figures: animals and plants
In addition to the already mentioned lighting technology, you can also install luminous LED figures in the garden. This is a very interesting solution for the holidays, and this light can be left on a permanent basis. To make curly objects look impressive, you need to create a composition. Figures in flower beds look great. For example, beautiful luminous figures of birds will look good on trees, and figures of animals and fabulous plants will be combined with fresh flowers and shrubs.
Artificial LED bushes and trees are used with the same effect.
They can be installed separately in an open area or among living vegetation.
The online store profneon.ru offers dozens of lighting options for your yard. Our consultants will help you choose the best set of lighting equipment, calculate the cost, and also give installation recommendations. For help choosing the right lighting for trees and shrubs, please chat online or call.
Other jewelry options
If you easily completed the “New Year’s gift” craft, you can make a more complex and attractive design.
- Christmas deer . We make two identical animal frames using wire on plywood. Then we carefully remove the blanks from the nails and connect them with wire in the body area at a distance of 20–30 cm. The size can be larger or smaller depending on the idea. We add volume to the Christmas reindeer by wrapping its parts with thinner wire or rope in a circular manner.
- Snowman . For the snowman, you need to make several rings of different diameters in order to subsequently connect them with wire, giving rounded features. A headdress is made using the same principle: if it is a bucket, then the rings of the bottom and top are connected by metal rods in height. But it could also be a hat made on a similar principle.
- Sled . They consist of side walls formed on a plywood board and joints where the seat should be. Decorations for the sleigh can be made with separate parts in the form of stars, snowflakes or wire circles. An even simpler way to make outdoor decor is to use the frame from an old children's sled, adding only individual wire parts.
In addition to the usual holiday attributes, ordinary garden trees can become decorations. This miracle looks incredibly beautiful and fabulous. Well, if there is no tree in sight, then it can be easily built from metal rods. Special artistic abilities are not needed here; the main role is played by lighting.
Not wanting to use foreign symbolism in the theme, you can try to make heroes of domestic fairy tales. Namely, bunnies, squirrels, a white-sided magpie or a hut on chicken legs. In any interpretation, the composition will look beautiful and unusual for the New Year. And both children and adults will enjoy creating decor.
Did you like the article? Tell your friends about it:1 1