How to attract a stork
In order for a stork to build a nest on the roof, you need to help him. A ready-made nest will help attract birds to your home. You can do it yourself, thereby making the stork’s work easier. Then it is very likely that a young bird family will honor you with its neighborhood.
There are conditions without which the birds will not be able to stay with you permanently.
Inspection of nesting sites
Ornithologists advise all volunteer bird helpers not only to build new stork nests, but also to check the condition of old ones more often. A tenth of storks die due to nests falling.
- You need to inspect the branches under the nests very carefully. If a branch is dying, it is better to cut it down and build a stork house nearby.
- Sometimes storks ignore a nest that is still quite strong: the reason may be the grass that makes its way there. By destroying inappropriate greenery, you will certainly attract birds to your home.
- When looking into the nests, do not forget to throw away objects and materials that are dangerous for the stork babies. There is a known case when adult storks covered the bottom of the nest with film, and the chicks died after choking in rainwater.
And one last thing. Be patient while waiting for “your” storks - they may be looking at a new home for several years. Artificial nests are not populated as often as we would like. But don’t lose hope: if you have followed all the “building codes” and are really looking forward to your feathered guests, they will certainly fly to your house.
Availability of food supply
Birds need a home and food to live. In order for storks (and these are birds of prey) to easily obtain food for themselves, within a radius of two kilometers from their nest there must be a swampy pond where frogs, snakes, and insects live that these birds feed on.
The water element is replaced or supplemented by a livestock farm or pasture located nearby.
Tantalum
The fifth and last genus of stork birds represented in India is Tantalus, 4 species of which are distributed in the tropical countries of Asia, Africa and America. It differs from other storks in the shape of its beak, which is rounded at the tip and rounded at the top and slightly curved downward, thus occupying the middle between the beak of the ibis and other storks.
stork tantalum
The Indian representative of this genus, the Indian tantalum (T. leuco-cephalus), known as the pelican ibis, belongs to the most famous birds of India, common in areas rich in water. It lives alone or in pairs, often nests socially in large trees near villages, easily becomes tame and is then very trusting of humans.
Neighborhood with storks
If there are already families of storks in the area, the likelihood that a young couple of these birds will settle next to you is high.
However, crowding of the bird population is also not desirable, since in this case conflicts may arise due to the division of territory. The distance from nest to nest must be at least 300 meters.
Preparing to build a nest
What stork nests look like in nature, and what a person can do - look at the photos of stork nests, if you are inspired, you can get to work.
In order for storks to live freely in the nest, they must have somewhere to feed - there must be farms, meadows, and swamps nearby. The probability of your nest being populated becomes higher if many birds already live in the area, which means that the stork will also take root here.
What to consider when choosing a nesting site:
- It is advisable for the stork to build a nest 300 meters from the neighboring nesting site of these birds, not closer, otherwise they will divide the territory and quarrel;
- the nest should be ready at the beginning of March so that the birds have time to settle in: at the end of April - beginning of May the laying is already done, the storks hatch the eggs; or build in the fall - for next spring;
- It should be convenient for birds to fly up - there should not be electrical wires above the nesting site; roofs of buildings, poles, tall trees are suitable;
- the height of the place must be at least 4 meters;
- the support of the nest must be strong - two adult storks with chicks and a nest weigh about 40 kg, these birds return to their nests for more than one year, each time the nest will become heavier.
What are storks afraid of?
During the mating season and during nesting, you should not make noise, shout, make sharp sounds, touch or move nests, so as not to scare away wary birds.
You should also not pay too much attention to the chicks. The storks won't like this. And the family can leave their habitable place. It is very rare, but it does happen that storks attack people or cause other harm while protecting the safety of their nest.
It is dangerous to place nests near high-voltage power lines. Birds can die by sitting on such a support, or accidentally touching live wires with their wings.
All these rules are taken from specific life experiences. Sometimes it is enough to carefully look at a photo of a stork’s nest to be convinced of the correctness of these conclusions.
Kinds
The genus of these birds includes about 12 species. Their representatives are similar in many ways. However, they are also endowed with differences, which consist in the size and color of the feather cover, but not only. They also differ in character, habits and attitude towards people.
Distinctive features of the external appearance can be seen in the photo of storks .
Let's take a closer look at some of the varieties:
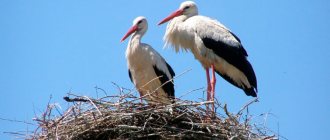
- The white stork is one of the most numerous species. Adults can reach a height of 120 cm and a weight of approximately 4 kg. The color of their feathers is almost completely snow-white, while the beak and legs are red.
Only the feathers bordering the wings are black, and therefore, when folded, create the impression of darkness in the back of the body, for which such winged creatures in Ukraine received the nickname “Blackguz”.
They nest in many areas of Eurasia. They are widespread in Belarus and are even considered its symbol. Birds usually fly to African countries and India for the winter. The white stork people with trust, and such representatives of the winged kingdom very often build their nests in close proximity to their homes.
White stork
- The Far Eastern stork, sometimes also called the Chinese and black-billed stork, is a rare species and is protected in Russia, as well as in Japan and China. Such birds nest on the Korean Peninsula, in Primorye and the Amur region, in the eastern and northern regions of China, and in Mongolia.
They prefer wetlands, trying to locate themselves away from people. With the onset of winter, birds move to more favorable areas, most often to the south of China, where they spend their days in swamps and rice fields, where they can easily find food for themselves.
These birds are larger than the white stork. Their beak is also much more massive and black in color. Around the eyes, an attentive observer may notice red areas of bare skin.
The black beak distinguishes it from other relatives of the Far East.
- The black stork is a little-studied species, although numerous. Lives and lives sedentary in Africa. On the territory of Eurasia it is quite widespread, especially in the reserves of Belarus, and lives in abundance in the Primorsky Territory.
Birds can leave unfavorable areas for wintering in southern Asia. Representatives of this species are somewhat smaller than their relatives from the previously described varieties. They reach a weight of about 3 kg.
The shade of the feathers of these birds, as the name suggests, is black, but with a slightly noticeable copper or greenish tint. Only the belly, undertail, and lower chest are white in such birds. The periocular areas and beak are red.
Birds of this species nest in deep forests, most often near small ponds and swamps, and in some cases in the mountains.
Black stork
- The white-bellied stork is a small creature compared to its relatives. These are birds weighing only about a kilogram. They live mainly in Africa and live sedentary lives there.
They have white underwings and chest, which presents a great contrast with the black feathers of the rest of the body. And the latter became the reason for the name of the species. The color of the beak of this type of stork is gray-brown.
And during the mating season, the skin at the base of the beak becomes bright blue, which is a characteristic feature of such birds. They nest in trees and rocky coastal areas. This happens during the rainy season, for which representatives of the described species are nicknamed rain storks by the local population.
White-bellied stork is a small representative of the family
- The white-necked stork is found in various areas of Asia and Africa, taking root well in tropical forests. The height of birds is usually no more than 90 cm. The background color is mainly black with a touch of red, the wings have a greenish tint.
As you can understand from the name, the neck is white, but on the head it looks like there is a black cap.
The white-necked stork has white downy neck plumage
- The American stork lives in the southern part of the continent indicated in the name of the species. These are not very large birds. In plumage color and appearance they resemble a white stork, differing from it only in the shape of a forked black tail.
Elderly individuals are distinguished by their grayish-blue beak. Such birds nest near ponds in thickets of bushes. Their clutch consists of a very small number (most often about three pieces) of eggs, which is not enough in comparison with other varieties of fellow storks.
The newly born offspring are covered with white down, and only after three months do the cubs become similar in color and feather structure to adults.
Pictured is an American stork
- The woolly-necked Malayan stork is a very rare, almost endangered species. Such birds live, in addition to the country indicated in the name, in Thailand, Sumatra, Indonesia, and other islands and countries with similar climates.
Usually they behave carefully, with extreme caution, hiding from human eyes. They have a special charcoal feather color, their faces are naked and covered only with orange skin, without feathers.
There are yellow circles around the eyes, reminiscent of glasses. Unlike many other species of storks, representatives of this species build small nests. In them, only two cubs grow from one clutch. After a month and a half of growth, the chicks of this species become completely independent.
The woolly-necked Malayan stork is the rarest of the family.
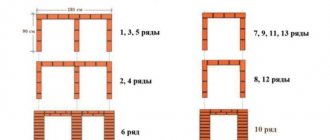
Stork nest materials
A nest, like any other house, should be:
- durable;
- convenient;
- beautiful.
We will build on these “three pillars” of construction.
We will need
- Pieces of wooden beams for the base, 4 pieces, 1.3 meters each.
- Boards for fastening.
- The round base is a wheel with spokes from a cart, wheelbarrow, or bicycle. You can make a circle out of wood. plywood, chipboard, but then the structure will be heavier.
- Rods for the nest - 3-4 armfuls. Willow, hazel, grapevine, and reeds are suitable.
- Hay, straw, hemp for bedding.
- Twine for fastening.
- A little lime and cow or horse manure.
When building a nest, do not use sharp metal objects. So that the birds do not accidentally get hurt.
The stork has one dream - height
A roof, a pillar, a tree - any natural platform is suitable for recreating a stork’s nest with your own hands, the main thing is that the birds fly up to it freely.
Oddly enough, in nature, long-legged dandies do not always settle high from the ground: stork dwellings were found on stumps, in thickets, and simply on the ground.
If the area is open, the nest can be installed lower than required near buildings and power lines. Traditionally, nesting boxes are raised to a height of 4 to 10 meters.
Accommodation
Place the nest at a height comfortable for storks - from 4 to 10 meters.
The support must be strong, stable and reliable to support two adult birds and their offspring. On average, this weight is 40 kilograms.
It must be taken into account that the nest will be used for several seasons. A year from the goal his weight will increase. That is why the support must be strong.
Support and foundation of the structure
Don’t forget also that Siberian Cranes love to modernize and strengthen their home, making it heavier from year to year. The weight of such a “nest” can vary from several centners to a ton.
The basis for a homemade nest can be old wheels (usually bicycles), harrows, or hand-made round structures made of metal rods, branches or boards.
The diameter of the base is at least one meter. Construction nails and stakes must be driven in along the perimeter, which will stand in the way of the branches, protecting them from slipping.
- Pillars made of any material can serve as support for the nests.
- The wooden base for the roof nest is made from boards nailed to the crosspieces and then attached to the roof ridge.
- On top of this base, a platform, grate or wheel is attached with nails.
Only professionals can arrange a site for black stork nests.
On a free-standing support
If you don’t want to load the roof, you can arrange a comfortable life for the birds on a pole or pile. They use old poles or specially install new ones. An old dry tree whose top branches need to be cut down will also work.
Make sure that the support is reliable and located in a place convenient for approaching. It’s great if the pole with the nest is located opposite the windows of the house. Then you can watch the worries of the birds at any time right from home, without disturbing them.
When and where to build nesting sites
Rural residents have not yet lost the skills of arranging home-grown stork nests. But before you begin this important task, several conditions must be met:
- the distance to the food “base” (meadows, pastures, swamps) should vary within 1-2 km;
- neighboring nests should be 200 m apart from each other, or even better, 300 m (to avoid bird conflicts);
- It is necessary to build a home for birds away from power lines.
The last condition is dictated by many years of observations: storks, like a magnet, are drawn to electric poles. Birds consider them an ideal point of observation and respite, and... they die en masse, carelessly touching the wires with their wings or beaks.
Storks return from warm countries in March-April. It’s great if the nests are waiting for their inhabitants by this time. It’s even better to make a nest in advance - in the fall.
By the way, it often happens that a pair of Siberian Cranes settles into their new “homes” in May-June. This occurs when the storks' eggs are destroyed and they are forced to reproduce again.
Manufacturing
Knock together the beams in pairs crosswise. Connect the crosspieces with several boards to get a structure similar to a sawhorse on which logs are sawed.
Secure the trestles to the roof. Place the prepared base on the trestles. It is better to make it round, according to the shape and size of the bottom of the nest. Place the finished nest on the base.
Cover it with soft bedding. Expect guests to arrive soon.
Do-it-yourself nest from branches: tips and instructions for making decorative nests (140 photos)
Bird nests placed by birds on trees are cute and interesting, but homemade decorative crafts made from twigs like a house for birds are a completely different matter from the design sphere.
The popularity of decorating the interior with such “fluffies” with toy eggs or figurines seated in them is becoming more and more widespread, which makes the algorithms for making them yourself more and more in demand.
Anyone can cope with this task, and the photos below of possible nests made from branches, options for using them in the interior, and recommendations for using such decorations will help with this.
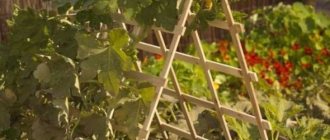
What can you make a nest from?
It’s better not to know what a bird puts into its nest, but you shouldn’t repeat after your feathered friends, since for home use it would be better:
- Branches and twigs;
- Hay, dry grass;
- Threads, yarn;
- Textile;
- Cardboard, paper.
Each option has its advantages and disadvantages, but the most desirable, according to decorators and designers, will be wood materials.
Why are branches better?
There are many reasons why it is advisable to make a nest from branches with your own hands:
- Safety. Wood is easier to process, and insects can live and breed in grass and hay.
- Aesthetics. The rods are more similar to the real thing (than fabric or cardboard products).
- Harmony. Wooden motifs always look better in the interior and suit any style of the room.
- Economical. Suitable branches can be found while walking, eliminating the need to spend money on craft materials.
What to prepare for the master class
Before you make a nest with your own hands, you need to take care of the materials and tools. Among them:
- Flexible rods of different lengths;
- Plastic disposable plate;
- Threads;
- Scissors;
- Glue;
- Decor (leaves, beads, stones, fluff, feathers, bird figurine).
The branches must be flexible, so it is worth narrowing the field for their search and choosing only birch, willow, willow, lemongrass, raspberry or grapevine twigs.
Step-by-step instruction
Then you can get down to business. Step-by-step instructions on how to make a nest from branches are as follows:
Twist one twig into a tight ring, leaving a small hole in the center. Take an odd number of other branches (preferably more than five) and secure them to the ring with a rope.
Start circular weaving according to the basket principle: first pass the twig under the jumper, then over it. Secure the ends of the branches with twine, and after finishing, continue weaving from where you stopped.
Fill the missing spaces with branches, grass, feathers or down.
Place decorated eggs or bird figurines in the formed bed.
There is another option for making a nest:
Break the branches into small sticks two to five centimeters long.
Inflate the balloon and tie it tightly. Coat the ball with a generous layer of glue.
Place broken branches on the surface in a chaotic manner, repeating the shape of the nest. Deflate the balloon and release the fake.
Supplement the product with rods and other decorative elements as desired.
Where can I place it?
After the process of making the craft reaches the finish line, you can think about placing the product. So, the following options are offered:
In the house. You can decorate any room in an apartment or house with a nest - the personification of comfort, family and warmth. The decoration looks especially good with a container of cereal or painted eggs placed in it.
On the street. A decorative nest for the garden is an interesting addition to any fence or a custom feeder for outdoor birds. You can try to find new residents by hanging a nest on the top of a tree.
As a present. A standard packaging box with a bow or a boring package is nothing compared to a bird's nest design. To give it a festive look, all you have to do is sprinkle the craft with glitter and add a shiny ribbon to the weave.
A decorative nest is one of those crafts whose simplicity of manufacture hides originality, practicality and incredible aesthetics. All that remains is to find suitable branches to decorate the interior of the living room or garden with an original accessory.
Photo of a nest made from branches with your own hands
How to make a nest correctly
You will have to weave the nest yourself or make it based on an old stork’s nest.
Lay the vine or flexible rods in an arched manner in a circle, intertwining them with each other. To prevent the nest from falling apart, tie it with rope in several places.
The nest should widen slightly at the top. It should create the illusion as much as possible that the storks have built the nest themselves. To do this, you need to add a little cow dung between the rods and coat it with lime, so that it seems that storks have already been there and left evidence of their vital activity.Be sure to make sure that your product is durable so that it does not fall apart on the first day after the birds arrive.
Before the arrival of the birds next spring, you need to check the serviceability of the nest, the reliability of its fastening, and, if necessary, carry out repairs. Dirt and extra branches must be hit without fail.
Nest from branches - 60 photos of how to make a decorative ornament with your own hands
Very often, many parents are faced with the problem of creating various crafts for children. In this case, the child can receive an assignment either from a kindergarten teacher or a teacher at school, or maybe on his own initiative. A dry branch is ideal for this type of activity.
At times, an ordinary piece of driftwood can turn into a cute animal or intricate decorative objects. One of the most popular crafts is a decorative bird's nest.
A composition of branches will perfectly decorate the interior of your home or wonderfully complement your garden; it can be made from any available materials collected from nature or the territory of your own home.
There are many ideas for designing a decorative nest. You've probably come across many different descriptions and step-by-step instructions with photographs of a nest made from branches. The composition can be a small Easter souvenir or a huge nest to attract the attention of storks.
Very often, the appearance and size of a decorative miracle depend on the intentions of the developer himself. As an example, photographs of small children sitting in nests made of branches are now very famous.
Materials and tools
What types of raw materials and equipment will be needed to build a nest?
To develop an artificial nest with our own hands, we will use previously prepared materials and tools:
- some hay;
- small tree branches;
- thick thread;
- bird feather;
- scissors;
- colorless glue;
- plastic plate.
Spray paint can also be useful for painting the nest; it will add an element of magic to it. If possible, you should stock up on quail eggs in order to put them into the prepared composition.
Of course, you need to remove the contents of the eggs in advance and save only the peel. Next, we need to figure out where to place our nest of branches. Someone will definitely “plant” it on a tree, this will require additional materials: large tree branches, leaves where we will place the product and transparent glue.
Creating a decorative miracle with your own hands
How to make an artificial nest with your own hands? First we need to form the base of our nest; for this we will need flexible small stems or a disposable plastic plate. Instead of stems, you can get by with vines, straw, grass or algae. You can gather these materials yourself or purchase them from a gardening store.
There is an alternative to this method; to do this, you need to make a small hole in the center of the bowl or foam. Next, the branches are attached to the base with thread or transparent glue. Carefully place straw or seaweed in a circle on the surface; for reliability, they can also be fixed with glue.
Next, take a large bunch of stems and bend it into a ring to form an English letter U. If you don’t get a closed ring, you need to add more branches. Then you need to tie the ends with thread or wire. If there are a lot of small, dry and hard leaves on the branches, you can braid them together without auxiliary devices.
But there are situations when it is difficult to connect the base of the nest, then you should glue the ends of the composition to each other and wait until the glue dries.
It is not advisable to use glue if your nest will be placed outside. Unless the cut plants retain the shape you want, you should hang the bunch on the porch of your house for a day to dry. The fresh stems of some plants can be woven without much effort, but you will benefit from choosing straw or grass.
Creating the second part of the decorative nest
To do this, you need to take a small bunch of branches and fold it into a smaller ring. Next, insert it into the large nest and lightly push it down, just like that, the base of your nest is formed.
To connect the rings with each other you need to use threads and glue, this way you will add strength and reliability to your composition.
Designer design (decoration and finishing) of the nest
So, the base of the artificial nest is ready. Professionals advise: for a small decorative nest, quail eggs will work wonderfully, in which you need to make a neat hole in the center and blow out all the contents.
Birds spend the whole day searching for scraps or pieces to make their nest cozy and secure. Of course, it won’t be very difficult for a person to do this much faster, but don’t rush and you will get great pleasure from searching for delightful objects in the forest, in nature and in the area of your home.
Some ideas for beginners
If you plan to keep a nest in the yard of your house, then you need to choose only materials collected from nature for it, and not use anything that can cause damage to the birds. It would be wise to use feathers and eggshells from quail or other suitable poultry.
For example, in the United States, it is illegal to collect the feathers of several types of birds, even if they are harmless and do not spread deadly diseases. In Russia, a similar law has not yet been introduced, so if you just collect feathers and do not disturb the bird, you are in no danger. But it is worth remembering about personal hygiene, you need to wash your hands with detergent.
Collect stems, dry leaves and moss of beautiful and unusual appearance and color.
If the artificial composition serves as decoration for the interior of your home, then you can use threads, colorful paper and confetti.
To complete your composition, you need to place the eggs in the nest. You can use marble pebbles or tennis balls, or put in real bird eggs, you need to decorate them or draw something unusual or make a carving using the necessary tools.
You can also give the nest a metallic tint, adding a little mystery. Feathers of fairy birds, taken from ordinary decorative hairpins, are also used.
So, to decorate an artificial nest from branches, you can use everything that the creator might like: multi-colored ribbons, bird feathers, beads, dried flowers, straw and even moss.
Creating a decorative nest with your own hands is not only a pleasant pastime, but also a benefit to our little feathered friends.
What else you need to know about storks
Neighborhood with storks, in addition to moral satisfaction and aesthetic pleasure, also brings a number of inconveniences that you need to think about before inviting birds for permanent residence.
If you are ready to put up with noise, branches, feathers, droppings on the roof and other debris scattered around the site, then feel free to get to work. Well, if not, look for other options.
Storks do not hesitate to eat mice, shrews and other small rodents. So they can become sanitary assistants in your area.
If you didn’t succeed in inviting storks to live next to you the first time, you shouldn’t immediately dismantle the nest. Be patient, and maybe not in the spring, but in the fall, or next year, residents will definitely move into the nest.
Stork made from plastic bottles
If storks do not want to settle in the garden, or the cottage is located outside their habitat, then you can make a decorative stork from plastic bottles. To do this you will need a metal mesh, wire, corrugated hose and foam. To make a stork from plastic bottles, you need:
- Cut plastic bottles lengthwise to create feathers. One bottle produces 5-6 feathers;
- Make a bird’s body from a metal mesh, carve a head from foam plastic;
- Assemble the frame of the craft by tightly connecting the stork’s head to the body with wire. The corrugated hose will become a long neck, and the legs and bases of the wings can be made from wire and mesh;
- Attach feathers to the body and cover the figure with paint.
Imitation of a stork's nest in the country
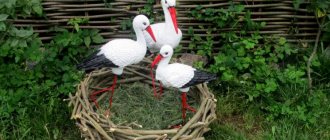
If natural, climatic or other objective reasons do not allow you to populate your country house with storks, a solution can be found in the form of a dummy - an artificial nest with bird figures.
Such country art objects of various sizes and modifications are sold in homestead stores.
A stork’s nest on the roof of a house is not just a home for birds, it is a sea of positive emotions and a unique decoration of the landscape. No one will pass by your house indifferently.
So let the storks live on the roof for many years and be the protectors of your family hearth, its talisman and amulet.
See a stork flying in the sky
If you happen to see a stork in the sky, you can expect a successful and bright streak. Even the ancestors noticed in their observations that people who happened to see him were lucky in almost any endeavor. Seeing a stork in the sky for an unmarried girl promises marriage in the near future; usually the omen came true a year after the significant meeting. If you see a flying stork in a procession at a wedding, then the marriage will be strong and long. If a couple cannot conceive children and sees a stork in the sky, it is worth making a wish for a new addition to the family, it will soon come true.
Photo of a stork's nest
Total
Category: Small architecture
Nest from branches: 135 photos and videos, master class on making large and small bird nests
If you look at a photo of a nest made from branches, made by yourself, you can make sure that this is a very aesthetic and attractive craft. It is used to decorate a garden, cottage, cottage, apartment and even a holiday table. In addition, making it is a fun activity that will help pass the time or spend it with children.
Craft ideas
You can make a nest of branches with your own hands from various materials. Their choice depends on what the souvenir is intended for. Here are a few ideas:
- from branches;
- from dried grass, hay;
- made of paper and threads;
- from yarn for knitting;
- airy Easter eggs, etc.
It is recommended to use your imagination and create an exclusive craft that will add zest to the interior or exterior.
Making a nest from branches
This craft will look great in any design version of the landscape, because... and in housing, especially those decorated in a rustic or country style.
Advantages of a nest made of branches
This craft has the following advantages:
- No insects. Wood can be treated with special compounds that protect against pests. They can grow in grass and hay.
- Natural appearance. Nests made from twigs are very similar to real ones.
- Harmony. They fit perfectly into almost any design solution.
- Economical. No need to spend money on buying material. Suitable branches are collected outside.
It is imperative to choose flexible rods.
Branches of birch, willow, willow, and raspberry are perfect.
What is needed to create
Before you make a nest from branches, you need to prepare the materials:
- branches of different sizes;
- disposable plastic plate;
- threads;
- scissors;
- glue;
- balloon.
You also need to think about the decor. To do this, you can use whatever comes to mind. For example, beads, small stones, feathers, fluff, papier-mâché birds, etc.
Step-by-step manufacturing instructions
How to make a nest with your own hands:
- Twist one of the strongest rods into a ring so that there is a little space left in it. Place a plate inside.
- Take branches (at least 5) and secure them to the ring with threads.
- Weave a basket (pass a branch under/over the jumper).
- At the end of the circle, secure with a thick rope. Start weaving again until the craft looks like a nest.
- Fill the resulting voids with grass, down, and feathers.
- Place artificial eggs (for example, painted oval stones) and bird figurines inside.
Such a nest can be placed on the branches of garden trees, on a windowsill or balcony.
Another way
Step-by-step actions:
- Break the branches into 2-5 cm pieces.
- Inflate the balloon and tie it tightly. Cover it with a thick layer of glue.
- Glue branches to it randomly, repeating the shape of a bird's nest.
- Deflate the balloon and take out the craft.
At the end, the nest can be decorated with various decorative elements.
Nest of threads and yarn
How to make from threads:
- Inflate a balloon with the diameter that the craft will have.
- Thread the thread into a thick needle and pass it through a tube of PVA so that the thread is saturated with glue.
- Remove the needle and wrap the thread around the ball from top to middle.
- Leave to dry for 24 hours, deflate the balloon.
- Decorate with decor.
It is recommended to use cotton threads. They are stronger and can be purchased in a variety of colors.
Yarn method:
- Fluff the knitting threads.
- Glue to a plastic plate.
- Form a nest in this way.
- Decorate with feathers, down, etc.
It is not necessary to place bird figures and eggs inside the nest; you can put some animals, for example, hares.
Paper nest
Step-by-step process for making a decorative nest for the garden from paper materials:
- Cut craft paper and cardboard into strips (10 cm long, 1 cm wide).
- Take a plastic disposable plate, turn it upside down towards the ceiling, and wrap it with plastic wrap.
- Grease each paper strip with glue and glue one end to the dish in a chaotic manner so that the other side remains free.
- After drying, remove the plate with the film.
- Steal a souvenir with bright decorative elements.
You can place empty quail eggs inside. Their contents are first pumped out with a syringe with a thick needle.
Nest for Easter
This craft can be used to decorate a holiday table or present Easter eggs in it.
Idea #1
Create a small diameter nest from paper strips. Glue thick cardboard inside and place quail eggs inside. This souvenir will be a wonderful decoration for the Easter table.
Idea No. 2
Easter eggs can be presented with more than just painted or decorated stickers. An interesting idea would be to place them in basket nests. They are done very quickly and simply:
- Cut multi-colored plastic cups into thin strips down to the bottom.
- Wrap them up and secure them at the bottom with a stapler.
- Place Easter paraphernalia inside.
Additionally, nest baskets can be decorated with lush buds made of colored paper.
Idea No. 3
Another interesting option:
- Get an attractive glass jar with a snap-on lid.
- Place grass or hay at the bottom in the form of a nest.
- Place eggs and sweets inside.
- Tie the jar with braid, to which attach a card and the name of the recipient.
This Easter gift option will definitely be appreciated.
Where to put
A decorative nest will look appropriate on the street, in a country house, or even in a city apartment.
In room
The souvenir will add comfort and special warmth to your home. He is the personification of a family idyll. You can place eggs or suitable sized containers with cereals in it. The nest can be placed in a cage with canaries and other indoor birds. It will look very cute and your feathered pets will like it.
On the street
In the garden it can be placed on the fence or at the entrance to the house. Also, a decorative nest will become a wonderful bird feeder. If you hang it on the top of a tree, then it is quite possible that it will attract feathered residents.
An interesting idea would be to place a nest on the roof of a country house. You can make it large in size, make large eggs from papier-mâché, and place a figurine of a stork or even two next to it.
Other uses for the socket
If you make a craft with a large diameter, then it can be used for a photo shoot of newborns or babies, placing them inside.
The main thing is to take care of safety; inside the nest there should be no protruding branches or other objects that could injure the child.
It would be an interesting idea to use the nest at a wedding. You can place a small satin pillow in it and thus take out the wedding rings.
You can place a pot for indoor flowers in a craft made from branches and plant plants in it. It is better that the container is completely hidden in the rods. To create the impression that the flowers are growing directly from the nest.
Making a souvenir nest with your own hands is very simple, even a child can do it. It won’t take much time, money or effort to make it. But it can be used to decorate various rooms and gardens. It will be a wonderful attribute for a photo shoot or wedding celebration. If there are children in the family, the craft can be made for kindergarten or school.
What do they eat?
As a rule, the diet of storks consists of food items of animal origin. Therefore, their diet consists of:
- From small vertebrates.
- From various invertebrates.
- From frogs and toads.
- From snakes and snakes.
- From locusts and grasshoppers.
- From earthworms.
- From mole crickets and May beetles.
- From dead and sick small fish.
- From small lizards.
- From various small mammals such as mice and rats, moles, hares, ground squirrels, and prairie dogs.
- From small birds.
The diet of white-bellied storks mainly consists of locusts and caterpillars, including other larger insects. White-necked storks prefer to inhabit park areas located near bodies of water, where they hunt fish, amphibians, snakes and lizards, including invertebrate animals.