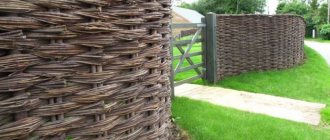
We form our first impression of a house or dacha even before we enter the property, sometimes before we even see the house itself. The first thing that catches your eye is the fence. Everything else comes after, and the first impression is from the fence. Some, albeit inexpensive, but attractive, make you want to stop and look: original ideas always attract the eye. One of the most interesting is a wicker fence or wattle fence. Moreover, they are woven not only from vines or branches: there are braids made from boards, and others from PVC rods. They all look different, but interesting and unusual.
Necessary materials
In order to make a fence, you need stakes driven into the ground at equal distances and rods for weaving. The latter can be almost any branches or even boards, but the best are: willow, birch and alder vines.
Thick branches, wooden posts or pegs can be used as supports, but such a fence will not last long; the aggressive environment and unfavorable conditions will quickly destroy the tree in the ground.
Therefore, when planning the installation of such a structure, it is better to use metal stakes. They can be made from old pipes, metal rods and other suitable materials.
To achieve the most natural effect, it is better to paint the metal in shades close to the color of the wooden rods used. The top of the pipe should be covered with a plug.
If you nevertheless decide to use wood as stakes, you must first treat it with special septic tanks and create a sand cushion around the part immersed in the ground in order to prevent rapid rotting.
The diameter of the supports should be at least 6-8 cm, and the diameter of the rods - 1-3 cm, but the higher and longer the fence, the larger the diameter of the wooden weaving is needed.
The process of making wicker flower beds
To weave a fence for a flower bed from twigs with your own hands, begin with a correctly selected location for the future planting of plants. First, prepare the top layer of soil, removing all weeds and growths from it. Then the soil is loosened and markings are made. If the flowerbed has a round appearance, then outline the outline in order to correctly place the pegs.
They are installed at a distance of 30-40 cm from each other.
Near the central corner peg, another peg is placed on each side. This will ensure the flowerbed has a reliable grip. This arrangement allows you to place the shoots in a “castle”. The rods are passed through three pegs and securely fixed using flexible bark or wire.
Then the rods are braided through the pegs in a zigzag. The work is done from the ground. First of all, thick shoots are used to ensure structural strength. It’s good if one rod is enough for three or four spans.
First, the first rod is fixed in front of the corner peg. Then it starts by the second peg. Then the rod is pulled in zigzags between the stakes as long as it is long enough.
The design will turn out very beautiful if the rods are selected the same size. When the rod is too long, it is cut off.
When the accumulated level of the fence becomes sufficient in height, remove the rail on which the horizontal level of the rods was set. During the work, the weaving is knocked down using a small hammer.
The finished wicker flowerbed will dry out within seven to nine days. And the structure will lose up to 1/4 of the thickness of the shoots.
To give the finished wicker flower bed additional strength, as well as to protect the rods from the direct influence of bad weather and solar radiation, the vine is coated with stain or varnish. The varnish must be matte, since the glossy texture gives the material (rods) an artificial appearance.
Anyone can make wicker flower beds with their own hands if they wish. Using basic technologies, it will not be difficult to create an original and spectacular flower bed with both simple and complex patterns or an unusual geometric shape.
Start of installation work
The first step will be to mark the area allocated for the future building and distribute the installation locations for the posts. The distance between them depends on the length of the weaving material, the height of the fence and is individual for each case, but usually about half a meter.
Having dug a trench, you need to insert stakes into it, fill it with sand if necessary, and for an even more durable and stable structure, you can fill the space around the pillars with cement.
The depth of the trench also depends on the height of the fence: up to 1.5 meters it is necessary to deepen 50 cm, up to 1 meter - 30 cm is enough, for a low fence that performs only a decorative function - 15 cm.
Before use, the rods must be soaked in water to give them greater flexibility and the ability to fasten them together tightly and without obvious gaps. The rods are secured at the beginning and end with wire. Their length should be 10 cm greater than the span between the columns.
If you pay attention to various photographs of a wicker fence, you will see that in addition to different materials for weaving, there are also various patterns and technologies for designing such a fence.
What shoots are needed for weaving flower beds
Before work you need to stock up on material. A distinctive characteristic of any vine is its flexibility. To weave a fence for a flower garden, use rods from:
- willows;
- and you;
- hazel;
- grapevine;
- birch trees
Non-standard branches will add a special twist to the wicker composition:
- apple trees;
- dogwood;
- raspberries;
- blackberries.
All of the above branches have a good degree of evenness and flexibility, their length is sufficient for work.
Experts believe that autumn is the best time of year for harvesting material, since the shoots finally ripen by then.
But this does not mean that if there is a desire to build a flowerbed, then we must wait for the onset of autumn. You can start harvesting shoots at any time.
The only limitation is the beginning of sap flow (April-May), since at this time the rods have not yet fully acquired sufficient strength and are not suitable for weaving.
It is rightly believed that shoots of pussy willow or willow are best suited for weaving. Willow twigs have the best flexibility. But the grapevine is not inferior to willow in terms of ease of use. Therefore, the material is chosen depending on what is available.
Types of laying rods
If you lay horizontal rods in a group, rather than one at a time, a “chess” pattern is formed;
To make “vertical weaving,” horizontal boards or slats are attached to the support posts at a certain distance, and the rods are laid between these slats;
The most difficult option is “diagonal chess”. You can't do this without a screwdriver and self-tapping screws. On the top bar, fixed horizontally by the posts, the rods are fastened with self-tapping screws and turned out diagonally, and between them, on the opposite side, similar actions are performed;
Chicken feederCapers - what are they? How to choose, cook and tips on which dishes to use (110 photos and videos)
- Order shaft production
To make weaving from veneer, it is enough to build a structure of 4 supports, and bend the veneer trims between them horizontally. The veneer must be secured with nails.
It is possible to construct a wattle fence from reeds. To do this, you must first collect it into bundles, and then secure them tightly with wire between the wooden horizontal crossbars of the future fence;
A wicker fence made of boards is one of the most difficult structures to implement.
Options for weaving flower beds
Beautiful weaving with rods is done in two ways:
- with vertical broaching of rods;
- from horizontal.
For any of the methods, first, foundation columns are driven into the ground (they are placed at a distance of 30-40 centimeters from each other). For horizontal weaving, weaving rods are stretched between the main posts - they run parallel to the ground. In those places where the rods connect, they are cut at an angle. Subsequent connections are made using wire or flexible bark.
If one twig ends, the next one is drawn from the back side of the column.
With the vertical weaving method, an additional level rail is installed, located parallel to the posts, between horizontally placed slats.
Rods are placed on both sides of the main column. The weaving technique is no different from horizontal weaving.
To make a wicker flower bed beautiful, follow the rules:
- they begin to weave from the thick end of the vine, smoothly moving to the thin one;
- Having completed one row, the next one begins on the other side of the column in order to evenly distribute the thickness of the fence;
- in order to achieve a straight level when weaving, the vine is secured with wire for visual control;
- the end of the vine should not extend to the place where the rod from the previous row ends;
- A wicker flowerbed-basket needs 2 cm flexible rods for the base; for small flower beds 1 cm is enough.
In addition to vertical and horizontal pulling of rods, they also use oblique weaving: several rods are pulled at a time in an inclined row.
Checkerboard weaving is also popular - this is a variant of horizontal braiding, the difference is that the rods are not passed through one column, but through two or three. The result is a complex pattern.
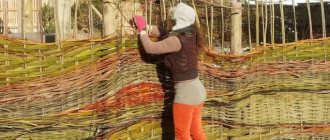
You can often find alternating unpainted and painted rods when creating a wicker composition. When the main willow twigs are stuck into the ground with the root part, they can sprout and turn into a hedge. A wicker flowerbed will take on a completely different look.
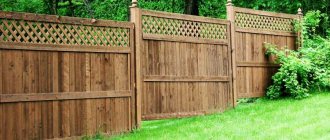
Wattle from boards
This is the most luxurious, most presentable and reliable wicker fence. To implement such a structure, you need to stock up on:
- Support bars. The fence will be massive and heavy, so it is advisable to use wood with a diameter of at least 100 mm;
- Thin boards for creating weaving. The optimal size is 150x20x2100 cm;
- Saw, screws, screwdriver;
- Antiseptic, paint and bitumen to treat the wood.
The distance between the beams should be about 2 m. In order for the fence to last longer, it is necessary to concrete the supports, carefully maintaining a vertical, level position. The ends of the beams buried in the ground must be treated with bitumen.
The boards must be cut to the same size and fastened from the bottom. The ends should overlap the supports. When positioning the boards, it is important to use a level. The boards are fastened with self-tapping screws. The next board is laid on top, but bent in the other direction - this way the entire canvas is constructed.
DIY hammock - instructions on how to make a high-quality and easy-to-use hammock (100 photos)- Do-it-yourself country table: the best projects and ideas that are not difficult to build (120 photos)
- Charcoal - description and features of charcoal production. 105 photos of receiving coal
After completing the work, it is imperative to coat the surface with varnish or paint to increase the service life of the material.
Decoration
Wicker fences made of branches and vines can be decorated with themed decor: clay pots, dried peppers, sunflowers, pumpkins, wreaths.
Pots or baskets with flowering bushes or stones laid out lengthwise will also help create the right atmosphere. These accessories will complement the fence and make it even more original.
Horizontal method
Everything is very simple. The vine twigs intertwine with each other and with buried stakes in the form of a “snake”. Work needs to start from the bottom. Wood tends to dry out over time, so taking this into account, the weave must be made very tight so that there are no gaps.
To create a strong hold, the rods must be tied with strong wire. To give the fence a natural look, the length of the rods must be different. To obtain a dense fence, the rods are pressed with great force. This way, the cracks will disappear and the fence will be stronger and more reliable. All uneven ends extending beyond the stakes are cut off with pruning shears.
The reed vine is most suitable for braiding hair. It has a small diameter and great flexibility.
Willow vines can also be used for the same purpose. The braid is woven from a different number of twigs, it all depends on the class of the craftsman. Return to contents
conclusions
Wicker fences for a dacha are one of the simplest and most cost-effective ways to decorate your backyard and create zoning for the area. Solid and tall, it will also become reliable protection.
Correctly selected and well-processed materials, carefully thought out and executed design will make it a durable and strong calling card of the entire site.
Do-it-yourself plow: the best designs and tips on how to create an effective device (70 photos)DIY summer house - main stages of construction and decoration (95 photos)
- Growing zucchini - simple and detailed instructions for planting, caring for and harvesting (85 photos)
How to care for finished fencing
The service life of wicker fencing reaches 5-7 years. After this period, the fence will begin to quickly deteriorate. The main factor that worsens its condition is dampness and, as a result, rotting of the lower part of the fence and the base. Basic care will extend its service life by preventing the accumulation of water under the fence. Dense vegetation and tall grass are also undesirable in this place, since the humidity in the thickets is high. It is recommended to use matte varnishes and antiseptics as protection. They form a barrier against moisture for the above-ground part of the fence. Among varnish compositions, preference should be given to matte ones, because after using glossy varnish the fence will take on an unnatural appearance. Treatment should be carried out at least once a year - then the chances of increasing the service life will be higher.