Village residents or owners of private houses, when purchasing or independently preparing firewood for the winter, usually store the resulting firewood in a regular shed. But you can make a firewood rack for your dacha much more original and beautiful, and so that it complements the overall appearance of your dacha or house in the village.
To do this, of course, you will have to make some efforts, but believe me, the result will surprise you. Also, follow all safety rules, because the woodpile may collapse right on you, so be careful!
Cage
This method of laying is suitable for long, even firewood: each top layer of logs must be laid perpendicular to the bottom, that is, crosswise. Experts believe that fuel is stored longer this way due to good air circulation.
The photo shows firewood stacked in a cage. Slate and pallets serve as pallets. The wood in the woodpile dries well, as it is located on the sunny side.
The method of laying firewood in a cage is suitable for constructing woodpiles of “wells”, which serve as reliable supports. Firewood stacked on top of each other (that is, in parallel) is unstable, and the destruction of the woodpile threatens damage to the material and wasted effort. Cross-shaped wells on the sides or inside the stacks give them stability.
Dome option
How to stack firewood in a woodshed using the dome method?
To make the woodpile acquire the peculiar shape of a haystack, fold the chibouks into a hemisphere. The formation will be truly compact and stable. Clear the soil to bare ground and draw a regular circle several meters in diameter. Fill the space of the figure with shanks end to end, leaving minor gaps. Place a stable pole in the center. Leave a little free space around such a rod to achieve high-quality ventilation inside the structure.
Continue stacking the wood in a circle with the ends facing toward the center of the ring. Form several layers. Leave the inside area near the pole empty. Alternatively, loosely sprinkle small wood chips into the space created. Closer to the top, move the ring of chibouks inward. To tilt the logs in the desired direction, periodically place thin planks between the layers.
The method of storing wood fuel will be effective and in demand only when the firewood is dry and well ventilated during storage. That is why the lower edge of the future woodpile should always be located not ON the surface of the earth, but ABOVE the surface, that is, on a kind of pallet or in a place inaccessible to moisture penetration. Otherwise, after the bottom row of firewood, the top rows will also rot.
That is why unique columns are laid out on the sides of the future woodpile, reinforcing the overall structure. With each subsequent row, the logs in these columns are laid across the previous row, which gives the entire structure stability and allows, along with chopped logs, to store unchopped round timber.
There are three most common types of stacking logs in a woodpile. In particular they are:
- stacking firewood, where firewood is stacked row by row on top of each other in parallel;
- laying firewood in the manner of a cage, where each subsequent row, as in the case of the side columns described earlier, lies perpendicular to the previous one;
- stacking firewood using the circular method, where firewood is stacked in a kind of circular stack.
Often, stacking is a shaky structure, and therefore this method is good if there is a supporting wall. It can be the wall of a barn or any other outbuilding.
In the process of stacking logs in a stack parallel to each other, you should pay attention to the fact that the growing woodpile constantly tilts towards the supporting wall. The slope is created by placing the thicker edge of the logs on the outside
If the woodpile runs steadily and levelly without any slope, the structure can be given a tilt by placing thin slats between the rows on the outside.
The following photo shows an example of a free-standing woodpile, where the sides are protected from spillage by a kind of frame made of boards.
This is what it looks like initially. The lower part protects the firewood from contact with damp ground, and the side parts prevent the woodpile from spilling.
Wood crates are many times more stable than stacks, however, even a free-standing wood crate is not immune to tilting and subsequent disintegration. As already mentioned, a cage is often used to strengthen a stacked woodpile against spillage, and by approaching the process of folding the woodpile creatively, one can “blind” a real “Portrait of the Artist’s Wife.”
Also worthy of attention is a circular woodpile in the shape of a kind of tent, thickened towards the top. But it is worth remembering that creating such structures can take much more time and patience.
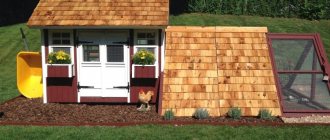
Some particularly advanced masters even give their masterpieces the appearance of original residential buildings, decorating them with doors into which a drunken, lost neighbor might begin to break, and window frames in which he might try to break the glass.
Closed structures made like huts are also ideal for storing firewood. Here the fuel will be the driest and always ready to ignite.
And after a long and meticulous laying of such a woodpile, which is a real work of wood art in the form of a fallen tree with unfallen golden leaves, the unlucky and patient wood sculptor and dreamer will seriously think about preparing more firewood for heating and putting it in a separate inconspicuous woodpile , which you won’t mind disassembling later for firewood.
Along with “Portraits of the Artist’s Wife,” some manage to create self-portraits.
Some lover of ancient old Russian wooden architecture decided to create woodpiles, like no other, more suitable in geometric slope to the domed church located in the background.
By the Wall
Without a separate firewood rack, many owners of village and country houses prefer to store fuel near the wall. This method is convenient because one side has a strong support, and the rest are open for ventilation. The walls of a house or barn are often used as a base. A small woodpile can also be placed near the bathhouse in order to have fuel reserves nearby.
The photo shows a wall-mounted woodpile located under the stairs. Thanks to this solution, the firewood is protected, and the space is used as rationally as possible.
Before stacking firewood in a wall woodpile, we advise you to insulate it in any suitable way: insulation will protect the wall from insects and rodents that can move into a house made of wood material.
Special shelter for your firewood
Just make sure that your yard is well protected, or that the holiday village in which your house is located has a completely prosperous contingent.If you are not satisfied with the methods presented above where to store firewood, or if you prefer the usual conservative method of storing firewood, then a regular shed is quite suitable for you.
It will be unpleasant if your winter supplies are stolen. This method is notable for the fact that there will be a lot of ventilation for the firewood, and there will be fewer problems.
Near the fence
In a similar way, you can put firewood in a woodpile not far from the fence. In this case, the owner of the fence must himself determine the degree of benefit of this option and the possible risks. If the fence is unstable, a high woodpile can break the structure.
The firewood will be dry if you leave a few centimeters between it and the fence. The same rule should be followed if you need to fold the woodpile in two rows. For stability, it is worth using strong stakes on the sides, and if it was not possible to prepare them, stacking the firewood in a cage will help.
The photo shows a fence with built-in niches for firewood. The woodpile not only forms part of the fence, but also adds a decorative touch to the design.
Firewood harvesting
Making a woodpile with your own hands is not a difficult task. It is perhaps more difficult to learn how to split and chop wood. This is only in fairy tales and epics. It is unusual for a modern person to work with both a chainsaw and an ax. It takes time to develop a skill and develop dexterity.
There is also plenty of brushwood at the dacha, but it burns quickly, it must be constantly tossed, otherwise the flame will be blown out by the wind or it will go out on its own. Large branches and massive pieces of wood burn longer, the wind is not a hindrance. This is why they are valued.
The length of the log usually does not exceed half a meter, often less. It is additionally split with an ax into four to eight pieces, sometimes more. This is done to dry the wood.
Freshly cut wood does not catch fire, smokes, produces soot, and does not burn completely. Drying a log will take much more time than drying firewood - in the inner layer, in the core, the plant juice circulates most actively, but in the bark it does not circulate at all.
By splitting the log into several parts, you can speed up the process by providing air access to the wettest part.
It is also convenient to stack firewood thanks to its triangular and square shape. More wood is placed in the woodpile. Logs will fall, it will be difficult to lift them and throw them. So it’s better to learn how to work with an ax or chainsaw. It is not necessary to use an ax - this is a tribute to tradition.
Firewood must be split taking into account the time it will take for it to dry and taking into account the life cycle of the tree. If you do this in the spring, they will dry out in approximately 4 months. Those cut at the end of summer dry for almost a year - 300-310 days.
But if you chop them in July, drying will take two and a half months - during this period the juice reaches the young branches and fruits most actively, and does not linger in the woody part of the trunk.
The fact that the firewood is easily stacked and a fairly stable monolith is formed is both good and bad at the same time. Air access is limited. It is advisable, before placing them in a woodpile, to dump them in bulk and leave them for a couple of weeks in a part of the yard where there is a lot of sun.
Round
The firewood rack in the form of a circle adds sophistication to the site and fits harmoniously into any landscape design. The structure can be solid or divided by shelves on which firewood, chips and cuttings of boards are stacked. The round woodpile is well protected from moisture by its shape.
In addition to finished products, summer residents often use homemade firewood burners from metal 200-liter barrels, sawing them into three parts, painting them and placing fuel in them. The lightweight structure can be mounted on the wall, making a compact mini-woodshed: in a small area this is an excellent solution that will save space.
In the photo, a hanging firewood burner for small scraps, made by yourself.
Canopy
A firewood shed for a dacha can be more substantial - in the form of an outbuilding under a canopy. It is not difficult for a home craftsman to do it himself. We will need:
- beam,
- boards,
- nails or screws,
- hammer or screwdriver,
- roofing material,
- some concrete.
We mark the contours of the future structure on the ground according to the given dimensions. We make a columnar foundation for the pillars of the structure. When the concrete gains strength, we lay timber along the contour.
We set up the racks and attach them to the horizontal beams. We secure the structure with an upper belt made of timber. The frame is ready.
We install the floors above ground level, resting the logs on the lower horizontal beams. Lay waterproofing material on the boards. This may be a layer of roofing material.
We cover the walls with boards, leaving gaps between them for air access. We place the boards vertically or horizontally depending on aesthetic preferences.
Small cross-section bars nailed at an angle crosswise look beautiful. The wooden lattice imitates a flower trellis and fits organically into the overall design of the site.
Now let's start installing the roof. We install transverse rafters and sheathing on the upper belt of timber. We arrange a single-pitched roof with a slope towards the rear wall.
Alternatively, hang a couple of hinges and a door on the woodshed.
Little house
The round woodpile in the form of a stack has another subspecies - a house. It is distinguished by vertical walls, laid in the same pattern as in the previous paragraph, and a conical roof on top.
To ensure reliable storage of fuel, it is important to stack the firewood correctly, that is, with an overlap. The roof, like a canopy, should protect from precipitation. For beginners, it is better to start with low buildings.
Where to store firewood
0
Perhaps, no matter how sad it is to talk about this, one of the primary criteria for choosing a storage location will be the question: do they steal or don’t they steal... Because if there are enough lovers of other people’s property in the area, then the only reasonable option is in a barn under lock and key.
0
Good firewood is not a cheap pleasure, and losing it would be very annoying, you must admit. So you will have to work hard and build a reliable storage for them. It can be located separately from other buildings, or combined with other outbuildings, or even adjacent to the house - the main thing is that all storage rules are taken into account.
Photo gallery
The listed methods of stacking firewood differ in the amount of material used, placement, and labor costs. Today, woodshedders have another interesting function - decorative. They have interesting architectural forms, laid out in the form of a spiral, balls, animals, paintings and outbuildings.
To build such compositions, you need to have a lot of experience, since decorative stacking of firewood in a woodpile requires patience and artistic taste. You can see unusual woodpile options in our photo gallery.
The more convenient it is to carry logs
Carrying logs in your hands is uncomfortable. Especially if they are wet, dirty or covered in ice and snow. The “third” and “fourth” steel hand comes to the rescue - a pincer (grab) grip.
152247User FORUMHOUSE
I was wondering if anyone has used a manual log gripper? Is it worth paying 3,000 rubles for a branded one? I want to order some for myself so I can load the logs. Is it convenient to use?
Russlanych FORUMHOUSE user
I've been using a pincer gripper for 5 years. I have never regretted buying it. I took them for 1500 rubles. My friends told me that he threw away the money, but now I don’t go to the forest for firewood without it.
When purchasing grab pliers, keep in mind that there are models with different grip widths. For example, under logs with a diameter of 20 and 30 cm. With pliers with a large grip, you can grab both large and small logs.
By the way, there is a cheaper option - single-jointed log pliers. Is it worth taking them?
wind1windSuper-Moderator FORUMHOUSE
With a single-joint grip, to prevent the log from slipping out, you will have to squeeze the handles, i.e. make additional physical efforts. On soft wood the force is less, on hard or frozen wood more. In double-jointed grips, compression occurs automatically due to the weight of the lifted log.
Well, for all home-made people, a user with the nickname 152247 offers to make a hand made version of branded pliers with a grip width for a log with a diameter of 30 cm.
In the background is a piece of paper with a 5x5 mm square.
Dome option
How to stack firewood in a woodshed using the dome method? To make the woodpile acquire the peculiar shape of a haystack, fold the chibouks into a hemisphere. The formation will be truly compact and stable.
Clear the soil to bare ground and draw a regular circle several meters in diameter. Fill the space of the figure with shanks end to end, leaving minor gaps. Place a stable pole in the center. Leave a little free space around such a rod to achieve high-quality ventilation inside the structure.
Continue stacking the wood in a circle with the ends facing toward the center of the ring. Form several layers. Leave the inside area near the pole empty. Alternatively, loosely sprinkle small wood chips into the space created. Closer to the top, move the ring of chibouks inward. To tilt the logs in the desired direction, periodically place thin planks between the layers. A dome gradually forms, which will close the necessary formation. Once you've figured out how to stack the wood, cover the woodpile with a piece of waterproof material.
Material selection
The material determines the design features of the woodpile, its service life and the set of basic operations performed directly during the assembly process.
For example, a metal woodpile has the following set of advantages:
- Long service life.
- Resistance to atmospheric and mechanical loads. Of course, to ensure weather resistance, you need to use stainless steel rather than bare black steel. An alternative option is to apply a protective and decorative layer in the form of paint or other material.
- Attractive appearance.
Some craftsmen prefer to use aluminum to form such a structure.
The aluminum profile is very light, and therefore the design is mobile and can be easily moved from place to place. In terms of strength, this metal, however, is somewhat inferior to steel, so it is not very suitable for storing large volumes of fuel.
The assembly of metal countertops can be based not only on the use of mechanical fasteners, but also on welding - it all depends on the features of the specific design and the type of profiles used.
The more popular base material, however, was and remains wood . During assembly, even old bars left over from the construction of a house or outbuilding can be used.
The main advantage of such a woodpile is its low price, but other positive qualities should be noted:
- Simplicity and speed of assembly.
- Light weight, if necessary, a portable structure can be constructed.
- Durability.
- Attractive appearance. Wood is a malleable material, so the configuration of the finished structure can be changed at your own discretion.
A classic woodpile is a canopy formed by a supporting frame, roof and walls.
It is best to make walls based on thin planks or thin boards, which will ensure good ventilation. Sheets of slate, metal or polycarbonate are suitable for roofing.
The most budget options are awnings and plastic film.
Self-construction
So, now let’s come to the most important thing, how to make a woodpile on a wooden base on your own. The list of tools required to complete the work is as follows:
- hammer;
- saw or hacksaw;
- screws with wood-oriented threads;
- screwdriver or screwdriver with appropriate slot;
- roulette;
- clamp.
Boards will be used as the base material. The classic set is a pair of three-meter boards for arranging the base, 4 one-and-a-half-meter boards for the sides and a board for the crossbars.
When the tools and materials are prepared, it’s time to start choosing a site. A good option is a plot next to the fence, which will provide the necessary shade and protection from precipitation. The base is poured with concrete or laid with one layer of brick so that the firewood does not come into contact with the wet soil.
Next, the frame is formed.
The board is sawn into 25-centimeter sections, which will serve as crossbars; all other boards are tightly connected to each other with screws.
This is the simplest version of a woodpile , but practice shows that it lasts a long time and fully fulfills its assigned tasks.
Useful video
Video on the topic of how to build a firewood shed with your own hands from scrap materials at minimal cost:
Watch an interesting video where a person shows how to make a metal cage for firewood, the dimensions of the firewood box are 1500x2000x800mm:
This video presents ideas for woodpiles in the country:
Which wood to choose
High flammability is the main requirement for firewood. The indicator depends on the type of plant and the presence of moisture inside. Poorly dried wood (more than 20% humidity) will smoke, leaving a lot of unburnt coals in the firebox and soot on the walls.
Oak logs are the best option for stove and fireplace heating. The material burns for a long time, releasing a lot of heat. Raw materials are consumed 25% less than birch or larch. The only drawback of firewood is its high cost.
How to choose raw materials Source ok.ru
Excellent logs for heating are obtained from hard fruit trees (plum, cherry, apple). Young plants are rarely used for heating, and the efficiency of older plants decreases. The wood has an excellent aroma, which allows it to be used in the grill and for smoking.
Willow and poplar burn too quickly and are therefore not suitable for regular burning. If you need a budget option for a stove, then it is better to give preference to birch firewood. Advantages of the material:
- dries quickly;
- easy to prick;
- good heat dissipation;
- smells nice.
Birch logs rot if stored improperly. To conserve supplies, it is important to arrange a shed with natural ventilation. The raw material contains a lot of tar, which clogs the chimney over time.
In terms of heat transfer parameters, aspen firewood is inferior to oak and birch types. The material is used as an aid for soot removal. When burning, wood produces little smoke and softens the black deposits in the chimney.
How to make a foundation correctly
At the initial stage, you need to lay out the ring and leave the central part empty. The result is a connected chain, the logs of which touch at the ends. The next layer is laid across the first, the slope is naturally oriented towards the middle. On the second layer, contact occurs with the side parts of the log, and not with the ends.
The center is free, gradually a pipe is formed in place of the center, which ensures the passage of air and rapid drying of the firewood. The rows may lose slope because the thickness of the logs varies. In this case, supports are installed along the edges, running across them - a ring that supports the edges of the first row. This will make the structure reliable and stable.
DIY woodpile
The simplest and most uncomplicated type of woodpile is a stack. We laid one row in one direction, maintaining spaces between the logs, and laid the next one in a perpendicular direction.
You can stack all the logs in one direction, also maintaining a distance between them for ventilation, but this design is unstable. In any case, the opposite ends of the stack must be reinforced with stakes to the full height of the woodpile.
To store a significant amount of harvested logs, there is another type of woodpile - round or stacked (it really resembles a haystack). Its main advantage is its compactness for large volumes of firewood.
We choose a well-ventilated, dry place and arrange a base of gravel or tree bark. The base will simultaneously serve as drainage.
Important! If you do not have experience laying a round woodpile, do not immediately try to set a record worthy of the Guinness Book of Records. Trying to immediately put together a very large round woodpile will result in an unpleasant need to redo everything.
Consider your first experience as the “first pancake” and try not to let it turn out lumpy. Whatever the outcome, one thing can be guaranteed for sure - it will be a very exciting activity!
On the base we arrange a cross of two stakes of equal length. The crosspiece will help us maintain the correct radius of the round woodpile. We lay out the first row of logs in a circle, end to end.
Leave it empty for now. After completion of the work, the empty center will serve as a kind of pipe, with the help of which good ventilation will be obtained. You can partially fill the center if you decide to stack a large woodpile. Then another row is laid out closer to the center, but the pipe is still preserved. However, we agreed to postpone the records for the future.
We lay the second layer in a perpendicular direction. We got a bias towards . In this circle, the logs touch their side surfaces. And so we continue to stack the logs, while trying to maintain a slope towards the center. You can periodically add logs in the same direction as the first circle.
By laying stakes crosswise at the same height, we will strengthen the woodpile. If the height of the structure is more than a meter and if there is an obvious excess of logs that cannot be stacked in this woodpile, you can start throwing them in any form into the empty center. In this case, ventilation will deteriorate quite slightly, because randomly thrown firewood will not impede air circulation. Firewood in the central structure will make the woodpile more stable.
We leave the flattest logs on the upper “floors” and lay them so that they form a domed roof. We will cover the roof with tree bark. This is enough to protect the firewood - tree bark is waterproof.
The advantages of laying logs in this way are obvious: they dry faster, the entire structure is stable, and much more logs can be stacked per unit area in this way. And what is important, the round woodpile has a very nice appearance. We don't care, do we?
We invite you to read: Self-installation of a plastic window - detailed instructions
In any case, you can approach the issue in a non-standard way and give the woodpile some original shape. A shape like the one in the photo is much more attractive than a boring standard stack. You can lay out the logs in a neat pile, and then the decision naturally suggests itself to make a cheerful face on the woodpile.
Additional Information
If you plan to build a lightweight firewood shed with a capacity of only a few cubic meters, a pile foundation is not needed for it. It is enough to place concrete pillars, old curbs, and several bricks under each support point under the base; It is possible to install a pile, columnar foundation made of brick. If desired, a shallow or shallow strip foundation can be poured. Concrete piles in roofing felt can be replaced with asbestos-cement pipes, pouring a concrete mixture with polyethylene waterproofing, or even into natural formwork; On the basis of any completed foundation, you can build a firewood shed from a steel pipe or angle. If a strip foundation is made, the foundations of the walls can be made of blocks or bricks; To improve ventilation of the lower part of the firewood storage structure, the lower rows are laid with increased clearance; To avoid stagnation of water under the woodpile, drainage can be made under it
When laying the foundation part, soil is excavated inside the perimeter to a depth of 20-30 cm, into which crushed stone or broken brick is poured; The front part of the structure can be additionally covered with a curtain made of polyethylene, tarpaulin, or banner fabric; To extend the service life of the frame and lining of the woodshed, all materials are treated: wood - with drying oil and varnish, or antiseptic-based paint, PF paint; steel frame - anti-corrosion coatings for metal, powder paint, ordinary enamel; It is important to carry out the correct turnover of firewood inside the storage warehouse so that the back stacks do not lie untouched for years while the nearby rows are consumed and renewed with new harvested firewood. Once every 3-4 years you need to disassemble the warehouse, check it, sort it out and put it back together again
This will help remove rotten, spoiled logs from the firewood storage area!
Construction of a medium-sized firewood shed in a country house, provided the materials and necessary tools are available, takes up to two days, not taking into account the technological periods associated with the foundation. But this time will be well spent, because now you can light up the stove or grill at any time using dry and fresh firewood, rather than smoking and non-flammable wet wood!
How to stack firewood? The simplest option is to place the pipes in stacks. Butt the logs end to end, forming a layer-by-layer structure. Separate walls of firewood should be in contact with their ends
It is important that adjacent structures have some slope towards the inside. Do not let the walls lean outward
As the height of the raspberries increases, the distortion will noticeably increase during laying. The walls will certainly begin to crumble to the sides where there is no support.
Selection of material for making the frame
The shelf life of the wood and the percentage of its drying depend on the quality of the created product. Therefore, before you begin assembling the main parts, you should draw up a detailed drawing of the future structure. The image will allow you to see and correct possible shortcomings on paper in a timely manner.
You also need to consider the material for the base. The service life of the product and installation features depend on the type chosen.
Metal
Using metal as a woodpile material has several compelling advantages. Among them:
- long service life;
- resistance to environmental influences;
- Beautiful design.
One option is a woodpile made of aluminum profiles. It can be done in a few hours. It will be light, so it will be convenient to carry it from place to place.
An interesting solution is a product made of iron or steel. To build it, you need to know how to operate a welding machine, and purchase the material in a store. If opportunities allow, then it’s worth drawing a picture of the future design and turning to specialists for help.
Tree
It is in greatest demand among owners of country houses. Often, every yard has leftover wood building materials, so a woodpile will be inexpensive because it can be made from existing raw materials. Beams, boards, bars will do.
In addition to the low price, among the advantages of a wooden woodpile are:
- quick assembly;
- the possibility of manufacturing a portable structure;
- a light weight;
- long service life;
- efficiency;
- neat appearance.