Having a veranda in a country house or suburban area is not an easy opportunity to improve and decorate your home; with its help, you can easily increase the available space and gain usable area, which is especially important for small buildings. But even if you already have a spacious house, you will certainly appreciate all the advantages that lie in the wide functionality of the veranda.
What needs to be decided before construction begins
The veranda is a simple structure, but its construction should be treated with utmost care. Firstly, you need to obtain permission for its construction, and when construction is completed, you will need to re-register the house (the rule is due to the fact that the area of the house increases). Secondly, no matter what kind of veranda you have in mind, its construction should be based on the following recommendations:
- For construction, choose the facade where the entrance door to the house is located. This is practical and convenient, especially if you plan to glaze and insulate the structure; the extension also becomes a vestibule, preserving the microclimate of the living space.
- Regardless of what material is chosen for construction, the design must match the architecture of the house and fit into the surrounding space.
- It is necessary to set the size of the veranda at the dacha in order to understand how much material will be required for construction. Structures with a length equal to the length of the facade to which it is planned to be attached look proportional. Comfortable width starts from 2.5 m. The summer veranda can be made smaller.
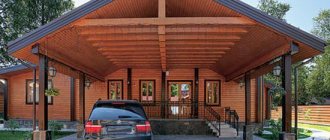
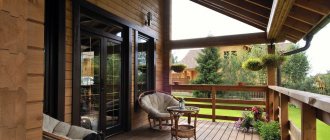
Corner wooden structure with two entrances Source we build with our own hands.rf
- The format of the building is immediately determined: will it be open (summer) or closed. In the latter case - will it be heated, what kind of glazing will it be (except for the standard one, possibly continuous, “French” glazing).
- Depending on the location relative to the walls of the home, the structure can be front, end, or corner. The veranda built around the perimeter of the house has an original appearance. It can be divided into open and closed areas, and there is enough space in it for a hallway, a pantry, and a summer kitchen, not to mention a spacious recreation area.
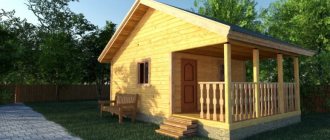
Types of wooden veranda
A veranda is a full-fledged extension with a foundation, walls, windows and a roof, which can be built into the house immediately during construction or be attached both from the side of the main entrance and from the back side of the house with access to the garden or yard.
In this article we will look at options for building a veranda made of wood; this material, compared to others, is much easier to process, so you can create such a structure with your own hands alone. There are several types of such structures:
1. open
2. closed
3. insulated
4. unheated
During construction, it is possible to provide for the possibility of changing the position of windows; with their help, it is quite easy to regulate the temperature inside the room
The design of the veranda opens up wide opportunities for the implementation of various ideas, for example, you can install a fireplace on it
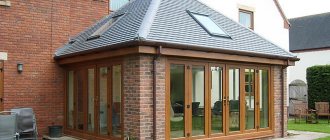
The veranda can also be used as a kitchen, dining room or even living room
Photo source: www.diz-cafe.com/postroiki/veranda-na-dache-svoimi-rukami.html
Which foundation is suitable?
The easiest way to build a veranda at your dacha inexpensively is to choose an open or closed frame option. A wooden extension will need a foundation with the following parameters:
- The foundations of the house and the veranda should not touch (even if they are being built at the same time). The structures are not comparable in mass, so their shrinkage occurs differently. It is enough to leave a technical gap of 1-1.5 cm and fill it with a shrinkage-compensating material (for example, foam plastic or mineral wool).
Bottom trim on a pile foundation Source yandex.net
- In most cases, the optimal solution will be a columnar foundation. It is suitable if the site has sandy or gravelly soil and the groundwater runs deep enough.
The foundation is arranged in the following order:
- Dig holes for supports (depth 1 m). For an open veranda, they are marked in the corners and every 1.5-2 m. If glazing is intended, the distance is set to a maximum of 1.5 m.
- Set up a cushion: A layer of crushed stone is poured into each hole, followed by a layer of sand, each 10 cm thick. The cushion must be thoroughly compacted.
- Construction of a concrete base. Concrete is poured into the pit (formwork from available material is first installed). There are two options - up to ground level or 20-25 cm above.
- If high concrete pillars are made, studs with a diameter of 14 mm are concreted into their upper part. They will be needed to secure the lower harness.
- If the concrete was poured to ground level, brick columns of the required height are built on the concrete pad, which are then waterproofed with hot bitumen.
- Drainage is arranged in the soil between the posts - a channel 10-15 cm deep is dug and filled with fine crushed stone or expanded clay.
Columnar foundation in the same style as the base of the house Source birzhaplus.ru
If the soil on the site is clay and prone to heaving, there is a danger of the columns shifting. In this case, to build a veranda, it is more correct to lay a pile foundation. It is more practical to use bored piles expanded at the bottom (TISE). Wells are made using a hand drill, the main thing is to go deep below the freezing level of the soil.
See also: Catalog of companies that specialize in redevelopment of country houses of any complexity
How to attach brick or foam blocks
Beautiful brick veranda
This is already a capital building. If the work is done according to the rules, then such a building will be comfortable at any time of the year. In the summer heat it will be cool there, and in the winter cold it will be warm. The brick veranda is distinguished by its durability, fire safety and ease of maintenance.
But it also has a drawback. Namely, heaviness. Therefore, its construction requires a strong foundation.
When the foundation and subfloor are ready, laying can begin. There is a type of spoon masonry, in which the total thickness of the walls is 12 cm; bonded masonry, with 25 cm walls and chain masonry, with 38 cm walls.
- Attach a mooring cord to the opposite ends of the base. Corner bricks are being installed along it.
- Once the corner bricks are exposed, fill the space between them using a masonry method that suits you. The bricks are fastened together using standard cement mortar. Check the evenness of the masonry with a building level. Carry out work to the height you require, not forgetting to leave openings for windows and doors.
Option for laying a brick veranda
- To build a pitched roof, you need to make a wall 1 row lower, which will fall on the lower part of the roof slope.
- After you have laid out the last row, you need to install the armored belt. Place formwork on top of the walls, the height of which is 7 cm, place anchor bolts in the corners, lay reinforcement and pour concrete.
- After the concrete has hardened, attach the strapping to the bolts using wooden beams with a cross-section of 100 * 100 mm. And then the order of the rafters is the same as in a wooden roof.
If the veranda is intended to be used all year round, then you can make 2 rows of masonry and put waterproofing and thermal insulation materials between them.
You can leave single masonry. Then insulation and waterproofing are laid between the brickwork and the internal wall cladding material.
External finishing work remains at the discretion of the owner: it can be facing bricks, it is allowed to sheathe the building with polycarbonate.
Calculation of the number of bricks for the terrace (table)
| Masonry size | Length | Width | Height | Number of bricks excluding the thickness of the mortar joint, pcs. | Number of bricks taking into account the thickness of the mortar joint 10 mm, pcs. |
| 1 m3 single brickwork | 250 | 120 | 65 | 512 | 394 |
| 1 m3 of thickened brickwork | 250 | 120 | 88 | 378 | 372 |
| 1 m2 of masonry in half a brick (masonry thickness 12 cm) | 250 | 120 | 65 | 61 | 51 |
| 1 m2 of masonry in half a brick (masonry thickness 12 cm) | 250 | 120 | 88 | 45 | 39 |
| 1 m2 of masonry in 1 brick (masonry thickness 25 cm) | 250 | 120 | 65 | 128 | 102 |
| 1 m2 of masonry with one and a half bricks (masonry thickness 38 cm) | 250 | 120 | 65 | 189 | 153 |
| 1 m2 of masonry with one and a half bricks (masonry thickness 38 cm) | 250 | 120 | 88 | 140 | 117 |
| 1 m2 of masonry with 2 bricks (masonry thickness 51 cm) | 250 | 120 | 65 | 256 | 204 |
| 1 m2 of masonry with 2 bricks (masonry thickness 51 cm) | 250 | 120 | 88 | 190 | 156 |
| 1 m2 of masonry with 2.5 bricks (masonry thickness 64 cm) | 250 | 250 | 65 | 317 | 255 |
| 1 m2 of masonry with 2.5 bricks (masonry thickness 64 cm) | 250 | 250 | 88 | 235 | 195 |
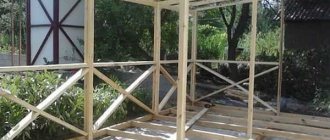
Frame
For the frame of an open wooden veranda you will need timber. For the bottom trim, choose a material with a cross-section of 150x150 mm. For racks and supports you will need material with a cross section of 100x100 mm. The construction of a frame for a veranda consists of the following steps:
- The lower trim is being constructed. The timber treated with antiseptic and fire retardant is laid on the foundation. If the posts have studs, the timber is placed on them and secured with nuts on top. If there are brick columns at the base, the lumber is secured with studs or bolts.
- Floor logs - timber of the same section - are mounted on the harness in 1 m increments. They are placed in pre-cut grooves and fixed with nails. If the length of the veranda exceeds 6 m, the joint between the two beams should not remain suspended; it is always placed above the column (pile).
Bottom trim and frame of the future veranda Source par-torg.com
- Install roof supports. The beams (at least 2 m long) are installed vertically along the wall of the house and at the outer corners. The racks are fixed to the harness with self-tapping screws; Steel corners are used to strengthen the structure.
- When constructing a frame for a timber veranda, the slope of the future roof is taken into account. The racks located closer to the wall are made higher and the required angle of inclination is set.
- Sometimes, for rigidity, a board is cut into the racks at an angle, and window sills are also installed.
- The top strapping makes the structure reliable. To make it, take 100x100 mm beams and connect all the vertical posts with them; fixed using mounting angles.
- Cross members are mounted between the racks, onto which the casing is attached. To make the frame structure sufficiently rigid, jibs are nailed to the top and bottom of the racks; corners are used to strengthen the transverse.
Finished frame of a country veranda Source markik.ru
Attaching the joist to the harness
They can be mounted on top of the harness, or at the same level with its top edge. You need to decide exactly how you will do this at the very beginning of the work: this will determine at what level it will be necessary to attach the support beam to the wall of the house (the height of the joists is taken into account or not). Methods for attaching floor joists are shown in the photo below.
How to attach floor joists to the frame
Read how to make beautiful and inexpensive paths on your site here.
Floor
The assembly of the floor begins with installing the logs on the supporting base, for which grooves are marked and cut out in the timber. The logs are installed in these recesses and fixed using mounting angles. It is convenient to use a protected terrace board for finishing the floor. It is laid on the logs and secured with wood screws.
If it is necessary to build a veranda at the dacha with a heated floor, the design is complicated as follows:
- Lay the subfloor using an unedged board.
- The timber is attached to the rough base in steps of half a meter (you can take a section of 50x50 mm).
- Insulation, for example, mineral wool, is placed between the beams. If a slab heat insulator (for example, penoplex) is selected, the gaps between it and the beams are filled with polyurethane foam.
- After laying the insulation, there should be a gap of 1 cm, which will serve as natural ventilation. The top of the insulation is covered with a water-repellent film.
- Lay the finished floor. If a solid or glued floorboard is chosen for it, it is additionally coated with two layers of varnish.
Finish floor for an open structure Source rabotai-sam.ru
Tools and materials
We list all the tools and building materials that may be useful to attach an open veranda to a wooden house:
- pegs and nylon cord for marking;
- roulette;
- shovel;
- boards for making formwork;
- cement, crushed stone, sand;
- knitting wire as reinforcement;
- waterproofing;
- spatula, building level, plumb line;
- nails;
- metal pipes to strengthen the pillars of the veranda;
- brick, concrete pillars about 1 meter high and 20 cm wide;
- beams and roofing boards.
Roof
Traditionally, the roof for the veranda is made of a pitched roof. The basis for it will be the top trim, and the angle of inclination was set at the stage of constructing the frame. Making a roof consists of the following steps:
- The sheathing is being constructed. Several longitudinal rafter boards are laid on the base, and transverse strips are nailed on top. The thickness of the sheathing depends on what roofing material is chosen for the finishing layer.
- If the project provides for insulation of the veranda, a layer of waterproofing and insulation is mounted on the sheathing. When installing them, galvanized nails with wide heads should be used.
- Roof installation. Care should be taken when choosing a material: if it is too heavy for the structure, it may collapse in the future. For the construction of a country veranda, metal tile sheets are often chosen; For their fastening, special self-tapping screws with a rubberized washer are used.
The roof is given a slope of 10-12° Source forvardplast.ru
Make a plan
Before you pick up a hammer, there are a few things you need to consider before building your new deck. Checking underground cables and pipes and deciding on the overall design of your deck are just some of the things you'll need to do before starting construction.
Final stage
To finish the walls, use lining or facade boards. If a warm veranda is being built, a layer of thermal insulation is laid under the cladding, which is protected with a waterproofing film. They also line the interior space, not forgetting about waterproofing.
To line the ceiling, use a board or lining. At the last stage (if a closed veranda is being built), the front door is hung, window blocks are inserted, and lighting is provided.
There are no special requirements for the stairs to the veranda. A competent solution would be a common frame of the veranda and stairs; this way the design will be more reliable and costs will be reduced. When designing a staircase, the following points are taken into account:
- The angle of inclination should be comfortable for safe use.
- For the lower base, supports buried in the ground or a small foundation are built.
- The design is completed with railings.
- The external staircase is made wide enough. It is beautiful and practical: the wide passage is convenient for bringing furniture and household appliances into the house. Flowerpots and containers with flowers placed along the edge of the steps will become an effective addition to the veranda.
Natural wood is the best interior solution Source on-off.com
With whom should the construction of the building be coordinated?
The owner of the site needs to contact several authorities:
- Local administration.
- Fire inspection.
- Sanitary and epidemiological station.
- BTI.
You will need:
- Ready project.
- Document confirming ownership.
- Technical certificate.
- Consent to reconstruction from all residents registered in the house.
Without this procedure, the object will be considered illegal and subsequently difficulties may arise with its donation, sale, or exchange. Also, you will not be able to take out a loan against your home.
- Laws and finance
Cadastral fraud: how a landowner can protect his property
Stick to the room dimensions specified in the project. Otherwise, the BTI will regard the extra meters as an illegal expansion of the area and issue a fine. Obtaining a building permit can take more than a month, so start preparing your documents early.
Briefly about the main thing
A veranda in a country house is, as a rule, a lightweight wooden structure that is built simultaneously with the house or added later. For a wooden building, choose a foundation that is not designed for heavy loads (column, pile, screw). When the foundation is ready, the frame (lower and upper) is made, the frame, floor, and roof are installed. If necessary, the building is insulated, double-glazed windows and a door are installed. At the last stage, a staircase is built, cladding is performed, and light is installed.
Ratings 0
Basic rules for adding a veranda to a house and its exterior design
When preparing for construction, remember four important points:
- For heavy construction, choose a strip foundation; for light construction, choose a pile foundation. In both cases, its height must coincide with the height of the housing foundation.
- An additional room must be built close to a large building to prevent drafts and excess moisture from getting between them.
- Maintain proportions between objects. A large house will be decorated with a spacious room, a small one - vice versa.
- Reconstruction is best carried out after the main building has settled, that is, two or three years after its construction.
Exterior finishing and decor
In addition to the materials listed above, basement and facade vinyl siding is often used for finishing. At the moment, many varieties of it are sold, including those designed to look like wood or brick. Siding is durable and lightweight, is not afraid of exposure to water, and is easy to cover walls with.
- Decoration Materials
Fiber cement siding: material features and installation nuances
Glazing with plastic double-glazed windows from top to bottom looks beautiful. Another type of PVC windows are soft, removable panels. This is a thick and transparent film. It is attached to the frame of the object and is convenient because it can be easily removed at any time.
To decorate wooden and brick houses, forged and carved elements are used on the roof, balcony, and porch. Landscaping adds special comfort and beauty to the building. Trees planted nearby will provide protection from the sun on a hot day. Lush, hanging plants in hanging pots and large, decorative pots look beautiful, as well as ivy hanging around walls and columns.
Photo: Instagram @elit_panorama_lumon
Photo: Instagram @ricdesignbuild
The procedure for creating concrete screeds
- A 10 centimeter layer of sand fills the base.
- On top there is an expanded clay layer.
- Next, a reinforcement layer is formed. Rods with a diameter of 6-8 millimeters and a cell of 25 by 25 centimeters are sufficient.
- Pouring concrete.
30-50 mm is the recommended thickness for the screed near the veranda. Calculations and checking how correctly the installation is proceeding are simplified by pre-setting the rack beacons.
Cut the decking to size
Before you start cutting your decking, measure the width of the area to determine how many pieces of decking you will need. When cutting your decking to size, be sure to wear the proper safety equipment. Once the deck is cut to size, secure a piece of wood along the outer edge of the deck. This will make the decking flush to the edge. Nail down the decking. The veranda is ready. Now it’s clear how to attach a veranda to your house with your own hands?
A polycarbonate veranda attached to the house is an ideal solution for spending leisure time. Bent polycarbonate sheets are attached to the floor and to the wall. Thanks to this, the veranda acquires a roof and a wall. The unusual design gives the house futuristic shades.
Installation of all beams
Use a nail gun to secure a second beam to each support on both sides of the beam. Now secure all the beams to the supports.
When you finish attaching the beams, measure the distance between them. Then cut pieces of wood long enough to fit between every other beam. This will provide the deck with additional support. Use a nail gun to secure the timber between every other joist. Your porch is now ready to be installed.
Marking for wall beam
On the wooden wall form board, measure and mark the length of the support beam. Then use a circular saw to cut the wall beam to size.
You will need to make a notch at one end of the wall beam so that it sits flush with the brickwork. Use a square to mark the recess, then use a circular saw, hacksaw and chisel to make the cut.
Note!
Do-it-yourself gazebos for a summer residence - 300 photos of exclusive ideas. Instructions for building a beautiful gazebo (diagrams, drawings, foundation, roof)
How to insulate a veranda for winter living: floor, ceiling, walls. Examples of insulation from the inside and outside (instructions + photos)
Do-it-yourself wooden veranda: step-by-step instructions with photos and descriptions. Open and closed options + new designs
Design selection
As already mentioned, the decking always rests on the frame. It can be:
- cellular structures on point supports (blocks, piles). Their structure is similar to the grillage of a residential building; the beams must run along the perimeter and be located under the entire flooring area with a certain pitch. Taking into account the relatively small load on the structure, the frame pitch is usually taken to be 1...3 m;
- logs, that is, parallel beams without additional connections. They can also be supported on piles or blocks, but more often they are laid on a platform filled with crushed stone/sand. The pitch of the lag is determined by the planned load and the thickness/material of the flooring.
Combined base for a terrace: beams are laid on the heads of screw piles, logs are distributed along them in increments of 0.5...0.8 m, fastened with a diagonal tie (along the edge of the site)
If you are planning a fence, it is better to give preference to lightweight lattice and column structures.
Fencing on posts made of profiled pipes mounted on a concrete grillage
Painted wood fencing
To install a canopy (roof), it is also better to use lightweight structures: pillars/racks made of profiled metal, wood and a simplified rafter system made of the same material. Suitable roofing materials include monolithic or cellular polycarbonate, tempered glass, wood, metal tiles, corrugated sheets and other options without insulation.
Tempered glass canopy with metal frame and posts
Monolithic polycarbonate on a metal frame
Polycarbonate with wave profile on a wooden frame
Sometimes it is appropriate to use a louvered roof, that is, instead of a continuous deck, shading is provided by inclined slats.
Let's take a closer look at several terrace construction projects.
Tape bases
Ideal for verandas later built from a brick or block base. In the case of new buildings, the thickness of the base remains at 70-80 mm.
Step-by-step instructions will not cause problems.
- The entire perimeter of the building involves digging a trench.
- Leveling the bottom and walls. Shields or boards are needed to form formwork that covers the entire height of the base.
- A 10 cm layer of sand is sequentially distributed on the trench bottom. Crushed stone is also poured in this layer, after which everything is thoroughly compacted.
- Rods of 10-12 mm diameter form a mesh for reinforcement. 10 by 10 centimeters is the optimal size for a grid cell. Then the strength of the base is maximum.
- Pouring cement. Preparation proportions: 1 part cement, three parts sand, 4-5 portions of crushed stone and water. Any veranda in a country house is built according to these rules.
Wait for complete drying after carefully leveling the fill. It takes 3-4 weeks to gain final strength.
Mooring cord tension
Drive a nail into the end of the first beam and another nail into the wall beam. Pass the string between these two nails. This will ensure that the beam is straight when installing it. Secure the beam to each support, if possible on both sides of the beam.
Using the first beam as a guide, measure and mark on the support beam the required distance to where the next beam will go. Mark each support so that your second beam lines up with the first beam.