Russia has vast territories that are located in different climatic zones. Climatic conditions in most parts of the country do not allow harvesting throughout the year.
The natural wisdom and ingenuity of the Russian people made it possible to significantly increase the growing season of plants. By productively using greenhouses of various shapes and designs, amateur gardeners have the opportunity to obtain early and late harvests.
A more competent approach to greenhouse construction will allow you to obtain crops throughout the year. In this article we will try to tell you how to make a greenhouse with your own hands.
Design features
A greenhouse made into reality, made with one’s own hands, occupies an important place on a summer resident’s plot. A greenhouse made by yourself does not mean that it will be less effective in its functionality.
Photos and drawings of greenhouses for making with your own hands can be viewed and studied on thematic websites. The design of the greenhouse and its shape will depend on the purpose of the object.
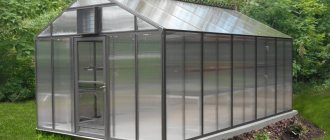
The most popular materials for the construction of greenhouses are fiberglass or galvanized metal profile pipes, which serve as a load-bearing role for the structure. Glass, polyethylene film, polycarbonate can be used as a coating.
Warm beds
For some time now, warm beds in a greenhouse have been in demand among gardeners, as they help to obtain an early harvest of greenhouse vegetables. Creating beds with a cushion of manure in a greenhouse should be done in the fall.
Making such a bed is not difficult. You will need to dig a small trench, having previously moved fertile soil from the ridge. Manure, mixed humus, and the remains of various plants are laid as the bottom layer. This base is covered with nutritious soil.
With the seedling method of growing greenhouse vegetables, this method allows you to get the first harvest 15-20 days earlier than using conventional beds. However, after 3-4 years, the lower “cushion” on the warm bed will need to be re-equipped.
The decision about which beds to arrange in a greenhouse is purely individual. When choosing an option, you need to focus on the method of growing plants and their varieties. When planning the size and height of greenhouse beds, it is important to take care of the ease of caring for greenhouse plants.
Exterior of the greenhouse
Typically, a greenhouse is designed according to the botanical species of the plant. Factors such as the light transmission capacity of the covering material and maintaining the required temperature inside the room are taken into account.
The shape of the greenhouse is:
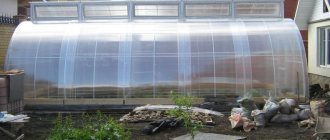
- with one slope. This could be a winter garden or a greenhouse. A passage is provided along the entire length, usually adjacent to the southern wall of the house;
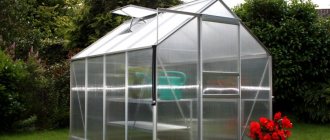
- with two slopes. This is the most common form throughout Russia. Offers a variety of interior design options;
- in the form of a drop. A fairly stable design, but difficult to install;
- domed. It has a very impressive appearance with a modest consumption of materials;
- polygonal shape. They look great in a garden plot and can easily withstand strong winds.
Geodesic dome
A rather interesting type of summer greenhouse is the geodesic dome. As the name suggests, this structure has the shape of a hemisphere. It is assembled from triangular modules: a wooden, plastic, metal or metal-plastic frame and glass, polycarbonate or film filling.
The main advantage of this design is that it provides a positive temperature without the use of heating devices, due to natural circulation. During the day, air heated by the sun's rays rises under the arches of the dome. At night, under the influence of cold masses, it lowers, giving warmth to the plants. And if you place containers of water inside the greenhouse, the greenhouse effect will noticeably increase.
To ventilate the greenhouse, it is useful to make vents in the upper part of the structure. This will help prevent the plants from overheating
Another positive point worth mentioning is wind resistance. Thanks to its streamlined shape, a good-quality dome greenhouse can withstand even a hurricane.
However, one cannot fail to mention the shortcomings. A geodesic dome is quite difficult to install. In addition, it is not very roomy. Usually the beds are laid out along the perimeter of the walls and made in. You can also hang boxes and pots with plants from the dome, but this is not very convenient, because you will have to stand on a stool or use a ladder to water and harvest.
Classification of greenhouses
Objects that ensure the maintenance of an artificial climate within themselves can be classified as collapsible and stationary greenhouses. Folding greenhouses quickly occupied their niche in the market for gardeners.
The ultra-light frame has standardized parts that can be assembled and disassembled by a person without special training. The price of such a kit will not put serious pressure on the family budget.
The coating for this design is usually a special polyethylene film. If handled carefully, it can be used for several years.
A stationary greenhouse design is considered a kind of classic for summer residents. In this case, the steel supporting frame rests on the foundation structure. Window windows are installed for ventilation, at equal intervals of wall glazing sections.
This design has proven itself to be a long-liver in the garden. Ease of manufacture and minimal operating costs are the undoubted advantage of this design.
Greenhouses are also divided according to the type of characteristic features depending on the author of the project. The design of the greenhouse, the author of which is Kurdyumov, provides for watering the plants using the drip method. Greenhouses also have the ability to maintain the desired range of temperature and air humidity.
The greenhouse design, authored by Mittleider, is a durable structure made of natural wood. As a rule, such greenhouses are installed in the direction of the sun. This ensures better illumination for the plants.
Preparatory work
In order to make the simplest greenhouse by hand, it is necessary to carry out the necessary preparatory measures.
When choosing a location for a greenhouse, you should be guided by the fact that there is no interference with direct sunlight. The site should be as level as possible, and it is advisable to have protection from strong winds.
News site- Features of electrical wiring installation in houses made of SIP panels
- How to choose a cast iron bath
Please note that you will need water for irrigation and electricity for lighting. Therefore, the greenhouse should be located on the site within acceptable proximity to these sources.
Choosing polycarbonate
Good performance characteristics of the greenhouse are due to the correct choice of coating. It has been proven that polycarbonate is ideal for these purposes and more.
The choice of coating depends on the type of material, its thickness, and light transmittance.
There are two main types of polycarbonate:
- Cellular (cellular).
- Monolithic.
The first option wins in its characteristics due to several layers of material and the presence of longitudinal jumpers between them.
This polycarbonate is lightweight, transmits light well and is resistant to temperature fluctuations.
Possessing flexibility, the honeycomb material is very resistant to mechanical stress. The light transmittance of the material helps create a greenhouse effect.
Polycarbonate intended for exterior decoration, including greenhouses, is treated with a special compound that protects it from the effects of destructive ultraviolet rays.
The presence of such a coating is indicated by a mark on the packaging, “UV protective layer.”
The thickness of polycarbonate for greenhouses ranges from 4 to 10 millimeters. For arched structures, it is recommended to use thickened sheets. For vertical greenhouses, thinner sheets are suitable.
Installation of the supporting frame of the greenhouse and covering
A reliable frame design will be the key to protecting plants from the hot rays of the sun and heavy rains.
After the concrete in the foundation has gained the necessary strength, the frame elements can be prepared for assembly. The elements of the lower chord and the stand are connected to each other with bolts.
The elements of the upper chord and roof slopes are sequentially connected into a spatial structure with rigid connections. The entrance door is located on the leeward south side.
Effective swirl ventilation should be ensured by placing opening vents in the roof structure.
Clinker brick- Barrel sauna and its features
Apartment renovation
When covering a greenhouse with your own hands from polycarbonate, the sheets are attached to the frame with anodized steel screws. A rubber sealing gasket is placed between the polycarbonate sheet and the frame element.
Glass coating is the most traditional material. However, high operating costs have pushed it out of the greenhouse materials market.
Film coating is characterized by low price and ease of use. It should be noted the low durability of this material.
Plastic, glass or film?
When starting to build a greenhouse, we inevitably face a choice: film, glass or polycarbonate? The cheapest option for filling frames is, of course, film. But whether such savings are justified is a moot point. Even with the most careful handling, the film will only last one or two seasons, and then the structure will have to be covered again.
Glass, on the other hand, can last for many decades. It perfectly transmits sunlight, and if you put double-glazed windows in the greenhouse, it will also serve as a reliable heat insulator, protecting plants even in cold weather. Only such a greenhouse, as they say, “will cost a pretty penny.”
Polycarbonate can be called the golden mean. In terms of light transmission, it is not much inferior to glass. At the same time, it is 20 times lighter and much, much cheaper. The material bends well, has high strength and retains heat well. As a rule, sheets with a thickness of 4 mm are used for temporary greenhouses, and 6 or 8 mm for permanent greenhouses.
Plumbing, electricity, greenhouse heating
After the greenhouse frame, covering, and ventilation are completed, you can begin installing the electrical network, heating and water supply.
Considering that the humidity in the greenhouse will be high, all electrical work must be performed taking into account the requirements of the relevant standards and rules for performing special work.
Stove heating, electric energy, or gas can be considered as a heat source for the room. The issue of efficiency will depend on the regional location of the facility.
For productive work, it is advisable to bring water into the greenhouse. For this, a plastic pipe with a diameter of 1.5 inches is usually used. The riser is located at the entrance to the room.
Arrangement of the vestibule
Another important point that can be implemented in the process of planning a greenhouse at a dacha 3 m by 8 m is the vestibule. In the future, the vestibule can be used to store garden tools. It is very inconvenient to constantly carry everything you need to care for your crop from home or a barn to the greenhouse; it is much more convenient and comfortable when everything you need is at hand. To do this, it will be enough to fence off a small space at the entrance to the greenhouse where you can place shovels, rippers, fertilizers, gloves, and a hoe.
For maximum convenience, during the internal arrangement of a polycarbonate greenhouse, it is recommended to install special fasteners for fixing the cuttings of working tools, which will allow you to properly use the free space.