In some regions, groundwater is very close to the surface. So close that they threaten the integrity of buildings (their foundations) and prevent plantings from growing. All these problems are solved by site drainage. In general, this event is costly both in terms of the amount of funds required and the time required. A considerable part of the time is spent on planning. If you do everything wisely, then you need hydrogeological research data and a project drawn up by a specialist. But, as usual, only a few do this; the majority make the drainage system with their own hands.
Site drainage can be designed as an element of landscape design
What water is removed by drainage?
Drainage of a site is a costly and labor-intensive undertaking that requires a large amount of excavation work. The best time for construction is the process of planning and arrangement of the site. Late deadlines lead to a lot of chaos, which doesn't make everyone happy. However, if there is water on the site, you have to do this too.
There are several types of water on the site that bother us and that need to be drained. They are of different nature and require different measures.
Surface water
They are formed during snowmelt and heavy rainfall, during work on the site (watering, washing paths), discharge of water from a reservoir, etc. What all phenomena have in common is their one-time nature: surface water appears after certain events. A more reasonable way to drain them is to install a storm drain. She copes with the task “excellently”, and the costs of arrangement are much lower.
Storm sewers are responsible for the removal of surface water.
To drain surface water, mostly open channels are installed; water intake is point-wise under storm pipes or linear along the entire roof overhang. From these receivers, water is carried through solid plastic (asbestos-cement) pipes into a drainage ditch or discharged into a river or lake into a ravine. Sometimes we allow output to the ground.
Groundwater
Those groundwaters that have a seasonal level (higher in the spring after a flood, lower in the winter), have a recharge zone (where they come from) and an outflow zone (where they go) are called groundwater. Typically, groundwater is present on sandy, sandy loam soils, less often in loams with a small amount of clay.
The presence of groundwater can be determined using self-dug pits or several wells drilled with a hand drill. When drilling, a dynamic level is noted (when water appeared during drilling) and a steady one (some time after its appearance, its level stabilizes).
When the groundwater level is high, strip foundations are also made, but the waterproofing must be high
If we talk about draining water from a building, then a drainage system is installed if the groundwater level (GWL) is only 0.5 m below the foundation. If the groundwater level is high - above the freezing depth - then a monolithic slab foundation with measures taken to drain water is recommended. At a lower level, other options are possible, but careful and multi-layer waterproofing is required. The need for foundation drainage should be assessed by specialists.
If high groundwater (groundwater level above 2.5 meters) prevents plants from growing, drainage of the area is required. This is a system of channels or special drainage pipes laid in the ground at a certain level (20-30 cm below the GW level). The depth of laying pipes or ditches is below the ground level so that water flows to lower places. In this way, the adjacent areas of the soil are drained.
Verkhovodka
This groundwater occurs on soils in highly located impermeable layers, but its appearance is often a consequence of construction errors. Usually this is water that, being absorbed into the soil, encounters on its way layers with a low ability to absorb moisture. Most often this is clay.
If after a rain there are puddles in the area and do not go away for a long time, this is perched water. If water accumulates in dug ditches, this is also perched water. If, a few years after building a house on clay soils or loams, the walls in the basement begin to “cry”, this is also high water. Water has accumulated in crushed stone pockets under the foundation, in blind areas, etc.
To avoid this situation, site drainage is required.
The easiest way to drain high water is with the help of ditches, but it is better to prevent its occurrence - backfill the foundation not with crushed stone and sand, but with clay or native soil, carefully compacting it in layers. The main task is to eliminate the presence of pockets in which water will accumulate. After such backfilling, it is necessary to make a blind area that is wider in width than the backfill and an obligatory touch is the drainage of storm water.
If the site has a slope, consider installing terraces and retaining walls, with the obligatory installation of drainage ditches along the retaining wall. It is most difficult to deal with perched water in low areas, which are located at a level lower than neighboring ones. A reasonable solution here is to add soil, since there is usually nowhere to dump water. Another possible option is to drain the drain through neighboring areas or along the road to the point of possible discharge. You have to decide on the spot, based on the existing conditions.
Advantages and disadvantages
Properly executed drainage can lower the groundwater level, remove flood waters and heavy precipitation from the site, improve soil fertility, prevent the death of tree and shrub roots, and the formation of mold and mildew on building structures.
The main advantages of drainage ditches include:
- simplicity of design;
- high efficiency;
- minimal care;
- Possibility of installation on your own;
- rapid removal of rain and melt water outside the site;
- affordable price.
With a little effort and bringing to life design ideas and personal creative fantasies, you can decorate the trench so that it becomes a decoration of the land, harmoniously blending into the surrounding landscape and the architecture of nearby buildings.
Among the disadvantages of drainage ditches are:
- possibility of clogging and silting of the system;
- lower efficiency compared to storm sewer;
- the need for regular maintenance.
Diversion ditches can be arranged even in low-lying areas where other types of drainage are difficult to implement.
To avoid drainage
Installing a drainage system is an expensive undertaking. If it is possible to make do with other measures, it is worth doing so. Other measures include the following:
- Storm sewer installation.
- Construction of a blind area (for heaving soils, an insulated blind area is desirable).
- In areas with a slope, the installation of a mountain ditch is a ditch of sufficient depth, which is located on a slope higher than the house. From this ditch, water is diverted below the site, into a drainage ditch, and discharged into a ravine, river, lake, etc.
To prevent the edges of the ditch from crumbling, it can be planted with moisture-loving plants with a powerful root system - Foundation waterproofing. To eliminate capillary suction of moisture, several layers of waterproofing material are laid on top of the finished foundation; to eliminate problems with damp walls in the basement, external waterproofing of the foundation is done (dug out to the full depth and treated with waterproofing materials). For greater reliability, treat the walls of the basement and/or ground floor from the inside with penetrating waterproofing of the “Penetron” type.
If after all these measures the situation does not suit you, it makes sense to make a drainage system.
Ways to strengthen drainage ditches
To prevent soil erosion in the ditch, the walls should be strengthened.
The most effective methods include:
- finishing the walls and bottom of the trench with natural stone;
- installation of gabions made of galvanized mesh filled with crushed stone or gravel;
- planting trees and shrubs along the edges of the ditch;
- attaching a geogrid to the walls and bottom of the ditch, followed by backfilling with soil, crushed stone or concrete;
- strengthening the embankment using special sods cut on loamy soils.
Drainage ditches in landscape design.
You can create a drainage ditch on your country property yourself, turning an ordinary ditch into an element of landscape design.
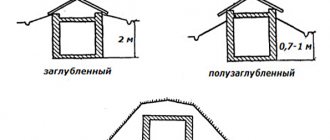
Types of drainage
Site drainage is a complex system with many nuances and features. In structure, it can be local (local) - to solve a problem in a specific area. Most often this is drainage of the foundation, basement and semi-basement (basement) floors. Also, water drainage systems on a site can be general - to drain the entire site or a significant part of it.
Soft drainage - without pipe. Suitable when it is necessary to drain a small amount of water in a summer cottage or near the house
By installation method
According to the installation method, the drainage system can be:
- Open. Concrete or stone trays are used and ditches are dug around the site. They remain open, but can be covered with decorative grilles to protect the system from large debris. If you need a simple solution for draining surface water at your dacha, these are ditches along the perimeter of the site or in the lowest zone. Their depth should be sufficient so that the water does not overflow at maximum flow. To prevent the unreinforced walls of drainage ditches from collapsing, they are made at an angle of 30°,
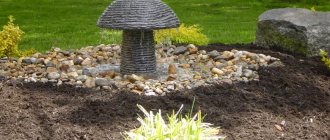
To prevent the walls of open drainage ditches from crumbling, ground cover plants are planted on the slopes or laid out with cobblestones
Open drainage near the driveway, parking lot, does not spoil the picture at all
Drainage option for a summer cottage - cheap and cheerful
You can use a drainage ditch to decorate your site.
Drainage of storm water from the house and paths can be arranged in this way
Can remove significant amounts of water- Closed. Water is captured by laying special water-permeable drainage pipes. The pipes are led into a storage well, into a drainage ditch, a ravine, or a nearby body of water. This type of site drainage is good for permeable soils (sandy).
- Backfill. This type of site drainage is usually used on clay soils or loams. In this case, the pipes are also laid in ditches, but they are filled with layer-by-layer sand and gravel backfill, which collects water from the surrounding soils. The worse the soil conducts moisture, the more powerful backfilling is required.
Drainage pipe in gravel backfill
The specific type of site drainage is selected based on site conditions. On clays and loams, an extensive gravel-sand zone is required, into which water will flow from surrounding areas of the soil. On sands and sandy loams there is no need for such a cushion - the soils themselves drain water well, but only a specialist can say specifically based on the results of geological research.
By type of implementation
There are several types (schemes) of drainage devices on the site:
- Annular. The pipes are closed in a ring around the object. Usually it is the house. It is rarely used, since the drainage pipes have to be deeply buried - the pipe itself must be laid 20-30 cm below the groundwater level. This is expensive and difficult to implement.
- Wall drainage - to drain water from the walls. It is located at a distance of 1.6-2.4 m from the walls (in no case close to each other). In this case, the drain is located 5-10 cm below the basement floor. If the floor is poured on top of a large crushed stone cushion, the drain is laid 5-10 cm below this level.
The correct solution for drainage from the foundation is a storm sewer system and drainage - Reservoir drainage. Used when constructing slab foundations in difficult situations. Necessary for drainage of overhead water, usually used together with wall water drainage. Reservoir drainage is layers poured into a foundation pit - sand, crushed stone, waterproofing (as they are poured from bottom to top). The reinforcement is already laid on top of this cushion and the foundation slab is poured.
- Systematic and radial. Used to drain areas. They differ in the way the drains are located relative to the central pipe. With a radial scheme, the system looks like a herringbone (already existing plants can be taken into account); with a systematic scheme, drains are laid with a calculated step (usually arranged when planning a site).
Radiation drainage of the area
When draining a site, the central drain or collector is made from pipes of larger diameter (130-150 mm versus 90-100 mm for conventional drains) - the volume of water here is usually larger. The specific type of drainage system is selected based on the problems that need to be solved. Sometimes it is necessary to use combinations of different schemes.
Classification of drainage ditches
The problem of soil waterlogging by storm drains, groundwater and flood waters is typical for country houses and summer cottages, highways and park areas.
The underground structures of houses suffer, roads and sidewalks are destroyed, the fertile layer is washed away and the soil structure deteriorates.
To solve waterlogging problems, drainage ditches are created, which are classified according to various factors:
By purpose
- drainage of water from the foundations of buildings and structures, cellars;
- redirection of water flows on slopes and areas with complex terrain;
- drainage of wetlands with high groundwater levels;
- protection of roads, sidewalks and access roads from destruction, arranged along roads in the form of ditches;
>At the installation location
Depending on the amount of wastewater discharged, drainage ditches are:
- main - in the form of a complex of trenches laid across the territory of the site;
- perimeter - made around the perimeter of a house or fence;
- auxiliary - receiving water from individual areas.
In case of minor watering, it is enough to arrange a ditch along the boundaries of the site. To fully protect an area with complex terrain, a complex drainage network will be required.
Figure 4. Open drainage tray.
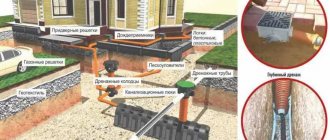
Site drainage - device
The drainage system consists of a network of interconnected pipes that are located around the perimeter (or area) of the area protected from water. Drainage wells are installed at intersections or turns. They are necessary to monitor the condition of the system and clean silty pipes. From all drainage areas, water enters the collector well, where it accumulates to a certain level. Then it can be discharged or used for irrigation and other technical needs. Discharge can occur by gravity (if there is somewhere), and submersible drainage pumps are used to supply irrigation and other technical needs.
The process of installing site drainage
Drainage pipes and wells
Special pipes for drainage are used - with holes ranging in size from 1.5 to 5 mm. Water flows through them from the surrounding soil. Holes are located along the entire surface of the pipe. They come in different diameters; for private houses and plots, the most used size is 100 mm; to drain large volumes of water, you can take a cross-section of up to 150 mm.
They are now made mainly from polymers - HDPE, LDPE (low and high pressure polyethylene) and PVC (polyvinyl chloride). They are used for laying to a depth of 2 meters. There are also two and three-layer combined ones, which are made from combinations of these materials; they are buried to depths of up to 5 meters.
Pipes for drainage are selected taking into account the depth. It is necessary to select according to the ring stiffness. It is designated by the Latin letters SN and the numbers following them, indicating the ring stiffness (resistance to loads). For laying to a depth of up to 4 meters, the rigidity should be SN4, up to 6 meters - SN6.
The surface of the drainage pipe is wrapped with filter materials. There can be from one to three filter layers. The number of layers is selected based on the composition of the soil - the smaller the particles, the more layers are required. For example, on clays and loams, pipes with three filter layers are used.
What does the drainage system consist of?
Inspection wells are installed at turning points and in places where several pipes are connected. They are needed for easier cleaning in case of blockage, as well as for the ability to monitor the condition of the pipes. As a rule, all pipes converge into one collector well, from where water is either sent by gravity to the discharge point, or is forcibly pumped out.
A drainage well on the site can be made from small diameter concrete rings
There are special wells for drainage systems, but it is quite possible to bury a concrete ring with a bottom and a cover of small diameter (70-80 cm) and bring pipes into it. Depending on the depth of the drainage rings, several rings may be required. Another option is to make a large inspection well and drainage pipe, but in this case you will have to come up with something with the bottom. For example, you can fill the bottom with concrete.
Slope
How to maintain the required slope of the bottom of the trench
In order for the collected water to drain on its own, it is necessary to maintain a certain slope towards the direction of movement. The minimum slope is 0.002 - 2 mm per meter, the main slope is 0.005 (5 mm per 1 meter of pipe). If the drainage is shallow, the slope of the pipe can increase to 1-3 cm per 1 meter, but it should be done as little as possible. When the flow speed is more than 1 m/sec, small soil particles are “sucked in”, which contributes to faster siltation of the system.
The slope is changed (relative to the “standby” of 5 mm per 1 meter) in two cases:
- If it is necessary to drain a larger amount of water per unit of time without increasing the diameter of the drain. In this case, the slope is increased.
- If you need to get away from the backwater (when a pipe laid with a given slope is below the water level, i.e. water simply will not drain). In this case, the slope is reduced.
In the practical design of the system, questions may arise about how to ensure a given slope. This can be done using a laser level (level), using a water level (not very convenient) or a flat board paired with a regular construction bubble level. Having leveled the bottom of the trench, lay a board and a level on it. By moving it along the board, they check and correct the slope of the bottom of the trench in a certain area.
Drain installation technology
Trenches of a given width and depth are pre-dug. The bottom of the trench is leveled and compacted. Don't forget about the slope, but at this stage there is no point in maintaining it exactly. Next, about 100 mm of coarse-grained washed river sand is poured, it is also compacted (spilled, then tamped), leveled. Sand preferably fraction Dsr 1.5-2.5 mm.
What should a drainage pipe look like in a sand-crushed stone bed?
Geotextiles with a density of no more than 200 g/m2 are laid on the sand. The edges of the canvas are lined along the walls of the trench. A layer of crushed granite stone is poured on top. The size of the crushed stone fraction is selected depending on the size of the holes in the drainage pipe. For the smallest holes, crushed stone with a grain size of 6-8 mm is required, for the rest - larger. The thickness of the crushed stone layer is 150-250 mm, depending on the type of soil. On clays and loams, 250 mm is required, on soils that drain water better - sand and sandy loam - about 150 mm.
The crushed stone is compacted, leveling it to a given slope. A drainage pipe is laid on compacted crushed stone. Next, the pipe is covered with gravel in layers, each layer is compacted. There should be at least 100 mm of gravel on top of the drain. After this, the ends of the geotextile are wrapped, their overlap should be 15-20 cm. A layer of sand with grains of 0.5-1 mm is poured on top. The thickness of the sand layer is 100-300 mm, also depending on the water permeability of the soil: the worse the water drainage, the thicker the sand layer. The “native” soil is laid on the compacted sand, and then plants can be planted.
A little about backfill materials
Crushed stone should be granite or other hard, lime-free rocks. Dolomite (limestone) or marble are not suitable. It’s easy to test the existing one: drop vinegar on it. If there is a reaction, he is not suitable.
Please note once again: the crushed stone is laid washed so that the new pipes do not immediately silt up.
Coarse sand
The sand required is coarse-grained. Grain size from 0.5 mm to 1 mm. The sand should also be clean. Some of the sand is filled with clean water, stirred, wait until the sand settles and evaluate the purity of the water. If the water is cloudy, with a large number of suspended particles, the sand requires washing.
Some nuances of construction
When draining a site, the central drain or collector is made from pipes of larger diameter (130-150 mm versus 90-100 mm for conventional drains) - the volume of water here is usually larger.
Fork arrangement method
The installation of drainage on the site begins from the lowest point and moves gradually upward. First, a collector well is installed. If the groundwater level is high or the high water has not yet receded, water may accumulate in the ditches. This muddy slurry will roll into the well, clogging it. In addition, the presence of water in the ditch greatly interferes with the work: drains must be laid in dry ditches. To drain them, side pits (sumps) of greater depth are made along the ditch. Crushed stone is poured onto the bottom. Accumulating water is pumped out of these pits.
Necessary materials
To make a drainage ditch yourself, you will need special materials:
- drainage perforated fiberglass pipes, 50-150 mm in diameter, for collecting and draining water from the site. Pipes must have perforations in the form of holes with a diameter of 1.5-5 mm located around the entire circumference of the pipe. May be encased in filter materials;
- bends, fittings and couplings for connecting pipes;
- geotextile fabric that protects the drainage system from silting;
- inspection wells for system maintenance;
- filtering or storage tanks for collecting wastewater from the site;
- river sand and crushed stone, for the construction of underlying and drainage layers.
In addition, you will need shovels for excavating soil, power tools for installing pipes and wells, and various tampers for compacting the bottom of the trench.
To protect drainage pipes when laid under the road, steel pipe sleeves will be required.
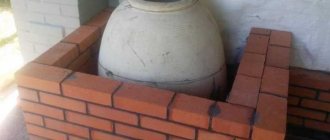
Interesting Facts
Our distant ancestors had their own way of determining groundwater. It consisted of placing a piece of wool at the bottom of the hole, putting an egg, and placing an inverted clay pot on top.
After the sun rose in the morning, they removed the pot and watched as the dew fell. If the egg and wool were wet from dew, then the water was shallow. If dew was only on the wool, then the water is deep. If the egg and wool were dry, then the water was very deep.
If the grass in the area is bright green even on dry days, then the water is shallow.
Second option
For the second organization option you need:
- Dig a trench 1.5 shovels deep with a slope towards the drain.
- Cover it with geotextile, which will act as a filter to prevent silting of the ditch.
- Fill with expanded clay or crushed stone in a layer of about 10 cm.
- Pour sand.
- Fill the soil removed from the ditch back.
- Lay turf.
Pipe placement
The drainage scheme for a site located on a slope is very simple. One ditch is dug across it, and the second - parallel to the base.
The communication of the ditches is ensured by connecting trenches. The lower ditch should provide water outlet into a stream or ditch.
Sewage from trays
This storm drain is very budget-friendly and will require 2-3 days to dig a ditch, also a couple of days for concreting and general installation. The owner only needs to think about the layout of the trays.
The result should be a “pie”:
- Ground bed - base.
- Sand layer 5 cm.
- Concrete layer 7 cm.
- Asbestos cement tray.
- Metal mesh reinforcement.
Advice: in the process of arranging a storm drain, it is worth laying reinforcement at the joints, with a gap for deformation of 3-5 mm between the trays.
The price for 48 meters of pipeline is about 10 thousand rubles. The storm drain can withstand winter, will not crack from frost and ice, will leave the ground dry and will divert water from neighbors.