Home > Catalog > Types of fences >
Order
A fence made of corrugated sheets with forged elements is a functional and decorative element of the arrangement of both a private plot and an administrative territory. The variety of colors and designs, ease of installation and affordable price make the designs in demand in the domestic market.
Design Features
Any fence made of corrugated sheets with forged elements looks much more presentable than an ordinary metal structure. Main design features:
- • decorative metal curls are usually used to decorate the top of canvases;
- • the front ornament is attached to the frame frame of the sections;
- • during further installation, the corrugated board inserts are strengthened so that the frame is hidden behind the edge, and the openwork top remains open.
Rules for ordering and installing a fence made of corrugated sheets with forging elements
You can order a forged fence with corrugated sheets from our company. We deliver structures throughout Moscow and the Moscow region with professional turnkey installation and warranty. A massive system requires the installation of a strip foundation, so the cost of installation will include this item. Main stages of arrangement:
- • visit of a specialist to the site to take measurements;
- • site marking;
- • preparation of trenches with compaction and organization of drainage;
- • laying metal reinforcement;
- • pouring the concrete base.
Forming the foundation may take some time as the concrete platform must be given time to harden and settle. The cost is calculated based on the area of the fenced area and the complexity of the work, which may also include leveling the area using special equipment.
In the catalog of our products on the website you can find ready-made fences made of corrugated sheets with photos and prices. If necessary, our designers and craftsmen will produce custom-made systems for you according to individual parameters in the shortest possible time.
If you have any questions, call us at the phone number listed on the website, or leave a request in the feedback form. Our consultants will tell you more about the terms of cooperation and help you choose the right option taking into account your wishes.
Set for work
- Welding machine with a set of electrodes.
- Grinder with grinding and cutting discs.
- Equipment for the production of decorative elements. There are several types of machines that allow you to give metal rods different shapes. You will learn more about the main units below.
- Vise. A flimsy student setup won't do. You need a powerful locksmith unit. Additionally, prepare patterned yews to give the rods a spiral shape.
- Pliers.
- Roulette.
- Hammer.
- Building level.
- Corner.
- A spray bottle or several brushes of different sizes.
- Steel rods with a diameter of 12-14 mm.
- Sheet steel 2 mm thick. We will use it to make peak tips. We buy the material if peaks are present in the selected fencing design.
Elements of a wrought iron fence
Photos of artistic forging
According to their functional purpose, forged fences are:
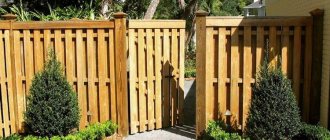
- Protective ones are more practical and simple.
- Decorative - made according to individual sketches. Each such fence is an artistic idea embodied in metal. Professional craftsmen who master the art of artistic metal forging turn the fence into a work of art. Skillful execution of any style - from classic to avant-garde, or a combination of several styles allows you to get an exclusive copy. Despite their openwork, such fences do not lose their protective functions.
- Combined – combining the functionality of protective and elegance of decorative fences.
Setting up the foundation
The work of making a wrought iron fence begins with arranging a reliable, durable and high-quality base. The support will have a columnar-ribbon appearance. The posts will support the fence sections, and a continuous concrete strip will bear the weight of the entire structure.
What are the pillars made of?
For the manufacture of supports we use reliable, strong and durable material. A wooden beam is clearly not suitable - it simply will not support the weight of the metal sections, and even if it does, such a structure will clearly not look the best.
The pillars can be made of concrete, bricks or metal. Each option has its own characteristics.
| Type of supports | Description |
| Metal supports | They are characterized by high stability, strength and long service life. The material is sold at an affordable price, does not require any complex additional preparation and processing, and is easy to transport and install. The supports can have a square or round cross-section. The minimum permissible diameter or cross-section of the rack is 6 cm. For the rest, we focus on the dimensions and weight of the future structure. |
| Brick pillars | They can withstand loads created by a variety of heavy and tall structures, including our wrought-iron fence. First, the perimeter of the pillar is laid out from bricks, and then the gap inside the masonry is filled with reinforcement and poured with concrete. The reinforcement is also embedded in the masonry. As a result, sections of the fence will be attached to these rods. |
| Concrete supports | They withstand the harshest external influences, serve for the longest possible time and are in full harmony with metal products. However, with all their advantages, concrete racks have a very serious drawback - they can normally withstand loads created by sections up to 150 cm high. When installing more impressive elements, the support may collapse under its weight. |
Most often, forged sections are used in combination with metal racks. This is exactly the kind of fence we are building. The choice is very good - you don’t have to bother with masonry, formwork, unnecessary concreting and other related activities.
Making the foundation
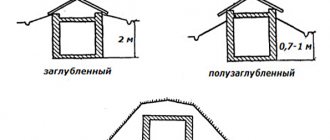
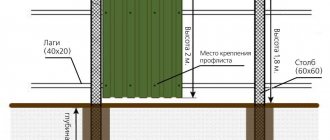
First step. We mark the area around the perimeter where the fence is installed. By marking we dig trenches. We select the depth and width of the pit taking into account a number of factors, including: the characteristics of the soil on the site, the climate in the region, the height of the fencing sections, etc. The optimal parameters are considered to be a width of 30-35 cm and a depth of 70-80 cm.
Trench
Second step. Along the perimeter of the dug trench we mark places for installing racks. We install the pillars with the same spacing. The average step is 1.5-2 m. For the rest, we focus on the size and weight of the fence, as well as the width of the sections and the features of the design idea. We dig the posts into the ground approximately 35-40 cm. The diameter of the hole should be slightly larger than the size of the support. We fill the post holes with a 10-15 cm layer of crushed stone and compact it. We are not pouring concrete yet - we will do this when pouring the tape.
Third step. We compact and level the bottom of the hole, and then fill it with a 5-10 cm layer of sand. For better compaction, we spill the sand with water.
Fourth step. We carry out reinforcement. To do this, we connect reinforcement with a diameter of 12-14 mm into a mesh with 10-centimeter cells. To connect the rods we use binding wire.
Reinforcement is best done in 3 layers. We will lay the first mesh at the bottom of the trench on top of a layer of sand, fix the second mesh approximately in the middle of the pit, and the third almost at the top of the recess. We fasten the nets to the dug-in support posts using binding wire. It is better not to use welding, because... After pouring the concrete, we will need to level the supports, and the welding seams will not allow us to do this.
Reinforcement and installation of support pillars
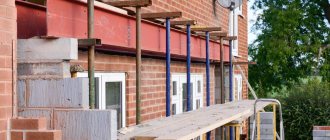
Fifth step. We install the formwork along the edges of the pit. You can use boards to assemble the formwork, but if you have a sufficient budget, it is better to make a form from laminated MDF. The use of this material will allow you to obtain a foundation with perfectly smooth visible edges that do not require additional finishing.
Sixth step. Fill the post holes and tape with concrete.
Foundation for a fence
Seventh step. Until the concrete has set, we level the supports and fix them in the given position using wooden stops. We leave them until the concrete hardens completely. This will take 3-4 weeks.
With this, a reliable and durable base for our wrought iron fence is ready. While the concrete hardens and gains strength, we will begin manufacturing sections and decorative elements for the fence being built.
Steel rod will be used to make all structural elements. But in order to give the rods the desired shape, you will have to buy or borrow special equipment. Which one exactly? Read on.
Sketches of forged fences
e-1
e-2
e-3
e-4
e-5
e-6
e-7
e-8
e-9
e-10
e-11
e-12
e-13
e-14
e-15
e-16
e-17
e-18
e-19
How to make decorative elements?
Forging equipment for cold metal forging
Bending machine
Such elements are produced using a variety of bending machines. The most commonly used types of equipment are:
- "Gnutik." This device allows you to bend metal rods to the desired radius and required angles.
- "Snail". This machine allows you to give the rods a spiral shape.
- "Sample". Bends metal rods into a circle. It is possible to change the radius of the circle.
- "Twister". Another unit for twisting rods into a spiral. Can be replaced with a vice and yews.
Cold forging
Equipment for cold forging
You do not have to spend money on buying or renting all of the listed units. Take 1-2 tools (machines) and, focusing on their capabilities, come up with a section design. Or you can choose tools in accordance with the already approved design - be guided by the situation.
For example, a device called “Gnutik” will allow you to create rounded elements and peaks - quite enough to decorate a forged fence. In this case, the rounded products will simultaneously take on the functions of stiffeners.
Wrought iron fences
Manufacturing and installation of fencing sections
We have smoothly approached the most interesting and important stage of the work. We proceed in the following order.
Sketches of forged fences
Sketches
First step. We find a flat horizontal area that can freely accommodate at least one section of the fence. You can use a large work table or do everything right on the asphalt.
Second step. Using chalk, draw a template for the fence section on the base. We draw stiffeners, protective parts and decorative elements. In accordance with this template, it will be possible to assemble all other sections of the fence.
Third step. Using a bending machine or special devices, we create the number of decorative elements we need. At this point, we focus on a project drawn up in accordance with our ideas, requirements and preferences. We make sure that the shape and dimensions of the products match the template we drew. At the same stage, we cut the steel rods to the required length.
Fourth step. In accordance with the template, we grab all the elements of the section by spot welding. We check the correctness and evenness of the connection of the parts. If everything is in order, we perform final welding.
In the same order we assemble the required number of fence sections.
Fifth step. We clean the welds and remove traces of corrosion if they are found.
Sixth step. We coat metal products with a primer and special protective paint. This finish allows you to simultaneously improve the appearance of the fence and protect it from rust.
Cold artistic forging
Cold artistic forging
Seventh step. We install ready-made sections. To attach them to the support posts, we use a welding machine or special clamps. Don’t forget to leave openings for installing gates and gates if they have a different design from the fence.
Element of artistic forging
Elements of artistic forging
Elements of artistic forging
Elements of artistic forging
Elements of artistic forging
Cold forging
At this point, all activities for the manufacture and installation of a wrought iron fence have been completed. The process is quite complex and time-consuming, but the result is definitely worth it.
Metal and wrought iron fences
Good luck!