Primrose is one of the first spring flowers, a herbaceous perennial of the Primrose family. The genus Primula includes about 500 species. And every year new varieties appear that decorate the areas of ornamental plant lovers.
How to grow primrose from seeds, what is the peculiarity of sowing and picking, how to care for plants during the growing season - Natalya Konstantinova , a passionate gardener from the Moscow region, will tell you about this.
Natalya Konstantinova is a breeder of ornamental plants, the author of a blog dedicated to growing popular perennial flowers. Articles by Natalya Konstantinova can be found in the magazines “Vestnik Florist”, “Kitka” and other publications, as well as on websites and forums of flower growers.
Every year I sow primroses for breeding purposes. I tried many different ways to grow seedlings. For myself, I long ago decided on the simplest and most reliable method of cultivation, which I want to share with those who are just mastering this science.
On the Internet you can find many tips for growing primroses from seeds. Sometimes such information is contradictory, since each grower has his own experience, which is not always suitable for all types of primroses. In addition, it often happens that certain manipulations with seeds and crops are carried out with amazing persistence, and it does not occur to any gardener that such “procedures” are completely unnecessary: for example, the notorious cold stratification, in which most primrose seeds, especially hybrid origin are not needed at all.
In this article I will share my experience in growing the most common and popular primroses: polyantha (P. polyantha), hybrids of high primrose (P. elatior hybrids), stemless (P. acaulis), Siebold primrose (P. sieboldii), auricula primrose (P . auricula), etc.
How to store primrose seeds
All my primrose seeds are fresh, collected last season. And if you are going to sow them in the spring of the current season, then you can store them at room temperature in a closed container. If you are going to store the seeds longer, then the best option is a refrigerator or even a freezer. Most often, gardeners store primrose seeds on the refrigerator door, packaged in regular bags with a clip-fastener or in a jar with a tightly closed lid. I just want to add that I have experience storing primrose auricula seeds at room temperature for 4 years, and they retained almost 100% germination. The photo shows the same seeds sown on a cotton pad for the experiment.
What plants does it go with?
Fine-toothed primrose from seeds in landscape design is usually used in combination with other crops. The best neighbors for him when growing are:
- low, densely leafy shrubs;
- conifers;
- violets and bluebells;
- hosts;
- milkweed;
- daffodils;
- ground cover phlox.
Primroses are grown in flower beds and borders, in rocky gardens and on alpine hills.
Moisture-loving fine-toothed primrose suitable for planting near streams and ponds
Timing for sowing primroses
At home, primroses, as a rule, begin to germinate in late winter - early spring: February-March. If there is artificial supplementary lighting and an appropriate temperature regime (preferably no higher than 18°C), then you can sow earlier.
Experienced gardeners begin to germinate seeds at home, starting in October-November. In this case, primrose seedlings usually bloom earlier than those sown in late winter - early spring. Often in the spring of the current season, seedlings sown in autumn bloom for the first time. But do not forget that primrose seedlings, although small, grow quite quickly; by the beginning of the summer season there may not be enough space on window sills and glazed balconies. However, with such early seed germination, other problems may arise.
Personally, I prefer to take my time and start sowing primroses at home no earlier than early to mid-February or early March. Primroses sown during these periods usually bloom in the spring of the next season (i.e., next year). Sometimes seedlings bloom in late summer or autumn in the year of sowing. With such sowing dates, artificial additional lighting will not be needed. The compact maintenance of seedlings and the natural stimulus of spring awakening noticeably speed up the process of growing primroses.
I don't use the lunar calendar. I tried it and didn’t notice the promised effect. However, I will not say that astrological agricultural techniques are completely useless. This requires comparative experiments and convincing evidence, which I simply do not have enough time for.
You can sow primroses in open ground as soon as the snow melts. It is best to do this in a container (in a pot), which is dug into the ground. In this case, you need to ensure that the soil surface does not dry out, that it is not washed away by rain, and that the crops are not damaged by domestic animals. Buried primrose seedlings usually bloom the following spring.
Spring shoots of primrose
In summer, primroses are sown in open ground when the seeds on the peduncles are ripe. If the seeds are purchased, then sowing is possible throughout the summer (June, July, August). In this case, you need a lot of seeds: not all seedlings will survive in summer conditions, when the soil surface often dries out, which is detrimental to young seedlings. With such sowing dates, primrose seedlings usually bloom in the spring of the next season.
Often in the summer (if the flower stalks with seed pods are not removed in time), primroses self-sow. This once again proves that the seeds of many primroses do not need cold stratification, but germinate at positive temperatures without any problems. Surprisingly, most summer primrose seedlings tolerate wintering well and emerge from the snow in spring in excellent condition, as if there had been no winter at all.
Summer self-seeding of polyanthus primrose
In the fall, as soon as the soil begins to freeze, at the end of October - beginning of November, you can also sow primroses in open ground. At such a time, the seeds of those primroses that need cold stratification are usually sown, or the grower does not want to waste time on sowing primroses at home in the winter-spring period. The germination percentage is high - in spring there are excellent conditions for germination: humid, there are practically no dry periods, the temperature is not too high, etc. With such sowing dates, primrose seedlings usually bloom in the spring of the next season. I will only add that, as a rule, seeds that are quite large in size are sown in open ground (polyanthus, stemless, tall primrose hybrids, etc.), and, again, a lot of seeds will be needed, because in open ground there is a high risk of force majeure.
Types and varieties
Fine-toothed primrose is represented by numerous decorative varieties. Several of them are especially popular among gardeners.
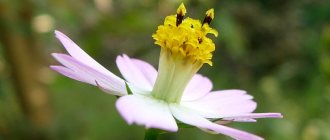
Alba
The frost-resistant, shade-loving variety blooms in April with small white buds up to 1.5 cm wide. The flowers are collected in dense capitate panicles at the tops of the shoots.
Primrose Alba blooms for about a month.
Rubra
The herbaceous plant rises up to 25 cm above the ground. The leaves of the variety are heavily wrinkled, petioled, large and wide. Small red flowers are collected in capitate panicles.
Primula Rubra loves high humidity and moderate lighting
Rubin
The fine-toothed variety begins to bloom in April or early May. The buds of the plant are ruby in color and very bright. Collected in inflorescences up to 6 cm wide, due to which the variety looks quite impressive during the decorative period.
Primula Rubin grows up to 30 cm
Lilac
A low variety up to 25 cm is distinguished by unusual flowering. Its buds are light, lilac-bluish, delicate in color. They appear on shoots earlier than the standard period - already at the end of March or at the beginning of April.
Frost-resistant primrose Lilac tolerates cold temperatures down to -25 ° C
Violet
A perennial plant up to 30 cm tall, it has spherical dense panicles of a purple hue. It blooms in April, the decorative nature of the buds is emphasized by jagged, wrinkled leaves of dark green color.
The flowering of Primrose Violet ends towards mid-summer
Glass beads
The variety is sold as a mixture of seeds and blooms with red, white and purple buds. The height usually does not rise more than 30 cm.
The Bugle variety has particularly thick and dense foliage.
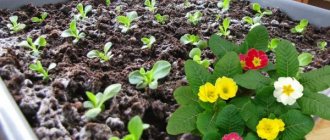
Soil for growing primrose seedlings
For growing seedlings, ordinary store-bought soil is suitable, but preferably from well-known manufacturing companies that are conscientious about the composition and quality of soil mixtures. Of course, you can use your own homemade soil mixture, but it must be disinfected and have a neutral or slightly acidic reaction. Ready-made soils contain a lot of nutrients, which can be detrimental to them at the initial stage of seedling development.
For successful seed germination, you need loose, granular soil, which for a long time retains the air needed by the thin, delicate roots of the seedlings. In soil rich in organic matter, without loosening substrates, after several waterings the air will be displaced and the roots of the seedlings will begin to rot. Therefore, before sowing primroses, it is advisable to add agroperlite and vermiculite to the prepared soil to improve the quality characteristics of the soil mixture. Good seed germination and active development of seedlings depend on this.
Perlite is a rock of volcanic origin. It loosens the soil well and helps moisture to be distributed evenly. Flower shops sell agroperlite. But if you buy perlite outside the flower environment, it is better to clarify that it is agroperlite that you need. Otherwise, you may end up with construction or filter perlite.
By using perlite in the earthen mixture, a water-air balance is established, caking and compaction of the earthen coma is prevented. Also, the addition of perlite provides the necessary drainage, seedlings develop better, their root system does not suffer from “suffocation” and is perfectly aerated.
Vermiculite is also often used in the preparation of earthen mixtures. With the addition of vermiculite, a crust does not form on the surface of the earth mixture and the soil does not cake. In addition, vermiculite protects the root system from temperature changes, and this is very important in winter when crops are on windowsills. Also, using vermiculite, you can reduce the acidity of the earth mixture, which stops the process of soil salinization due to frequent watering. Vermiculite perfectly absorbs, retains moisture and gradually releases it to plants. Therefore, if we add it to the soil, we can water the seedlings less often. Vermiculite usually comes in different fractions and shades on sale. Any type is suitable for sowing primrose seeds.
For sowing seeds, perlite and vermiculite are used together in equal proportions. When used together, their shortcomings are compensated. A mixture of perlite and vermiculite is added to the soil from 20 to 50%, depending on the size of the seeds: the smaller they are, the higher the percentage of baking powder. Some gardeners, instead of perlite and vermiculite, add chopped sphagnum moss or coarse river sand (well washed and disinfected) to the soil. I prefer perlite and vermiculite. These modern and popular soil improvers are affordable, easy to use and do not require additional disinfection. Sometimes gardeners sow primrose seeds in gel or peat tablets. I tried these methods of growing seedlings, but came to the conclusion that they are less convenient and have their own disadvantages. However, I will not argue with those who grow primroses in peat tablets, gels, cotton pads, sponges for washing dishes, etc., because everyone decides for themselves what is more convenient for them.
So, fill the sowing container with soil:
If the seeds are very small, like Siebold’s primrose or auricula primrose, additionally sprinkle the surface with vermiculite: a layer of no more than 0.5 cm.
If there is no perlite and vermiculite, the surface of the soil mixture can be sprinkled with a thin layer of river sand (clean and disinfected).
Diseases and pests
If there is insufficient care during the growing process, fine-toothed primrose from seeds on the site may suffer from fungal diseases and parasites. The danger for her is:
Rot forms against the background of excessive watering when growing rot - brown or grayish spots appear on the flowers and stems of the crop, the plant gradually withers;- spotting - dark marks appear on the plates, over time the flower turns brown and dries out;
For symptoms of spotting, fine-toothed primrose is sprayed with Fitosporin - nematodes - a soil parasite that attacks the roots of primroses, swellings and growths appear on them;
It is impossible to cure the nematode; the affected primrose is destroyed and the soil is disinfected with formaldehyde - spider mite - a pest that attacks plants in hot, dry weather; cobwebs on the leaves allow you to recognize its presence.
Spraying with plain water can prevent the appearance of spider mites during cultivation.
For most fungi, copper preparations - Bordeaux mixture, Fitosporin and others - have a good therapeutic effect. Homemade soap solution and garlic or onion infusions help eliminate pests.
Sowing seeds
We pour the soil mixture in the containers well with water so that excess moisture flows out of the drainage holes. In order not to wash out the layer, you can spill the substrate from a sprinkler, carefully wetting the vermiculite until the substrate in the container is completely moistened. After this, we take out the primrose seeds and pour them onto a regular napkin. If there are a lot of seeds, then sow on the surface of the soil directly from a napkin folded in half. If there are few seeds, then you can use a regular toothpick, first moistening its tip, which is convenient for catching seeds from a napkin. We spread the seeds over the surface, lightly pressing them into the substrate.
The sown seeds are moistened with a sprinkler. It is advisable to add a solution of Maxim or Vitaros fungicide to the sprayer container. Even if your soil mixture is disinfected, there may be mold spores on the surface of the seeds. Using a solution of these fungicides, you can avoid the appearance of mold on the soil surface at the beginning of germination. Treated crops are covered with a transparent lid or film.
Primrose crops are kept at a temperature of 12-18°C. This is an average ideal temperature and may vary depending on the type of primrose you are growing from seed. At higher constant temperatures (above 25°C), most primrose seeds will germinate more slowly and may even die. As one of my friends said: “Primroses are not heat-loving tomatoes.” Therefore, the advice: placing jars with primrose seedings on radiators or keeping them at temperatures above 22-25°C are useless and in some cases even harmful.
At lower temperatures (below 10°C), seed germination is inhibited. Day/night temperature fluctuations only have a positive effect on seed germination, because bring them as close as possible to the natural conditions of germination in nature. But, unfortunately, it is difficult to create such a temperature environment in room conditions. Do not rush to place containers with crops in the refrigerator or under the snow. Seeds of hybrid primroses do not need cold stratification, as amateurs often mistakenly believe. Only certain types of wild primroses require germination with stage-by-stage cold stratification. But, as a rule, amateurs rarely grow such primroses from seeds, mainly only experienced collectors and breeders. Cold stratification does not have a positive effect on the germination of hybrid primrose seeds. If primrose seeds are initially of poor quality, then nothing will help them.
Determining on your own which seeds of wild primroses germinate only with stratification is quite simple: if after 30-40 days fresh and high-quality primrose seeds have not sprouted at a temperature of 12-18°C, then the crops are placed in a refrigerator at a temperature of 0-5°C (or buried in snow) for a month or two for cold stratification. And only then they germinate again at a temperature of 12-18°C.
I do not recommend pre-sowing seed treatment with any stimulants or fertilizers. Unfortunately, such biostimulants do not always have a positive effect on seed germination. More often the opposite happens: after treatment, the seeds germinate worse. You need to know the exact proportions of solutions and the degree of influence of the biostimulator on a particular type of seed. Sometimes it happens that all of the above conditions are strictly met, but fresh primrose seeds do not germinate at all or only a small part of them germinate. From personal experience I will say that the seeds of individual primroses usually behave this way, which, due to some of their individual characteristics, have a very low percentage of seed germination. And there’s nothing you can do about it: you have to put up with it.
I will only add that sometimes the seeds of such primroses germinate within a year or even after 2-3 years. I assume that some capricious primroses inherited this feature from their distant wild ancestors. As you know, the seeds of many wild primroses have such an amazing ability: their seeds do not germinate all at once, but germinate in stages: only some of the seeds germinate annually, the rest simply wait their turn and germinate in separate groups over several years. This distinctive characteristic of wild plants allows them to survive difficult climatic periods; and if in some year the plants died from drought, severe frosts, heavy rainfall, etc. force majeure circumstances, then the seeds preserved in the soil will certainly germinate in a few years.
Selection of planting material
Of all the options, propagating primrose by seeds is the most labor-intensive and time-consuming method. However, if you go through it to the end, the end result is a strong and healthy plant that will easily tolerate relocation to open ground, and will delight you with bright flowering in the flowerbed for the next ten years. Proper selection of seeds for planting is the key to successful cultivation; take this task responsibly.
Remember the rule - the older the seed, the longer you will wait for it to sprout.
If you want confidence in the quality of planting material, collect primrose seeds with your own hands. Even with proper organization of storage of primrose seeds in winter, next season the seed germination rate will drop to 60%. Collect primrose seeds together with the seed box. After collection, place the boxes in a dark place for the material to ripen. Monitor the air temperature in the room: at temperatures above +20 degrees, the seeds will die.
Seed certification
The artificial creation of natural conditions for plant growth is called stratification. The method is that the seeds are first allowed to swell and then placed in the cold, simulating their presence in the ground under the snow. Thanks to this method, the seeds will sprout on time and will be transplanted into open ground as already grown seedlings.
I will describe several ways to stratify primrose seeds:
- Keep the primrose seeds on a warm windowsill for several days, then place them in a plastic bag in the ground and place them in the refrigerator or freezer. Moisten the soil periodically. After the sprouts appear, plant the seedlings in separate pots on the windowsill, avoiding open sunlight.
- Treat the seeds with a solution of potassium permanganate and soak in water for a day. Place the seeds in peat tablets, cover with plastic wrap and place in a cool place. Keep the soil moist. Remove the film after sprouts appear on the surface of the peat.
Place the dish sponge in the tray and fill the tray with water. Sprinkle primrose seeds onto a sponge in a thin layer. Send the sponge along with the tray to a cool place. After the sprouts appear, plant the seeds in the ground.
How to care for crops
Typically, containers with crops are kept on window sills. In winter, it is ideal to grow primrose seedlings in well-lit windows. But direct sunlight should not fall on the microgreenhouse. However, in winter there are not often sunny days, and the sun is not as bright as in spring and summer. As long as there are no green shoots on the soil surface, direct sunlight is not a big problem. As soon as the seedlings appear, shading from the bright sun is a must!
As soon as the seeds begin to germinate, we begin to carefully monitor the humidity on the surface of the soil: it should not dry out, but it should not be too wet. Sometimes, in order to create sufficient moisture for the crops, it is necessary to treat the inside surface of the transparent cover with water from a sprinkler. Watering should be done very carefully and moderately while the seedlings are small. As soon as they begin to grow, you need to water abundantly only as needed. Typically, gardeners use a sprinkler with a very fine spray of water for watering or water the seedlings from a syringe without a needle.
After the emergence of seedlings, you need to constantly open and ventilate the crops and make sure that the soil is moist, but not wet! Otherwise, the seedlings will rot instantly. You need to completely remove the transparent cover or film when the seedlings have 1-2 true leaves. And you need to remove the cover gradually. If mold appears on the surface, then dust the soil with ordinary river sand (well washed and disinfected). You can buy it in flower shops or prepare it yourself.
You can also fight mold with a solution of Maxim or Vitaros by carefully treating the surface of the soil with a syringe. Make sure that after treating with fungicide the soil in the bowl is not too wet.
Fifth rule. Features of picking
When each seedling has a pair of true leaves, the first picking is carried out to stimulate the development of a fibrous root system. At the same time, each plant is given its own separate glass with a volume of about 50 ml. And it is important to emphasize that for starting picking you must use tweezers and a toothpick as an auxiliary tool, since by hand there is a high risk of damaging delicate plants.
After 30 days, the time comes for the second picking, transplanting into containers with a volume of 200-300 ml, and this time it is not forbidden to carefully work with your hands.