And it all started as usual. Since ancient times, there has been a change house on the dacha plot, it doesn’t seem to be presentable, but there is a place to spend the night, store all sorts of dacha necessities, and hide from bad weather.
So it was decided to somehow cultivate the change house. Initially, plans were to add a veranda. But in the process, little by little, they built a country house, and then a terrace. It turned out pretty good. The most important thing is not to be afraid, and there are a lot of examples of such alterations, because it’s easier to start from at least some basis than from scratch.
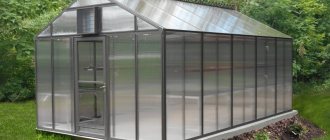
Country houses are built in small sizes. Their area often needs to be increased. If you are on a limited budget, adding a do-it-yourself extension to a shed is a good way out; it will definitely be more profitable than buying a new shed if you need to increase the utility space.
Design options
In a summer cottage there is not enough space for a hallway or dining room. There is a need to add a porch, terrace, veranda. These building options have different functional purposes.
Porch is a door area measuring 1–1.5 square meters. If you equip a hallway in the vestibule, more living space will appear in the change house.
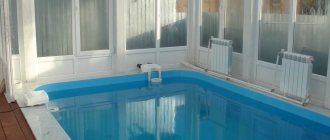
Veranda - covered glazed room, extension. Entrance to it is possible from the house or from the street. On the veranda they set up a summer kitchen or receive guests. If the room is insulated and heating devices are installed, then it can be used all year round.
Terrace is an open flooring for relaxation. It can be fenced with railings or have a canopy. The platform is used in the warm season; in winter it is not functional. In summer, garden furniture and sun loungers are placed here.
Need for construction resources
When starting construction, they independently make an estimate of tools and materials.
- timber 50x50 mm; 100x100 mm;
- board 25–40 mm thick.
Visible surfaces are made of planed wood.
- petrol or hand saw;
- drill;
- Bulgarian;
- screwdriver;
- and others.
The extension to the trailer with an iron frame is made of rolled metal. For the work you will need a welding machine.
Preparatory work
As with any construction, first of all you need a project or at least a sketch. You can find photos of canopies or drawings adapted for self-installation. Before starting work, you need to prepare tools and purchase building materials.
Tools you will need:
- Roulette 5 m.
- Level 1.5 – 2 m.
- Hammer with drills (for material).
- Self-tapping screws (if the structure has a wooden frame and polycarbonate, nails will do).
Construction stages
Construction work is being carried out in stages. I - preparation of the site and materials. II - construction of the foundation. III - construction of the floor, walls, roof, canopy.
Preparatory work
The floor level of the building is supposed to be horizontal.
To remove the extreme points of the structure without distortions, you will need:
A regular rectangle and a square have equal diagonals.
The area for the extension is cleared of the top layer of soil. Select soil 20 cm deep. Cover with sand and crushed stone 10 cm thick with layer-by-layer tamping.
Foundation for an extension
The construction of a terrace is possible without a foundation on a prepared crushed stone base. Crushed stone is poured with cement mortar. Lags are laid from beams. They are protected from dampness with waterproofing mastic. The wooden frame is attached to the cabin with metal corners.
Ready-made blocks are placed under the porch and veranda or a tape fill is performed. Blocks are placed at the extreme points and in the middle. The column spacing is 2–3m.
To make a strip foundation, formwork is made from boards. The fill is made 30 cm wide, deepening it 50 cm into the ground. Concrete grade 150M is used. The foundation is reinforced with rods or meshes. After the concrete has hardened, frame beams are laid on it.
Basic structures of the extension
The installation of the frame continues upward. Vertical posts are placed on the lower beams, which are tied at the top. Then a pitched roof is made. After erecting the frame, they begin laying the floor and ceiling, sheathing and insulating the walls.
Construction of a simple canopy sheathing
First, you need to secure (dig it in and fill it with mortar, or you can even fill it with fragments of brick) in the designated place two main posts - opposite each other. This is done taking into account the level of slope of the site. Next, right angles are measured from the base posts using a marking rope, and then the posts of the right row are securely dug in, then the left ones.
Now is the time to arrange the first set of rafters - with screws on one post, then on the other (here you need an assistant, one cannot do it alone). You should get the first “entrance” arch from the racks and the rafters crowning them. Next - according to the “scheme”. But first, the last “exit” arch is assembled, and only then the two internal ones, the second and the third.
Projects
Country house expansion projects are limited only by the owner’s imagination.
The area is used advantageously when the veranda is attached to the cabin along the long side. In some bold projects, the veranda goes around the entire building. The garden shed is connected to the terrace according to the same principle.
The porch is attached to the change house from the entrance side.
Buildings can be oblong, square or round. A veranda, terrace, or circular porch will look unusual. The extension may have a forward projection in the form of a bay window.
A veranda attached to a one-story house is complemented by a roof. The roof of the general building is single or gable. The entrance to the veranda is mounted with sliding or hinged doors. Wooden, metal or glass doors are installed in the extension.
Terrace - open plank flooring, platform. Instead of a roof, a canopy is made over the site. The perimeter of the terrace is surrounded by railings or stairs.
Choosing a tent gazebo
Design Features
Gazebos and awnings for summer cottages produced by modern industry can have a variety of designs:
- The most expensive are the so-called closed canopies. They are frame devices with load-bearing elements made of steel profile pipes. An awning is stretched over the frame, which covers not only the roof, but also the walls.
- The advantages of such a system are obvious: the interior space is reliably protected from both the sun and precipitation. However, there are also disadvantages, because the fabric used to sew the protective cover does not allow air to pass through well. So in hot weather, the gazebo warms up quite quickly and it becomes very stuffy.
- Open canopies have a simpler design. Their frame is a roof frame mounted on metal supports. The frame is covered with a relatively small awning, which creates shade and provides minor protection from rain.
- The advantage of this solution is the low price and low weight of all materials (and this is important if we purchase a collapsible system for periodic transportation). As for the disadvantages, all you have to do is try to hide from the rain and wind under such a structure at least once, and you will understand everything yourself.
- Combined structures, in which the walls can rise under the roof, are also popular. Thus, in the heat, we get a simple canopy that protects from the sun, but if necessary, we can quickly lower all the canopies and protect ourselves from the rain.
Model with removable walls
Note! There is no need to talk about the tightness of such gazebos, but in most cases such protection from drops from side winds is quite sufficient.
- Gazebos-canopies
- Canopy gazebo for a summer residence
Material used
A variety of materials can be used to sew canopies, but among the options that provide the necessary waterproofness, the following can be distinguished:
- Tarpaulin . “A timeless classic” that has been used for a very long time. The structures turn out to be quite heavy, bulky, and besides, they do not look very attractive. Among the advantages of tarpaulin covers are good water resistance, relatively low price and high strength.
Note! For high-quality protection from rain, the tarpaulin should still be impregnated with special compounds. True, such impregnations impair breathability, so you have to make a choice.
- Polyvinyl chloride fabric . An alternative to tarpaulin, which in recent years has been actively used for mass production of gazebos, awnings, canopies, etc. It does not allow water to pass through, is lightweight, and the price is quite affordable. The main disadvantage is that it breaks quite easily and melts when exposed to high temperatures.
PVC based fabric
- As for other materials, such as thin tent fabric, they are used quite rarely for the manufacture of gazebos. Among the reasons are the high cost and difficulty in processing seams.
In addition to the basic materials, additional materials are also used in the manufacture of canopies:
- Transparent polymer inserts . They act as windows in closed gazebos and provide natural light. As a rule, they are glued into PVC fabric with mandatory stitching around the perimeter.
Note! It is possible to make a completely transparent awning for a gazebo from such material, but this is done quite rarely, because then it will not provide protection from the sun. But in greenhouse farming this technology is used very widely.
- Mosquito net . Made from artificial fibers, they provide ventilation under the canopy. They can be installed either as part of the wall (then the perimeter of the attachment point must be sealed with a special tape), or hung as a separate canopy.
- How to protect the gazebo from rain and wind?
- DIY tent
- DIY gazebo made of plastic pipes
Canopies over the terrace
The terrace is not insulated or sheathed from the inside; only a floor and a canopy are installed.
The latter is made from various materials:
The frame of the canopy is made of wood, metal or suspended on cables. Lightweight structures with supports can be folded if necessary.
The canopy can be made over the entire area of the terrace, or it can cover only part of it.
The design of extensions is varied. The article describes the main layout options. The type of construction is selected for the house, site and region of residence. The choice of construction remains with the owner.
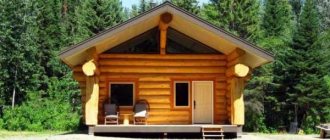
Having a comfortable cabin with a veranda at your dacha is no less important than building the house itself. Everyone knows that due to financial or other problems, the construction of private property sometimes takes many years, so all this time you will simply need to have a room for temporary residence, which, although smaller, will be practical and comfortable. Such a temporary structure for a summer residence can be either stationary or mobile (on a platform and wheels). It can be transported from place to place in a similar way, made angular (so that it takes up less space) or freely moved within the site if you need it.
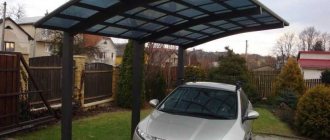
Wooden canopy for a summer residence
If the canopy will serve as part of the porch and it is attached to the house, then it is best to use wood. Wood is an environmentally friendly and safe material that is easy to process and does not require special construction skills. At the same time, it must be remembered that wood needs to be pre-treated with antiseptics and protective solutions to prolong its service life. To assemble the structure, nails or screws and metal corners are used. It is worth noting that to organize a canopy it is not necessary to use only wood, because it can be used to build a frame by covering the canopy with any convenient material (metal, polycarbonate or slate).
Features of country houses
The most versatile, affordable, ergonomic and popular among our compatriots are cabins measuring 6x3 m. Such generally accepted sizes are also important when you need to transport the cabin. In this case, no special documentation will be required to transport the structure along federal highways.
An even more comfortable option for temporary accommodation is a two-room cabin with a veranda. At the same time, over time, you can modify its design by making a storage room or bathhouse out of such a structure. The veranda in such projects can serve as a summer kitchen, hallway, or simply a resting place with sun loungers, a table or chairs located on it.
The roof in a cabin with a veranda can be single- or double-sloped and preferably connected to the rest of the building. Inside the house, the space is usually divided into 2-3 compartments. For example, this could be an entrance hall with a kitchen attached to it and 2 residential mini-rooms (living room and bedroom). This option is ideal for families with children, so that everyone has their own corner in the cabin.
It is thanks to partitions that you can create a special coziness inside and correctly not only zone the space, but also distribute the thermal energy inside the room. The simplest and most inexpensive option would be a plasterboard partition.
Features of the design and variety of its types
First of all, you need to decide on the place where the canopy will be located. After this, it’s worth thinking about the visual design, the functional purpose (there are movable variations of canopies).
Both types perform their tasks perfectly, but the stationary one is much more durable and stronger, but the mobile version has the main advantage of mobility. The mobile one is made of durable materials using a reinforced frame.
Sheds also differ in the type of placement. There are options where the canopy is attached to the house, as an element of the building and is special, and where the canopy is an independent structure.
The frame consists of many elements, but the foundation is the supporting pillars. They are made of metal, pipes, brick or wood. Some are made from concrete, but this method is quite long and inconvenient.
The roofing material is identical to conventional roofing: profile decking, tiles (ceramic or metal), polycarbonate. The only difference is that sheds do not use a flat roof.
Depending on what material was chosen, the installation time varies. So, for example, with brick pillars and ceramic tiles, the installation time will be about two weeks, and with pillars made of profile pipes and polycarbonate – several days.
Advantages of cabins
The undoubted advantages of garden cabins over other options for places for temporary residence include:
- versatility and multifunctionality (can be used for various purposes);
- ease of installation (for the construction of a cabin with a terrace, two skilled workers and several days of intensive work will be enough);
- affordable price (if cost is a priority, a metal shed is the most inexpensive option).
Variants of cabins
Modular cabins can be divided both according to their functional purpose (in this article we are considering a residential option) and according to the materials used in construction:
- metal (“trailer” or block container), covered with corrugated iron;
- wooden (made of timber frame, insulation and wooden cladding);
- combined (metal frame covered with board or plastic).
Advantages of wooden cabins:
- heat;
- environmental friendliness of the material;
- variety of designs and shapes;
- affordable price;
- strength and reliability.
The disadvantages include the possibility of fire and the need to care for the wooden surface. But these problems can be partially solved with the help of special impregnations and wood care products.
Advantages of metal cabins:
- durability and service life;
- ease of care;
- resistance to various external influences;
- possibility of covering with material at the request of the owners;
- reliable protection against vandals.
The only downside is that even with a layer of insulation in such a home it can be cold in winter and hot in summer. Therefore, this option should be chosen by those who do not spend too much time in the change house, but only occasionally use it for its intended purpose.
According to the method of collection, cabins can be divided into several types.
- Panel cabins are the fastest, easiest and cheapest way to erect such a structure. Such a change house is temporary and does not require a special foundation.
- Log cabins are the most reliable and warm, so they are suitable for use in northern regions. In fact, such a change house is a small, but very practical and functional country house.
- Frame cabins are assembled using a special technology, so you can live in them even in winter. This building is being created for long-term living. The inside of the building is covered with clapboard or chipboard, and clapboard is also used outside.
Brick canopy
If you need a gazebo-canopy, then you should think about building a more substantial structure. The ideal solution would be to use brick, because it is a reliable and durable material that can last for decades. Features of the construction work:
- First of all, you need to determine the location of the future canopy and prepare the area.
- A screed is poured on the prepared site, and a columnar foundation is poured at the locations of the supports, providing a solid foundation.
- The pillars are laid out of brick, after which a reinforced belt is prepared to create a roof.
- Construction of a rafter system using wood or metal.
- Roofing. The material covering the canopy can be either soft roofing (bitumen shingles) or polycarbonate. Slate, corrugated sheeting and metal tiles are also suitable for this.
How to build a shed with a veranda
If you decide to build a change house on your summer cottage yourself, first draw up a work plan (it can be found on the Internet from many manufacturers of change houses) and draw a preliminary drawing or sketch of the structure. The standard two-room cabin design has the shape of a “vest” with a hallway.
The presence of a veranda will add additional comfort to the structure. When determining a place for a change house, keep in mind that the distance between it and neighboring structures should be more than 3 meters.
The durability of the cabin depends on a reliable foundation (of course, if we are not talking about a mobile structure on wheels). If a standard strip foundation is not possible (for example, if the site is located on a slope), it would be better to use screw piles. In such a situation, do not forget about drainage, which will protect the site and the buildings on it from the destructive power of groundwater. Compacted gravel, sand and crushed stone are suitable for this. The most common type of foundation for such structures is columnar, it is made of concrete or brick.
The frame of the cabin is made of beams and is mounted from the corners, then it is the turn of the roof. The vertical beams along the facade are made higher, and the roofing itself will be supported on rafters connected by sheathing. At the same time, do not forget to drain the water.
The roofing covering is laid on top using bolts and screws. To make your roof reliable, practical and energy efficient, cover it with roofing iron and galvanized sheets, and you can insulate the roof with isospan. For those who do not like the sound of drops on an iron surface, we can recommend coating with soft ondulin.
Next comes the turn of insulating the walls and ceiling and installing windows and doors. Beams adjacent to the ground should be treated with an antiseptic to prevent exposure to fungus or insects. For the facade it is worth using roll insulation. And all sorts of cracks in the structure can be masked using polyurethane foam. These kind of cabins can be rented, contact us and they will definitely help you.
Do-it-yourself installation of an awning canopy
For a temporary version of the canopy, even a piece of polyethylene sleeve (7 x 3 m) in two layers, which can be stretched over the structure, aligned and secured under a synthetic parachute line using a furniture stapler, with 10 mm staples, is quite suitable.
But such an awning will protect people and equipment from rain, and not from sunlight. And it won’t withstand snow drifts, so in any case, this coating is for one season, no longer. If you need to design something more substantial, you will have to cut out an awning from special textiles.
Extension of a veranda to a change house
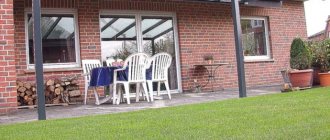
A veranda under the roof, attached to the side of the front door, will give you additional comfort in the summer, not only increasing the usable area and creating a pleasant shade in the heat, but also becoming a place for relaxation, drying clothes, a summer kitchen or even a place for a barbecue (don’t forget about fire safety measures). The main thing is to ensure a single foundation plane when planning such an extension.
To add a veranda to the shed you will need:
- boards 30 mm and 25 mm;
- timber 100x100 mm;
- roofing sheeting;
- fasteners;
- 4 adjustable supports;
- Building tools.
The foundation of the veranda should be laid together with the main foundation of the building. You can add a terrace later, the main thing is to firmly connect the 2 foundations. The blocks are installed in the same way and adjusted in height. The timber frame is securely attached to the shed with metal corners and screws. Check that the length of the diagonals of the veranda is the same.
The base of the terrace is made level, floor boards are laid, and the vertical supports are secured with jibs. Keep in mind that the roof will be sloping with a difference of 10 cm. The top trim is made of timber, rafters and sheathing are installed, and corrugated sheeting is secured under the roof. Railings are made at a height of approximately 90 cm from the floor level. And all kinds of decorative elements, for example, pilasters and balusters, will add beauty and originality to your veranda.
What wood to use for awnings
To create a roof you can use:
- Glued and profiled timber.
- Logs.
- Beam.
- Thin boards 15-40 mm, plywood sheet.
- Trunks of woody plants.
- Lining, block house, boards, panels.
Important! A canopy made of timber, trunks, or logs goes well with stones, concrete mix, metal, and polycarbonate. These materials help make the structure more beautiful and elegant.
Additional equipment
You can supply water by connecting to a centralized water supply or using an autonomous structure. To install the wiring, you should definitely hire a professional electrician so as not to risk your safety. Among the “benefits of civilization” that you will probably need in temporary housing, you can also use a toilet, shower, sewerage, and air conditioning.
You can cook food on an electric stove or use gas from cylinders. Likewise, with properly organized installation work, you can live comfortably in a cabin with a veranda all year round.
How to assemble a finished structure
Think carefully about the purposes for which the gazebo will be used and under what conditions. The correct selection of material will determine the service life of the fabric. Having decided on the material, you can begin to consider the installation diagram. A simplified assembly technology can be considered screw. When laying the center counterweight on the ground, there should be a thread in the middle for screwing on the tent. Therefore, there is a need to install a reliable awning structure. It is better to give preference to models with metal bases and brackets. The sequence of assembling the awning structure is as follows:
- A suitable location is determined. The durability and functionality of the tent depends on the location of the main structure, the tension angle and other small details.
- Prepare the area for the installation of a gazebo-tent. If the awning is not mounted directly on the ground, then install bases.
- Assemble the support posts.
- Adjust their alignment. Make sure the support legs are stable.
- Install the roof base.
- Make sure all frame elements are stable.
- Stretch the awning cover.
- Correctly adjust the angle tension and force. The effectiveness of the protective awning will depend on this.
Don't forget about the assembly instructions for this object
Adviсe
A do-it-yourself cabin is a practical, inexpensive home that doesn't have to be temporary until you build a home on the property. It may well come in handy after this as a residential or auxiliary space, for example, a bathhouse or utility room. You can choose for yourself whether it is worth buying a ready-made cabin from a construction company or whether it is better to build it yourself.
If you want to purchase a ready-made version, it is cheaper to buy the structure directly from the manufacturer rather than in construction stores. Before making a purchase, be sure to discuss in advance all the nuances regarding the type of materials used in construction, as well as sizes, type of glazing, installation details and payment. It is quite possible that they will bring you a finished product, since it is assembled in special hangars. Builders, at the request of the customer, can install the structure on your site.
And if you decide not to rush and make a change house with a veranda with your own hands, choose the two-room option. This type of cabin is as comfortable as possible. It will be an excellent place to relax after a working day at the dacha.
If you arrange such a “nest” comfortably, then you probably won’t even notice the difference between it and a full-fledged home.
To learn how to build a shed with your own hands, watch the following video.
What can be attached to a country trailer
Let’s immediately make a reservation that if the trailer is installed on a wheeled chassis, then it must be removed from the frame and placed on the ground, having previously prepared a pedestal made of wood or a foundation.
Important!
We recommend using a foundation slab as the base, which will evenly absorb the entire mass of the change house and also protect the floor from growing into the ground and freezing.
The most ideal option for an additional extension is a second trailer, identical or worse in quality with a smaller area. The trailer is designed and manufactured by the factory for comfortable living in field conditions - this is the key to the quality and convenience of the future additional structure. But, if the second trailer is not available, then you can make a room from the following materials:
- Brick or various blocks: foam blocks, aerated concrete, cinder blocks, adobe bricks.
- Wood: boards, beams, panels.
Important!
If wooden or siding panels are used for construction, they are mounted on a durable frame, and then provide thermal and water insulation.
What type of veranda or terrace to choose
All verandas or terraces in the construction plan are the same structures: square or rectangular. Sometimes, following various trends in construction fashion, the owner wants to build a rounded or corner room, but the main thing that distinguishes verandas from each other is the architectural design. It includes - interior design, number of windows, roof type.