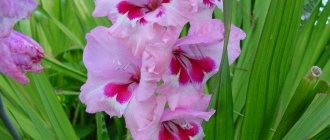
This regal plant does not often decorate flower beds - the inflorescences quickly lose their appearance and become sloppy, but for cutting it is unrivaled. This is precisely why gladioli are most often grown. This is a corm-like perennial plant native to the African subtropics. Over several centuries of breeding work, many varieties have been developed that are striking in color and size. But gladiolus did not learn to winter in our conditions.
Bulbs that renew themselves annually need to be dug up. Proper storage of gladioli will allow you to admire their flowers next year. To make it lush, you need to provide suitable conditions for storing gladioli bulbs in the winter in an apartment or cellar, carry out treatments against diseases and pests, and dry the planting material well. Its humidity should not exceed 14%.
Timing of preparation for winter of gladioli
Preparation of gladioli for winter begins at the end of summer, when the plant is still in the active flowering stage. To achieve full ripening of the bulbs, the flower stalks must be cut off before they form seeds.
When cutting gladioli for bouquets, you need to leave more leaves on the bush. No more than 50 days should pass from the moment the flower stalks are cut until the bulbs are fully ripened. If left until the leaves have completely yellowed, the bulbs may be susceptible to attack by pests. The plant may get sick and die in winter.
You need to monitor the plant; if a month after flowering it begins to turn yellow, we can talk about the development of the disease. Such flowers should be removed from the garden area. Gladioli are dug up sequentially: first, early, then later varieties.
How to dig up bulbs
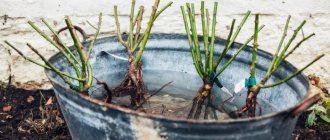
Before the onset of cold weather, it is necessary to dig up gladioli for the winter. Do not delay digging, since the bulbs are very sensitive, they can deteriorate even with a slight cold snap. Frozen bulbs become useless for further planting. Most often, they start digging flower bulbs in mid-October. You will need a shovel, or better yet, a pitchfork. Manipulations can only be carried out in dry weather.
The gladiolus bush is carefully pulled out of the ground, the soil is shaken off, and the foliage is trimmed. All work must be carried out quickly, since moisture evaporates through the leaves, the bulb will lose it and dry out during storage. Also, pest larvae may remain in the foliage; they should not be allowed to move to the bulbs. If pests are noticed, the leaves are removed with pruning shears and the bulbs are dried in the sun for a week.
How to prepare gladioli bulbs? After digging, the bulbs are sorted, removing diseased and damaged specimens. Some gardeners throw away such bulbs without regret, but they can be revived, especially if we are talking about a rare variety. To do this, it is worth trimming the damaged areas with a sharp knife and then treating them with a solution of potassium permanganate.
The stem of the bulb must be trimmed well so that the remaining stump is no more than a centimeter, otherwise the risk of thrips multiplication increases. The roots and main bulb are removed from an adult tuber. For young tubers, only the roots are removed. Then the planting material is placed in warm water, this will remove adhering soil. After this, the bulbs are placed in a solution of potassium permanganate for 20 minutes.
Cleaning rules
You should start harvesting gladioli in the fall when the night air temperature is below +10 0 C. The removal of corms begins by dismantling the pegs and binding material. To do this you will need a shovel or a pitchfork. The tool should be inserted into the ground vertically. With inclined input there is a greater risk of tuber damage.
It is necessary to remove the plant from the ground along with its green foliage.
Where does cleaning begin:
- Using a shovel or pitchfork, carefully lift the layer of soil at a distance of about 7 cm from the plant.
- Grasp the stem with your hand and carefully pull it out of the ground. Place in prepared place. Do not forcefully pull out the plant, so as not to harm the seed material.
- Check to see if there are any small onions left in the hole.
The stems should be removed immediately after harvesting. Because the moisture accumulated in the tuber will evaporate through the leaves. During the growing season, useful substances have accumulated in the bulb, which will evaporate with moisture. By spring, such planting material will be lethargic and become unusable.
There are two ways to remove the stem:
- Carefully break off the stem with your hands.
- Trim with garden shears.
After removal, the corms are cleaned of adhering soil, washed in water, and dried.
The mother bulb should be carefully removed so as not to damage it. You need to trim the roots through which moisture will evaporate. Specimens that are damaged or have a wide bottom are not left for storage.
For bulbs grown from buds, there is no need to completely remove the roots, just trim them a little. The largest ones are selected for storage. They are better preserved and bloom earlier.
How to dry onions
After processing, the bulbs need to be dried.
- First they are dried at a temperature of about 27°C for 14 days.
- Then you need to move the tubers to a place where the temperature remains around 22°C for a month.
The quality of the planting material depends on how competently the drying was carried out. If the bulbs are not dried thoroughly, mold may develop. Flower growers still cannot come to a consensus on whether it is worth removing tuber scales. Some believe that an infection develops under the scales, but experienced gardeners say that the bulbs will remain healthy and scaled if they are well dried.
To repel pests, you can place garlic cloves next to the tubers. You can sprinkle the planting material with mothballs, this will also help prevent infectious diseases.
Gladioli bulbs are protected by scales from drying out. It is convenient to store the bulbs by dipping them in melted paraffin. A layer of paraffin will protect the tubers from mold and prevent them from drying out. And when landing it will not interfere.
How to store tubers in an apartment
You can store flower tubers in an ordinary apartment, but you need to create certain conditions. The apartment has many suitable storage spaces:
- Loggia, if it is glazed.
- Balcony opening.
- Pantry without heating.
- Place by the front door.
To avoid drying out, you need to pour dry sand into a plastic bag and place the bulbs there. They need constant ventilation to prevent mold from appearing. If traces of it are found, you need to remove the affected areas and treat the sections with potassium permanganate. The remaining onions are treated with Fundazol solution and must be transferred to another bag.
But what if there are a lot of bulbs? The tubers, wrapped in newspaper, are placed in a single layer in cardboard boxes. It is recommended to store gladioli in winter away from heating, where it is always cool.
Storage at home
It is necessary to choose a place where the temperature does not fall below 0°C, but does not exceed 20°C. After processing, the bulbs are placed in a box, holes need to be made in it. If the right temperature and humidity are maintained, the bulbs can be stored for up to two years in the basement. Instead of the basement, you can put the box in the pantry.
You can also use old nylon stockings in which gladioli tubers are placed. The stockings are then hung on hooks. Inspect the bulbs regularly to ensure they are not dry or damaged.
You can also store bulbs in the attic of a private house, only if it is heated. The corms are placed in a box, which is placed closer to the pipe.
Possible storage problems
Most often they are associated with latent diseases and non-compliance with temperature and humidity parameters during storage. The reason may also be improper preparation of planting material - insufficient drying time, not treated against thrips and diseases.
- Under-dried onions. They can get botrythiosis - spots that are light brown in color. Diseased bulbs will have to be thrown away, and the rest will have to be treated with a fungicide and dried.
- Gray-green mold is how the penicillum fungus manifests itself. The reason and actions are the same as in the previous case.
- The bulbs dry out a lot. Too high a temperature is to blame. Perhaps the planting material simply did not have time to mature. Unripe bulbs are waxed.
- Thrips were observed on the planting material. They are fought by keeping the bulbs for 30 minutes in a solution of “Inta-vir” or “Tseneba”. Three days of drying will be required.
- Germination too early. High humidity and temperature are to blame for this. The bulbs are emerging from dormancy and preparing for the growing season. Reduce the temperature to 1 degree Celsius to slow down the process and reduce air humidity.
- The bulbs are softening - the temperature is too low, they are simply frozen.
In order to detect problems in time, a regular inspection of planting material is carried out - at least once a month, and if signs of diseases have already been identified, then more often.
Share
Autumn care for gladioli
Caring for gladioli in the fall includes the following steps:
- fertilizing flowers;
- proper watering;
- pruning activities;
- digging up bulbs;
- sorting;
- pest control;
- drying;
- storage.
Feeding activities
Feeding throughout the entire growing and flowering season will help prepare gladioli for winter. Closer to autumn, all feeding activities are gradually stopped. After the second leaf appears, ammonia or potassium nitrate is used. Gladioli also respond well to potassium sulfate or urea solution at the rate of 15 g per 0.5 bucket of warmed water. This fertilizer is enough for 0.5 m2 of planting.
The second stage of feeding is carried out after the flower produces its fourth leaf. The same compositions are used, supplemented with microfertilizer. Microfertilizers are diluted in accordance with the instructions for use.
The third stage of feeding is done after the appearance of the 5th or 6th leaf. The last stage should be carried out at the time when buds appear on the flowers. The soil is treated with nitrophoska in a ratio of 25 to 30 g per bucket of heated water.
The final stage is disinfection of the flower garden using a weak solution of potassium permanganate.
Autumn watering
It is important to water gladioli correctly. Caring for them in the fall and preparing for winter should be accompanied by a reduction in watering activities. Flowers require abundant irrigation in the spring, when they grow green mass and form buds. In summer, flowers are watered with warm, settled water at the rate of 10 to 15 liters per plant. In autumn, watering is reduced to once every two weeks. This is necessary so that the bulbs are well formed.
Pruning flower stalks
The main thing during the flowering period is to remove the flower stalks in time. They are removed before the seed pods begin to form. This will ensure full ripening of the bulbs. After flowering, the peduncle is immediately cut off, leaving the foliage. A flower that has withered will not spoil the appearance of the flower bed, and the bulbs will remain strong for the coming winter.
In summer, when cutting flowers for bouquets, leave as many leaves as possible. This is necessary for the further growth and development of gladioli. A month and a half after cutting the last flower, the bulbs will be fully formed and can be dug out of the ground.
Digging up gladioli bulbs
It is best to dig up bulbs in dry, sunny weather. You need to prepare containers and a place for storing them. Most often, bulbs are stored:
- in cardboard boxes;
- in cloth bags;
- in wooden boxes.
If you have different varieties of flowers planted on your site, you should prepare several separate containers for them. This will help avoid confusion during storage. You can also label each container.
You need to dig out the bulbs carefully, using a fork or shovel. The tool is buried in the ground as far as possible from the root system of the flower, with an indentation of 10 cm. After the root is dug, you need to pull the tuber by the foliage, pull it out of the soil and shake it off a little.
Sorting process
Careful sorting of the bulbs after digging will help to properly prepare gladioli for winter. First, damaged and spoiled material is set aside and thrown away. Tiny bulbs may remain on lumps of earth that need to be preserved. The stems that remain after removing the material from the soil are cut to 2-5 cm.
- dense, healthy, without signs of disease;
- the best material is round bulbs;
- maximum age of the material is 4 years;
- Small bulbs should not have damage to their scales.
If during sorting you come across bulbs with a flat bottom, send them immediately to rejection.
Disinfection and pest control
At the end of the sorting process, the bulbs are thoroughly cleaned of soil and disinfected. First, they need to be washed in warm water and soap, then placed in a solution of potassium permanganate. The holding time of the material in the solution is from 30 to 40 minutes, at a liquid concentration of 1-2%.
Several drugs can also be used for disinfection. An ampoule of Maxim is dissolved in 2 liters of water, the treatment time will be half an hour. An ampoule of the drug “Decis” is dissolved in 5 liters of water, the processing time for a batch of material is 40 minutes. The bulbs are kept in the Fundazol solution for half an hour, after which they are treated with a solution of potassium permanganate or boric acid.
There is another processing option. It is carried out sequentially, in two solutions. First, 20 g of chlorophos is dissolved in a large bucket of water and the material is placed there for 20 minutes. 10 g of potassium permanganate is dissolved in another bucket and the bulbs are placed in it - immediately after treatment in chlorophos. The holding time is also 20 minutes. After double disinfection, the material is sent into water heated to 50C for 15-20 minutes. Some gardeners recommend keeping the bulbs in cold water to wash off any remaining disinfectant solutions.
Drying
Prepared gladioli need to be dried so that they do not rot. First, the material is dried at +28-30C for 7 days. After this, another stage of drying is carried out - at a temperature of +20C for 30 days. It is necessary to ensure full air circulation for the bulbs, spreading them out so that they do not come into contact with each other. Before drying, the material is covered with gauze.
If it is impossible to control the temperature in the room, it will take about two months to dry the material. After drying is completed, each adult onion is peeled. Do not clean small “babies”: they should not be left without covering scales.
Laying gladiolus bulbs for storage
All that remains is to properly place the material in containers and leave it to be stored until spring. All containers must be dry and well ventilated. In cardboard boxes, the material is laid out in one layer, excluding the bulbs from touching each other. After unfolding, they are covered with paper.
Paper bags are suitable for placing small “children” in them. Paper containers will also have to be opened for ventilation. Synthetic vegetable nets are suitable for storing large tubers. The good thing about nets is that the material constantly blows air.
Caring for gladioli in autumn in different regions
It is necessary to care for gladioli in different regions, focusing on the climate. They are dug out before the ground freezes completely, so that they do not freeze along with it. There's no need to rush either. If the material is dug up early, it will not ripen and will not germinate in the future.
In the north, tubers are dug up in early October, in the south - closer to mid-October. In Crimea and the Krasnodar Territory, frost-resistant types of flowers are not dug up, but are grown as perennials. They are protected from the cold with the help of spruce branches.
Some tips for flower growers
A few useful tips will help you preserve planting material until spring:
- Before storing, the tubers can be kept in warm paraffin and then cooled in cool water. This will help them retain moisture and avoid infection with fungal spores;
- each tuber must be wrapped in a sheet of paper and only then placed in a box;
- You can put a few garlic cloves in the box or sprinkle the material with ash. This will prevent drying out and prevent mold from appearing;
- do not try to save all the tubers “indiscriminately”. Weak and empty bulbs will not germinate, will rot and infect healthy material;
- When labeling containers, indicate the variety and color of gladiolus. Fresh tubers differ from each other, but during the drying process they will become the same, and they are distinguished only by their markings;
- By spring, the material dries out, so before planting it must be soaked in water and left for several hours.
Gladioli are wonderful flowers that require careful care. If you care for them properly, they will delight gardeners every year with their unusual beauty.
The popular gladiolus flower, also called the “skewer”, is found on almost every gardener’s garden. To achieve bright and abundant flowering, you need to properly care for them not only in the summer, but also provide them with decent autumn care. In this article we will tell you when to dig up gladioli in the fall and how to store them.
Many novice flower growers are wondering: is it necessary to dig up gladioli for the winter? The answer to this question is ambiguous.
In the southern regions in winter the temperature rarely drops below 0, so you don’t have to dig up the bulbs. In case of frost, it is enough to cover the plantings with any covering material: film, agrospan, etc.
The northern regions and central Russia are characterized by long and harsh winters. To prevent flower tubers from freezing and getting sick, they must be dug up.
- In the northern regions, gladioli are planted relatively late, sometimes the bulbs do not have time to ripen at all.
- In the middle zone, gladioli begin to be harvested in the second half of September. It is at this time that constant autumn frosts begin.
When and how to take it out after winter storage?
Gladiolus bulbs are taken out of the refrigerator thirty days before planting (the necessary period for the formation of full-fledged arrows and pecking of the bud).
Considering that it is recommended to plant bulbs when the air temperature in the morning reaches at least 10°C (beginning of May), it is necessary to remove flower tubers from the refrigerator no later than the beginning of April.
After removal from the refrigerator, each onion is freed from scales and sorted by size and appearance. Quality tubers are shiny, pale yellow or cream in color, with dense white root buds. Wrinkled, shriveled, and spotted bulbs are planted separately.
After the planting material has been sorted, the tubers are placed in boxes (in one layer), tops up . The box is placed in a dry, warm, dark place. After 2-3 weeks, when the dormant buds have hatched and reached at least 4 cm, the flower tubers can be planted in the ground.
Gladioli tubers planted in the ground immediately after refrigeration will take root, but you should not expect lush flowering from such plants.
When to dig up gladioli bulbs
Heat-loving gladioli must be dug up; they will not survive wintering in open ground. Due to low temperatures and excess soil moisture, the bulbs become sick and rot. Soil pests can also cause irreparable damage to tubers.
One of the determining factors for timely cleaning is air temperature. You can start digging up bulbs if the temperature drops below plus 5-10 degrees.
In early September, it is necessary to cut off the flower stalks of gladioli. There is no need to wait for all the flowers to bloom. Peduncles are cut when 1 or 2 lower flowers are open. A sharp knife is used to cut inflorescences. Cut at an angle so as not to touch the leaves. After two weeks, the plant bushes are dug up.
Depending on the variety
It is also important to pay attention to the time when the gladiolus finishes flowering. Different varieties have different flowering times, so it is very difficult to name the exact date when to dig up gladioli in the fall. Typically, harvesting begins if at least 30 days have passed after the end of flowering. During this period, the bulbs continue to ripen and gain strength for winter storage. Dig up plants while their leaves are green.
- First, early and middle varieties are dug up, then later ones, and those that were grown from children.
- First of all, you need to remove dark varieties of plants - red, burgundy, purple and black. They are the ones who are more susceptible to various diseases than others.
- Young and non-flowering plants require more time for their bulbs to mature well. They are dug up after harvesting the remaining tubers. The flower arrow of young gladioli usually appears at the end of August.
It is better to dig up the bulbs when they are slightly unripe. This will help you select the rhizomes along with all the children. When dug up, corms that are too mature may crumble and the fallen children will be very difficult to find in the soil.
There are species of gladioli that are left to overwinter in the soil. Among them is the imbricated gladiolus, which successfully winters in open ground and does not need to be dug up. However, it is very rarely found on sale.
Many experienced gardeners believe that the best time to dig up gladiolus bulbs is when the potatoes have already been harvested, but the cabbage has not yet been harvested.
Depending on the region
In each area, the timing of when to dig up gladioli in the fall will vary. The basic rule is that the corm fully ripens 35-50 days after the plant blooms.
Selection of quality corms
Bulbs of each variety need to be further sorted to get rid of material with signs of rot or drying out. At the same time, the dug up children are also sorted; bulbs that are too small will not survive the winter. Their minimum size should be at least 6–8 mm.
In this case, only babies that have covering scales will be stored well. It is better to throw away old bulbs; they will no longer produce full blooms. Young large corms have a regular round shape, their diameter is usually equal to their height.
How to properly dig up gladioli - step-by-step instructions
A warm, sunny day is ideal for digging up gladioli. Then their further drying will take less time. To properly harvest gladioli, you will need a regular shovel or garden fork.
- At least 20 cm are removed from the stem; the forks are inserted vertically. Gently shaking them, lift the earthen ball with the bulbs to the surface. Place it on a tarpaulin without breaking it.
- When the soil on the roots of the gladiolus dries out a little, shake it off the corms. Separate the bulbs from each other and collect the baby. The stems are cut at a height of 5 cm from the bulb. Sick and old tubers are thrown away.
- To prevent diseases, gladioli are soaked in a solution of Fitosporin or a soda-salt solution (5 tablespoons of baking soda and a glass of salt per 10 liters of water).
- They are sorted by grade and size.
- After drying, the corms are stored in a cool and dry place (basement, not a damp cellar).
Useful videos from the Garden World website
Experts tell you how and when to dig up gladioli in the fall and how to store them.
Preparation
must be properly prepared before storing in the refrigerator
The dug up planting material is carefully sorted (only strong, dense tubers without signs of rot or other damage are selected).- The sorted tubers are dried.
To do this, planting material is folded in one layer into mesh boxes, after which it is sent to dry in a warm, dry place (the air temperature should not fall below +24°C). Drying lasts for at least forty days (at the end, the babies are removed from the tubers, the dried stem and roots are cut off). - The bulbs are dipped in a weak solution of manganese (a few granules per liter of water are enough) for thirty minutes, after which the tubers are sent to dry again for another week. Treating the bulbs with antiseptic solutions is a very important step; it helps preserve planting material during storage from fungal and bacterial infections.
Flower tubers prepared for storage must be immediately sorted into varieties so that in the spring, when planting, there is no confusion.
How to properly prepare gladioli bulbs for storage
Above we looked at when to dig up gladiolus in the fall, but there are several more important points. Preserving gladioli tubers until the new sowing period is quite difficult - they react very strongly to changes in temperature and humidity.
This task is quite doable if you follow some rules:
- Before storing the material for winter storage, it must be washed thoroughly with water and treated with a weak solution of potassium permanganate. Then the tubers are divided into varieties, placed in gauze bags and dipped in a special preparation (Maxim, Inta-vir, Khom).
- Next, the processed bulbs are laid out to dry. After four days they are transferred to wooden boxes with holes. Store boxes with bulbs in a room with a temperature of no more than 22 degrees.
How to store gladioli at home in winter
In the apartment
In a city apartment you can find quite good places for storing seed:
- in the vestibule or hallway. Each onion is wrapped in paper and placed in a plastic bag. The bag must have a sufficient number of holes.
- on a glassed-in loggia. Flower tubers are placed in one layer in boxes and placed on a raised platform. In severe frosts, the boxes are brought indoors and placed near the balcony door.
- on the windowsill
In a refrigerator
In the refrigerator, gladioli tubers can be stored in vegetable containers. Each tuber is wrapped in several layers of newspaper and placed in the appropriate compartment. It is imperative to control the humidity in the refrigerator. If mold appears on the tubers, they need to be dried again and the paper replaced. If the humidity is high, the newspaper needs to be changed at least once a month.
In the cellar
A cellar or basement is considered the most suitable for storing gladioli bulbs. Low temperatures and stable humidity make it possible to preserve the material almost without loss. The tubers are laid out in boxes, which are stacked on top of each other. This will help save space and ensure good air exchange.
It is not recommended to place fruits and vegetables near tubers; they can release large amounts of moisture. This may lead to mold growth. If mold appears, the tubers need to be sorted out, dried and replaced with newspaper.
How to protect from pests and diseases
Thrips and other microorganisms can cause great damage to gladioli tubers. Thrips crawl under the husk and completely drink the juice from the corm. After this she dies. The following will help protect bulbs from pests and diseases:
- Garlic. In this case, chopped garlic cloves are placed in the boxes along with the tubers. When checking planting material, dried segments are replaced with fresh ones.
- Paraffin. The candle is melted; the wax should not be hot. To prevent the composition from hardening, place it in a water bath. Then each bulb is dipped in paraffin and then in water. This procedure will protect against moisture loss and external infection. The paraffin layer can subsequently be easily removed by hand. For an already infected bulb, such a procedure will not be life-saving.
If pests do appear, you can use the drug Zineb. The bulbs are immersed in it for 30 minutes, then dried well (about 2-3 days) in a ventilated room and stored again.
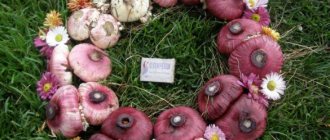
How to cull corms
Below in the photo we see a fully matured corm.
Signs of maturity of the gladiolus corm:
- Full-blooded root scales; the baby is “dressed” in scales.
- The scales of the baby are dense and dark.
- The baby is easily, without effort, separated from the corm.
During the growing season, one peduncle grows from the corm, and one young (replacement) corm with children is formed. Beginners often worry that they won't be able to figure out where the babies are and how to get them off.
Mariska Member of FORUMHOUSE
The children are impossible not to notice. Association: a large river mother mussel with a bunch of baby mussels clinging to the shell.
It happens that not one bud awakens in the corm, but two or three. In this case, two or three peduncles will grow and two or three replacement corms will form. In the spring, inspect each corm again, and if you notice that there is not one sprout, but two or three, leave the strongest one and break off the rest.
On average, corms of one gladiolus replacing each other live 3-4 years; Every year the corm becomes flatter, and its productivity and immunity decrease. It is because of this that old bulbs are discarded and burned, but unscrupulous sellers willingly slip them to newcomers. Unfortunately, it will not be possible to obtain a good, flowering plant from such a corm. When buying, look carefully, here are the signs of an old onion:
- it is flat;
- she has a wide bottom.
Otherwise, there may be such a sad picture - it looks like there is a flowerbed full of gladioli, but you still won’t get any flowers.
Valucha Member of FORUMHOUSE
This year I have a problem with gladioli - none of them bloom fully, all the buds turn yellow and wither.
We also do not take into storage children whose shells have burst or their corms are damaged.
Quality of planting material
The value of gladioli corms is determined by many features. The first of them is age. Children (young bulbs that have not yet bloomed) have the most valuable planting qualities.
Size also plays an important role: the bulb should not be large, its diameter should not exceed 4 cm, and the diameter of the bottom should not exceed 1 cm.
The root tubercles must be fully formed. The scales covering the bulb should be shiny, golden yellow or reddish, without dark stripes or spots.
Gladioli are wonderful flowers. If you want them to delight you in your summer cottage, it is important to know when to dig up gladioli in the fall, as well as how to store gladioli in the winter at home.
- Author: Maria Sukhorukikh
Rate this article:
- 5
- 4
- 3
- 2
- 1
(0 votes, average: 0 out of 5)
Share with your friends!
Treatment of tubers from diseases and pests
Newbie gardeners are often interested in the question of whether it is necessary to peel the gladiolus bulb before storing? After a month, you should clean the gladiolus bulbs from the upper scales and remove the old corms along with the roots. If necessary, you can use a sharp knife. It is easy to distinguish, the old corm is brown in color. When this is not done, it will die and infect the bulb.
Small baby tubers should be divided before planting. Trim the dried stems to a height of 1 cm.