The steam room room should be small; the popularity of projects for small one-story bathhouses is often higher than for full-size buildings 5x7 m or even 8x12 m. According to many experts in bathing, comfort and free space in a small-sized sauna or bathhouse, you get less steam, but the steam produced is significantly greater hotter and richer.
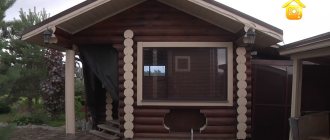
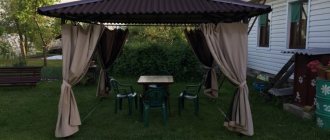
Photos of small bathhouses in the country with your own hands
This section contains interesting solutions from bathhouse masters - photos of do-it-yourself mini-baths for a summer residence, created according to individual projects.
In conclusion, we can say that building a mini-sauna for a summer residence is a completely feasible idea, both financially and in terms of doing it yourself
It is necessary and important to note that building a small bathhouse on a summer cottage will take a little time and effort, but at the same time it guarantees a feeling of comfort in free evenings. We hope that our short review will help you make your choice.
Well, if you have experience in construction/purchase or have any questions, we invite you to participate in the discussion.
Interior
Single design
The simplest option is a frame mini-sauna in the country, installed with your own hands. The minimum size of the structure is often limited to a length of 2 meters. Its width rarely exceeds 1.3-1.5 m. The outer layer is lining, and the waterproofing is roofing felt. The room can be heated with a powerful heater up to 4 kW. It is located next to the heater made of fragments of soapstone or basalt.
Single bathhouse
If space allows, it can be filled with a wood-burning stove. It will warm up a small room very quickly.
VIDEO: Mini sauna. The dream of all summer residents! Log house 2x3 and dressing room made of clapboard
Bathhouses
If a summer cottage was purchased recently, most likely it is not equipped.
Sometimes it happens that it does not even have the necessary amenities. In this case, a bathhouse designed as a change house helps out. This room is comfortable and contains everything you need for use. A sauna can also be made from a sea container, which saves time and money. Here are some examples of how to quickly build a bathhouse:
- Sauna. This type of cabin contains an electric or regular stove with wood, a table, benches and a suitable container for water. The water supply system in it is connected to the general sewerage system. The sauna bath contains a dressing room, a steam room and a washing department. Nowadays, a sauna in a country house is a common occurrence.
- Shower room. A bathhouse with a shower stall that meets your needs is built from moisture-resistant materials. It also has all the necessary equipment.
- Prefabricated bathhouse. This bathhouse combines a bathroom, which is connected to the central sewer system.
Location Features
In addition to a successful box design, you will need to choose the right place in the country where you can build a bathhouse without occupying the most valuable areas of the territory. On the other hand, the steam room should be located at a sanitary distance from the dacha house in order to ensure a fire safety distance and a minimum of smoke in the area in front of the house.
A typical design for a simple mini bath involves building a room in the space between the remote toilet and the dacha building.
The second option is the most common. In this case, the structure is placed as far away from the house as possible, preferably closer to shrubs or trees that shield the box from the wind.
A bathhouse can be built in the so-called sanitary zone of the dacha, and the site for the foundation, even without taking into account the height of the piles, must be located above the drainage pit or septic tank.
Where to place the washing compartment in a 3 by 3 bath
Next, how can you place a washing compartment in such a bath?
The only reasonable option is to combine the washing compartment and the steam compartment. Because even if you allocate a 2 by 2 meter “cube” for the steam room, you will be left with an “appendix” only 1 meter wide.
It will be impossible to wash in such an uncomfortable room. Of course, unless you add a 2 by 3 or 3 by 3 frame insulated extension to the 3 by 3 log house, where you can arrange a washing compartment.
Or, just like that, divide the room 3 by 3 into 4 parts at once - a steam room, a shower room, a relaxation room and a furnace room. Well, at least the porch is separate, and then go ahead.
Photo examples of ready-made baths in the country
Before starting the construction process, it is necessary to develop a working design and draw up a detailed drawing indicating the technical parameters of the future structure. Original and popular options for budget bathhouses in summer cottages, built with your own hands, in our photo selection.
A functional frame bathhouse on a summer cottage is an accessible and relatively cheap construction option for home use. To reduce construction costs, you can create your own project and use only inexpensive and practical materials. A compact heating stove, made by yourself, will also help to significantly reduce the cost of servicing the finished bath.
Projects for 3-4 people
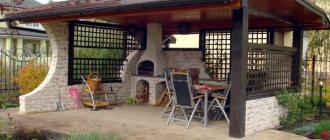
- with a veranda (photo);
- with a rest room (photo);
- without a veranda and a relaxation room, but with an enlarged steam room (photo).
By covering such a frame base, you can create additional space. The new space will serve as a lounge during the summer months and will serve as a locker room in the winter. So, you will achieve the most important condition for a comfortable layout, which should include the main rooms: a steam room, a locker room and a washing room.
As an option, you can leave an additional building as a veranda or open terrace.
Selection of building materials for a bath
The choice of materials for construction is currently very large. Let's look at some:
Frame bathhouse - this type of construction copes with its purpose perfectly. In addition, its cost is quite affordable. Due to the light weight of the structure, the construction of the foundation will also be inexpensive.
Wood is a favorite material for load-bearing structures of bathhouses. Its cost is more expensive than the previous option, but you can save on insulation, since, unlike a frame structure, a wooden one does not need it.
Brick is not often purchased specifically for a bathhouse. A brick bathhouse requires a very reliable foundation, and this, in turn, requires additional costs in terms of money, time, and effort.
A bathhouse made of wood concrete is durable and retains heat well. Its cost, at the same time, is quite affordable. The construction can be either monolithic or block.
Insulation of walls and roof
In order to make the bathhouse as warm as possible, you need to apply thermal insulation between the inner and outer lining. Mineral wool, synthetic boards and various insulation materials are often used as insulation.
Any insulation that has been used should be firmly and securely fixed in a cavity specially designed for insulation. We must not allow gaps to appear between the sheets, which could become sources of cold in the future.
When the insulation is completely fixed, it will be necessary to install a vapor barrier on the inside. Glassine is usually used for this. One side is equipped with a heat-insulating layer, and the other with metal foil, which also retains heat quite effectively. Glassine is installed with foil inside the room.
Bathhouse layout. We build a bathhouse ourselves
The size of the bathhouse is determined based on the size of the area. Usually such a structure is made 6x6m or 6x4m, but if the area is very small, then you can make it 3.5x3.5m. In such a small room you can accommodate all the necessary rooms, such as:
- steam room;
- dressing room;
- a small room for relaxation;
- toilet and shower.
The ratio of rooms in size can be absolutely varied. You can, for example, build a steam room 2x3, a bathroom - 4x3, a relaxation room - 3x6, this ratio looks like this: 1:2:3, which is the best option. If the bathhouse is small, then instead of a dressing room you can make an ordinary vestibule with hangers for storing clothes.
What should be the foundation for a do-it-yourself bathhouse?
The type of foundation depends on the type of soil on your site. For dry soil, a foundation made of stones is quite suitable. They are placed under each corner of the bathhouse and where the walls connect. The beams of the bathhouse are placed on top of them, which must first be treated with a special compound so that they do not rot. The remaining space between the stones must be sealed with clay.
This type of foundation is made quite rarely; the following types are most often made:
- Pile foundation.
- Ribbon view.
- Columnar foundation.
For a columnar foundation, stones, bricks or concrete are used; you can also use ready-made concrete pillars. This type of foundation is often found, which is made using wooden pillars. After installing the pillars, the distance between them is laid with brick or other more convenient material.
If the soil on the site is too complex, then a pile or screw type of foundation is used. It is made in the form of piles that are driven into the ground.
It is best to build a strip foundation, which is quite simple to do. You need to dig a trench around the perimeter and fill it with concrete, not forgetting to lay reinforcement.
How to make walls in a bathhouse?
The best option for the material from which to build the walls of the bathhouse is, of course, wood. This material is natural and environmentally friendly. Other materials, such as concrete, brick or wood concrete, are used only if they are easier to purchase than wood. The main advantage of stone walls is their durability.
If you nevertheless decide to build a country bathhouse from wood, then you should know that the first row of logs must be placed on waterproofing, having treated them with an antiseptic beforehand.
If the bathhouse is made of logs, then they need to be laid in such a way that their ends look out. This is done in order to protect it from the wind. The best and most reliable connection is considered to be fastening the logs into the end tongue. To do this, you need to make a groove on one side of the log and a tenon on the other.
To build the walls of a bathhouse from timber you will not need much effort; all steps are performed quite simply. They just need to be laid on top of each other and connected with special spikes.
It is best to lay special insulation between the logs, which is usually made from flax or jute. This material is sold in roll form and is secured using a stapler. All actions are performed very quickly and easily.
To make the bathhouse more decorative, you can seal the joints between the logs with jute rope - it looks good and provides additional insulation.
Making a steam room
The size of the steam room depends on the length of the shelf, the size of the bath itself and the number of people who will steam in it.
The size of the shelf is determined depending on how a person will be positioned on it, namely:
- 40–60 cm - if you just sit;
- 1.5 m - if you lie down with your legs clenched;
- 1.8 m - to stretch to your full height.
To heat the steam room, you can use a stone stove, any electric heaters or pipes filled with hot water or gas. The best option, of course, is a stone oven. It is best to place it in the corner connecting all the rooms - the water will be heated, the locker room and bathroom will be heated. The size and appearance of the oven can be absolutely any. You can build it yourself, buy it in a store, or purchase it online.
Pouring the foundation
The construction of any structure begins with the creation of a foundation
When arranging a miniature object, this point should be paid special attention to. Due to the fact that its structure is made of wood, the weight of the building will be light
Therefore, it is unwise to spend money on a heavy foundation. A better solution would be to create:
- support-column foundation;
- strip base with a shallow burial level.
The second option is the most suitable if the site is dominated by loose, soft soils. The first is chosen for areas where hard soil predominates and digging a trench becomes a difficult undertaking.
To construct a lightweight foundation, it is necessary to lay stones over the entire area allocated for the construction of this facility. A layer of clay should be placed on top of them and then compacted. Upon completion of this work, you can proceed to the next step - laying waterproofing.
If you decide to build an object on a strip foundation, then the first step is to dig a trench. At its bottom it is necessary to arrange a sand cushion. The layer thickness should be 150 cm. After this, roofing material should be laid as a waterproofing material. Then the wooden formwork is installed. The next step is to fill the trench with concrete.
In order to build a high-quality foundation, you need to take care of purchasing concrete pillars in advance. They are buried in the ground at a distance of 1 m from each other. This type of foundation is relevant if the owner plans to build a frame-type building. A pile-screw foundation requires no less attention. Speed of installation is its main advantage. Proper design of this type of foundation allows, upon completion of the work, to obtain a high-quality structure characterized by high strength characteristics.
When creating it, a distance of 2 m should be maintained between the piles. They can be dug into the ground manually. To make this task easier, you should use a hole drill
In this case, it is necessary to pay attention that these elements are immersed in the soil below the freezing level, which is located at a depth of 200 cm from the surface of the earth
General information
Consider the types of saunas for an apartment
Types of mini-saunas for city apartments
The sauna in apartments should not be full-size, but miniature. We briefly talk about the features of the most popular four types of mini-saunas, and the important fact is that this small sauna can even be bought ready-made.
With electric heater
The construction of a sauna in an apartment usually results in the re-equipment of the sanitary unit, since modernization of communications is important. Consequently, such an event will be accompanied by the collection of permitting documents. But installation can be greatly simplified by connecting using a flexible hose. In this case, running around to the necessary authorities can be avoided, and all responsibility in this case will fall on the manufacturer.
Phytobarrel
If you don’t have enough free space, a compact phyto-barrel is an excellent alternative to the classic options. Such a small sauna in the bathroom can be placed in any free corner. The area it occupies is approximately 1 m2. It is no more tall than a person, and the power of the heating device used in it is approximately 2 kW. The most popular models include barrels made of cedar and equipped with their own steam generator. Although such a mini-sauna is very simple and compact to operate, its installation should be entrusted to the manufacturer. The phytobarrel is easily controlled using a special remote control, and certain models have special devices that make the procedure even more enjoyable, for example, a sprayer for aromatic balm.
Portable sauna
This type of sauna is made of a frame covered with fabric. The principle of operation is similar to a phyto-barrel, and when the head is in it outside the heat zone, such a device is inexpensive, has a low weight and is compact. The main advantage of a portable sauna is that it is easy to use, and the only thing required for operation is an outlet.
Infrared sauna
From experience, we can say that this type of sauna is the optimal solution for indoor use, and it, like an important steam room, can remove toxins and excess fluid from the body, and can also activate the functioning of human organs.
Finnish type sauna
If there is enough space in the apartment, you can completely think about arranging a Finnish sauna. Even in 1 session it can accommodate a couple of people, and the steam in it is dry, it heats up to +100 degrees. This point is the main difference from the saunas listed above.
Turkish steam room
Selecting a location - pantry, bathroom or balcony
A sauna in an apartment with your own hands must be designed correctly, and the first thing to start with is selecting a location and developing a project. The following options can be considered for its placement:
- Combination of a corridor and a sanitary unit that leads to the kitchen. You can even add a bathroom here.
- Balcony or pantry in the case where the sauna will have infrared heating. By the way, a sauna on the balcony is beautiful because it will not reduce the living space of the apartment.
Naturally, the size of the sauna will depend on the number of people
When making the appropriate calculations, it is important to allocate at least 2 square meters of space for each person. The ceiling height in the room should be 2 meters or more
If you decide not to buy a ready-made miniature sauna, but to equip it yourself, then you can leave the one you have. An excellent option would be tiles, and the room for the sauna should be at least 1.8 * 2 meters. This makes it easy to place a bench, and such a sauna will become a practical and also convenient solution for an apartment.
What do you need for a bath?
The most necessary component of a sauna holiday is a stove. There are a huge number of mini sauna stoves on the market. But if you have welding skills and an inverter, you can weld a stove yourself.
Stove in a barrel
Typically, mini-ovens for small volumes are metal structures designed to generate steam. As an example, consider the Varvara “Mini” sauna stove.
Wood-burning stove Varvara Mini with a water circuit for a saunaSauna stove Varvara Kamenka mini
This is a wood-burning stove with overall dimensions of 48x66 cm and a height of 88 cm. The steel structure of the firebox itself is covered on top with a casing, inside of which there are convection channels. The air, heating up in the firebox area, escapes into the heater through the holes in the casing, thereby quickly heating the stones. As a result, the oven heats up very quickly, warming up a small room in a very short time.
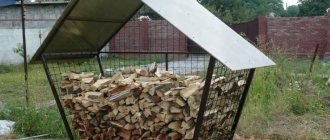
In addition, there are also simpler stove designs in which the heater is heated directly by exposure to heat from fuel combustion. When using a mini-stove for a wood-burning sauna in a steam room, you need to provide a place for storing fuel, a woodpile or a shed not far from the sauna.
For small steam rooms, in some cases it is advisable to use electric sauna stoves and electric heaters.
Kamenka
Mini-pools for baths
Additional installation of a swimming pool in the sauna will expand the functionality of the sauna and add comfort. It is worth noting that it is better to initially provide for the installation of a swimming pool in the bathhouse design, since mini-pools for a bathhouse require water supply systems, water drainage, and heating.
PoolFor this reason, embedding a pool into a finished bathhouse is quite troublesome and costly. There are several types of pools designed for installation in a bathhouse:
- Stationary. In this case, the pool is initially included in the bathhouse design, a pit is dug under it, the walls of the pool are concreted and covered with a decorative coating. This type of pool is used mainly for full-size bath buildings.
- Font. A metal or plastic structure designed for installation in a pre-prepared bed. To put it into operation, you only need to connect the font to the water supply system.
- Portable pools. Metal structures with plastic trim. Just like a font, they are installed in a prepared bed, after which they are connected to the water supply system.
Swimming pools can be equipped with water heating systems and hydromassage equipment, but in this case, connecting them requires the help of qualified specialists.
Mini sauna for a summer residence
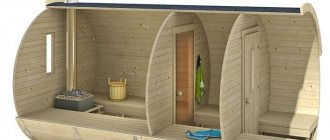
A sauna is distinguished from a bathhouse by the type of steam and temperature. In order to make a sauna out of a steam room, it is enough to install an electric steam generator, an electric heater or a wood-burning sauna boiler inside the steam room. When using a steam room for a sauna, it is recommended that the interior be made from one type of wood: pine, linden or alder. A mini-sauna in a country house should be as closed as possible, practically airtight
Particular attention should be paid to its thermal insulation. This is necessary to maintain a high temperature inside the sauna for a long time, with minimal energy consumption. Mini sauna and shower in the portable sauna
Mini sauna and shower in the portable sauna
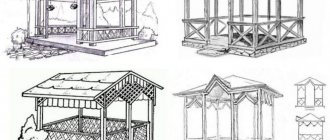
Project options for small baths for a summer residence
Small bathhouse projects are optimal solutions for lovers of country holidays who have a small plot of land and a great desire to have a good time with health benefits. Before choosing the best design for a small bathhouse, you need to resolve several issues: carry out all the necessary calculations yourself, using a standard project, or involve professionals. If the owner of the site feels confident, he should be ready to become a designer, architect and builder in one person.
Bathhouse project with the necessary drawings
Small sauna: what are the benefits?
The advantages of a small bathhouse for a summer residence are obvious:
- A small bathhouse will not take up much space, but will bring a lot of positive emotions to the owner and his family.
- Economical. “Heating” the bathhouse will not be difficult; you will need a small amount of firewood.
- Low construction costs. To build small houses you will not need a lot of materials.
- Construction speed. With the right approach, the building can be erected in the shortest possible time.
Modern bathhouses for summer cottages are structures equipped with everything necessary for a comfortable stay. For construction, high-quality, reliable materials are used, and the most modern technologies are used. There are many options for ordinary houses with a built-in bathhouse, but you can also build a separate bathhouse using a variety of construction technologies (Canadian and others).
Small bath projects
A small bathhouse is a completely functional structure, despite its compactness. In order for the bathhouse to be harmoniously located on the site among houses and other buildings, without taking up unnecessary usable space, a project is needed. Today there are several very popular options for a small bath. Projects for small baths come in the following options.
Project “3x4”. The most budget-friendly and popular option for arranging a bathhouse outside the city. One of the optimal solutions for small areas. It can be built in just 3-4 days. The project has everything you need for a good rest: a steam room, a washing room and a relaxation room from which the stove is fired. If necessary, a shower with a tray is installed in the washing room. Thanks to the well-thought-out breading, the bathhouse, although small, is spacious. Construction technologies and materials characteristic of this class of baths are used in the manufacture. Bath stoves come in two types - gas and solid fuel, and are installed wherever the owner wishes. The big advantage of the “3x4” project is the possibility of adjustment, since all rooms are blocks that can be manipulated at your discretion.
Project “3x6”. Structurally, it consists of 3 rooms of the same size, located one behind the other. Each room has a window that is included in the general ventilation system. If the area of the summer cottage allows, such a project can be supplemented with a large terrace, creating a place to relax. The material for the construction of the building is timber. To build such a bathhouse, you need to spend about 9 days. The floor is warm, made of two layers, the roof is made using ondulin.
Project “4x4”. A building consisting of 3 parts. The relaxation room measures 2x4 m, but is quite spacious. It has 2 window openings with double glazing. The dimensions of the steam compartment and the sink are the same, their dimensions are 2x2 m, thanks to which several people can be accommodated there at the same time. A shower can be installed in the washing compartment. There is only one window opening, its dimensions are 0.5x0.5 m, but for such a bathhouse it is quite enough. If necessary, you can make adjustments to the project by changing the location of doors and windows. Ceiling height – 2m. Of all the projects, “4x4” is the most common option. If the weather is good, the bathhouse can be built in 7 days. The project involves the mandatory construction of a foundation. You can also install a stove of any model.
Project “4.5x5”. It has originality and special design. There is a large terrace measuring 1.5x4 m. The building looks great and has a good layout. The entrance to the bathhouse is through a porch, opposite which there is a door to the bathhouse itself. The useful area of the terrace is isolated from people coming and going. Behind the door there is a recreation room with two windows, one of which opens onto the terrace. The inner door from the relaxation room opens the way to the washing room, and the next one leads to the steam room. Both parts have the same size 2x2 m. If you install a shower with a tray in the washing room, it would be advisable to also make a small window in it. The building material is timber.
Regardless of the design, a bathhouse is always a useful and pleasant vacation. At the owner's request, you can invite friends or take a steam bath yourself.
Stages of constructing a roof for a bathhouse
The roof is erected after the walls of the bathhouse are completely built. The principles of constructing a bathhouse roof are the same as for conventional buildings: first the mauerlat is laid, then the rafter system is installed, then the sheathing is attached, and at the final stage of the work the structure is covered with roofing material.
Mauerlat and rafter system
At the first stage of work, the protruding ends of the mauerlat should be leveled, because it is these logs that will serve as support for the rafter legs. The more carefully the measurements are taken and the smoother the logs are cut, the faster and easier the rafter system will be erected.
It is necessary to measure all the protruding parts of the Mauerlat and determine the smallest value. On the logs located along the edges of the structure, make a mark of the lowest value and drive nails there. Stretch the cord between two logs at opposite ends, make marks on all other parts and saw off the excess logs. After which you can safely begin installing the rafter system.
Before installing the rafter system on the mauerlat, you should lay a rough flooring on which you can walk. Flooring can be made from any boards.
The rafter system is made according to the roof parameters indicated in the bathhouse design. Those parts of the rafters that rest on the Mauerlat beams are impregnated with a special waterproofing agent, then wrapped in roofing felt, inserted into pre-prepared grooves and securely attached to the walls using metal brackets or studs.
Roof structure
An under-roof structure is mounted on the finished rafter system - it helps to securely attach the roof directly, transfers external load to the rafters and ensures good ventilation in the space under the roof.
The roof structure consists of the following elements:
— rough flooring;
— waterproofing;
- counter battens;
- laths.
The rough flooring carries a huge functional load. Waterproofing material is applied to the flooring and a counter-lattice is attached. In addition, together with the sheathing, the flooring forms gable overhangs with a length of 60 cm.
The rough flooring is made from plywood, boards, OSB or unedged boards. The gaps between the boards should not exceed 2 cm, so when laying the flooring it is necessary to adjust the protruding areas and minimize the possibility of gaps.
Waterproofing is laid on the rough flooring. Any rolled waterproofing material that is sufficiently resistant to moisture is suitable for an attic roof. Strips of waterproofing material are laid horizontally on the flooring with an overlap of 15-20 cm. For insulated attics, it is recommended to choose a material that allows steam to pass through.
A counter-lattice is placed on the waterproofing layer. For this, bars with a length of 70 cm and a cross section of about 30 mm by 70 mm are used. Starting from the very bottom, the counter-lattice is filled with lathing - bars with a cross-section of 50x50 mm or 40x60 mm. The sheathing pattern for all types of roofing material is the same, the main difference between the structures is the distance between the individual bars. So, for example, under slate the bars are placed at a distance of 50 cm from each other, under ondulin - up to 60 cm, under corrugated sheets or metal tiles - 35 cm.
The final stage of installing a bathhouse roof is the installation of roofing material. When choosing a roofing covering, you should consider the following factors:
— strength and reliability: the material must have sufficient resistance to wind and precipitation;
— functionality and durability: a good coating protects the structure from snow and rain, extends the life of the building walls; the longer the service life of the material, the longer the roof will last, requiring only ongoing maintenance and intermediate repairs;
— basic roofing tool;
— good thermal insulation: well-chosen hydro- and thermal insulation materials, as well as their correct installation, retain heat inside the building in winter and prevent walls from getting wet and rotting.
Competent roofing work means a reliable roof for a bathhouse for many years. If all important points were taken into account during construction, then further operation will not require significant material costs; it is enough to periodically clean the roof of overgrown plants and small debris.
What is dangerous to save on when building a bathhouse?
A bathhouse is a specific structure that requires compliance with safety rules. Therefore, you cannot thoughtlessly save on all materials. The purchase of building materials should not be based on the lowest price, but on the basis of quality and suitability for use in high temperature conditions. Study the raw materials approved for use in bath structures, analyze the pricing policy of construction stores and purchase high-quality materials in exactly the quantities required for the job. If carrying out independent calculations is an overwhelming task for you, seek advice from specialists. This way you can save money, but still get the materials you really need and of high quality.
Another integral part of the bathhouse, which is not recommended to skimp on, is the stove. It must be a certified design, purchased from a store and passed a safety test. Homemade stove structures may save time at the first stage of construction, but will require additional time to be spent on manufacturing and maintenance.
Materials for interior finishing
It is recommended that the rest room and dressing room be decorated inside with materials that have a low degree of thermal conductivity. Alder, linden or aspen are good for this purpose.
Wooden lining is usually used for the walls and ceiling in the steam room, since it can withstand prolonged exposure to high temperatures. It is not recommended to use softwood due to its ability to release resin. Wood derivatives (fibreboard, chipboard) can emit harmful substances, so they must also be discarded.
Having studied the photo of the bathhouse inside, it is easy to decide on the options for the interior decoration of the bathhouse.
Features and advantages of small bath buildings
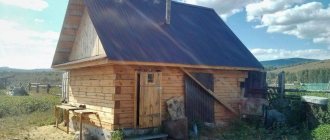
For a summer house you can build a small wooden bathhouse
The most popular material for building a bathhouse is wood, which is highly flammable. This imposes a number of fire safety restrictions: the need for treatment with fire retardant compounds, strict adherence to fire safety standards when installing the stove and chimney. When building any bathhouse, even when using non-combustible material, it is necessary to maintain the regulated distance to neighboring objects located on the site.
Construction of a steam room is a fairly simple and quick procedure. In most cases, small baths for a summer residence do not require a solid foundation and the purchase of a large volume of raw materials. In addition, in the process you can use up timber and other available materials left over from the construction of other structures.
The raw materials used should not have rotten areas, wormholes, cracks or other signs of destruction.
Other advantages include:
- no need to spend money on a massive foundation;
- speed of construction;
- small area occupied by the object, which is especially advantageous if the site is small;
- the ability to fit the building into different types of landscapes due to its compactness.
Video: Bathhouse 3 by 3 Classic Russian bathhouse in Kazan
Materials
Any material that is most available in the area where the building will be erected is suitable for construction. In Siberia, it may be cheaper to order logs from nearby sawmills. In steppe regions, buildings made of foam blocks are in great demand.
In the southern regions, bathhouses are made of frames, filling the interior space with clay mixed with straw. But, of course, nothing compares to a wooden structure.
A frame bathhouse is placed on a strip foundation; 100x100 cm timber is used for the building material. A log bathhouse is a classic of Russian architecture. The logs must first lie down and dry; during construction, insulation is used, for example, forest moss. It is difficult to lift a log house on your own; additional workers will be needed.
An excellent option is a rounded log. Beauty and quality speak for themselves. The big advantage is the absence of the need for external and internal finishing. Construction from profiled or laminated timber is the most successful option, but its cost is higher than from logs.
Profiled timber does not require additional insulation, since the grooves tightly close the surfaces, preventing heat leakage.
They also build baths from brick, but this requires special knowledge. An inexperienced builder will not be able to build a brick box efficiently and beautifully. The box itself turns out to be heavy, so the foundation is reinforced with reinforcement.
Summarizing
Summarizing the material presented, we can draw the following conclusions:
- If you decide to start building a bathhouse with your own hands, the first thing you need to do is draw up a project;
- Next, think through everything thoroughly and purchase the necessary material;
- You need to approach work carefully and carefully, but at the same time creatively;
- There is no need to rush in this matter, but you should not leave an unfinished bathhouse for the winter.
And if you follow these simple rules, then a mini sauna at the dacha will not only please the eye, but also soothe the soul, and give health and joy to you and your loved ones.
If you have any questions, have something to say on the topic, or you find an inaccuracy in the article, please write about it in the discussions below.
Video
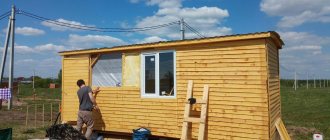
Bath frame
Sizes, of course, are up to everyone’s taste. The whole trick lies in how the bathhouse is designed. It's very easy to do. The main frame was welded from 25 angles. For transitions: floor-wall, wall-roof, the corners were welded with shelves to each other. Don’t forget about the corners for the entrance (steam room) and outer doors.
Lightweight design
To allow water to roll down, I made the roof of the bathhouse sloping and “broke” it into two parts. The first is the dressing room, has a slope in one direction, with a difference of 10 cm. The second part is the bathhouse itself, located at an angle of 90 degrees to the first with a slope height of 20 cm from the highest point of the dressing room.
Strengthening the structure
I also additionally strengthened the floor with one corner in the middle, along the steam room compartment, and to strengthen the structure - another one on top across the steam room. Another corner, for rigidity, in the middle of the partition between the steam room and the dressing room. Horizontally from the wall to the inner door. We drill as many holes for screws in the corners as you think necessary in order to hold the block on them.
Attaching wood to iron
Having cut the 50th beam - dry larch - to the size of the corners, screw the bars to the corners with screws. We nail one-inch dry boards, also made of larch, onto the bars, cover the floor of the bathhouse with them, not forgetting about the hole for the stove (what kind of bathhouse, even a small bathhouse, without it!), the inside walls and the roof. Without relying too much on the dryness of the boards (which I was convinced of myself after a couple of years - gaps appeared between the boards), to improve the insulation we glue cheap ceiling tiles to the walls.
External cladding of a bathhouse with wood
The outside of the bathhouse is lined with one-inch boards located parallel to the ground. We begin sheathing from the bottom up so that the boards lie, slightly overlapping, on top of each other. Your bathhouse at the dacha will greatly benefit from this. Don’t forget to varnish the boards twice later.
Stove, pipe and bath insulation
We install iron (can be made of stainless steel) in the bathhouse: a stove of the size you need, and a pipe, a hole for which we first cut in the roof. Take a pipe of such length as to maintain a distance of 1.5 meters from its end above the roof to the roof itself. And don’t forget about the spark arrestor on top of the pipe.
We install the stove on bricks with a two-centimeter gap from the wall. This gap is quite enough to install insulation between the wooden wall and the stove so that the wall does not burn.
Without further ado, I secured the insulation to the wall. I had it (at first - 25 years ago) in the following order: asbestos fabric, thickness 1 mm, galvanized sheet on it - 1 mm, asbestos sheet - 5 mm and galvanized again. Again - when replacing the stove - I left the first two layers adjacent to the wood, and put fire-resistant polymer fabric on top of them.
Both the initial and subsequent insulation are enough to prevent the boards from burning, even in a hot oven. We line the second, long wall of the stove with bricks the width of the brick so as not to get burned (a small bathhouse in the country is a hot business).
We make a hole in the roof with a diameter larger than the diameter of the pipe in order to lay insulation between the roof and the pipe.
I personally made a hole in the roof 4 centimeters larger, fixed it on the transverse ceiling corner, and so that the boards did not burn, I wrapped the pipe with insulation and lined it with pieces of asbestos board on 4 sides. It rains, of course, but the simple steel stove is like new for 14 years, without rust.
Sewing the internal partition
Having installed the stove, we sew up the frame of the partition between the dressing room and the steam room with a board. We install shelves in two rooms. Don't forget to install the doors. And the final touch. We cover the roof with roofing felt or any material that suits your taste that meets the necessary tasks. A small bathhouse in the country with your own hands is another way to get pleasure and cleanliness, naturally. Enjoy Your Bath!
To my shame, I want to admit that this building was the last to be built. There was everything: I made greenhouses with my own hands and such a structure as a pergola for grapes was already standing, but somehow I never got around to doing such a necessary task.
Preparation for construction
When building a hammam with your own hands, you will need to thoroughly study all the stages and features of construction, draw up a project and drawings, stock up on building materials and patience, but also purchase tools, building materials and equipment.
To make it easier for you to build your hammam, view our sample designs that will help save you time and money during the design phase.
Also, you can get acquainted with the features of non-standard solutions and the construction of hammams in different types of premises:
- Construction of a hammam in an apartment
- Royal hammam in the bathroom
- How to build a Turkish bath in a country house or a wooden house?
- Hammam in the cottage. How to build a Turkish bath in your home?
- How to build a hammam in a townhouse?
- Turkish bath with swimming pool
- Joint construction of hammam and Finnish sauna
- Combined hammam with Russian bath
- Walls (panels)
- Sunbeds
- Doors (glass)
- Dome
- Cranes
- Qurna (bowl for ablution)
- Nozzle
- Mosaic
- Backlight
- Fiber Optic Lighting
- Lamps
- Ventilation
- Control system
- Steam generator (Hygromatik)
- Dosing stations
Tools
It will not be possible to build a Turkish bath without:
- construction mixer and container for mixing concrete;
- shovel;
- drills with drill bits;
- trowels;
- screwdriver;
- hydraulic level;
- hammer;
- rubber mallet;
- trowels for plaster.
Construction Materials
Once the area and layout of the future hammam has been determined, the need for the amount of building materials can be calculated.
To build a Turkish bath in a private house, you will need the following set of materials:
- Brick. It will be needed to lay out the base of sun loungers or benches.
- Material for the construction of walls and ceilings. It must be resistant to corrosion and moisture. You can use glass-magnesite slabs or sheets of cement and shavings.
- Mortar of cement and sand.
- Finishing materials for floors, walls, sun loungers and ceilings.
- Door made of heat-resistant tempered glass, fully equipped.
- Pipes for a steam generator. Through them, steam will flow from the steam generator into the hammam room.
- Heat-resistant sewer and water pipes.
- Waterproofing materials and mortar for walls and floors.
- Fasteners in the form of self-tapping screws and dowels.
Equipment
A hammam is not just a warm room with running water and a drainage system. There is a certain list of mandatory equipment, without the installation of which the normal and safe functioning of the steam room is simply impossible.
We will help you choose equipment for your hammam:
For proper operation of the Turkish bath you will need to install:
- steam generator;
- system for heating floors, walls and sunbeds;
- bowl for ablution - kurna;
- ventilation system;
- taps for hamam;
- special lamps.
Approximate estimate of the minimum required equipment for a standard mini hammam:
| Name | Quantity, pcs. | Unit price, rub. | Sum |
| Steam generator | 1 | about 40,000 | 40000 |
| Drain valve | 1 | from 10000 | 10000 |
| Qurna | 1 | from 15000 | 15000 |
| Sun lounger | 2 | from 12000 | 24000 |
| Drain ladder | 1 | from 1500 | 1500 |
| Glass door Tylo | 1 | from 20000 | 20000 |
| Taps and shower | 2 | from 3000 | 6000 |
| Lamps | 3 | from 1500 | 4500 |
| Remote Control | 1 (if not included in the steam generator package) | from 15000 | 15000 |
You can do without other devices, such as a watering can with a “tropical shower”, an air aromatization system, and an acoustic system. They are optional and are optional. Also, you will have to separately calculate the plumbing, electrical and ventilation parts.
How to draw a plan for a future building?
Once you have decided on the basic issues, it is time to start construction. The first step is to draw it yourself or purchase a ready-made plan. You can purchase a ready-made bathhouse plan from developers involved in frame construction. They already have several ready-made, proven solutions that they will be happy to sell to you. An additional advantage may be the help of company representatives with the purchase of building materials or practical advice on assembling it yourself.
Approximate plan of a frame bath
However, if you want to do everything yourself, pay attention to the following tips:
- Determine how many people your bathhouse is designed for on average. If you often have guests, you can save on space by reducing the shower room and thereby increasing the dressing room or seating area. The shower room is traditionally the smallest room in a bathhouse.
- Even if you plan to steam alone or with a small group, do not make the steam room very small. The steam will be of poorer quality, and besides, you may not have room for a three-level bench, which is needed to steam at different heights.
- Consider creating a deck.
- It wouldn't hurt to have a bathroom at all.
- Place several outlets in the break room. Then you can use an electric kettle, listen to music and even connect a small refrigerator with cold drinks if necessary.
- Think about the location of the windows. The relaxation room should be the brightest, and the steam room can do without natural light altogether. A do-it-yourself panel design allows you to make windows anywhere.
- Doors should be positioned functionally. From the shower you need to be able to immediately go to both the steam room and the relaxation area. It is better to place the bathroom closer to the shower - this will make it easier to lay communications.
Taking into account all these factors, having decided on the budget, you can begin to select building materials.
Wood sanding
Then we prepare the log house for painting. The log will be processed everywhere, from the end - this is the loosest area that can cause damage to the log.
Start with the simplest and smallest wall. It's worth tinkering with the corners, the circle of the grinder doesn't reach everywhere, you'll have to work with a chisel. The ends are processed at the end, they are sealed with mastic. It is convenient to use white; it will be easier to paint. Sanding allows you to show the beautiful structure of the wood and natural pattern.
Dry the base for 1 day, then apply glaze. After this, it is good to walk over the surface with sandpaper. Then the paint is applied in layers, the first one is dried for half a day, but it is better to leave it for a day, then a new layer is applied, which gives a matte shine.