Historical reference
Europeans first learned about this subject from Indians living on the Caribbean islands. The natives used it for sleeping. The hanging device is called a “hammock”. Why did the Indians use it? The fact is that the islands were infested with all sorts of poisonous insects and other dangerous animals, and sleeping on the ground or any other object was mortally dangerous.
The recreational device came to Europe through the famous explorer Christopher Columbus. The hanging item was often used by sailors, allowing them to sleep in comfort instead of hard floors and bunks.
Let's start creating
To make a simple hammock, you will need:
- thread the edges onto a 60 mm wide fabric and sew the folded piece lengthwise using a household machine;
- the loops are located at the required distance for fixation with holes for rings in the hammock;
- using a wood base, the tool makes holes for the tin hinges of the product;
- cut the fabric from the holes to fix the ring;
- cut a piece of fabric according to the finished pattern;
- insert metal fasteners into the holes for the ring;
- The hammock is now easy to thread through the loops and hang on the stands.
- for ring fastenings you need to drill holes with a tool at a distance of about half a meter;
Types of hammocks
Like many devices known since ancient times, the hammock has gone through a lot of changes. Currently, they can be divided according to several characteristics. Hammocks come in different sizes:
- Family (width from 2 m), such a device can comfortably accommodate more than two people.
- For two (width from 1.6 m), you can have a great time in it.
- For one (width from 1.4 m), you can comfortably sit in a hammock, read a book or just sleep.
Also, hanging devices vary in shape: hanging chairs, cocoons, round. The simplest ones are cocoons, i.e. they have a lightweight structure. They weigh little and are easy to move and take into nature. In addition, such a hammock is very practical, it is difficult to fall out of it, because it completely envelops the human body. But this has a downside: it’s hard to turn over in it, and getting inside also requires skill. Round and hanging hammocks are more used for sitting relaxation. They are also used as swings.
Colombian hammocks are woven from natural raw materials - various vines and hammock bark.
When dyeing, natural dyes are also used. Colombian variants are considered special: they are allegedly woven using their own, secret technology.
Brazilian hammocks are knitted from cotton or threads obtained from Brazil nuts. A distinctive feature of the device is the presence of fringe, which is considered luxury. In the homeland of the device, there is an opinion that a hammock without fringe is not a hammock. However, knitting such a device takes a lot of time.
Design
When choosing a product design, consider where and by whom it will be used. Any options (both fabric and wicker) are suitable for a dacha; it all depends on personal taste. The choice of colors is also unlimited
If you choose a hammock chair for your home, you should take into account the style of the decor. Wicker models in natural colors (beige, brown) will fit perfectly into the eco-style. This can be either a model with a round base or a soft version.
In the second case, the cords can be secured to an untreated stick with small knots
This can be a model with a round base, or a soft version. In the second case, the cords can be secured to an untreated stick with small knots.
If you like boho and ethnic styles, a model with tassels and colorful pillows will suit you. Both wickerwork and canvas models will fit well into a rustic setting (country, Provence).
Both snow-white and blue “cobwebs” will look good in a Mediterranean interior. The Scandinavian style is characterized by white, gray, and beige tones. In the last two cases, it is better to avoid an abundance of details. The product should be elegant, but laconic. It is difficult to fit a hammock chair into modern style (modern, minimalism, hi-tech). Typically, plastic models and artificially painted rattan options are chosen for such rooms. However, if you wish, you can not only not disturb the integrity of the interior, but even decorate it with a soft hammock.
For example, you can take a wicker design on a hoop of a modest design in white, gray, beige or black. Decorate it with a fluffy rug or stylish pillows, and the chair will immediately transform.
Tools and materials
Today, hanging devices can be bought everywhere, from supermarkets to specialized outdoor equipment stores . But it’s still much more pleasant to make a hammock with your own hands. To do this you will need a certain set of tools and materials:
- The main fabric is the main element of the hammock. A durable and dense material (canvas, tarpaulin or denim) is best suited for this role. Although such fabrics last less than synthetics, they are much more comfortable and also breathable.
- Hanging ropes should be selected taking into account the strength of the material. It is desirable that they withstand a weight of 130-200 kg.
- Wooden planks, which are sold in a specialty store. You can cut them yourself. The diameter of the slats should be 4-5 cm.
- In addition, depending on the model, additional elements may be needed, such as eyelets or padding polyester, which can be used to fill hammock pillows.
- A sewing machine that can work with rough fabrics.
- Felt pen or chalk.
- Measuring tape, ruler and square.
- Scissors.
Peculiarities
The features of the hammock chair include:
- safety and environmental friendliness (due to the use of natural and non-toxic materials);
- original design;
- simplicity and ease of use;
- Possibility of use at any time of the year;
- ease of care;
- long service life.
A hammock chair is a soft version of a hanging structure. On soft pillows that sway from side to side, it is pleasant to spend summer evenings in the fresh air.
Advantages
The advantages of a hammock chair include:
- Wide selection of models. Such products differ in shapes, designs, colors, and materials of manufacture. Some chairs are something like a cocoon, others are a product with a soft fabric seat.
- Possibility of self-production. To do this, you will need to use minimal sewing skills and prepare supplies.
- A hammock chair can be framed or frameless. Both models do not have sharp corners or parts, which makes them popular among small users.
- The textile can be easily detached from the product and washed in an automatic machine.
Device
A hammock chair usually has a fairly simple design. It consists of:
- Fabric seat. For these purposes, a tight cut is most often used.
- Crossbars, which serve as a strapping element and distribute the load. The seat is tied to the crossbar.
- Sling. To do this, use a strong rope or braided cord.
- Suspension. For these purposes, chains for ceiling mounting or rings with a spring are used.
Hammock on slats
This product is a little more complicated than the previous one. Its size is calculated in a similar way. The width can be reduced slightly - up to 90 cm. You need to add 20 cm to the length, since part of the fabric will go to the hem, where the handle will then be inserted. The narrow parts of the fabric where the head and legs will be located need to be sewn with a double seam and the strips secured in them.
This is done like this: you need to fold 20 cm of fabric from the edge of the canvas and sew a double seam so that the resulting drawstring includes a wooden block and leaves a little margin. Then you need to step back from the resulting seam at a distance equal to the diameter of the eyelet and go through the line again. In the resulting area, you need to insert fittings for the loop in increments of 12-15 cm. The second edge of the canvas needs to be processed in the same way.
Typesetting row
Usually, along the edges, the mesh threads are attached to wooden rods, but they can also be brought into a corner to be grabbed by a metal ring (this will be discussed below). The ends of the ropes from which work begins are called a set row. In practice, more than one method of attaching threads is used; let’s look at the 4 most common ones.
Method 1: Horizontal hinge jumper on the front side
- The thread is folded in half and placed on a wooden handle with the loop facing up.
- The loop bends back and goes under the rod.
- Both ends are threaded into the resulting loop and tightened.
Method 2: crossbar on the wrong side
- The rope is folded in half and placed under the wooden base with the loop facing up.
- The thread folded into a ring is bent forward and wound over the rod.
- Both ends are inserted into the created loop and tightened.
Method 3: Double Hitch (Extended or Extended Hitch)
The crossbars remained on the wrong side. The typesetting row made in this way is denser; the wooden handle does not show through it.
- The thread folded in half is secured using method No. 2.
- Each end (separately) performs one turn.
- The thread that goes around the base is pulled over the loop formed at the bottom.
The attachment to the handle will be even tighter if you make more turns at each end. The same typesetting row can be made so that the bends of the nodes are on the front side, but such a solution looks less neat.
Method 4: Attaching only one end of the thread to the rod
- The upper end of the thread placed under the cutting is fixed at a distance of 2–3 cm from it.
- The lower end of the thread is draped over the base to the right of the upper, then, going around it, it makes a turn; the thread is pulled down.
- The next turn is performed to the left of the upper end, the operation is repeated in a mirror manner. After tightening it, the knot is ready.
When using threads of different colors or different lengths, several fastening methods can be used. For example, first hang one rope using method No. 3, not forgetting to leave a gap in the middle of the fastening. Then a second thread is tied to the left space using method No. 2.
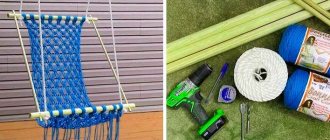
Braided device
Another option for making a hammock is weaving. To do this, you don’t need to have deep knowledge of weaving macrame with your own hands, you just need to learn how to make a simple knot. So, the necessary list of tools:
- two strong wooden planks 1000x30x20 cm;
- cotton cord - 200 m;
- rings with a diameter of 10 cm - 2 pcs.
Fastening with hints of Empire style
When the mesh is ready, you can start creating fasteners.
Take a strong, rigid 50-centimeter cord (cross-section - 1 cm). Measure 5 cm on one side and 10 cm on the other, dividing the length in half. This mark is wrapped with tape, cut off and burned, removing the film. The rope is connected into a ring, tightly wrapping the joint with threads. Then the remaining section is wound to the joint. The threads are wound in 3-4 layers, while the edges are made thicker. After this, super glue is poured into the middle and also soaked on all sides.
In the store you need to buy a fastener called a thimble - a steel eyelet. It is placed on the opposite side of the winding, fixing it all with thread and filling it with glue. Then they make an openwork fastening. The principle is very simple:
- prepare 10 pieces of 2 m each in advance;
- they are thrown onto the formed shaft;
- then the upper threads are crossed with the lower ones, while the outer ones are passed between them, throwing them to the sides and carefully tightening.
After this macrame master class you will get a nice triangle. At the end of the work, there should be two cords left, which should be tied using a straight knot. Next, each axis is conscientiously tightened. This fastening is necessary in duplicate.
Spacers are made from ordinary shovel handles or plastic pipes. Holes are drilled on them at intervals of 5 cm.
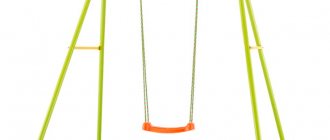
How to hang
If there are trees at least 20 cm in diameter on the site, then you can hang a hammock from them. You can also attach one end to a tree and the other to a support.
The support should be made strong and deepened by at least a meter. If this is not possible, then you can buy a special support in the store, but it is not cheap. To install the supports yourself you will need:
- 2 beams for the base, 2.5 m long.
- 2 beams for posts 1.8 m long.
- 2 beams for cross support, 1.2 m long.
The posts are secured with self-tapping screws or bolts to the base. To add rigidity to the structure, special supports are attached to the end of the bases.
Do it yourself
If you prepare the drawings in advance, it will be much easier for you to complete all the work.
We will look at 2 options on how you can make yourself an original and practical hanging chair using PVC pipes.
- With weaving
. The idea is to take a couple of rings for the base and weave the chair around them; - With case
. Here the frame will be placed inside the soft case. For those who are not familiar with the macrame technique, for example, this option is much simpler.
But first of all you need to decide on the size. Think or look at other drawings about what diameter pipes you need. The question is how to get the exact diameter. There is an answer.
Elementary calculations. Therefore, there should be no problems with this.
Next, it is equally important to understand how to bend the pipe. PVC and polypropylene pipes cannot simply be bent by hand. They then lose their properties
Here are the options:
They then lose their properties. Here are the options:
- use special tools for bending plastic pipes;
- heat the material and then give it the desired shape;
- pour hot sand inside and bend the pipe into a circle.
Connecting the 2 ends is not difficult. You can use some kind of inserts in the form of a piece of wood. Special glue is also used. But objectively, the best solution would be a bushing together with welding.
Wicker chair
To weave a hanging chair based on a pair of pipe rings, you need to take:
- 2 rings with a diameter of about 70 and 110 cm;
- approximately 800-900 meters of cord;
- 12 meters of slings;
- 2 wooden rods;
- a couple of thick cords;
- roulette;
- scissors, etc.
Choose a cord width of 4 mm or more. It is better to use a pipe diameter of at least 35 mm. The thicker the pipes, the more weight they can support.
Next you need to do the following:
- Connect two hoops using a winding on one side, pulling the cord well. This is where your feet will be located in the future. At the bottom there is a ring with a smaller diameter, at the top with a larger one;
- The pipes themselves along their entire length should also be wrapped in several layers for softness and decorativeness;
- After this, the process of weaving the base (seat) begins using the macrame method. Choose the ornament yourself;
- Next you need to make the backs. The top ring will be raised at approximately 45 degrees. Due to the difference in the distance between the lower and upper rings, space is created for weaving the back.
At the final stage, the slings are attached and the structure is suspended.
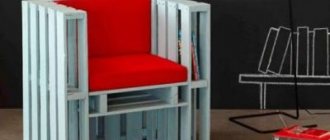
Armchair with cover
If you are far from the weaving technique, then you can use another method. Here the task is much simpler. The fabric cover will allow you to get a soft, but at the same time durable hanging chair.
Here you need to take:
- one durable hoop with a diameter of 90-100 cm;
- a piece of durable fabric;
- braid;
- metal buckles;
- about 8 meters of sling;
- metal ring for hanging;
- sewing machine;
- scissors, needles, etc.
This is not to say that everything is extremely simple here. There are some nuances.
The process of making a hanging chair with a fabric cover can be described as follows:
- You need to make a cover out of fabric. First, cut a couple of squares of the same size, fold them 4 times, and cut out a circle;
- After ironing the circles, cut out holes for the slings;
- Next, the elements are connected to each other. When sewing the circles together, be sure to leave room to insert the ring later;
- Having made the cover, turn it right side out, make an indent of 5 cm on each edge;
- Place a ring inside the case and then sew it with strong threads;
- The case should be filled with padding polyester. Or any other material of your choice;
- Slings are installed, and with their help the structure is suspended. It can be applied to the ceiling, to a tree, to a beam in a private wooden house, etc.
At this point the manufacturing process can be considered complete.
Video with detailed instructions for weaving a hammock using the macrame technique
And here is macrame - to understand what they are saying, turn on the subtitles.
Full version of the work from start to finish:
There are many options and techniques. And we were convinced of this today. All that remains is to see how to work on a hammock using the macrame technique from the very beginning to the end. But we saw that macrame can be different, from intricate patterns to regular mesh. Therefore, any person, both those who have just decided to make their first hammock, and those who have been trying different options for a long time, will find a lot of useful and interesting information for themselves.
But, if you have already tried all this, and you have something to say and offer something new, write! Share! And we will all be grateful to you for this! I think your friends will also be grateful if you share the link to this article with them!
To make a hanging bed based on knot weaving, you will need to be patient. However, the time and effort spent are worth it; the resulting hammock will be spacious, comfortable, environmentally friendly, transportable and definitely unique. After all, everyone chooses the sizes, weaving method, and materials independently.
More interesting than the Lego game
Assembling a structure is perhaps one of the most exciting activities. The spacer is suspended using cables. Marks are made at the ends of the threads so that knots can be tied. All 10 cords are lowered into each hole. The marks are fixed with needles.
Now you need a hanging weight. Water is filled into the bottle so that it weighs ½ the mass of the spacer, that is, 0.5 kg. She is tied using a boa constrictor knot. And at the end of the cable a hook made of a pin is attached.
As a result, a bottle weight is attached to each rope. When tensioning it, make a mark under the spacer with a marker. After the procedure, the pins and bar are removed. The mesh is put on the handle, the warp threads are passed through the holes and tied to the openwork fabric at the place of the marks. The excess is cut off and the ends are melted. The edging cable is threaded around the perimeter of the hanging hammock, having previously connected it to the fastening. The second side is made according to the same scheme. A real work of art is ready for the garden museum.
What is woven for home interior decor using macrame technique?
With the advent of knitted yarn and multi-colored cords, the weaving technique received a new impetus for development. Today, things made using the macrame technique once again decorate our homes.
There are a lot of possibilities for what can be made using the macrame technique for decoration:
- Wall panels for the home.
- Macrame pillows and blankets, not only made from cord, but also from felting yarn.
- Curtains for windows, doorways, interior partitions for the home.
- Lamps and lampshades for the home.
- Macrame bags.
- Tracks on the table.
- Napkins and hot mats.
- Macrame carpets and floor runners for home decor using the macrame technique.
- Vases for the home.
- Hanging chairs and hammocks.
- Macrame baskets for home decor.
- New Year's panels and toys for the Christmas tree.
It’s probably impossible to list everything! It's amazing that macrame home decor has become so popular and diverse.
What is home decor made from using macrame technique?
- Cotton cord is the most common material. It can be either natural white or linen, or painted in any color of the rainbow. The thickness of the cord for macrame is also different.
- Synthetic cord.
- Knitting yarn.
- Yarn for felting in skeins.
Macrame wall panels for home decor
Wall panels for home decor can be found today in classic home interiors and in boho style. This is perhaps the most popular thing in the macrame technique and at the same time the most voluminous.
To work, you will need a lot of cord at once, the ability to weave different knots and connect the threads during the weaving process, and hide the joints. You will also have to get some driftwood and process it in order to attach the panel to it. The snag can be replaced with a round or flat stick, preferably made of natural wood. A novice needlewoman is unlikely to cope with such work.
Macrame panel for home decor on a straight stick
Macrame panel for home decor on a wooden driftwood.