Traditional cultivation of the land requires a lot of time and physical effort, and the harvest does not always correspond to expectations. That is why more and more gardeners are setting up high beds on their plots, which allow them to obtain an excellent harvest of vegetables every year without much effort. Anyone can make raised beds with their own hands, because this does not require special skills or special equipment.
DIY raised beds
Benefits of raised beds
Compared to conventional beds, bulk beds have many more advantages:
- a vegetable garden can be planted even in an area completely unsuitable for farming;
- Digging and weeding of the garden are replaced by light loosening of the soil;
- in a limited space it is easier to remove weeds;
- the high bed is easy to install and just as easy to disassemble;
- You can lay out paths between the beds and walk along them in any weather;
- plants ripen faster, which is especially important for cold regions;
- when arranging a high bed, good drainage is ensured;
- crops in the beds can be easily protected from frost by covering them with tarpaulin or agrofibre.
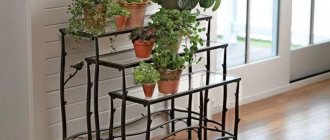
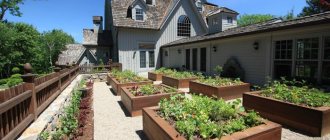
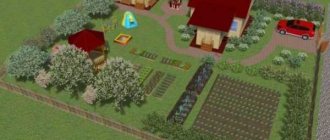
In addition, a vegetable garden made from raised beds can be very decorative, so you can plant it next to your house.
DIY raised beds
Advice from experienced gardeners
Tall brick structures for personal plots have their own characteristics of care. Experienced gardeners offer several useful recommendations that will significantly simplify work on such structures and help increase plant growth and productivity.
Gardener care tips:
- The big advantage of raised beds is the soft, almost ideal soil. It is strictly forbidden to step on it or walk on it. To make it convenient to care for plants, the width of the fence structure should not exceed 120 cm.
- To prevent the soil from drying out and maintaining an optimal level of moisture, it is recommended to mulch the beds with planted plants. Grass, straw, wood chips or leaves are suitable for this.
- For ease of watering, you should consider an automatic watering system before filling the fence with soil. This can greatly facilitate plant care and maintain soil moisture at an optimal level.
- Care should also be taken to protect plants from pests and rodents. Therefore, it is imperative to use a construction metal lattice (preferably with frequent spacing) as the basis for the fencing design.
- To protect plants from weeds, a barrier is provided at the bottom of the base. For this purpose, you can use old cardboard, thick paper in several layers, and unnecessary floor mats.
- To increase the yield of vegetable and fruit crops, one should not forget about regularly fertilizing the soil with compost, as well as systematically loosening the soil as necessary.
- At the end of the growing season, it is recommended to cover the soil of the bed with mulch. This will help protect it from freezing and compaction in winter. For this purpose, dry straw, grass, leaves, and a mixture of organic waste from the garden are used. To protect fertile soil from low temperatures, garden film is also used.
Following the recommendations can significantly simplify plant care, and systematic prevention of fenced and high brick beds will improve plant growth, health and fruiting.
Fencing materials
A raised bed is a frame of certain dimensions, the internal space of which is filled with soil, compost and fertilizers. Most often, the frame is made of a rectangular shape, and it is assembled from boards, slate, branches, plastic and other materials.
Wood is the most affordable, easy to install and environmentally friendly material. To assemble the beds, boards, timber, and small logs are used. Disadvantages: wood requires protective treatment, quickly darkens and loses its attractiveness, and is not durable.
Raised beds
Vine and twigs are an inexpensive and original solution. Wicker walls look very attractive; you can give the bed any shape. Disadvantages: weaving vines requires skills; the service life of such a frame is very short.
Stone and brick are an option for areas with classical architecture. A very reliable and durable material, it gives the beds a decorative look. Disadvantages: high cost, it will take more time to create a bed, difficult to dismantle.
DIY raised terrace beds with tiers of bricks
Plastic is an excellent alternative to wood. Sheet plastic is easy to assemble and disassemble, it is quite durable, has an attractive appearance, is very durable and relatively inexpensive. Disadvantages: certain types of plastic contain harmful substances, so they are not suitable for the garden. The environmentally friendly material has an appropriate certificate, which must be presented upon purchase.
Raised beds
Metal is a convenient and durable material, ideal for shaped beds. If necessary, moving the metal frame will not be difficult, as will dismantling it. The appearance of the metal walls is neat; they can be painted in any color or decorated with ornaments. Disadvantages: welding skills are required to assemble a metal curb, the price of sheet metal is quite high, and high-quality surface treatment is required to protect against corrosion.
Raised beds made of metal sheets
Concrete is an excellent solution for multi-tiered beds or arranging a vegetable garden on a slope. The walls can be made monolithic or assembled from individual concrete blocks. The concrete surface is easy to decorate, it is extremely strong, durable, and has a neat appearance. Disadvantages: lengthy installation process, high cost of materials, additional requirements for the design of the drainage system.
Decorating beds with slate is a completely budget-friendly and simple option. The walls can be installed very quickly, this material lasts a long time, and for decorative purposes the slate can be painted in any color. The main disadvantage is the fragility of the material, so it should be handled with care during installation.
Slate beds
Raised beds at the dacha
Lazy beds: photos and basic information for beginning gardeners
Designing the right garden beds will solve many problems and open up new opportunities for the owner of a summer cottage:
- protection against soil erosion in the garden when there is a large amount of rainfall or watering the plants. The sides of the bed will keep the nutritious soil in place, preventing it from washing out onto the paths. In addition, the passages between the structures themselves will remain clean, no dirty puddles or streaks;
Neat garden beds will make your garden more attractive and organized.
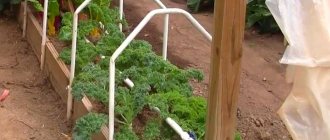
- the possibility of forming the basis for creating a temporary greenhouse for the spring period. By installing high sides as fences, a multi-layer bed can be organized inside the structure, which can be used as a greenhouse. To do this, it is enough to install special arcs and stretch the film. The result will be a neat greenhouse house;
- improving the appearance of the garden due to orderly and even plantings with beautiful framing;
- creating boundaries to prevent the spread of weeds.
By planting plants correctly, you can avoid the growth of weeds in beds and paths.
Making beds with your own hands from boards and other materials allows you to clearly limit the planting area, thanks to which weeds and harmful plants do not have the opportunity to spread widely. If the garden fence is dug to a greater depth, the level of protection increases and perennial weeds, which are unable to overcome this barrier, can no longer penetrate into the garden bed.
On a note! With the help of beds with well-buried fences, the spread of plants such as reeds and creeping wheatgrass is effectively blocked. Their root system is capable of covering large distances underground if left unconstrained.
High, warm beds made from quality materials can serve their owners for many years.
Optimal sizes of raised beds
Each gardener selects the size and shape of the bulk bed at his own discretion. And yet, there are optimal parameters at which the bed will be most effective:
- height from the ground 15-50 cm;
- width 90-120 cm;
Optimal sizes of high beds
If the bed is poured onto fertile soil, it is made 15-20 cm high. This is quite enough for a good harvest. If the soil on the site is not suitable for farming, the bed is raised to 30 cm. Compost beds are made even higher - up to 0.5 m. Sometimes the walls are raised very high, which allows you not to bend over while cultivating the soil and planting plants, but this increases material consumption and requires more time to arrange a garden. In addition, with a large frame width, it is inconvenient to cultivate the soil at such a height.
How to make a raised bed
The width of the bed should be sufficient for two rows of plants. With this planting, all plants will receive the same amount of air and sunlight, which has a very positive effect on yield. More rows result in the average plants receiving less air, being shaded, stretched upward, and yields falling. It is also much easier to cultivate a bed of standard width than one that is too wide.
The length of the bulk bed does not play a special role, therefore it is limited only by the size of the plot. The most common option is beds with a length of 1.5 to 3 m; They are compact and look neat in the garden.
How to arrange beds in a vegetable garden: photos and recommendations for choosing a location
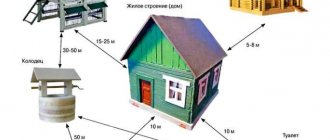
Of no small importance in obtaining a rich harvest is the correct choice of location for the construction of beds and the layout of their placement. It is desirable that the area chosen for organizing a vegetable garden is flat and receives maximum sunlight throughout the day.
On a note! Most plants need plenty of sunlight. In the afternoon, a little darkness will be useful.
To make the right choice of location for organizing a vegetable garden, it is recommended to spend some time on the site and observe the distribution of light throughout the area throughout the day. In addition, special attention should be paid to the placement of trees, both on your site and on the territory of your neighbors. This is necessary in order to determine how big the shadow is and where it falls. It is worth considering that an area flooded with sun in winter may be shaded in summer, since in the warm season thick foliage appears on bushes and trees.
The best place is an area where there is sun throughout the day. It is allowed to install beds where there is shade in the morning or during the day. If the proposed construction area is dark throughout the day, you should not use this place for arranging a vegetable garden.
Proper arrangement of high beds
For example, a bed with a fence made of boards is taken; This option is the most convenient and inexpensive.
During the work you will need:
- bayonet shovel;
- roulette;
- drill or screwdriver;
- building level;
- circular saw or jigsaw;
- self-tapping screws;
- boards 50x200 mm;
- timber 50x50 mm;
- primer;
- construction mesh.
Step 1. Wood processing
Scheme of a high bed
The boards are cut to the size of the frame, and then covered on all sides with antiseptic impregnation. You can use used oil for these purposes, and to prevent harmful substances from penetrating into the soil, after treatment it is recommended to cover the tree with film on one side. The lower edges of the boards, which will be in contact with the ground, are treated especially carefully. The timber is sawn into pieces 50 cm long and also impregnated with a protective agent. After this, the building material is laid out to dry.
High bed scheme
Step 2. Site preparation
The area for the garden bed should be illuminated by the sun for at least 5 hours a day. They mark the boundaries of the bed, remove stones and branches, and dig up perennial plants. If desired, you can dig up the soil together with fine grass - this will increase the permeability of the soil. If the soil is very dense and trampled, it is enough to remove the layer of turf around the perimeter of the marking to a small depth to make it easier to position the frame.
Step 3. Assembling the frame for the bed
Frame assembly
Assembling the frame for the bed
Dried boards are knocked down in pairs into panels and connected to each other using bars. The height of the shields is equal to the height of the bed, the long sides of the frame are additionally reinforced with transverse bars in the center. Since the length of the bars is greater than the height of the walls, they should protrude 10 cm above the frame. These will be the legs of the frame. To improve the appearance of the structure, boards laid flat, the edges of which are cut at an angle of 45 degrees, are placed around the perimeter of the frame. Finally, the frame can be painted on the outside.
Assembling the frame for the garden bed
Step 4. Installation of the structure
Installation of the structure
The finished frame is transferred to the installation site; align the structure according to the markings, make recesses for the legs, check the location of the bed using a building level. If necessary, place pegs or, conversely, remove excess soil. The structure should be as level as possible, with all corners at the same level. Finally, add soil around the perimeter of the walls and compact it so that there are no gaps left.
Step 5. Filling the bed
First, the bottom is covered with a construction mesh and nailed along the edges to the walls of the frame. The mesh will protect the structure from the penetration of moles and mice. Then geotextiles are laid, which will not allow weeds to grow. Next, the beds are filled in layers:
- small branches, bark, large shavings, leaves;
- bird droppings, rotted manure or compost;
- fallen leaves, branches, bark, grass;
- mineral fertilizer;
- fertile land.
Filling the bed
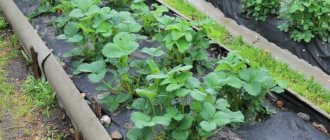
The thickness of each layer is 10 cm. There is no need to mix the layers, but it is necessary to level and compact them well. If the soil on the site is not of very good quality, it is better to use purchased soil. After filling, the bed is well watered and left for a couple of days. During this time, the layers will settle a little and become denser. It is recommended to cover the frame with black agrofibre, which provides better soil heating and prevents weeds from germinating.
Harvest beds
It is recommended to make high beds in the fall or at the end of summer, so that the layers are well rotted and the plant roots receive the maximum of useful substances. If the beds are installed in the spring, it is necessary to fill them at least a month before planting and pour plenty of water several times to compact them. It is easy to turn such a structure into a greenhouse: to do this, plastic or metal arcs are installed above the frame, the ends of which are secured to the walls with bolts. A polyethylene film or special agrofibre is attached to the arches on top.
Harvest beds
Prices for various types of construction boards
Construction boards
Plastic
Fencing for garden beds made of plastic panels will help you create mini fences of the cutest look. A huge variety of colors and shapes allows you to decorate your garden in the most original way. The advantages of this type of design include:
- low cost;
- ease of installation and dismantling;
- immunity to temperature and moisture;
- the ability to maintain an attractive appearance without effort on the part of the site owners;
- durability.
The disadvantage of plastic is that it is not environmentally friendly.
For the winter, it is better to put such a fence in a house or barn.
Uneven beds and tree fencing can help create border strips. Soft plastic bends beautifully in all directions and creates uniquely beautiful fences.
The disadvantage of this design will be the inability to hold the soil during heavy watering or strong winds. In this case, you will have to install additional pegs.
Fences made of plastic bottles will add originality to the beds. This option will save garages and sheds from plastic deposits, and the planet from excess pollution.
Bottles can be placed bottom down or up, painted in different colors, and created with curved lines. But such fences are rarely created for garden beds. Fences and borders made from bottles will look much more organic as a flowerbed design.
Construction of beds made of slate
To create bulk beds, you can use both flat and wavy slate. The technology for installing beds using this method is very simple and anyone can do it.
Slate bed
Table. Wave slate
| Sheet profile | Dimensions, m | Sheet area, sq.m | Weight, kg |
| 8 wave | 1.75 x 1.13 x 0.0058 | 1,9775 | 26,1 |
| 7 wave | 1.75 x 0.98 x 0.0058 | 1,7150 | 23,2 |
Prices for flat slate
For work you will need:
- slate sheets;
- Bulgarian;
- bayonet shovel;
- a piece of chalk or pencil;
- roulette;
- level;
- rubber hammer;
- drill;
- wooden pegs or metal rods.
Step 1. Marking
In the selected area, the boundaries of the beds are marked and beacons are installed. Narrow grooves are dug along the perimeter to the depth of a bayonet. If the soil is good, then remove the entire fertile layer inside the marking, pouring it near the future beds.
Step 2. Preparing the material
Flat slate fastening option
Connecting parts of the longitudinal side of the bed
Sheets of slate are laid on a flat surface, the required length is measured and a chalk line is drawn across the waves. After this, the slate is cut along the lines using a grinder. The pegs are impregnated with bitumen mastic or waste oil, and if scraps of metal rods are used as posts, they are treated with anti-corrosion compounds.
Step 3. Installing the frame
High beds made of slate
The first sheet of slate is installed vertically in the groove from the corner of the marking. Next, place the next sheet with an overlap in one wave, level it, and beat it on top with a rubber hammer so that both sheets are at the same height. Check the location of the upper edge of the slate with a building level; if necessary, add or remove soil from below. The walls are reinforced with metal rods or pegs, which are driven in on both sides to a depth of 0.5 m. So, all the sheets of the frame are placed one by one, the trench is filled up and the horizontal level is checked again. After this, the soil near the walls is compacted and the excess is removed.
Step 4. Filling the bed
A bed made of flat slate with corners.
At the very bottom you can lay old newspapers, cardboard, pieces of wallpaper, the next layer is chopped brushwood, tree bark, sawdust. After this, small shavings are poured in, plant waste, peat or compost are laid. And all this is sprinkled on top with the soil that was taken out at the very beginning. Water the bed generously to wet all layers and leave for several days. When the bed is compacted, you can begin planting.
Metal
Fencing for garden beds made of galvanized steel will not require any time investment. The prefabricated structure is easy to install and move as needed. But the price of such an acquisition makes you think again about the profitability of such an investment.
A disadvantage of the design will be the high thermal conductivity of the material. On a hot day, the metal will heat up quickly, drying out the soil and burning nearby plants.
In cold weather, the metal will begin to take heat from the ground.
The advantages of iron fences will be:
- durability;
- environmental friendliness;
- neat appearance.
Profiled sheets left over after the construction of fences can reduce the cost of purchasing a metal fence.
Garden bed care
When the plants sprout, the plantings should be well watered and mulched. Weeds that break through the mulch layer are immediately removed. After harvesting, the surface is loosened and sown with green manure. Before the onset of cold weather, all vegetation is mowed down, leveled on the bed, covered with a layer of earth on top and covered with black film for the winter. Periodically it is necessary to inspect the walls of the frame, replace or repair individual sections.
The soil between the beds is most often covered with fine crushed stone, gravel, straw, and sometimes sown with lawn grass. In such conditions, the garden always remains well-groomed, weeds do not grow, and dirt does not stick to shoes. If desired, you can lay out paths of tiles and bricks, or pour concrete ones.
Video - DIY raised beds
Stone
Stone beds have the same features as brick. But for a heavy fence made of this natural material, you will have to provide a small foundation, which will significantly increase the cost of the structure.
If you make a high stone fence without a foundation, the structure may sag over time. A low fence will not require such difficulties.