Having your own source of water at your favorite summer cottage will significantly increase the level of comfort. It will eliminate the need to carry buckets of water to care for carefully grown plants or to fill containers in a bathhouse or shower.
The construction of a water intake structure can be entrusted to a team of workers specializing in this field. But it is better to dig and equip a well at your dacha with your own hands, investing a minimum of money in it. We will tell you how to choose a place for a water source, how to drill and equip a working.
Do I need permission?
According to the Law of the Russian Federation dated February 21, 1992 N 2395-01 “On Subsoil”, Article 19 allows for drilling wells for one’s own purposes without any permits, provided that no more than 100 cubic meters of liquid from the aquifer rise to the surface per day, and that the source is not centralized.
That is, if you want to obtain water from a source solely for watering your garden, agricultural or household needs, drinking, etc., you do not need to obtain any permits for either a summer house or a private home.
What is a bottom filter for a well?
When the aquifer is reached, a pump should be installed to remove the water entering the mine, and the rings should be deepened another 1-2 m. You should not go too deep at this moment because of the danger of going through the aquifer and going deep into the soil layer that does not contain water.
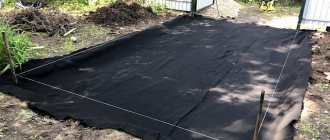
After this, a filter should be installed at the bottom of the well to naturally purify the water entering the mine. Without this, it will be cloudy, with admixtures of suspended sand and clay.
A bottom filter is made by pouring stones or coarse gravel into the well. The thickness of this layer should reach 20cm. The second layer is filled with medium-fraction gravel (1-3 cm in diameter) in the same layer.
And on top of these two layers, a final layer of river pebbles and coarse-grained clean sand is poured. Water rising from the bottom of the well passes through this multi-layer filter and is purified naturally.
How to find a place?
First you should search for water. The easiest way is to ask your neighbors. If they don't have a source, have they looked for it? If neighbors' attempts are unsuccessful, it will be impossible to find the liquid. You can determine the place where to dig yourself. If there is a source, then before looking for water on your personal plot, you should start from the following factors:
- Terrain.
- Soil type.
- Climatic conditions.
- Nature and plants.
How to determine where is the best place to dig?
The best way to find liquid at a site is through geological exploration.
Having discovered a source or supposed place with water, you should not rush to dig, it is better to check its quality. Does it have any aftertaste, is it cloudy or dirty, etc.
Advice : if you are digging a source for drinking water, it is recommended that you first send it to a laboratory for analysis. The test will be for: microbiology, inorganics, organics, herbicides, radionuclides and pesticides. You can check for fertilizers and petroleum products, iron and manganese.
It is not recommended to dig near the following objects:
- landfills;
- car washes;
- swamps;
- farms and pigsties;
- tanks with sewage and the like.
If the soil in your area is rocky and there are large blocks, then setting up a mine will cause serious difficulties. For this purpose, geological exploration is carried out. This includes:
- studying the nature of the soil and the characteristics of the local rock;
- determining the depth of the source.
Finding water on your own property can make it easier to study the flora. For example, sedge, sedge, and coltsfoot grow mainly in damp areas. If the groundwater is high, then you will see the following trees: spruce, birch, alder. This may be the optimal location.
Important : the search should not be carried out in ravines, river banks, or gutters. In such places, fluid drainage is carried out artificially.
There is another popular way to search for water on your own site. For this, a slingshot made of willow branches is used. It is held in a vertical position, where the aquifer is close, and the tension of the slingshot barrel is felt in your hands. Instead of willow twigs, metal wire is also used, from which 2 equal L-shaped frames are made. If you hold them in a horizontal position with your elbow bent, the frames begin to move and cross where there is liquid.
Independent hydrogeological surveys
The approximate depth of the mine can be determined in advance. To do this, you need to go around the neighboring areas and find out at what level the water is in the nearby wells. You should ask whether the well was dug for technical or drinking purposes and whether the groundwater level in it is stable.
At the same time, it’s worth asking around whether it was difficult to develop the mine, and whether large boulders were encountered during digging.
The survey method is acceptable if the estate is located on flat terrain with slight hilliness. There, the layers of rocks lie almost horizontally, approximately repeating the shape of the natural relief.
The groundwater table is located approximately at the same level, because in permeable rocks the principle of communicating vessels operates. The difference in the length of the shaft can only be caused by differences in the elevations of the well mouths.
The depth of underground water in a mine planned for construction in a flat area can also be determined in advance using a neighbor’s well as a guide. To do this you will need an aneroid barometer.
The scale of this device is marked with divisions every 0.1 mm. The distance between divisions corresponds to 1 meter difference in elevation.
For example, measurements near an existing well showed a level of 634.7, and at the site of future production, the barometer needle stopped at 633.8. This means that groundwater will appear at a depth of 9 m.
The depth of groundwater can be determined using an aneroid barometer by comparing the readings above the neighbor's well and the planned place to dig your own
The survey method does not work in regions with high occurrence of rocky and semi-rocky rocks. Especially if you have to extract fractured water, which spreads sporadically and sometimes flows into adjacent layers.
Surveys will not be of much help in areas with pronounced hilliness, where it is impossible to accurately represent the geological section without surveys. It is advisable for owners of plots in such areas to contact the local center for designing water supply and sewerage networks or a hydrogeological organization.
More information about searching for the aquifer is provided in this article.
Shaft depth
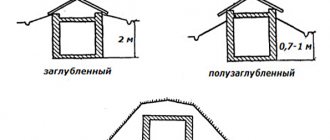
Conventionally, aquifers can be divided into several horizons. For a full-fledged well, it is enough to dig into the first one. Typically the depth ranges from 5 to 30 meters. Depending on how wells enter the aquifer, dacha wells are divided into 3 types (diagram below):
- Perfect with sump (B).
- Perfect (B).
- Imperfect (A).
In the third case, water inflow is possible through the bottom and side walls. In the second case, exclusively through the walls, and as for the sump, the shaft will be located in the rock. Due to this, the fluid supply increases significantly.
Based on the characteristics of the soil in your area, you need to choose the most affordable method of installing your well.
Where to install a water supply facility
Choosing a location for an individual water supply source is not very easy, especially if a small area is already occupied by impressive residential and commercial buildings.
Even if you want to save meters, when planning a place to build a personal well with your own hands, it is recommended to adhere to the following rules:
- A drinking well should not be located near manure heaps, latrines, bathhouses, cesspools, barnyards and similar objects. There should be at least 20-25 m between the well and the source of probable contamination.
- There is no need to build a well on the slopes of river banks or ravines. Due to the decreasing flow of underground water, the flow rate will be significantly reduced.
- The minimum distance between the well and the foundation of a house or utility block must be at least 5 m. Water currents will be directed into the well, like into a reservoir formed in the ground, washing away the soil from under the foundations, particle by particle. The corner of the building located nearby will certainly sag.
Ponds with standing water are considered an undesirable neighborhood. Water will certainly infiltrate through permeable rocks, which is extremely dangerous for the drinking category.
According to sanitary standards, the distance from the well to the specified objects should be at least 20 m, ideally 50 m (+)
It is prohibited to locate a well near sources of biological and chemical pollution, as well as on slopes, near ravines and on river banks.
What time of year should you dig?
Is there a difference when it's better to dig? Yes. The ideal time of year is late summer and January. To cut a spring in winter, there must be frost for at least three weeks.
Digging during this period has its advantages:
- The groundwater level is very low.
- There is practically no perched water.
- It is easy to calculate the debit, since at this time of year it is minimal.
If you plan to dig yourself, with your own hands, then you need to start in early August in order to be in time before the rainy season.
Important : the selected time of year should be as dry and dry as possible.
Design and decoration
When the well pit is ready for use, we proceed to the construction of a stable structure. It consists of stone or concrete masonry, a head, a shaft with a rope and a protective cover.
The well head should be located at a height of 85 centimeters. The structure contains a wooden shaft with a rope. This part allows you to lower the bucket to the very bottom of the hole to raise water.
The well cover is designed for additional protection from foreign debris. It is made from lightweight solid wood.
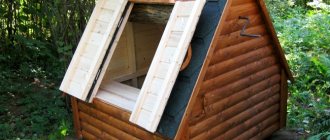
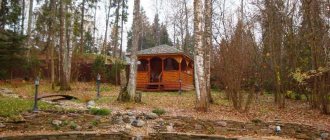
Some people prefer to make a decorative well. It is made from wooden beams. This product design can fit into any stylistic direction. The design allows you to create a realistic imitation of an artificial reservoir.
Digging technique
Drilling is performed using several technologies:
- open;
- closed;
- mine;
- tubular.
Let's take a closer look at these types of wells.
Open
You can dig a mine in an open way. To do this, dig a hole of the required depth. The diameter of the shaft should be 20 cm larger than the diameter of the reinforced concrete ring. After lowering the concrete products, they must be connected to each other. The joints are also sealed. The resulting space between the walls of the shaft and the ground is filled with earth.
Closed
A summer source can be made in a closed way.
Before digging a well, it is necessary to prepare a hole in the ground up to 2 m deep. A reinforced concrete ring is carefully inserted into it. As it deepens, the installed co-construction will gradually sink down. The second, third rings and so on are carefully mounted on top. The latter should rise above the soil level.
Important ! As new rings are installed, all joints must be sealed.
Construction using this method requires certain skills.
Shakhtny
A shaft that should be strengthened to prevent soil from collapsing. Previously this was done using logs. Currently, the shaft or shaft is reinforced with concrete round rings. As a result, the source is protected from wastewater and pollution.
Monolithic well with reinforced concrete knife: knife device
Among supporters of well water supply, not everyone likes ready-made concrete rings. An alternative is a monolith, which is gradually poured into the formwork as the shaft deepens. This method was chosen by a member of our portal with the nickname Benderoid. But he preferred a reinforced concrete “knife”, not a concrete one, the width of the “blade” was 70 mm. To fill the knife I used a ready-made M300 DSP.
Tools
The set of tools and materials may differ depending on what types of wells will be built.
Tools:
- cable;
- homemade winch;
- buckets;
- shovels with short handles;
- ropes;
- wheelbarrow;
- hammer/drill;
- carpentry tools (when working with wood);
- jackhammer;
- scrap;
- ladder;
- flashlight;
- pump;
- insurance;
- level;
- helmet.
Materials:
- reinforced concrete rings;
- cement;
- sand.
Video description
About fastening well rings with staples in the following video:
- Crowbar, pickaxe. They will be needed if you come across a layer of dense or rocky rock.
- A bucket and a cable for lifting soil, a wheelbarrow for removing it.
- Rope ladder for descending into the mine, lantern, tape measure.
- Winch or well gate, slings for installing rings (for the open method). Mechanization can also be used to lift soil to the surface.
- Vertical control tool. The easiest way to check the vertical is with a plumb line with a cord; you can use a construction spirit level (level).
- Drainage pump for pumping out water entering the mine.
- Tool for sealing seams.
- To attach the brackets you will need a hammer drill and bolts.
Digging a mine requires compliance with safety regulations: it is recommended to work with a partner: one performer is underground, the other is insuring from above. Safety precautions also require the use of a helmet and a safety belt with a cable.
Preparing the ring for descent Source kanaliza.ru
Safety precautions
To build a well with your own hands, it is extremely important to follow certain precautions:
- When digging, the head is protected by a helmet.
- Bucket handles must be strong and reliable.
- The rope for lifting the bucket must be strong.
- The carabiner must be reliable.
- From time to time you should check the carabiner, rope and handle on the bucket.
- Digging is done one by one.
- It is necessary to make sure that the ladder is reliable and durable.
- Work should be carried out in strong, high and leak-proof shoes and overalls.
- Reinforced concrete products must be installed very carefully.
- The harness with the stone should be lifted slowly and carefully.
- Insurance required.
- If there is a gas leak, go upstairs immediately.
- Keep children away from the work area.
- Do not dump the raised soil closer than 3 meters from the hole.
- Warn the digger about lifting and lowering objects.
Briefly about the main thing
Construction of a well is a labor-intensive and costly process. In order for the costs to be recouped and the owners to have access to clean drinking water for a long time, it is necessary to carefully choose the place, time and digging technology.
To dig a well on your own, without using equipment, choose a shaft structure. A shaft of suitable depth can be obtained by two methods, open and closed. The first method involves preparing a shaft and then lowering reinforced concrete rings into it. In the second case, the shaft is deepened while tiers of rings are simultaneously built up. In both cases, a sand and gravel bottom filter is installed.
Ratings 0
Common Mistakes
- A small number of rings.
- If it is necessary to deepen the mine, then you should not dig in one ring from the outside, but rather clean the source.
- If it is necessary to deepen, then the shaft is completely dug.
- Avoid superficial restoration of joints. The seams should be completely cleaned of mortar.
- If the old source is running, it is better to spend money on digging a new one.
- Do not leave seams through which water can leak.
- Do not abandon a dug mine without cover.
Recommended materials
First of all, you should proceed from the dimensions of the structure. If the well is to be built on a small scale, the remains of materials that were preserved after the construction of the house (boards, roofing) will be sufficient. All materials must be combined in color and texture with the materials of the house.
Tree
Wooden structures create comfort and warmth. Carved and artificially aged wells for decoration look especially beautiful:
- Wood is a natural material, so the structure will fit perfectly into the interior of the garden.
- It is easy to make a structure with straight edges from wood.
- For work without the help of professionals, it is better to take wood. The material is easy to process, install and maintain.
- The service life of wooden structures is long.
- All wooden parts must be treated with an antiseptic and water-repellent agent.
Stone
The stone structure is solid and durable. It will take longer to make a well from stone than from wood. Such a structure should be surrounded by vegetation so that the element fits harmoniously into the interior. Such a well looks especially beautiful in combination with a path paved with stones.
Brick
It will be possible to lay out a round or square base from brick. The surface is left unchanged or plastered. The construction is strong and durable.
Modern solutions
Lining
Lining is the name given to thin planed boards that are used for surface cladding. The panels are placed vertically or horizontally.
Siding
Siding is often chosen to cover a structure. The material is characterized by durability and for many years gives the well a neat and aesthetic appearance.
Corrugated sheet
Profiled steel sheets are considered a popular finishing material. Corrugated sheeting can be used as a roofing material, or it can be used to cover the walls of a well.
Available materials
The most popular option for making a well yourself is from old tires or tires. Craftsmen manage to make a structure out of buckets and a roof out of straw.
How to make a mine from concrete rings?
The process of making and installing rings with your own hands is a labor-intensive stage of work. Reinforced concrete wells are manufactured in the following sequence:
- Marking is being carried out on the site.
- The bottom is leveling out. A diameter of up to 1.5 m is enough.
- The concrete well is immersed after excavation to the height of the ring using a tripod or winch.
- The first ring is mounted, measurements are taken all the time.
- As you go deeper, a second one is installed, and so on. Using a crowbar we level it.
- The well can be sealed from the inside using a rubber band, which is placed in the gap between the rings. If there are loops, they bend inward.
- A filter is installed at the bottom of the source.
- Groundwater protection is carried out. Waterproofing is done using special mastics.
- Before caulking the seams between the rings, you need to connect them with anchors.
Before digging a well by hand, it is necessary to have the exact diameter of the concrete ring. The pit for reinforced concrete wells should be 200 mm wider in width. While digging a hole, be sure to check the level; the shaft must be vertically level. As the hole is dug independently for the reinforced concrete rings, the soil gradually rises upward. Everything happens in stages, the bucket goes down and goes up the winch.
Advice : knowing how to dig a mine at your dacha, you can handle all the work yourself. The well must be waterproofed to protect the source from groundwater penetration.
If a boulder is encountered, it is removed if possible. Although in some cases the mine is filled up and arranged in another place.
Stage four. We protect the structure from surface water
To keep your well clean, it must be properly protected. Water should enter the shaft only from below, and therefore the walls must be reliably insulated. To do this, we firmly connect the rings to each other, resorting to one of two possible methods.
Well
- We drill the walls of the rings and fix them with metal brackets mounted on bolts.
- We twist the rings with steel wire, catching it on the loading eyes. To twist the wire we use a metal rod, for example, a crowbar.
Pay attention to the waterproofing of the seams between the rings! If water leaks through the seams, this will lead to contamination of the well. To seal the seams, you should use a substance that will not affect the quality of the water.
External and internal sealing of concrete rings with traditional bitumen materials
We strengthen the seams according to the following scheme.
Step 1. Place pieces of linen rope in the voids between the rings (an excellent material - natural and environmentally friendly).
Step 2. Cover the ropes with a solution of sand, cement and liquid glass. By doing this we will achieve reliable waterproofing, which will also be completely neutral when in contact with water.
Step 3. On top of the upper rings, dig a meter-deep pit.
Step 4. Waterproof the outer surface of the rings using liquid bitumen mastic.
Step 5. Place a thermal insulation layer around the upper rings (we can use any foamed polymer, for example, polystyrene foam).
Step 6. Fill the pit around the well with clay. This is called a "clay castle".
Clay well castle
Clay well castle
Video – Clay castle
How to seal seams: mine waterproofing
When the well is completely drilled and the rings are all in place, they need to be waterproofed from the inside.
If it will be carried out in wet soils, then coating compounds are recommended. For example, you can use bitumen mastic. She must treat the outside of the rings. This will significantly extend their service life. The joints are additionally coated from the inside.
Concrete shafts are often wrapped with roll insulation, such as dense polyethylene, as waterproofing. Film is much cheaper. However, it is used exclusively from the outside. You need to quickly dig around the rings in a circle and wrap them with film.
Important ! The film will last for several years if you buy a durable one with reinforcement. But it is better to allocate a budget for coating insulation.
Some summer residents resort to additional waterproofing by making a clay castle. This is especially true if clay rises to the surface when digging. It can be used by filling the well from the outside.
What you need for work
After determining the most promising point for digging a well, you should prepare the necessary tools. From a technical point of view, it is best to dig in the winter, when the groundwater is at its lowest.
True, winter work is complicated by the human factor: doing heavy physical labor while wrapped in several layers of warm clothing is not very comfortable.
To dig a well, you will need the following tools and equipment:
- There are two types of shovels - scoop and bayonet. The cuttings on them should be shortened for ease of maneuvering in confined spaces.
- A crowbar or pick, for driving through dense layers of compacted gravel or clay.
- Buckets for lifting waste soil. Particular attention should be paid to the reliability of attaching the handle of the bucket to avoid its breakage when lifting.
- Ropes for lifting buckets. Their strength should also be given special attention.
- A tripod frame with a block or winch attached to it. It is installed directly above the well shaft and serves to facilitate soil lifting.
- A plumb bob to control the verticality of a mine shaft.
- Protective equipment and work uniform - construction helmet, gloves, etc.
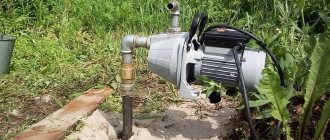
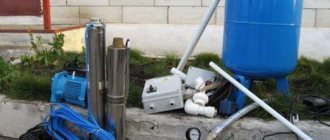
- Pumping equipment for pumping water coming from the aquifer into the mine shaft.
Until relatively recently, the walls of the well were made in the form of a log house from logs or beams. Today, such a labor-intensive option is increasingly becoming a thing of the past. It is much easier and more reliable to make a well from concrete rings.
It is better to purchase rings with a ¼ lock for these purposes. This will make it easy to center them on each other, and will also simplify the work of waterproofing the joints.