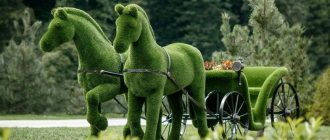
A well-groomed and landscaped dacha helps create an atmosphere of peace and tranquility. A DIY stork for the garden is an excellent addition to flower beds, flower beds and lawns. This bird is a symbol of happiness, prosperity and prosperity. A stork garden sculpture looks good anywhere. It can be installed on the ground, roof, pole or tree. To make the product more realistic, a technique such as constructing an artificial nest is used.
Stork figurines for the garden bring happiness and blessings, and are also a good decoration for lawns and flower beds.
Next, we will consider various options for making a stork statue and a nest yourself from various available materials.
How to make a stork for your dacha with your own hands: master class
A DIY garden stork is one of the favorite crafts of summer residents and gardeners, and there are many variations of its execution on the Internet, but the manufacturing principle is approximately the same in all cases, regardless of the materials used and the richness of the decor. Read how to make beautiful wooden signs for your home here.
First of all, the head, neck, torso, wing frame and legs are made, which are connected with fastening tools.
The remaining time is devoted to the rather painstaking procedure of cutting, fringing and decorating the feathers - they will make up the plumage of the bird’s body, neck and tail. There are homemade options without using plastic bottles, but they are less common. Let's take a closer look at different options for making a stork in this article.
Test of strength
Before the birds arrive, it is important to make sure that the nest will not crumble as soon as the bird family settles there. Check your strength every year
design. Remove excess branches, dirt, strengthen the nest. Then the chances that it will be inhabited by long-legged inhabitants will increase.
We recommend reading:
- How to make a decorative border - features of choice and options for installing a decorative border (120 photos and videos)
- How to make a washstand - a step-by-step description of how to make a washstand correctly with your own hands (135 photos and videos)
- DIY house for children - 150 photos, drawings, video master class and step-by-step manufacturing instructions
Materials and tools for garden figure
The stork figurine consists of a head, beak, neck, body, legs, wings and white plumage with layers of black feathers. All parts are fastened together with a furniture stapler and seated with universal glue.
The stork's body can be cut out from a wooden block of the required size, polystyrene foam or a 5-liter plastic canister.
To make a stork you will need:
- 1.5 and 1 liter plastic milk bottles;
- plastic bottles of 1.5 and 0.5 liters for kvass or beer;
- canister 5 l;
- scissors;
- knife;
- glue;
- self-tapping screws;
- a piece of foam;
- corrugated tube;
- steel rods;
- frame mesh;
- thin wire;
- sandpaper;
- furniture stapler;
- red acrylic paint.
The stork's plumage is also made from transparent bottles, but then the plastic under the feathers should first be painted with white and black acrylic paints.
Several ways to prepare gypsum mortar
The solution hardens quickly after preparation. This is both its advantage and disadvantage. Plus: the time for making crafts is reduced, minus - you may not have time to make the product. There is also another negative point: fragility. You need to be extremely careful when transporting the figurine so as not to break it.
When making sculptures from plaster, it is very important to prepare the solution correctly. There are many ways, let’s look at the most popular ones
- Add gypsum to water in a ratio of 7 to 10. Mix thoroughly and add 2 tbsp. PVA glue. Thanks to this component, the mixture will be more elastic.
- Mix gypsum with water (6 to 10). After mixing, add 1 part slaked lime. This will make the mixture plastic, and the sculptures, after drying, will be harder and more durable.
A more complex process step by step:
- Dilute 1-2 jars of gouache in water.
- Stir thoroughly until the paint is completely dissolved.
- Pour gypsum into the colored water, stirring gradually (10 to 6 or 10 to 7).
- Mix until smooth, similar to pancake batter. Watch carefully to ensure no bubbles form.
- Gypsum is added to water, not the other way around. This helps avoid dust.
Stages of manufacturing from plastic bottles
Having prepared the necessary materials and tools, you can begin making the components of the craft. Find out about beautiful wooden fences with your own hands here.
It is important that all parts of the stork’s body are proportional to each other.
Head
Using a sharp foam knife, the outline of the head with the beak is cut out, after which the surface is sanded and the edges of the beak are smoothed with sandpaper. If desired, the head can be painted with white paint - the coating will give the future product a rich white color and create an additional barrier from the sun, wind and rain.
The beak consists of 2 plates, which are attached to the head with self-tapping screws. For the beak, the neck and bottom of a dark plastic bottle are cut off, and the remaining part is cut into rectangular plates. Triangles are cut from the resulting blanks, which will subsequently become the upper and lower parts of the beak.
The plates are bent in the middle and screwed to the junction of the head and beak.
Paws
The legs are cut from 2 half-liter bottles with dark walls, after first cutting off the bottom. The fingers of the future bird are cut from the very edge to the neck of the bottle - you should get 3 in front and 1 in the back, and are bent outward.
Each finger is shaped into a long, sharp triangle using scissors.
Plumage
Processing blanks for feathers to give them a beautiful natural shape with feather veins is the most labor-intensive and time-consuming part of the work.
To cut out feathers, the bottom and neck of the bottle are cut off, and the cylinder of the bottle is cut into 6 equal parts - 6 feathers. They will be of different sizes: small for the body plumage, longer for the tail. Each feather must be given airiness by creating a fringe edging around the edges. This article will tell you about forged metal gazebos for summer cottages.
Feathering on the neck can be done in 3 ways:
- cutting out even smaller plates than for the belly, decorating them with fringe and curling them with scissors;
- cutting off large plates the length of the neck and notching their edges;
- cutting off half the bottle and making deep sharp cuts in the resulting plates.
Each feather is a rectangular plate made from a plastic bottle with a rounded or embossed edge.
Frame
It is convenient to make the stork’s body from a 5-liter canister, the handle of which is first cut off. Then a mesh mesh is attached to the container, to which future feathers will be attached - it is bent and cut into the shape of a wing.
Next, you can begin assembling the main part of the product - a neck tube is inserted into the neck of the canister, and 2 holes are cut in the lower part, through which a long piece of thick rod bent in half is threaded - these are the legs.
The grids are fixed with wire or steel brackets on the canister.
Assembly and decoration
The stork is assembled starting from the head - it is connected with wire to a corrugated tube and additionally fixed with hot glue.
The feathers are secured with a stapler, starting from the bottom of the canister and then upward in layers. The tail is attached to the back of the figure. The feathering is also applied to the mesh in layers, starting from the outer edge, and fixed with wire. In this case, black feathers are located on the outer edge. You will get only about 6-7 layers of feathers. The outer row connecting to the tube is screwed with self-tapping screws.
Prepared plates with sharpened edges from bottle halves are wrapped around the neck.
The number of feathers depends on the location of the wings: the option under consideration is designed for folded wings, but when flapping, the wing mesh is covered with feathers on both sides and the back of the stork is also made.
After assembling the bird, you can begin to creatively design the craft.
The eyes can be bought ready-made in stores that sell parts for knitted and sewn toys, and glued with hot glue. For insert eyes, choose large black beads or balls. You can also paint the eyes - with simple black or colored paints to suit your taste.
If you used transparent bottles during the work, you need to paint feathers before cutting them, after wiping the surface of the coating with an alcohol solution.
The beak and legs of the product also need to be painted with red paint. Alternatively, you can wrap them with red tape.
Basic mistakes
When creating gypsum products, you should avoid the following common mistakes:
- Pouring water into plaster. The result will be a lumpy solution, unsuitable for further work.
- Creation of large plaster figures without a reinforcing frame. The greater the weight of the mold, the greater the likelihood of it breaking.
- Mixing large quantities of plaster at once. It must be remembered that gypsum tends to harden very quickly, so it is recommended to mix it in parts.
To decorate a garden or plot, you can choose ready-made figures from different materials, but hand-made gypsum products will make the design unique. In this case, you just need to choose the type of figures, determine the composition and you can begin the simple creative process. Working with gypsum will not take much time due to precise adherence to the technology for using the material.
What else can you make a stork from?
Craftsmen manage to create masterpieces from everything lying around in the garage, including a greenhouse made from plastic bottles, a greenhouse made from PVC pipes, and also use leftover building materials after renovations. You can safely take note of several of these variations of garden storks - making them will not be more difficult than the previous option.
From polyurethane foam
Using this method, you can create a garden sculpture by turning it and giving the stork a realistic image. The “skeleton” of the product will be a steel frame - steel rods are welded to each other, and then other elements of the stork’s body are attached to them.
To make a stork you will need:
- 5-liter plastic bottle;
- polyurethane foam;
- steel rods;
- Styrofoam;
- dye;
- soil solution;
- scotch;
- knife;
- rasp.
You need to put a bottle body on the frame, and attach sharpened pieces of foam plastic to each other with tape to the neck rod. Curly hips made of foam are secured in the same way.
It is noteworthy that in this craft there is no need to tinker with the feathers for a long time, collecting plastic bottles and processing each feather - instead, you can use natural feathers, gluing them to the surface of the body and neck with universal glue.
The foam part of the stork is moistened with water, and then foam is applied to it. It is easy to give the hardened foam any shape by cutting off the uneven edges and cleaning the shape with a rasp until the desired final result is obtained; this can even be done with garden shears for trimming bushes. Next, the surface of the sculpture is primed and covered with acrylic paint, fixed on top with an additional layer of varnish. The varnish helps to increase the resistance of the coating to wind, dust, water and UV rays.
From plywood
This is a method of making a wing without the use of mesh and foam - the entire figure is formed from plywood blanks. Rabbit cages are also made from plywood.
Even with the use of waterproof plywood, the possibility of the sculpture getting wet during the cold season increases, so it is recommended to store it indoors until the weather warms up.
To make a stork you will need:
- plywood;
- plastic bottles with white and dark walls;
- hot glue gun;
- rods;
- jigsaw;
- self-tapping screws;
- scissors;
- screwdriver;
- furniture stapler;
- red acrylic paint.
It is advisable to first apply the elements of the body and wings on paper, creating a “pattern” of the parts before cutting them out on a sheet of plywood. The wings are screwed to the body with self-tapping screws. The legs are made of steel rods and are attached with staples to sheets of plywood that serve as the body. Plywood sheets are also used in the construction of a dog house or enclosure for a shepherd dog.
Feathers are created from bottles, and each plate, in turn, is processed along the edges with scissors until an airy fringe is obtained. The plumage is applied to the entire surface of the stork, starting from the back: first, black feathers are laid out, and then white ones, from which the bird’s tail is also created.
Each workpiece is sanded along the edges and the surface is primed.
Next, you can decorate the figurine using acrylic paint:
- a layer of red paint is applied to the plywood beak;
- You can draw the eyes yourself.
The rods of the paws can be sharpened from the bottom edge so that they can easily fix the product in the soil.
From foam plastic
The foam stork is a monolithic structure, lightweight and easy to manufacture.
To work you will need:
- foam sheets;
- steel rods;
- universal glue;
- scissors;
- saw;
- furniture stapler;
- sandpaper;
- acrylic paint black and red.
First of all, the legs are made - the lower edges of 2 steel rods are sharpened, and the upper edges are bent for subsequent fixation in the foam body.
The main creative work on such a stork consists of creating the correct foam blanks, because the finished bird will consist entirely of it. The body, head and neck are drawn in foam and cut with a saw. This link will tell you about plastic barrels for watering your dacha.
Iron rods are stapled into the stork's body, its surface is sheathed with a layer of foam plastic for volume, and wing blanks are glued on top. The neck and head are mounted on a rod.
The stork's beak is painted red, and it is better to make inset eyes from beads or balls - this way the figure will be more expressive.
Next, the final modeling of the figure is carried out, giving it smooth and beautiful features with sandpaper and a knife. This is the case when you don’t have to make feathers for the bird - the embossed plumage can be cut directly on the body of the product, simply accenting the edges of the wings with black paint.
Choosing plywood
One of the best ways to create a stork figurine is to use plywood sheets. They are easy to process and cut, quite durable, but at the same time lightweight, and boast good water resistance. To count on all these benefits, you should choose plywood wisely. Here are the main recommendations:
- if the figurine will be placed outdoors, it is better to buy FSF brand sheets or laminated material, which is better protected from moisture;
- plywood of medium thickness is suitable for creating crafts - you should not go below 6 mm (the strength and durability of the product will suffer), and there is no point in overpaying for 15 mm sheets (10-12 mm is quite enough);
- If you plan to paint a stork figurine, then you can purchase medium or even low grade material. If the main treatment is coating with transparent varnish, then it is better to choose high-grade material with a minimum number of defects (chips, knots, etc.).
The most profitable option is to use plywood residues that remain after repair or construction work in a country house or cottage. Depending on their size, you need to choose the dimensions of the future figure.
What you will need besides plywood:
- manual or electric jigsaw - for cutting sheets;
- emery cloth - will allow you to sand the edges;
- paints (preferably acrylic), varnish and brushes - for painting the bird;
- a drawing or template of a stork, the contours of which are transferred to a plywood sheet;
- pencil - with its help, the figure of the bird is transferred to the workpiece;
- wood glue - if you intend to join individual pieces into one whole figure.
The main stages of making a stork from plywood with your own hands:
- Creating a drawing of a bird or searching for a ready-made image.
- Transferring the image to a piece of plywood.
- Cutting plywood along the contours marked on the plywood
- Grinding the edges to obtain a smooth product without burrs or other flaws.
- Manufacturing of auxiliary elements - legs, wings and/or base (if required).
- Decoration - painting and applying varnish for additional protection.
How to make a nest with a stork for the garden
The classic composition with storks in a nest traditionally symbolized a cozy home with a large family among the East Slavic peoples, indicating fertility and cordiality of the owners. Installing storks in a nest on your own property, flowerbed, roof of a house, or area for recreation with children will help not only decorate the area, but also show guests that the owners are jacks of all trades. This material will tell you about outdoor country washbasins.
Old wheels from a bicycle, cart, trailer or wheelbarrow will fit under the frame of the nest. You can weave a nest from bushes and live or dry branches, securing the entire structure with steel wire and installing it on a special platform consisting of X-shaped pads.
Let's start creating
It’s easy to make an origami paper crane with your own hands.
First, let's fold a simple crane. You will need a square-shaped piece of paper.
- Fold the square in half on one side and unbend it. We do the same with the second side;
- Four folds have formed on the workpiece. We place the figure with the angle up and tuck the side parts inward;
- Pull apart the side layers. We bend and fold back the right and left edges, then bend and straighten the top of the figure. Turn over and do the same with the other side;
- We lift the top layer of the square and bend it upward;
- Turn the workpiece over and do the other side in the same way;
- We push the layers apart on the sides and fold the side parts of the figure towards the middle;
- Let's turn the crane to the opposite side and do the same actions as in step 6;
- Now we will spread the side layers of the workpiece and turn the lower sharp tips up. We press on the sides, align the craft and turn the nose and tail of the bird to the sides;
- We form the nose of the bird, straighten the wings and that’s it, the work is finished.
The action plan for assembling the crane can be viewed here:
Conclusion
- The most labor-intensive work on a garden stork is creating its plumage - each feather must be worked on by hand, giving the edges a jagged or fringed shape so that they look like natural bird feathers.
- Feathers from transparent bottles should be painted white and black so that they imitate the natural plumage of a stork.
- Before painting the feathers, they need to be wiped off from dust and rubbed with an alcohol solution so that the paint goes on evenly.
- The easiest way to make a stork is to make it entirely out of foam and sharpen it with a knife and rasp to the desired shape; the simplest wing without a frame is made from a piece of plywood, which is screwed to the homemade body with self-tapping screws.
- The body with a neck can be made from a plastic 5-liter canister with a cut off handle and neck, into which a corrugated tube is then inserted.
- You can make garden sculptures and stone crafts from leftover building materials lying around after renovations, and it will cost almost nothing. Additionally, you will only need to buy acrylic paints in order to draw the eyes and color the feathers.
Scenic wrist bracelets
The child will not be afraid of the difficulties of the work if the technology for making the craft is explained to him in an accessible form. Subsequently, he will be able to make various decorations with his own hands, without the help of adults, which his friends will see and appreciate and will gladly accept as a gift.
Making a children's bracelet
Before you get started, you should consider the acceptable color combinations of seeds. Then, using one or more rubber bands, fasten the seeds and turn them into a finished product - a necklace or bracelet. Depending on the brightness and extravagance of the decoration, it is worn daily or only on holidays.
Step-by-step instructions for creating a “Garden Mushroom” figurine
Fungus on the base of a plastic bottle. For the form you will need:
- Plastic bottle for mushroom stem.
- An old bowl or rubber ball.
Materials for sculpture:
- Sculptural plaster;
- PVA glue
- Construction knife with a retractable blade Ordinary compass; Simple pencil;
- Facade paints,
- Decor (optional) Various beads, flowers for decoration;
- Protective varnish,
- Food film,
- Vaseline (or other fatty substance).
Sequence of work:
Spread cling film of the required size with a mixture of sunflower oil, liquid soap and water. (The solution is prepared in a ratio of 2:1:7, you can measure it with tablespoons)
Wrap the inside of the mold with film so that after hardening it is easy to remove the plaster from it.
Cut the plastic bottle crosswise (in diameter) so that the part with the neck looks like the stem of a mushroom. Dilute a small part of the gypsum by carefully pouring the powder into the water and stirring gently. Pour the mixture into the mold
To save material, you can put a smaller one inside the main bottle. When the mushroom stem is ready, it is carefully removed from the mold, after cutting it with a construction knife. It's better to make several cuts. Then they start making the hat. To do this, use a rubber ball cut in half or an old bowl. The mold is treated in the same way as a plastic bottle; the inside is lined with a greasy film.
Pour the gypsum solution to the desired level. You should not make the hat too voluminous, then it will be easier to hold on the stem. As soon as the solution in the cap begins to harden, the finished leg is inserted into the center. Wait until the “structure” is completely dry, about 30 minutes. They are primed, you can buy a special façade compound or use a 1:2 PVA glue solution. Painting begins after 2 - 3 hours. Facade paints are used. Finally, a protective varnish for exterior use is applied to the dried paint.
The sequence of making the sculpture “Mushroom”
Where to put?
A garden figurine of a stork in a summer cottage is an excellent decorative option. You can place the bird anywhere.
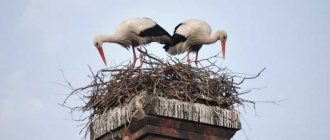
- One of the places where the figurine is placed is the roof. Most often, a whole composition with a nest is installed on the roof. To ensure that the decor holds tightly, crossed boards are used. The sculpture is attached to such a base.
- A chimney is also suitable for installing a stork figurine. However, remember that smoke and sparks escape. The figure must be protected with a steel sheet or raised by a meter using metal rods.
- The figurine can be placed on a tree or stump. Some summer residents use an uprooted old tree for the base, on which the sculpture is installed. A family of storks in a nest looks great on a stump. This composition will become the main accent of the garden plot.
- Single bird figures look great near bushes. Compositions of several storks resting in the shade of vegetation look original.
- The sculpture is placed in the middle of the beds.
- Some summer residents install a figurine of a stork in front of the entrance to the house. Such a figurine at the entrance creates an atmosphere of comfort and hospitality.
- In order for the stork to bring good luck and happiness, there are some nuances in the placement of the figure. Some landscape designers advise installing stork sculptures on the sunny side, as the magical properties of the sculpture are enhanced under the sun's rays.
- Another placement option is to install the craft near the water. You can create a small artificial pond and place a stork and his family next to it.
- You should not install the figurine with its back to the windows of the house. The bird should look into the house. Correct placement of the figurine will give strength and energy to all its inhabitants.
- Since the stork is a symbol of procreation, the bird can be placed near the bedroom window. At the same time, do not forget that the figure should look out the window.
Making a craft is very simple. You can create a unique figurine or composition of several birds. In this case, the product will look no worse than a purchased sculpture.
See below for a review of stork garden figures.
Creative recycling of tires, or all about flower beds
To make a flower garden, all you need to do is paint tires of different sizes in a bright color and stack them in a heap.
Self-tapping screws or screwdrivers that fasten the tires along the inner surface will help to give the structure strength. After this, earth is poured inside each, having previously covered the inside of the tires with geotextiles. The multi-tiered beautiful flower garden is ready.
A single-tier flower bed, reminiscent of a daisy, looks no less beautiful. But the tires will have to be cut for it.
This is not easy to do. Although, having a sharp, strong knife and strength, it is quite possible. It is recommended to lubricate the knife blade with grease so that the rubber does not “jam” the metal. It is better to use a grinder or jigsaw with a blade made of durable steel and a reverse tooth.
Video: DIY tire flowerbed
Preference for proven nesting
In order to better attract a living talisman to their home, many try to make a new, beautiful nest. However, storks have their own habits and are much more willing to choose already proven homes.
But you can artificially age such a structure and lure feathered residents to it. To do this, you need to take several bunches of brushwood, last year's straw, lime and manure from large ungulates.
Tie brushwood around the perimeter with any cut material or ribbons, since wire is dangerous for birds. Scatter straw on top and sprinkle with lime mixed with manure, creating the appearance of traces of droppings. Birds accept such a nest faster than uncomfortable clean surfaces.
What should a new beekeeper know?
Every beekeeper should know this:
Activities of a beekeeper. Many people want to become beekeepers and sometimes they don’t really understand whether they can do beekeeping or not. It is necessary to find out the compatibility of bee venom with the beekeeper’s body. If there are no allergies, then you need to purchase the most basic equipment.
Location of hives. It is necessary to understand how to place hives correctly. The location is from another hive to 2 meters from another house, you cannot warp them.
Care. A bee colony is no less worth caring for than any other pet. You can't kill drones.
Selection of bees. It should be based on your region.
Frame location. If the frames are placed incorrectly, the bees will make two tongues, not honeycombs, so it will need to be processed into wax.
Building bees. At the end of summer, build up young bees for the winter. Winter bees live 6-7 months.
Feed. You should not skimp on food for winter bees, as they may not survive until spring. But you shouldn’t overfeed either.
Wintering of bees. There is no need to insulate the hive too much. For the winter it is necessary to open 2 entrances. Advantages – you don’t need to spend anything; bees are not afraid of the cold.
Using polyurethane foam
Stages of making a stork from foam plastic in parts.
An unused foam balloon can be successfully used to make a three-dimensional figure of a stork. Using foam, you can quickly make a three-dimensional blank from which to cut out the desired shape.
To work you will need:
- plastic bottle with a capacity of 5 l;
- scotch;
- Styrofoam;
- steel rod;
- primer;
- paint brush;
- acrylic paints;
- sharp knife;
- rasp.
There is a similar set in the pantry of every home. There are no additional costs required.
A garden decoration in the form of a stork sculpture is made in the following sequence:
- The steel frame is assembled. For strength, it can be fixed by welding.
- A plastic bottle is placed on the frame.
- Styrofoam strips are taped to the neck wire. You can grind them to shape in advance and glue them together.
- The pins intended for the legs are fitted with thigh parts machined from foam plastic.
- The finished frame is moistened with water. Foam is being applied. It covers the entire surface of the workpiece, except for the wire simulating legs.
- After the foam hardens, all excess is cut off. Relief is created using a knife and rasp. After finishing, the sculpture is cleaned of sawdust and dust.
- The dried product is coated with a primer. Next, the bird needs to be painted with acrylic paints. Varnish is applied over the paint.
For reliability, they need to be placed on polyurethane glue.
Read also: European euonymus cascade photo growing conditions
The finished figure can be installed in the garden for a long time. A stork decorated with acrylic paints withstands ultraviolet radiation, cold and moisture.