Winter is not the best time for small birds. Frost, snow, lack of food and constant competition with larger representatives of birds cause the death of huge populations. Caring people can help younger brothers survive an unfavorable period. A feeder is the easiest way. Traditional bird "canteens" are a tray with a roof made of wood. But the classic options require certain skills in working with a hammer and nails. There is a simpler and more affordable alternative. You can make feeders from plastic bottles with your own hands.
What tools and materials will be needed
When creating a house, you need the following materials, which can be found in almost any home:
- empty plastic bottle of suitable volume;
- electrical tape or tape;
- cutter;
- rope.
These materials are suitable for creating a classic feeder.
For more original and interesting products, you may need some other tools, for example:
- hot glue;
- drill;
- decorative ornaments;
- screws;
- Bowl;
- “perches”, etc.
Also, when making a feeder, you need to follow a few simple rules:
- Bottles must be used only clean. If the container contained sweet foods or household cleaning products, they should be rinsed thoroughly. The most optimal way is to soak the bottle in a solution of lemon juice and water (no more than a day). After which the bottle must be thoroughly washed, first using soap (without fragrances or dyes), and then with clean running water.
- Do not use toxic items or items containing chemicals. additives.
- The edges of the feeder must be carefully processed so as not to harm the birds.
- It is necessary to ensure that seeds that are harmful to feathered comrades, for example, fried sunflower seeds, do not get into the bird’s “dining room”.
- Before placing the “dining room”, you should make sure that the birds do not fall into the trap and do not damage their wings or feathers.
- Do not place feeders near roads or other places with high sound noise. It is best to do this near forests or a large cluster of trees, in courtyards, or in the country.
We involve children in the process
The child not only welcomes bright, beautiful things, but also understands that feeders make the wintering of birds much easier. As a rule, children take up work with interest, realizing that they can help birds survive in harsh conditions.
In order not to expose the little craftsman to danger, it is better for an adult to undertake all processes associated with cutting and piercing the material. The child can design the external design of the feeder and help with the installation of the product.
Bonus – pleasant time spent between parents and children.
Bird feeder from a 1.5-liter bottle: step-by-step instructions
The simplest option for making a “canteen” for birds is made from a 1.5 liter bottle:
- Laying the bottle flat, cut out symmetrical holes on two opposite sides so that there are “walls” of at least 1-2 cm. The shape of the holes is not particularly important, but usually an oval or rectangle is used.
- The sharp edges of the slots must be covered with electrical tape so that they do not harm the feathered comrades.
- It is recommended to make tiny holes in the bottom of the bottle so that the food does not spoil due to excessive moisture.
- You need to drill a small hole in the lid: you need to thread two edges of the rope into it so that a loop is formed on top. Then the ends of the rope need to be tied into a tight knot. You should make sure that the rope is strong enough to support the weight of the millet and birds.
- Having screwed the cap on the bottle, all that remains is to find the most suitable tree and hang it, not forgetting to leave the food.
Feeders made from such improvised means have a number of advantages:
- Reach and economy;
- ease of use (plastic is a fairly flexible and thin material);
- cold and moisture resistance;
- impermeability to wind and dirt.
Advantages
As we have already said, in the usual sense, the structure with bird food is made of wood. The process of its creation is very labor-intensive and requires special skills and knowledge. Therefore, a canister bird feeder is a simple and correct solution, especially for beginners. This design has a number of undoubted advantages.
- A properly made plastic feeder will not allow the food to get wet in the rain and will protect the contents from snow.
- Low cost. In most cases, you can use a used canister to create a refectory for birds. For example, a container for fabric softener or liquid soap will suit you.
- Plastic is easy to cut and you can easily create the necessary holes in it.
- The canister is sufficiently resistant to adverse weather conditions. She is not afraid of severe frosts and gusts of wind.
5 liter bottle bird feeder
5-liter plastic bottles have enough volume to make your own feeder for larger birds, such as pigeons, cuckoos or crows:
- It is necessary to make gate-shaped cuts from the edges of the bottle (the top, uncut, stick should be on the top side). By bending the resulting piece of plastic, you can get an improvised canopy that will protect the products inside from dirt and dampness.
- Each of their sharp edges should be covered with electrical tape.
- At the bottom of the bottle, closer to the edge, you need to drill a hole into which to insert a fairly strong rod. It is recommended to secure it with hot glue to prevent the feeder from slipping and falling.
- You can secure the feeder to a tree by attaching a rod to a tree branch using rubber bands or rope.
5-liter bottles have a special handle next to the lid - it is advisable to get rid of it, as birds can get stuck in it.
Bird feeder made from 2 plastic bottles
Using 2 plastic bottles you can make a so-called bunker feeder.
Despite the name, making it is quite simple:
- For the first bottle, you need to cut off its top by 2-3 cm.
- The second bottle must be placed horizontally and two round holes must be cut. Both holes should be on the same side of the bottle: the first, it should be slightly larger than the diameter of the cut side of the first bottle, it should be placed closer to the bottom of the bottle; the second, larger one, is cut close to the neck.
- The first bottle, after filling it with food to the brim, must be carefully inserted into the small hole of the second bottle, bottom up. The bottles must be perpendicular to each other: the first bottle must be placed vertically, the second - horizontally. It is worth noting that only part of the food should spill out of the first bottle into the second, but if all of it spills out, then something was done incorrectly.
- The larger hole in bottle No. 2 is intended for bird landing, so its edges should be covered with electrical tape.
This type of do-it-yourself bird feeder made from a plastic bottle is the best for the following reasons:
- Most of the food is protected from contamination and excess moisture, which means it will remain fresh longer.
- Birds, due to their food consumption habits, often scatter some of the food. Thanks to the feeder-hopper, the spilled portion of the feed will be reduced to a minimum.
- In case of accidents (falling feeder, rain or snowfall), only part of the food will be spoiled, while the rest of the food will remain intact.
Original winter feeder made from plastic bottles
Winter is the time of the most unfavorable conditions for birds: most of the food (of which there is not very much in the cold) that birds can get is hidden under thick snow, and strong gusts of wind and snowfalls do not make the task any easier. That is why it is very important to make feeders specifically for the winter period.
However, not every feeder may be suitable for the cold period and “winter feeders” have a number of features:
- The presence of a canopy that protects food from snow.
- The walls of the feeder must be of sufficient height to protect the food from sudden gusts of wind that could blow it out.
- In order to avoid the product falling from the tree, it is necessary to equip the feeder with a sufficiently strong latch.
- The base of the feeder should consist of a material with high frost and moisture resistance.
To make a suitable feeder you will need Zbutyl: 2 1.5 liters and one 5 liter:
- A large bottle will become the basis for the feeder. On its three sides it is necessary to cut 3 holes in the shape of the letter “P”: 1 large and 2 smaller ones. Bend them upward to form a canopy. You need to make a hole in the lid slightly larger than the neck of a small bottle.
- You need to make a couple of holes in the bottom of one of the small bottles, and then insert it inside the base bottle.
- “One and a half” No. 2 must be cut in such a way as to form a funnel. It needs to be inserted onto the neck of the first 1.5 liter bottle.
- Finally, after filling in the food, you need to screw the lids on the bottles.
Automatic bottle feeder
Those who are planning to make such a “canteen” for the birds will need 2 bottles (their volume does not matter).
First bottle:
- Trim the bottom of the bottle and one of the sides like a child's spatula.
- Stepping back at least 3 cm from the cut end, cut a hole slightly larger than the neck of the second bottle.
Making a bird feeder from a plastic bottle with your own hands is very simple if you follow the step-by-step instructions.
You don’t have to do anything with the second bottle: you just need to remove the lid and pour the food inside.
Then:
- Insert the second bottle, neck down, into the opening of the first bottle and secure them together using hot glue.
- Make two tiny holes at the bottom of the second bottle, a short distance from each other. Insert one end of the rope into the hole and pull it out of the other (loop down). Tie the edges of the rope together into a strong knot.
- Perform the same operation with the bottom of the first bottle.
Feeder with dispenser made of 2 plastic bottles
To make a bird feeder with automatic food supply with your own hands, you will need a couple of plastic bottles: 5 liters. and 1.5 l. In larger bottles, large holes must be cut around the entire perimeter, which must be located at least 2 cm from each other and from the top and bottom of the bottle.
A small bottle needs to be filled to the brim with food and inserted into a large one, neck down (without a lid). Then the bottom of the “one and a half” needs to be cut off. Close the large bottle with a lid and a string threaded through it. You can replenish food supplies by unscrewing the cap of a large bottle and pouring grain into a small one. Sharp edges must be taped with electrical tape.
Each time the amount of food in the large bottle decreases, it will begin to pour out of the small bottle.
Teremok
Not a tricky product for tits - for food in winter, and as a drinking bowl in summer.
Stages:
- The top is cut off; this will be the roof of our tower.
- The height of the bottom needs to be reduced by about a third.
- When cutting out the window, bend the “tongue” of the plastic outward, forming a kind of bridge for landing. Make a larger window so that not only small winged birds can enjoy the food.
- You can decorate the details if you wish. To do this you will need paints of any palette. They also use stickers or self-adhesive film, etc.
- Next, cut two holes in the bottom part of the house and one in the top part - the plug.
- We stretch a long rope through the top.
- Your creation is ready.
All that remains is to pour the food and hang it on a tree branch in the yard of the house or in the park. Now you can wait for guests and watch them. They will quickly fly in to feast on you.
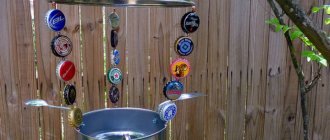
Feeder made from bottle and spoons
For such a “dining room” it is necessary to do 1.5 liters. The bottle has several holes: 2 on each opposite side (spoons should be placed perpendicular to each other). Moreover, the size of the holes is also distributed in pairs: 2 of them must be at least 2 times larger than the others. The size of the small holes is selected depending on the volume of the spoon handle.
You need to insert a spoon into the holes so that the handle is in the small hole, and the “spatula” looks out under the larger hole. You need to cut a small hole in the bottle cap for the rope. Then you need to pour the food into the bottle and close the lid. The principle of operation of such a feeder is very simple: food for birds spills into the spoon as it is emptied.
perch
A long branch as thick as a pencil is used to pierce the feeder right through. Its ends protruding from both sides will become perches, providing the birds with a comfortable landing.
Holes for the perch are cut at a distance of 40 mm from the bottom of the feeder. Their diameter should ensure a tight fit of the rod. Otherwise, the food will spill through them.
Instead of a branch you can use:
- simple pencils;
- durable chopsticks;
- wire, etc.
To increase the number of “seats”, additional perches are installed. They are placed 50-70 mm above the main ones and at an angle to the latter.
For reliability, the rods are fixed with glue. At the same time, it will act as a sealant, preventing water from seeping through the gaps.
Feeder made from a bottle and a plastic plate
Instructions:
- In a deep plastic bowl, cut a hole in the center, do the same with the lid. Fasten them with a bolt and screw.
- Make several small holes at the neck of the bottle so that the food can pour out through them.
- Make a hole at the base of the bottle, insert both ends of the rope into it and tie a tight knot (you should get a loop outside the bottle).
- After filling the bottle with food, screw on the lid and plate. This bird feeder works on the following principle: food comes from a plastic bottle into a plate, eliminating the need to constantly fill the feeder with your own hands.
How to decorate a finished feeder?
There are several ways to make a product more attractive:
- Paint, paint with patterns using non-toxic paints;
- wrap with colored twine or ribbons;
- stick on various applications;
- attach materials found in the forest: spruce branches and cones, bark, rowan branches, etc.;
- Instead of standard cutouts on the “dining room”, you can use artistic carvings.
In fact, you can make a feeder more attractive in a huge variety of ways, the main thing is to show your imagination.
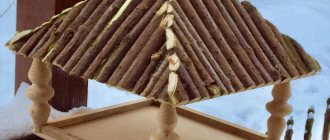
For example, you can make a cute little mansion feeder using some materials:
- Broom made of dried twigs;
- non-toxic paints;
- sticky mass;
- rope.
Coat the entire surface of the bottle with glue, and then wrap it with twine so that there are no gaps left. Place the broom rods evenly at the neck, not far from the lid, and tie them tightly with twine. When the product dries from the glue, you can draw beautiful carved windows on top of the twine.
For feeders built for the cold season, you can use unnecessary clothing, such as socks or a T-shirt (depending on the size of the bottle). However, it is necessary to ensure that the clothes are clean and do not emit strong odors that can scare away the birds.
To decorate this way, you just need to pull an item of clothing onto the feeder, sew it at the bottom so that the clothing fits tightly to the bottle, and cut out holes corresponding to the holes in the bottle. For the safety of the birds, you should glue the bottle with clothes near the holes, otherwise the bird may fall into the trap.
It is not always easy for birds to find food for themselves, so humans must help them with this.
Making your own bird feeders from plastic bottles is not only a good deed for the fauna, but also a great way to spend time with your family. In addition, this hobby will help to conduct a much-needed educational conversation for modern children about the importance of preserving nature.
New Year's gift box
After the New Year, there are often gift boxes left over that are a pity to throw away. They are colorful and bright and can be useful for something.
When cutting out windows in a box, leave enough space from the corners of the package, at least three centimeters. This will help maintain the reliability of the structure. You can tape it on the front side so that it doesn’t get wet so quickly and become unusable. Find a suitable location and place the feeder within sight.
Small birds do not have very good eyesight, so at first you can scatter food under a homemade feeder to attract their attention. Give the birds time to get used to you, and they will come every day for a meal.
«>