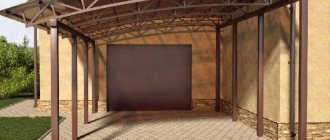
Owners of private houses and summer cottages with a fenced area often face the problem of parking a vehicle. Friends or relatives who have to leave their cars outside the fence may come to visit. This is not only inconvenient, but also unsafe, so you should think about creating parking spaces. Building a garage is an expensive and complex procedure, an alternative to which is a carport. What should be the dimensions of a carport for two cars and how to calculate them correctly? About this in the material.
How to choose the size of a carport for two cars
Planning a carport involves an individual design that takes into account the wishes of the homeowner and the size of his vehicle. When choosing a design, first of all, you need to determine the dimensions of the car, finding out the width with the doors and trunk open. In addition, you need to determine the location of the structure and measure the area where construction is planned.
When developing a project, you need to take into account all neighboring buildings located on the site, indicating their sizes. It is also necessary to indicate the location of communication systems, since the carport for two cars should not come into contact with electrical wires or pipes.
The wider and larger the design, the more convenient and practical it is, but at the same time more expensive. Of course, the extra width will have a positive effect on car parking, since you won’t have to get into frames limited by pillars. This problem is felt especially strongly at night, when there is a risk of opening the door, damaging the body structure.
The dimensions of the canopy must be calculated taking into account roofing materials in order to reduce waste to a minimum.
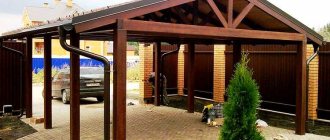
To do this, you need to determine in advance the type of roof (single or gable) and calculate its area. Attaching a canopy to your home is a more convenient and rational solution that allows you to easily get into your car without getting caught in the rain.
Construction stages
To build a durable structure that can last for several decades and reliably protect the car during this period, it is necessary to consistently carry out the construction stages. Having designed the structure, it is necessary to determine the location of the shelter, prepare construction equipment and begin construction step by step.
Choosing a place on the site
When choosing a location for placing a car shelter, it is recommended to take into account a number of parameters:
- If there is a garage on the site, it is advisable to erect a building in front of its entrance.
- For the convenience of parking two cars, it is necessary to provide convenient access to the shed.
- Since a massive structure creates a large shadow, it should be positioned in such a way as not to block the penetration of sunlight into the house and onto the main part of the site.
- Due to the heavy weight of the car shelter, there must be strong and non-subsidence soil underneath it that can support the concrete platform and supports.
Tools and materials
To build a canopy, you need to prepare a set of tools and materials in advance. The amount and type of base material depend on the type of construction chosen. Additional materials required: cement, gravel, sand, screws with thermal washers, monolithic and cellular polycarbonate. Among the standard tools for installation work, you must use:
- container for diluting cement;
- shovel;
- tape measure and marker for measurements;
- rope and pegs used at the stage of marking the territory;
- drill and screwdriver;
- hammer, axe, saw, chisel.
If metal is used as the main material, then you will additionally need to use a welding machine to fasten sheets of corrugated sheets . For other materials, a basic set of tools is sufficient.
Laying the foundation
Having designed the building and armed with the necessary resources, you can move on to the stage of laying the foundation. The basis for the car shelter is a pile foundation, for which, taking into account the characteristics of the soil, screw piles made of durable steel are used.
Regardless of the type of piles used, holes about 0.5 m deep are dug in advance for them. For concrete piles, a frame made of reinforcement is installed in the holes, filled with mortar. In the case of screw piles, concrete is poured inside after they are fixed in the soil. If pipes act as supports for the canopy, they are filled with cement mortar inside and in the pit.
The foundation is secured with a transverse ligament, after which metal or wooden frame elements are fixed to it.
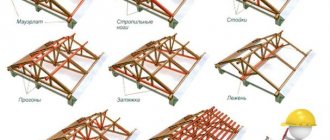
Frame construction
To build a shelter in the shape of an arch to accommodate two cars, it is enough to bend several pipes in an arc or use bars with a rounded shape. Metal arcs are fixed to the structural supports using a welding machine. If desired, it is possible to separately assemble the metal frame and then attach it to the support pillars.
Roof installation
When starting to install a roof, you need to decide in advance on its type. The top of the canopy can be straight or inclined. From the point of view of protection from precipitation, a sloping roof is a more practical option, but during its installation it will be necessary to additionally equip the drainage system. To ensure that precipitation collects in only one place, it is recommended to build specialized recesses at the edges of the roofing material. The roof installation process consists of the following work:
- Preparation of roofing material in the required quantity.
- Trimming and adjusting sheets in accordance with the dimensions of the canopy. To process the material, a hacksaw with small teeth or special scissors is suitable.
- Fixing the polycarbonate to the frame using screws with thermal washers, which prevent the formation of cracks.
- Installation of sheathing. For a standard pitched roof, sheathing is done by nailing boards or welding profile pipes at a distance of up to 90 cm. This figure cannot be exceeded, since the dimensions of standard roofing material are up to 1 m.
- Arranging drainage and laying a waterproofing layer for additional protection against roof leaks.
Carport dimensions for 2 cars: calculation of dimensions and drawings
The appearance and dimensions of the structure directly depend on the dimensions of the vehicles, which will be protected from ultraviolet sunlight, precipitation and other environmental influences. If you plan to transport cargo on the roof of the car, then this should be taken into account by increasing the height of the canopy by 0.5 meters. The calculation of the size of the shelter for two cars is carried out according to the following principle:
- determine the total width of the vehicle;
- when calculating the length of a light building, we focus on the length of a larger car;
- between cars you need to leave free space - 0.8 meters or more;
- Along the perimeter you need to make an allowance of at least 0.5 meters in length in each direction.
Advantages and disadvantages
A carport for two cars has several obvious advantages:
- it can be quickly erected. It will take minimal time to build the structure;
- having a small budget for construction. You can build it with less money on hand than, say, for a garage;
- possibility of resizing. This design can be easily expanded to several machines, even of different sizes;
However, along with the obvious advantages, the main disadvantage is the insufficient protection of the equipment under the building, since it is open.
Drawing layout
Be that as it may, the advantages of these types of structures more than compensate for their disadvantages.
Carport width for two cars
It is much more convenient and practical to make one large canopy than two separate structures. In addition, this allows you to save on building materials and precious square meters of land. In this case, cars can be located one after another or next to one another. In the first case, a long carport is built for 2 cars, the width of which is determined by the dimensions of the larger vehicle. It is enough to measure its parameters by adding 0.5 meters on each side. A large carport with 2 cars assumes that its width will be equal to the sum of the dimensions of the car with the doors open.
How to lay out the site
The easiest and most inexpensive way to make a platform under a carport is to fill it with gravel. To do this, you will need to remove the turf, dig the curb, pour crushed stone and compact it well using tamping platforms. Then the platform will be rigid and ruts will not form.
Compacted crushed stone is a good surface for car parking
Recently, areas paved with paving slabs or paving stones have become more popular. They have a more attractive appearance, but their construction is more expensive. Preparation begins the same way: first the soil is removed. But the pit is made about 20-25 cm deep. Crushed stone is poured onto the bottom, which is also compacted well. Then it is advisable to spread a layer of geotextile on the crushed stone. This is a non-woven material that will prevent the sand that will be poured on top from spilling out and mixing with gravel. Geotextiles also redistribute the load more evenly, preventing the base from sagging under the wheels of a car (it is used in road construction). A layer of sand is already poured onto it, which is also compacted. Paving slabs, clinker bricks, cobblestones and other similar materials are laid in the sand.
Paving slabs
In the middle in terms of costs is a concrete site. The base is also prepared from compacted crushed stone. Wooden planks are laid on it at a distance of 1 m, which are set level or with a slight slope to drain water. These strips serve as beacons during pouring, and then play the role of damping joints, compensating for the thermal expansion of concrete. With this structure, cracks appear less frequently.
Structure length
This parameter also depends on how the machines are located. If there is a long passage to a residential property in the garden area, then it is worth considering a carport for two cars standing behind each other. The width of such a structure will be no more than 5 meters, but the length will be 1.5 meters more than the total length of the cars.
Advantages of a long shelter:
- can combine neighboring buildings;
- fits perfectly into landscape design;
- there is no risk of damaging the car, since they are not close to each other.
Disadvantages of this solution:
- You cannot park a truck;
- high cost compared to a large canopy;
- inconveniences that arise when a car parked behind is leaving.
If we talk about a large canopy, then a typical project assumes a length of about 6.3 meters, but the length depends on the dimensions of the car and can vary from 6 to 7 meters.
To obtain more accurate numbers, you need to know the dimensions of your car, taking them into account when calculating the dimensions of the canopy and drawing up drawings.
Color shades of polycarbonate
Color shades are different, so everyone who contacts our company will be able to choose protection for their car from rain, snow, wind and even ultraviolet radiation to their liking.
- Model No. 1 (green)
- Model No. 2 (transparent)
- Model No. 3 (blue)
- Model No. 4 (white)
- Model No. 5 (bronze)
- Model No. 6 (yellow)
- Model No. 7 (brown)
- Model No. 8 (blue)
Practical recommendations for construction
The optimal height of the shelter, which provides reliable protection from oblique precipitation, is 2 meters. If a minibus or truck is parked under the roof of the canopy, then the height of the structure should be increased to 3-3.5 meters. In this case, you should strengthen the structure with transverse beams, choosing a gable roof.
Length and width when choosing a large carport with cars located next to each other are not particularly important. It is enough that they exceed the dimensions of the car by 1 meter (if the area of the site allows, then by 2 m). If the carport for two cars is made of polycarbonate, then it is better to use an arched shape, which will allow the edges of the roof to be lowered as low as possible. This will increase the degree of protection of the vehicle; in addition, the structure can be sheathed around the perimeter using polycarbonate, lining and other available materials.
Frame materials
Mostly, wood is used for supports - timber or logs, metal pipes of round or rectangular cross-section. Sometimes the supporting columns are made of brick or stone. They are more massive, attract more attention, and therefore must fit into the style of the building that is located nearby.
There are also options when the bottom of the support column is made of brick, and the top is made of wood or metal. And in this case, everything is determined by the style of the house and the site. You should not make brick supports if there are restrictions on the size of the site: they are quite massive and take up a decent amount of space.
All materials (except brick) are processed before use. Wood is necessarily coated with fire retardants (reducing the flammability of the material). Then it is impregnated with compounds that will protect it from damage by wood-boring insects, as well as from all weather conditions.
Interesting polycarbonate carport project
Particular attention should be paid to the processing of wood that will be buried in the ground. It can be impregnated with special compounds for wood in contact with the ground (for example, Senezh Ultra and its analogues). The impregnation performed well during testing. The ends of the pillars that will be buried are immersed in a container with mining for a couple of days. After drying, they can be used without additional measures. 10 years is enough.
The second option is to pour a concrete pillar into the ground, and install a mounting plate, shoe or pin into it, to which a wooden beam is then attached.
Metal poles are cleaned of rust and coated with primer. After welding, the seams are additionally processed and everything is coated with paint in two layers. The second is applied after the first layer of paint has dried to a touch-touch state.