Many owners of country houses prefer to pave paths in their local area using paving slabs. As a result, they receive not only a practical and durable coating, but also a real decoration of their site. Proper laying of paving slabs is the key to ensuring that the coating will cope with the tasks assigned to it. The opinion that hired craftsmen who know the installation features well will do the job better than the owner himself is sometimes erroneous. If you understand the technology of laying tiles, then it is not difficult to cope with the work yourself.
Stages of planning, design and site marking
Laying paving slabs with your own hands begins with choosing the material and planning the site.
Site layout
When planning a local area, you should not go to two extremes - do without paving at all or create a continuous covering over the entire territory. The best option is paths from the gate to the house and to the main buildings on the site and a platform for a car. This way you can avoid mud during rainy weather and at the same time preserve your lawns and perennials.
Looking ahead a little, technically, first of all it is necessary to use “beacons” to mark the area planned for installation. In this case, it is necessary to take into account the angles of the territory and observe both transverse and longitudinal slopes.
Important! The slopes must be determined before the preparatory work begins.
Selection of coating material
Now you need to decide on the choice of covering for the paths. Paving stones are considered the best option because the cost of laying paving slabs is quite reasonable, moreover, the work is easy to do yourself. The following advantages also speak in favor of this option:
- the ability to replace individual elements and dismantle the coating;
- the tiles are frost-resistant and do not float in the heat like asphalt;
- unpretentious in care;
- moisture easily seeps into the seams between the elements.
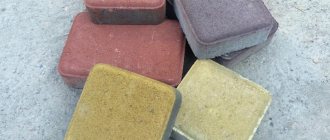
It is important to decide on the type of paving stones. Thus, factory vibro-pressed and vibro-cast elements are available for sale. Decide on the thickness, color and shape of the products. But if you want to save a little and have free time and desire, then you can make the tiles yourself.
There are several types of tile coverings on sale. Each of them differs in its characteristics, scope of use and requirements for the foundation:
- Vibro-cast products up to 4 cm thick are suitable for blind areas and walkways. The price of such elements is the lowest. Moreover, some owners make such tiles themselves.
- Vibro-cast elements up to 6 cm thick are suitable for paving driveways and parking areas. The price of such tiles is average; if desired, you can make them yourself. A base of cement and sand is prepared for installation.
- Vibropressed tiles are the most durable. Its thickness is 6-8 cm. It is used in places with heavy traffic and loads, and is manufactured only at the factory. Paving slabs are laid on a concrete base and sand cushion.
Important! The type of soil on the site affects the choice of base for paving. On moving soils, a concrete base is installed even for blind areas and sidewalks. In dense soils, a cement-sand base is made under the driveways.
Criterias of choice
When choosing a suitable material, you first need to focus on its cost. High-quality tiles that will last for several decades are made mainly from natural raw materials and have a relatively high price. The following types of raw materials are most often used in the manufacture of finishing materials:
- hard and soft varieties of natural stone;
- fake diamond;
- polymer sand mixtures;
- concrete mixtures;
- firing materials.
An additional criterion for choosing a finishing material is the thickness of the tile. To design, for example, narrow paths, it is quite possible to choose a material whose thickness does not exceed 0.4 - 0.6 cm. If you are laying a road or parking lot, you need to choose especially durable tiles, the thickness of which varies over 0.8 cm.
Tiles made from a mixture of concrete Source plitkaoskol.ru
Useful tips and tricks for your device
Despite the fact that the technology for laying paving slabs is quite simple, pay attention to the following recommendations:
- When laying the coating on a concrete base, be sure to arrange a slope for rainwater runoff. You can use a longitudinal, transverse or transverse-longitudinal slope of the coating. The optimal slope is 1 cm per meter. As a result, water will not collect between the tiles and the concrete base, which will protect the coating from swelling. In this case, a gap for water drainage is made between the tile covering and the curb.
- The width of the track is selected as a multiple of the dimensions of one covering element. Do not think that large-sized products are installed faster. Due to their significant weight, they are more difficult to lift, move and level on the base.
- All underground communications on the site are laid before the construction of paths and driveways. Otherwise, the coating will have to be dismantled. If some communications are planned to be carried out in the future, then plastic pipes are laid under the path at the place where they are carried out (the cross-section is chosen based on the size of the communications).
- To prevent grass from growing between the individual covering elements in the future, a layer of geotextile is laid in front of the foundation.
- Laying the tile covering is carried out only on a dry base, so work is not carried out during or after rain.
- The base for the tiles is carefully leveled. To arrange the pillow, purified sand without impurities and clay is used.
- The size of the track is selected taking into account the selected covering elements. If you plan to make a pattern or ornament, then it is worth drawing a diagram in advance and calculating the width of the coating, taking into account the seams. The circular method of laying products will require cutting some elements to the desired size.
At the preparation stage, it is worth considering the coating pattern. The sketch will allow you to get an idea of the future creation and calculate the required number of elements of a particular color and configuration. If paving slabs are laid by a master, the price, of course, for paving with a pattern or ornament will be higher.
Advice! The most options for patterned layouts are obtained when using rectangular paving stones.
Coating care
To ensure the durability of the coating and maintain its beautiful appearance, you must follow the following rules for caring for it:
- The slabs are regularly cleaned of dirt and dust using a soft brush plus a special detergent.
- During the operation of the paths, sand may be knocked out of the seams; it needs to be added.
- If part of the coating sags, the warped blocks are removed and a cement-sand mixture is poured under them.
- In winter, the paths are cleared of snow without the use of sharp tools. Do not chip the ice, otherwise the surface will be damaged.
- You cannot sprinkle salt on the surface, it will corrode the ice and at the same time the outer surface. Using special reagents, their effect is first tested in a small, remote area.
- Damaged items are promptly replaced so that they do not spoil the appearance of the entire site.
In fact, this is a simple process that you can completely handle on your own, but you shouldn’t rush it. The work requires thoroughness and painstakingness; it is better to do the work slowly, carefully following the recommendations of specialists.
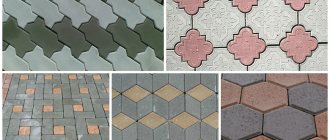
Tile layout options
Design of paving stones
From traditional design solutions, three main layout options can be distinguished:
Paving slab production technology
- Geometric is the use of simple shapes in design, such as line, square, circle and monotonous repeating elements. Similar solutions are presented in layout diagrams.
- Chaotic layout - elements are laid out in discord, so that it is impossible to trace any patterns. But sometimes they adhere to one rule so that adjacent elements are not repeated, or there are no more than two repetitions.
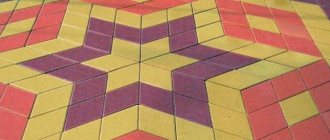
- Artistic laying of paving slabs is perhaps the most interesting and expensive option in classic solutions. As a rule, such decisions are of an author’s nature, take into account the peculiarities of the location of objects on the site, emphasize them or, on the contrary, shift attention. In this segment there are both standard solutions and exclusive design solutions. The latter option may require custom-made paving slabs in individual sizes and colors.
And there is another option for modern design, this is imitation of the 3D effect, creating the illusion of volume or violating the laws of geometry. This optical illusion effect is achieved by using the features of our vision and as a result we observe a stereoscopic, three-dimensional image.
And the latest fashion is luminous paving slabs
Read more about the technology for making luminous paving slabs with your own hands.
The best manufacturers
Let's take a closer look at 5 well-known manufacturers in the CIS countries that have proven themselves with high-quality products and affordable prices.
"Siyan"
Russian paving slab factory. Each view is fully painted over. Therefore, when worn out, the products do not lose the integrity of the color coating. SIYAN produces tiles of various shapes and thicknesses. It is suitable for laying garden paths, driveways, and highways. Prices are available. The products are durable and reliable.
"Unigran"
A Ukrainian manufacturer that has its own raw material base, from which it produces wall blocks, tiles, and borders. All products are certified by the ISO 9001:2015 quality control system.
Paving, ceramic coating is created using vibrocompression technology. The company offers more than 30 types of goods. All tiles are frost-resistant, with a service life of 50 years.
"Stellard"
The company and production are located in Russia. The products are manufactured using the method of semi-dry vibrocompression. German equipment is used to create tiles. The plant carries out individual orders for the production of tiles of various shapes and colors. The work of the workshops is automated.
Stellard products are a worthy replacement for old road or garden surfaces.
"White Hills"
A Russian enterprise that has been specializing in the production of facing bricks, stone, tiles, paving slabs and related decorative elements for more than 10 years. With a wide selection of textures, shapes, colors. The paving stones they produce are very popular, imitating natural stone such as gabbro and diabase.
"Steingot"
A relatively young Russian enterprise. It was founded in 2015. Engaged in the production of paving slabs and facing materials. The workshops are equipped with modern German equipment. The production process is automated. The main consumer market is Moscow and surrounding regions.
Whatever manufacturer you choose, a garden covering decorated with paving slabs will be a profitable, convenient, and most importantly, durable option for arranging a summer cottage. Construction is easy to do yourself. And if you want to post entire drawings, you can invite specialists to help you who will bring your ideas to life.
Preparatory work and necessary tools
Before starting work, prepare the required materials and tools. To work you will need:
- curbs;
- tile;
- sand;
- cement;
- water.
Also stock up on the following tools ( an exhaustive list is presented, you need to select the necessary ones based on your situation ):
- tamper, vibrating plate with pad or hand roller;
- bayonet and shovel shovels;
- paving cutter;
- grinder with diamond discs;
- sieve;
- wheelbarrow;
- stretcher;
- level;
- broom;
- Master OK;
- rule for leveling sand embankment;
- rubber mallet;
- pegs;
- guides;
- nylon thread or leveling cord;
- water supply hose.
Advice! If you have to cut the tiles, you will need a grinder with a diamond wheel or for cutting on concrete.
Site marking
According to the outlines of the future path, we drive in “beacon” pegs and stretch the nylon cord. Since the tensioned thread is a guideline for determining the height of the paving, we carry out the tension according to the level.
Preparing the base
The base can be made of:
- sand;
- crushed stone and concrete.
The type of foundation is selected based on the purpose of the future path or site.
The foundation preparation process consists of several stages:
- remove the top layer of turf and soil, remove plant roots and compact the bottom well;
- If necessary, we level the bed with gravel or crushed stone;
Important! If excavation is not carried out, the path will be higher than the level of the lawn. This is not very good, since the coating will be washed away by melt and rain water.
- we fill the bed with a drainage layer 15-20 cm high - for pedestrian paths and 40 cm - for driveways (gravel or crushed stone is used for drainage);
- A layer of sand 2 cm high is poured on top of the crushed stone to level the base.
To prevent erosion of the base cushion by groundwater, geotextiles are laid under the drainage layer.
This completes the foundation preparation work. Let's start laying street tiles and borders. Step-by-step instructions for laying paving slabs with your own hands will help you do the job no worse than professional craftsmen:
Production of polymer sand tiles and laying technology
Placement of boundary borders
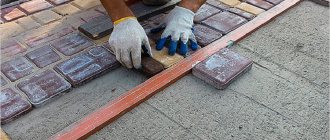
Laying the curb is carried out immediately after completing the drainage work. It is better to use a ready-made concrete curb. Curb blocks are installed near the vertical cut of the soil along the edges of the road. It is desirable that the top edge of the border is 1-2 cm above the soil level. Otherwise, the paths will be constantly dirty.
Curb blocks are secured with concrete mortar. After laying the curb, you need to check how even it is. To do this, use a building level. If some blocks are installed incorrectly, their position is corrected with a wooden mallet.
Technology for laying paving slabs
Drainage and slope installation
These measures are carried out to ensure that water does not accumulate on the surface. Slopes should not be directed towards the foundations of nearby buildings. Most of the rainwater is removed through slopes and the rest goes into the ground through tile joints. Therefore, it is recommended to use gravel or crushed stone as the main load-bearing drainage layer.
Formation of the carrier layer
Depending on the purpose of the future coating, the base is formed either from sand, if the surface will be used as a pedestrian area with low traffic, or from concrete for areas with high traffic and problem soils.
Important points:
- The height of the layer is determined depending on the expected load on the coating. Those. the higher the permeability, the higher the layer should be and, accordingly, more materials will be spent. In case of significant loads, the base is laid in stages in several layers.
- The load-bearing layer must be laid evenly, but taking into account natural or planned slopes.
- Each laid layer must be compacted using a tamper, vibrating plate or hand roller.
Installation of curbs
There are options for laying paving with and without curbs. But when using curb stones, the path is clearly marked and protected from spreading. The border is laid after leveling the base on a concrete lock. Plastic tile borders are also permitted. The product is mounted flush with the paving surface or slightly above it. Since the tiles will shrink, it is recommended to lay the paving stones 5 mm above the curb.
Construction of sand or cement-sand layers
If crushed stone or sand is used as a supporting layer, then in the case of sand, an additional layer of sand is a continuation of the base. In the case of crushed stone, this layer is a dry mixture of cement and sand. However, the following rules should be followed:
- it is necessary to set all guide rails in advance, taking into account all slopes and firmly fix them;
- the underlying layer is leveled using the rule so that it is approximately 10 mm above the level of the tiles being laid. This is necessary so that the tile remains at the planned level after leveling the surface of the coating and subsequent subsidence of the sand or cement-sand mixture;
- To obtain a flat surface, the leveling slats must be removed and the remaining depressions must be filled with sand or dry mixture.
Important tips before starting installation
Do not under any circumstances try to lay tiles by eye; do not be lazy and stretch a nylon cord around the entire perimeter of the surface to be laid. This will allow you to monitor the correct geometry of the laid material, tile joints and slopes. It is recommended to check the geometry of the seams every 2-3 rows.
Laying should start from the lowest point and move towards the highest. Or from some important element, for example, the entrance to a house.
Leveling the tiles is allowed using a mallet or vibrating plate if the tiles are higher than the required level. You can also add dry mixture or sand if it is lower. Based on GOST and SNiP, the surface is considered flat if for every 2 meters the height difference is no more than 5-10 mm.
To form the finish, the tiles are sawed using a grinder with a diamond blade.
- Preparing the base for laying paving. There are three types of bases:
- sand is poured between the curbs to a height of 5-6 cm, then the sand layer is moistened and compacted, the tiles are laid on wet sand;
- the paving is laid on a cement-sand base, to arrange it, a layer of sand 3 cm high is poured between the curbs, then a reinforcing mesh is laid and covered with a mixture of cement and sand in a ratio of 4 to 1;
- masonry on a concrete base, in this case the cake consists of the following layers: sand on compacted soil (10 cm), gravel (10 cm), reinforcing mesh, road mesh, concrete (12 cm), cement-sand composition (2 cm).
- Paving with paving slabs is carried out in compliance with the following rules:
- work is carried out from the lower point of the coating;
- the master is located on the already laid tiles so as not to damage the prepared base;
- when laying in a circle, work is carried out from its center;
- elements are laid out not in rows, but in a diagonal direction, which facilitates horizontal alignment;
- the cord for leveling the first row is pulled across the width of the track;
- the horizontal is checked with a level after 3 rows;
- the tiles are installed by tapping with a mallet;
- if necessary, add sand or a sand mixture under the element;
- a gap of 3 mm is made between adjacent elements (usually crosses are used if the tiles do not have a remote lock).
- Grouting of joints takes place in two stages. First, pour sand onto the paving and sweep it along the seams with a broom. After this, the seams are sprinkled with a cement-sand mixture (proportion 1 to 1). There are ready-made mixtures for joints on sale. Then the path is generously sprinkled with water.
Step-by-step technology for laying paving slabs on sand
Laying paving slabs on sand is recommended for areas with low traffic: cottage villages, private households, areas inside the yard.
| Landscape assessment and marking . The site for laying paving slabs must have the necessary slope for the outflow of rain and melt water. The outflow of water, as a rule, is done towards the street. Laying of paving slabs will be carried out from the street line, this is the zero line - the lowest section of the site. Pegs are driven in along the perimeter of the future site, the lowest of which are located closer to the street and the highest - in the far part of the site. A leveling cord is stretched along the perimeter between the pegs at a height equal to the thickness of two paving slabs. The slope of the cord between the highest and lowest point of the platform should be at least 0.5-1 cm per meter, or 2 degrees. Use a level to measure. | |
| Preparing the bed . Remove the top layer of soil and remove plant roots over the entire area of the future sidewalk path or site. Remove excess soil from the protruding areas and add those areas where there are holes, and carefully compact the bottom. Pay special attention to areas with loose soil. | |
| Backfilling with sand . Pour sand into the prepared bed in a layer of 5-15 cm and carefully level its surface with a rake or rule. Keep an eye on the level and follow the leveling cord. | |
| Moistening the base . With a minimum flow rate of 10 liters per square meter, generously water the entire base with water from a hose or watering can. | |
| Compacting the base . To avoid subsidence of the base during further use of the sidewalk, carefully compact the sandy base using a hand tamper. | |
| Installing a curb . Dig trenches along the edges of the base to the required depth. Plant curbs on the M100 solution, and then pour concrete over them and fill them with sand. | |
| Laying tiles . The first row of tiles is laid starting from the zero line. Next, the rows are laid diagonally. The master moves forward, kneeling on the already laid tiles, so as not to damage the even base. When laying in a circle, the movement begins from the center of the circle. The gaps between the tiles should be 0.5-0.7 cm. Check every third row of laid tiles using a level, not forgetting the required slope. Using a heavy rubber mallet, drive the protruding tiles to the required depth. Under those tiles that are below the planned level, sprinkle a few stones and a little extra sand. | |
| Filling gaps . Fill the gaps between the tiles with dry mixture or sifted sand. To do this, pour sand onto the sidewalk and use a brush to move it over the entire surface. Remove excess sand or dry mixture with a weak stream of water. Make sure that sand does not wash out of the cracks between the tiles. | |
| Surface cleaning . Remove dirt and any remaining mixture from the surface of the pavement using a brush. |
Step-by-step technology for laying on crushed stone with a dry mixture
Laying on a crushed stone base with a dry mix is recommended for areas with moderate traffic and light vehicle parking areas.
| Landscape assessment and marking . Laying of paving slabs is carried out from the street line, this is the zero line - the lowest section of the site. Pegs are driven in along the perimeter of the future site, the lowest of which are located closer to the street and the highest - in the far part of the site. A leveling cord is stretched along the perimeter between the pegs at a height equal to the thickness of two paving slabs. The slope of the cord between the highest and lowest point of the platform should be at least 0.5-1 cm per meter, or 2 degrees. Uses a level to measure. Large areas are divided into strips using pegs and leveling cords. | |
| Preparing the bed . Remove the top layer of soil over the entire area of the future sidewalk. Remove plant roots to prevent future regrowth. Remove excess soil from the protruding areas and add those areas where there are holes, and carefully compact the bottom. Pay special attention to areas with loose soil. | |
| Backfilling of crushed stone . Fill the prepared bed with crushed stone in a layer of 10-20 cm, carefully level the surface. Keep an eye on the level and follow the leveling cord. | |
| Compacting crushed stone manually. | |
| Installing a curb . Dig trenches along the edges of the base to the required depth. Plant curbs on the M100 solution, and then pour concrete over them and fill them with sand. | |
| Backfilling with cement-sand mixture . Place a mixture of cement and sand on top of the crushed stone in a layer of 5-10 cm. If necessary, install reinforcing mesh. Carefully level the cement-sand mixture. | |
| Laying tiles . The first row of tiles is laid starting from the zero line. Next, the rows are laid diagonally. The master moves forward, kneeling on the already laid tiles, so as not to damage the even base. The gaps between the tiles should be 0.5-0.7 cm. Check every third row of laid tiles using a level, not forgetting the required slope. Using a heavy rubber mallet, drive the protruding tiles to the required depth. Sprinkle a few stones and dry mixture under those tiles that are below the planned level. | |
| Wetting the sidewalk and filling cracks . Spray the surface of the sidewalk generously with plenty of water. After the surface of the path has completely dried, fill all the cracks between the tiles with a dry mixture. Water the path one more time, making sure that the filler does not wash out from the gaps between the tiles. | |
| Surface cleaning . Remove excess mortar from the pavement surface to prevent it from hardening. Make sure that all joints are completely filled with the mixture and that the sidewalk is clear of mortar. The coating is ready for use. |
Step-by-step laying of paving slabs on a concrete base
Laying tiles on a concrete base is recommended for arranging areas with heavy loads and traffic, as well as in problematic soils, for constructing blind areas.
| Landscape assessment and marking . For proper drainage of rain and melt water, paving slabs are laid from the zero line - the lowest section of the site according to the plan. Pegs are driven in along the perimeter of the future site, the lowest of which are located closer to the street and the highest - in the far part of the site. A leveling cord is stretched along the perimeter between the pegs at a height equal to the thickness of two paving slabs. The slope of the cord between the highest and lowest point of the platform should be at least 0.5-1 cm per meter, or 2 degrees. Uses a level to measure. Large areas are divided into strips using pegs and leveling cords. | |
| Preparing the bed . Remove the top layer of soil over the entire area of the sidewalk being constructed. Remove plant roots to prevent future regrowth. Remove excess soil from the protruding areas and add those areas where there are holes, and carefully compact the bottom. Pay special attention to areas with loose soil. | |
| Backfilling of crushed stone . Fill the prepared bed with crushed stone in a layer of 10-15 cm, carefully level the surface. Keep an eye on the level and follow the leveling cord. | |
| Compacting crushed stone. | |
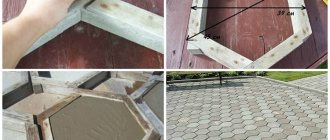
| Installation of formwork . Place formwork boards more than 4 cm thick along the edges of the future site or sidewalk. Secure the boards with stakes driven in at a distance of 60-100 cm from each other. | |
| Pouring concrete . Concrete is poured in a layer of 5-15 cm. To improve the strength characteristics, reinforcement is made with road mesh. To do this, concrete is first laid in a layer of 3 cm, a reinforcing mesh is placed on it, then concrete is poured to the required height. To avoid the appearance of cracks in the concrete base in winter or when laying a large area, it is necessary to leave so-called expansion joints of 0.5 cm every 3 meters. | |
| Leveling the concrete surface . Carefully level the concrete surface, taking into account the level of the base and the required slope. | |
| Installing a curb . Dig trenches along the edges of the base to the required depth. Plant curbs on the M100 solution, and then pour concrete over them and fill them with sand. | |
| Laying tiles . Moisten the concrete surface and lay the tiles on a layer of 1-3 cm of cement-sand screed. | |
| Filling expansion joints . To protect against cracking, seal expansion joints with elastic filler. | |
| Filling gaps between tiles . Carefully fill the gaps between the tiles with grout or mortar, making sure that the mortar does not get on the front side of the stones. Immediately remove excess grout from the tile surface. The coating will be ready for use in 48 hours. |
Video description
Video about laying tiles on sand:
Processing of decorative tiles
The next recommendation on how to properly lay paving slabs in the courtyard of a private house or in another area is to treat individual elements with compounds that will significantly increase the performance of the material, its wear resistance, and ensure moisture and frost resistance. Hydrophobic compounds are used for treatment, which also effectively protect elements from the appearance of mold stains and improve the appearance of the decorative coating as a whole.
The tile processing process is quite lengthy. It involves dipping each element one by one into a pre-prepared composition, then drying it thoroughly and repeating the procedure. When processing tiles, it is also recommended to inspect each element for cracks or chips. There is no need to throw away damaged tiles; they are quite suitable for laying on inconspicuous surfaces.
Before installation, it is recommended to treat each of the elements with a special solution Source almaty.flagma.kz