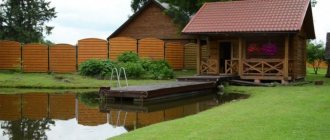
An artificial waterfall in a modern landscape is considered one of the most spectacular elements of aquatic design. It brings the same dynamics as a fountain, but the water in it does not rush upward, but flows down from above in one or several streams along a prepared base. And before you start arranging an artificial waterfall on the site, you need to choose a place, shape and size for it, decide on the composition - the relative position and relationship of all the constituent elements.
The working principle of a decorative waterfall
Any waterfall operates on the same principle - water circulates in a confined space due to a pump . And the shape of the streams is created by special drains hidden among the stones.
The dynamics of water flow is created by a pump
If there is any body of water (pond or pool) in the garden, the task of building a waterfall is greatly simplified. This is explained by the fact that the mini-waterfall should consist of three parts:
- a hill from which water streams fall;
- the lower reservoir where the water rushes;
- pump
If there is no basis, then the first step is to create it.
You can do without a pump if you build a system where water flows will move due to the pressure created by the difference in height. Only with this option it is difficult to achieve long-term operation of the waterfall. You will constantly have to pump water from the lower container to the working (upper) one.
Choosing a location on the site
A distinctive feature of the waterfall is its multi-tier structure. If the site is located on a slope, then you just need to slightly “tweak” the natural topography, and the direction and orientation of the flow is set initially.
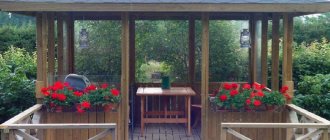
In other cases, you need to find a place where the view of the waterfall will be as advantageous as possible in the summer, taking into account the position of the terrace, gazebo or any other recreation area where family and guests gather.
Although the proximity of the recreation area is not an axiom. If landscape features require it, the waterfall can be anywhere on the site. Especially if we are talking about a small form - a miniature waterfall.
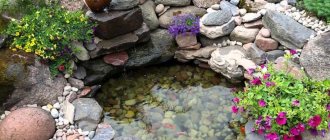
It can be built in the form of a small alpine slide, as part of a rock garden, or placed in a secluded place next to a bench, where it is so pleasant to relax and unwind under the soft murmur of a stream of water.
Stages of work and step-by-step instructions for them
The first step in building a waterfall is planning. A project on paper will help to visually represent the original object. Defined with the following parameters:
- purpose
- location;
- shape and depth;
- materials used for waterproofing;
- design (backlit or not).
They also take into account the need for network connectivity.
Further steps to create a waterfall with your own hands largely depend on its purpose. This can be a waterfall to decorate the garden, next to which it will be pleasant to relax and enjoy the murmuring sounds of the water. Some people prefer to populate the tank with various living creatures (fish, turtles, snails). The latter option requires the presence of aquatic vegetation and an appropriate depth (at least one meter).
Having decided on the initial parameters, they move on to preparatory activities.
Materials and tools
You will need to prepare the following materials:
- sand;
- pebbles;
- stones;
- cement mortar;
- sealant;
- film.
To build a waterfall at your dacha you will need construction sand
Required tools:
- shovel;
- building level;
- soil compactor;
- pegs, twine or spray paint, bags of sand (for marking the territory);
- Bulgarian.
Place
It is advisable that the site be elevated and sloping. Otherwise, you will have to artificially create both. This is necessary for water dynamics. The waterfall will look best surrounded by flowers and other vegetation. It is placed on an area that is clearly visible from all sides and from afar.
Usually decorative waterfalls are erected in the courtyard next to the house, where there is free territory for arranging a recreation area. If the structure is small, then you can place it in the garden.
Base structure
The shape of the lower bowl can be any, as can the depth. If there are no plans for fish to live there, then a small depression is sufficient.
The base can be of the following design:
- concrete and stone with waterproofing;
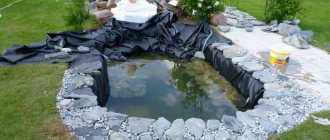
- pit with flexible insulation (film);
- in the form of a finished container.
The first option is the most labor-intensive and expensive. If you want to build a large pond (more than 10 sq. m), you should give preference to flexible waterproofing. The easiest way is to purchase a rigid form, which is usually made of plastic mixed with fiberglass. To avoid installation problems, it is recommended to take a small-sized form.
Ready-made plastic tanks for waterfalls are commercially available
Pit
Regardless of the chosen foundation option, you will need to dig a pit. The area under the waterfall is cleared of all kinds of debris and weeds. Then they mark the contours along which the hole will have to be dug. You can use pegs that stick and tension the rope. There are several other marking options: paint from a spray device or sand.
Before digging a pit, mark the area
Dig a hole to the required depth. The size is taken larger than planned by 20–30 cm. To prevent the earth from crumbling to the sides, it is constantly moistened and slammed down with a shovel.
The removed soil can later be used to create a hill along which water will flow. And so that the slide does not wash out, they cover it with film and surround it with stones.
A layer of sand (about 12 cm thick) is poured into the bottom of the pit and compacted thoroughly. The sidewalls are reinforced with PVC mesh.
Waterproofing
To prevent water from seeping through the ground, waterproofing the pond is necessary. This is not required if a plastic bowl is installed. It is recommended to use PVC film or butyl rubber as an insulating material. The latter will last ten years longer. Only such a pond will have to be emptied of water for the winter, otherwise it will freeze and break through the film material. Cover the pit with film with a meter and a half meter extending outwards for fixation.
Cover the bottom of the dug pit with a flexible film and fix it with stones
It is more practical to make a concrete base. Then the film is first laid, a wire frame is mounted on top and concrete mortar is poured (the bottom goes first, the walls a day later).
Construction of the cascade
The construction of a cascading waterfall involves laying steps to a height of no more than one and a half meters. Flat boulders or sand slabs are suitable for this. They are fastened together with polyurethane foam or cement. Begin laying out from the bottom tier, which should be level. For subsequent ledges, this aspect is not fundamentally important. It is recommended to make low sides on the sides so that the water does not spread.
The stones are fastened together with moisture-resistant glue or polyurethane foam.
To prevent the foam that serves as a grip for the stones from being noticeable, immediately sprinkle the joints with sand. This will look more aesthetically pleasing and natural.
If it is desired to obtain smoothly flowing water flows, the protrusions are placed close to each other. If a noisy fall of water is preferred, then the lower stage is located at a considerable distance from the next one at the top. Multi-jet flows, which are obtained due to ledges with a relief surface, look beautiful.
The elevation from which the water falls can be of different designs - it all depends on the flight of fancy of the builder. Many people use various decorative objects as a source: a jug, a flower, a statue, an animal figure, etc. Ready-made cascades are also sold in stores.
Pump installation
The pump for driving the water into motion is selected depending on the dimensions of the waterfall and the required pressure. For mini-waterfalls, a power of 70 W is enough, but for cascading structures you need more. When purchasing a pump, keep in mind that most models are designed for pumping clean liquids. Therefore, in addition, a filter and a protective device against “dry running” are installed in front of the pipe.
There are two types of pumps:
- submersible (mounted on the bottom of a reservoir);
- surface (attached directly next to the pond).
They are equipped with two hoses: for suction and for supplying water to the top. The first hose is placed at the bottom of the tank, the second is hidden among the stones.
The pump is selected depending on the size of the waterfall
Any pump operates on a voltage of 220 V. To connect to the network, select an extension cord with waterproofing.
Decoration
The waterfall looks picturesque surrounded by flowers and other vegetation.
Whatever the waterfall, it will fit harmoniously into the overall landscape only with appropriate design. Usually large cobblestones are laid on the sides, and the riverbed is decorated with small pebbles. The surroundings of sculptures, alpine slides and flower beds look impressive. It is preferable to plant marsh and aquatic varieties of plants (for example, buzulnik or calamus).
A fountain glowing in the dark will look fabulous. To do this, install lighting on the bottom or sides.
An illuminated waterfall looks impressive at night
Styles
In landscape design, the number of styles is no less large than in the interior. But if we talk about the design of the waterfall, then their list is not so long. In principle, all diversity can be reduced to three areas:
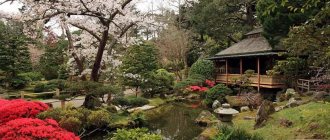
- Natural style. Suitable for all landscaping styles using natural stone in natural, chipped or tumbled form. And a specific direction is set with the help of small architectural forms, plants and the way the space is organized - they are the ones who emphasize the historical or ethnic features of the design. It can be any European or Asian style - for example, English, French, Chinese or Japanese.
Terraces for cascades or a rock for a “single” waterfall are laid out of natural stone. To do this, you can use any material that is commercially available - limestone, sandstone, granite or marble. Large pebbles (okat) and boulders that can be found on or near the site are also suitable. - Regular style. To be precise in terms, this is a classic cascading fountain with tiers of polished granite or marble slabs.
Although in essence and form it is nothing more than a waterfall. It is the same man-made as the previous version, but without imitation of natural origin. - Modern urban forms in the style of minimalism. In fact, this is another design option with strict geometric lines, but made of artificial stone - concrete or brick.
This can be either a cascading fountain with overflow over concrete slabs and trays, or a small decorative waterfall from a wall based on a monolithic reinforced concrete slab or brickwork. - Mediterranean or Moorish style. Another type of cascade fountain, but in this case they use a series of round bowls from which water flows in the form of small waterfalls.
It can be either a free-standing structure or wall-mounted (in the image of the Bakhchisarai Fountain).
Caring for decorative structures
The lifespan of the waterfall depends on how the waterfall is cared for.
To extend the life of a waterfall, it is necessary to provide it with proper care. The main activities are as follows:
- systematically add water to the tank as it evaporates;
- clean the water surface from accumulated debris (leaves, branches);
- add special anti-blooming drugs to the water;
- Aquatic plants are planted in the pond (if possible), which will not only decorate, but also purify the water;
- Clean the pump filters 2 times a month;
- drain the water for the winter;
- Regularly inspect the wires for damage.
Water source
Site selection, overview and composition are not the only planning issues that need to be addressed. Even before building a waterfall, you need to decide on the source of water. There are three options:
- Water intake from the water supply system. This is the most common option for swimming pools, fountains, and artificial reservoirs. And the waterfall is no exception. Essentially, this is a closed cycle water circulation system, with periodic replenishment to compensate for natural loss due to evaporation, less than ideal waterproofing, and splashes.
Even in technical equipment, such a waterfall is very close to a pool or fountain - the main technical elements of the system: pump, filter, pipes. But in this case, you can use not only a surface pump, but also a submersible one. A submersible pump is installed in a reservoir at the foot of a waterfall, a surface pump is installed at the mouth of a stream on a hill.
It is easiest to organize such a system for compact options, small cascades, modest-sized artificial reservoirs and streams. Although for a stream through the entire site it is possible to organize a closed water supply cycle - it is a matter of pump power, pumped volume of water and the capabilities of the electrical network. - Water intake from an external reservoir. If the site is located on the shore of a lake, river or stake, then they can be used as a source of water supply.
In this case, the water also moves through the cycle. Although, of course, this cycle cannot be called completely closed - it’s just that a natural reservoir is also used to discharge water. - Water intake from a natural source on the site. The option is extremely rare, non-standard - after all, we are talking about a spring or stream. If it is a stream, then you will still have to make a lot of effort to create a system of cascades on a separate section of the riverbed.
With a spring it is even more difficult - as a rule, they do not have a high flow rate, and they are not located on a hill. Therefore, you will have to organize a water supply to the source of the waterfall, and literally select a pump that would not drain the spring and would not “catch” air.
Required Tools
You will need the following tools:
- screwdriver;
— construction pistol;
- drill;
— a set of drill bits;
The guy gave the girl chewing gum to meet her: she broke into a smile
Alla Ioshpe's husband passed away: he died 40 years after the death of his wife
The doctor called the unusual effect of taking medications by patients with COVID-19
— dust-proof construction mask;
- garden rake;
- protective glasses;
- shovel;
- roulette;
- utility knife.
Possible errors in construction
Despite the many ready-made diagrams and drawings, as well as the presence of step-by-step instructions with video and photo reports, mistakes still happen. Often they are due to the lack of proper experience and construction skills of the master. What errors occur in practice:
- Using an insufficient pump. In this case, even with the correct design, the water pressure will be insufficient for a beautiful waterfall.
- Poor quality foundation, in which water will seep into the cracks and gaps between the stones.
- Incorrect flow of water in a cascading waterfall. The reason is the use of stones that are not flat in shape, but perhaps with deep irregularities and grooves.
You can avoid such mistakes by carefully studying the step-by-step instructions and practical recommendations for beginning craftsmen. You can easily make a waterfall on your property using tips from landscape design experts. A photo of waterfalls in a garden plot will help you decide on the choice of model for construction. A creative approach and a little patience are the key to success.
Communications
Necessary communications to create a waterfall:
- pipes that will be in the water treatment system;
- a device that collects the top layer of water and supplies it to the filter;
- wires for lighting.
The entire filtration system is installed at the bottom of the container.
In the future, they can be hidden by decorating with stones. All these communications are positioned in such a way that the shield is close to the waterfall itself.
Important! At this stage of work, be sure to check the operation of the pump!
Decoration
Waterfall-alpine slide
The process of making ledges largely depends on how you imagine the finished waterfall. If you make a narrow space between the stones on the upper tier, the water will flow more rapidly. Thus, the wave will break against the rocks with noise and foam.
If you want the water flow to fall down evenly, forming a flat straight line, make a cascade with flat stones that have smooth edges. They should be laid out according to the principle of a pyramid. If you are attracted by streams of water breaking into streams, equip the waterfall with chipped, uneven and even sharp stones. If you like the slowly flowing and tranquil flow of flowing water, then use stones with depressions in the middle to create a cascade. When filled, water from such natural bowls will smoothly pour into the next tier, located a little lower in level. Be that as it may, you will have to lay all the ledges on a cement solution. Consider special sides in the lower threshold, this way you will prevent the possibility of large splashes of water from an artificial source.
Construction of the slide
The construction of the slide is of no small importance. This design can be done in different ways
rocky slope
This option is characterized by a rocky shape, which is mainly made of stones. Plants are planted among them.
Terraced slope
This composition is characterized by protrusions at different heights. They are made using retaining walls. Buildings can have different configurations.
mountain gully
This area is characterized by stones of different sizes. They protrude from the ground. The boulders are supplemented with plants with a long flowering period.
Gorge
When constructing it, it is worth taking into account the terrain. Stones are used to decorate the slopes. At the same time, ground cover crops are planted on the hill.
Czech rolling pin
This is a multi-tiered hill that includes flat stones. They are folded vertically. Decorative crops are planted nearby.
Valley in the mountains
The structure is made of large stones, which are partially immersed in the ground. The composition is complemented by lushly flowering crops.
Cover the bottom with film
For better drainage , the bottom is covered with a layer of crushed stone (10 cm) and sand (12 cm). Old linoleum is sometimes laid over the sand.
The size of the film , which will cover the entire relief of the lake bowl, should be with a margin so that about one and a half meters of film extends beyond the outer edges. At this distance, it is possible to dig a small trench into which the edges of the film will be bent and pressed down with heavy stones, crushed stone or nailed with pegs.
It is better to cover the bottom with film on a hot sunny day. The polymer, when heated in the sun, becomes more flexible and elastic, easier to install, and more accurately follows the entire topography of the prepared bowl.
If your garden is located in an area where the water freezes to the bottom, it is better to drain it for the winter . When freezing, the liquid increases in volume and can damage the waterproofing film. In a large pool, a hole should be provided for emergency drainage.
We install waterproofing of thresholds
Thresholds require high-quality waterproofing. The film used after the construction of the pool is used as film. Any waterproofing fabric and agrofibre are also suitable.
Waterproofing is done on both sides, leaving a slight overlap on the curbs.
After the waterproofing work is completed, the installation of decorative stones begins. They are attached to the waterproofing; a moisture-resistant sealant is chosen as the glue.
Base for rocky part
- We mark out an area on the ground for the rocky part.
- We remove the soil to a depth of about 40 cm.
- We fill 1/4 of the depth with stones, rubble, pieces of broken brick, etc. We do not use sand-lime brick (it attracts moisture) or wood waste (it rots quickly).
- We fill the pit with a mixture of sand and crushed stone - as a result, we get an excellent drainage cushion.
- We install several large stones.
- We pour the earth, forming a hill. Add stones to prevent the earth from crumbling. It is advisable to pre-treat the soil with herbicides against weeds.
- We water and compact each layer of soil.
Stones of different sizes - just like in nature
Great combination of rocks and water
Such a water structure can become the pride of the garden
Water flows over flat stones
Flat stones look good in the above-ground part of the waterfall
Laying stones to create the shape of a waterfall
Sheer waterfall - an interesting effect
The stones do not have to be large.
To construct the rocky structure into which the waterfall will be built, we use any natural stones. You can choose stones that are approximately the same in color and size, or completely different ones to get a mixed picture.
Porous limestone, shell rock, and calcite actively absorb moisture, which is why they collapse. They can be used to decorate a waterfall, but it is advisable that they do not come into contact with water.
If you are making a cascade waterfall, use flat stones.
An original waterfall made from old metal bowls, cauldrons and a jug
The main elements are installed on pedestals (you can use decorative driftwood or a slide made of plastic), and the water supply system is routed through all containers. A large cauldron is installed at the very bottom, which acts as a bowl. All metal surfaces must be treated with an anti-corrosion coating before construction.
Material
In order for an artificial waterfall to look beautiful and not be subject to natural disasters, you need to use high-quality materials when assembling it.
By the way, this applies not only to internal communications, but also to cladding. By exploring fresh ideas, you can come to the conclusion that the basic foundation is almost the same for everyone. You will need:
- Sand.
- Pebbles.
- Cement.
- Mixtures for creating waterproofing.
- High quality pump.
- Stone for facing.
- Set of tools - shovel, rake, spatula, brushes.
- Primer.
- High-quality water supply system.
The basis of any artificial waterfall is the presence of at least 2 containers. If there is no natural storage facility on the territory, an artificial one will have to be created.
The main nuance of such a construction is a high-quality foundation pit. It must be cleared of roots and unnecessary living creatures in advance, so that in the future the roots do not damage the seal.
How to choose plants for an alpine hill
The choice of plants for a rock garden must be thought out in advance, since each type of landscape is suitable for one or another set of representatives of the fauna world, for example, rock gardens on slopes are characterized by creeping species, and valleys are characterized by flowering types. Experts advise choosing representatives of the flora that bloom in different periods, so that the alpine slide can please the eye for a long time. Perennials, in most cases, bloom in the fall. This could be lavender, geranium, saxifrage, etc. Their growth requires careful monitoring, since heavily overgrown crops can block sunlight for shorter plants. Bulbs (crocuses, hyacinths) bloom in the spring, and in winter, coniferous species - thujas, some varieties of spruces, etc. - will not allow the landscape to be empty.
On the alpine hills there are also low-growing shrubs, such as Japanese maple, rosemary, azalea, and dwarf roses. Among herbaceous representatives, you can choose thyme, bells, marigolds, and edelweiss, phlox, and dwarf ferns are also often planted on the hills. Ground cover daisies, St. John's wort, and yarrow will perfectly cover the empty spaces between the stones.
When planting, you need to take into account one of the important rules: low-growing species are planted in groups, and lush flowering ones - separately. Planting plants in the ground begins from the top of the alpine hill and gradually moves to its foot
To avoid water evaporation and block plants from being damaged by weeds, when planting, you need to leave a small funnel around each specimen into which to pour pebbles.
Features of the alpine slide
The main feature is that the composition should look as natural as possible; artificial elements are not allowed.
Height
Alpine slide, as the name suggests, is a hill. The height can vary from 1 to 3 meters.
For taller compositions, a slide core will be required to prevent collapse. One slope should be flatter, which is best located on the south or east side.
Stones
Also, the alpine slide is a rock garden. Depending on the type of stones there may be more or less. Natural stones-boulders of the same type, differing in size, look best.
Plants
Since the landscape composition in question is an imitation of mountainous terrain, the plants for the alpine hill must be suitable.
It is advisable to use low-growing plants; evergreen conifers are well suited: cedar, juniper, spruce, larch.
Also suitable for use: thuja, succulents, violet, phlox, hosta and other plants.
It is best to choose flowering plants so that they bloom at different times for a beautiful display throughout the season.
Location
At the dacha, alpine slides look most organic on natural slopes or breaks in the landscape. But this does not mean that such a composition cannot be created on a flat area.
Alpine slides are placed in a prominent place and so that the bulk of the plants are in the sun before noon, and in partial shade after noon.
Not the best location in the shade of large trees and where groundwater comes close to the soil surface.
Stage 2 – digging a pit
You have decided on the size and shape of the bowl, now you need to drive in pegs along the intended contour and pull the rope. The soil formed during the work should be cleared of stones, roots and other debris. Store the soil in a separate place, it will be useful when arranging a waterfall and pond. The earth from the walls of the bowl will crumble, this is inevitable. Therefore, they need to be periodically moistened and compacted. When the pit is ready, add a layer of sand (10-12 cm) to the bottom and compact it thoroughly.
The pit for the pond is of regular oval shape, the walls and bottom are carefully compacted. The depth of just over a meter will allow it to breed fish and aquatic flora.
Stones: which ones and where to get them
The basis of any type of slide is stones and you will need a lot of them - several tons, and of different sizes. Choose from those breeds that are more common in your area. Chopped blocks look best, but already aged, with dark edges. You can also use pellets with smooth sides, but creating a natural composition from them is not an easy task. You will need about one fourth of a large size, about the same amount of a medium size - the rest are small stones.
Granite looks great. But it is hard and “cold”; even the most tenacious saxifrages can rarely grow on it, and the soil next to it quickly acidifies. This should also be kept in mind and periodically adjust the acidity (or plant plants that love acidic soil).
Stones in the form of slabs look good on low slides
It is best to use tuff. It drains water well, water flows through it well, and what’s even more important is that plants grow well right on it
What’s also important is that it neutralizes acidity, which the “Alpines” like.
Lime slabs are also good, but they come in slabs; they are good for decorating alpine plains or very low and gentle hills.