How to propagate thuja: a quick and easy way
Thuja propagates in two ways: seeds and cuttings. Each of these options has its own characteristics and difficulties, and therefore requires gardeners to have at least basic knowledge and experience.
What does it look like
Propagation of thuja using seeds is a long process during which the plant goes through several stages of development. The advantages of this approach include the following features:
- rapid adaptation to the climate of the region after transplantation into open ground;
- increased resistance to adverse environmental conditions.
There are also a number of disadvantages:
- duration of seedling preparation (growing a seedling from seeds will require about 5-6 seasons);
- the need for mandatory stratification (this definition usually means keeping the sprout in the cold);
- little chance of preserving the qualities of the mother tree.
Thuja cuttings for propagation are used much more often than seed germination. There are several reasons for this:
- speed of obtaining seedlings;
- complete preservation of the quality indicators of the donor (the tree from which the shoot was cut).
This reproduction technology also has disadvantages:
- lower endurance of young trees;
- the survival rate of seedlings after transplantation is only 70-80%.
Propagation of thuja by cuttings
Basic mistakes
Below are the most typical mistakes that people make when propagating thuja. Familiarization with them will help prevent their possible repetition in the future:
- Poor quality cleaning of the lower part of the cutting, due to which the needles have contact with peat or sand. Even minor contacts lead to rotting, which often causes the death of all planting material.
- Planting seeds without preliminary stratification. Keeping in cold conditions is not a recommendation, but a mandatory condition, without which it will be impossible to obtain a strong and weather-resistant plant.
- Using shoots that are too weak for cuttings. The planting material must be healthy and strong, otherwise it will not have enough energy to take root and adapt to new conditions.
Propagation of thuja by cuttings in spring
Some experts advise cutting shoots in the spring, but there are also propagation techniques in which branches are harvested for rooting in the summer and fall.
How to propagate ampelous geranium at home
If the decision is made in favor of propagating thuja by cuttings in the spring, then harvesting shoots should begin immediately after the snow melts. At this time, active growth of branches has not yet begun.
Important! If time is lost and the shoots begin to grow, it is worth postponing this event to the second half of August. During this period, tree growth slows down.
Gardeners recommend starting work in the spring for several reasons:
- root formation requires a minimum of time (about 2-3 months);
- At this time, active growth has not yet begun.
However, there is also a serious drawback, which is that the plants do not yet have time to fully strengthen before winter.
Tips for Beginners
- If you choose to propagate thuja by cuttings, then for better growth and adaptation to the soil, new cuttings or branches can be placed in Kornev’s solution 12 hours before planting. This will accelerate their growth and the “babies” will appear much earlier. Don't forget to remove weeds from your pallets and greenhouses, otherwise all the power of the earth will go to extraneous plants.
- It is best to cut the cuttings themselves in cloudy weather early in the morning. The ideal growth period for cuttings and branches for propagation is 4-8 years. If your thuja is sick, but propagation is necessary in any case, then a cut of the cutting can be treated with a heteroauxin solution. If the shoots sit in the ground for a long time and do not sprout, and it is already cold outside, then do not forget to insulate the shoots with sawdust, leaves or spruce branches.
- Choose the method that suits you, propagate your thujas and enjoy your beautiful plant.
How to grow thuja from a twig
Juniper - shrub or tree, how to propagate and plant it
To ensure that cut cuttings quickly take root and take root well in the open ground, gardeners recommend following a few tips:
- correct choice of mother tree. When propagated by cuttings, the young tree takes on all the characteristics of the donor;
- cutting shoots and preparing them for further work is the most important component of cultivation;
- the correct choice of soil for replanting thuja affects the growth rate;
- care of seedlings. If the rules of care are not followed, even those plants that have already taken root can die.
The mentioned propagation features are applicable to all varieties of these plants (both spherical and emerald).
Conclusion
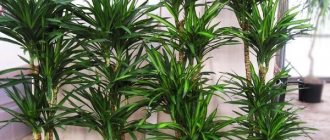
Thujas look ideal as one of the elements of landscape design. They look impressive both individually and in group plantings. Plant compositions complemented by thuja cannot but please the eye. Dense plantings will look very impressive, allowing you to form amazing alleys or hedges. By the way, after planting a thuja, you can form a crown of almost any shape.
There are many ways to propagate a coniferous tree such as thuja, but the best one is cuttings. It is both simple and effective. The cutting itself can be carried out using various methods, all of which are equally effective. The main thing is to follow the instructions, and then after a while the young evergreen trees will decorate the garden or personal plot.
Selection of mother plant and cutting time
Before growing a thuja from a twig, you must carefully select a donor tree. The bush must be completely healthy and strong. From a weak and diseased tree, it is more difficult for shoots to take root; in addition, there is a high risk of getting the same diseased seedling.
Transplanting rhododendron from one place to another
No less requirements are placed on the branch from which the shoot will be separated. The one located at the top of the bush is best suited for this purpose. Gnarled shrubs often grow from the lateral shoots.
Note! The best way to cut thuja is to separate shoots 10-15 cm long and 2-3 years old. The foundations of such growth have already become woody.
Thuja shoots need to be correctly selected and prepared
Best time to grow
In order for the cut branches to take root safely, it is necessary to choose the most successful season for planting the plant.
Did you know? Thuja wood is very fragile, but it is widely used in carpentry to create furniture with fine carvings.
You can propagate a tree by cuttings at this time of year:
- from the end of March to the first half of April - in the spring, sap flow begins in the shoots of trees, so rooting occurs faster;
- in June - in summer, the tree continues to actively grow, but the likelihood of damage to the seedling by spring frosts disappears;
- in October - autumn, the probability of seedling survival is much higher, since sap flow in the shoots slows down, and cool and humid weather promotes the formation of young roots.
Preparing the substrate for rooting
For rooting thuja, a light type of soil, which is characterized by good drainage properties, is best suited. You can choose one of two options:
- clean river sand (it is important that there is no contamination in it);
- substrate.
To prepare the substrate at home, you will need several components:
- leaf soil;
- peat;
- sand.
These components must be mixed in equal proportions. It is recommended to add a solution of potassium permanganate (3%) to the resulting soil, after which the soil is mixed and used for its intended purpose.
If sand is used for rooting, it is first boiled for 5 minutes, after which it is treated with a solution of potassium permanganate.
You can use special boxes, cassettes or jars for seedlings as containers for planting seedlings. The presence of holes (drainage and aeration) should be checked. Expanded clay is placed at the bottom of the container as a drainage layer and the container is filled with soil.
Rules for preparing cuttings for home rooting
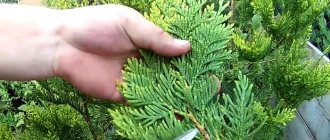
To quickly germinate seedlings, cuttings must be prepared taking into account several conditions. The planned shoots must be torn off from the mother tree. This must be done with your hands, with a confident, sharp movement from top to bottom.
As a result of this action, the shoot should come off with a small piece of last year's tree bark. This part of the handle is called the heel. It contains nutrients that the tree has managed to accumulate. As practice shows, branches with heels give roots faster and take root better.
Important! The leaves located near the heel are removed so that at the bottom there is a bare trunk measuring 2-3 cm. The upper green leaves of the thuja are trimmed.
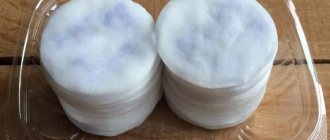
Rooting cuttings with moss
There is an alternative way to propagate thuja. For this you will need moss (sphagnum). The advantage of this option is the rare decay and rapid appearance of roots.
To perform this work you need to stock up on the following materials:
- plastic bag;
- a piece of fabric;
- growth stimulator (any can be diluted);
- a piece of moss.
First of all, the moss is soaked in cool boiled water. It should remain in this form for about 2-3 hours. After this, the sphagnum is placed in the center of a piece of fabric and several cuttings are placed on it. They should all be at some distance from each other.
The fabric is folded, and then tied with an elastic band or rope and placed in a bag. In this form, the cuttings must spend some time before roots appear.
The right time
To date, it has not yet been established what time of year is best to cut thuja branches for further cuttings. Some people insist that it is better to do this in winter, while others believe that the best time of year is summer or autumn.
Professionals say that you can propagate thuja from cuttings at any time, but it is best in the spring - this way the root system forms faster, and it is stronger and more resilient.
But there are some additional recommendations:
- In spring, branches should be cut in April;
- In summer, cuttings are collected in June;
- if autumn is chosen, then the shoots are collected in October;
- For winter cuttings, branches are cut at the end of December.
However, if you correctly collect the material and root it in accordance with all the rules, then the time of year will not play any key role.
Caring for thuja before planting in a permanent place
Before transplanting thuja into the ground, you need to consider several care requirements.
- The ambient temperature should be between 18-23°C;
- It is advisable to maintain humidity at 70-75%;
- the place in which the seedlings can be planted should be sufficiently light and sunny, but the shrub must be protected from direct ultraviolet rays;
- To maintain optimal temperature conditions, regular ventilation is necessary.
During rooting, seedlings require constant care
Water the plants carefully, avoiding exposing the heel. The easiest way to achieve this result is to use a spray bottle.
Important! The soil should not be over-dry, however, waterlogging of the soil causes rotting of the seedlings. For this reason, you need to water the thuja sprouts only after the top layer of soil has dried.
Step-by-step instruction
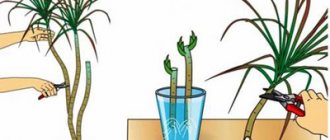
Most often, rooting of cuttings is carried out in water or in a pot with substrate. The second method is used more often, as it helps to obtain a stronger seedling with an extensive root system.
To plant a cutting, you need to follow these steps step by step:
- Prepare a wide wooden box of shallow depth with drainage holes at the bottom. You can use plastic containers to grow seedlings.
- Prepare a loose substrate by mixing garden soil, clean river sand and peat in equal quantities.
- Pour boiling water over the resulting soil mixture, and then treat it with a 3% solution of potassium permanganate for disinfection.
- Place a drainage layer of expanded clay or small stones on the bottom of the container.
- Fill the container with disinfected substrate, leveling its surface with your hands.
- Using your finger, make a small hole 1.5–2 cm deep on the surface of the soil in the container. When rooting several cuttings in one container, the distance between adjacent holes should be 5-6 cm.
- Place the lower end of the branch into the hole, placing the cutting at a 45° angle to the soil surface.
- Sprinkle the seedling with soil, lightly compacting it with your hands. Pour in a small amount of warm water.
After planting, the container with buried thuja branches is kept in the greenhouse. If there is no greenhouse or the gardener decides to plant the cuttings in the fall, then rooting can be done in the room. When planting cuttings in spring, they can be left outside, having first installed a wire frame with plastic film stretched over the container.
Important! You can remove the cover from the container or take it out of the greenhouse only after the cutting has taken root. At the same time, new buds and branches appear on it.
How to transplant thuja
Even after the roots have appeared, the thuja sprouts are not yet strong enough to be planted in a permanent place. For this reason, they are sent for rearing. If thuja cuttings were carried out in the spring, then the plants are replanted in September.
For growing, you can use two schemes:
- transplanting into flowerpots;
- transplanting to growing beds in the open air.
You can grow thuja in flowerpots
If preference was given to planting outdoors, then the bed should be chosen not in direct sunlight, but in partial shade. The work is carried out taking into account step-by-step instructions:
- Before rooting the thuja, you need to dig up the ground. In the process, the soil is fertilized. For 1 m², 0.5 buckets of sand and 1 bucket of peat are required.
- Holes for planting are prepared at a distance of 25-30 cm. The dimensions of the holes should correspond to the size of the plant's earthen ball.
- Thuja needs to be replanted by transshipment. After this, the lump is covered with a layer of earth and immediately watered.
To protect against cold weather, seedlings are covered with leaves or needles.
For your information! In a temporary bed, young shrubs will grow for 2-3 years, after which strong plants can be planted in a permanent place.
Most often, young plants are transplanted into open ground.
How to transplant an adult thuja to another place in the spring
The method of transplanting an adult tree may differ slightly from planting seedlings. The best time for such work is autumn (late September and early October). In this case, you need to take into account the fact that you need to move the tree to a new place before the cold weather. During this time, the shrub will be able to form new small roots and gain a foothold in the soil. The area for planting the plant should be in partial shade. In addition, there must be protection from strong winds.
15 days before transplanting, you need to dig a planting hole. Its depth should be no more than 0.5 m, and its width should be 3 times the width of the seedling’s crown. The bottom is lined with gravel. This is necessary to prevent water stagnation.
To remove a tree from the ground, you need to dig it in a circle and carefully remove it. The soil remaining on the roots should not be removed. This lump of earth preserves the roots of the plant and helps it quickly adapt to new conditions. The roots of the thuja are located superficially and compactly. If very long roots are found, they can be carefully cut off with a sharp knife or pruning shears.
Important! The cut area must be treated with a mixture of putty and heteroauxin. Such measures are aimed at combating parasites.
Before planting, you need to water the hole generously. Planting soil is prepared from several components:
- peat - 2 parts;
- sand - 1 part;
- turf soil - 1 part.
Coniferous litter and humus are added to the resulting soil. After planting, the soil is compacted and watered.
After replanting, the soil should be watered generously
General description of culture
This evergreen plant has excellent decorative properties. Thuja is a very durable tree. It is grown by many gardeners; the shrub is considered very popular among landscape designers. The wood of the plant is often used to make furniture and for carving.
Thuja is a low tree or shrub that is covered with cracking bark. The entire plant consists of skeletal branches, short, they can be sticking up or spread out in different directions. The branches create a narrow crown. Young shrubs have needle-shaped needles, which over time transform into falling out.
The crown of the thuja is oval or pyramidal in shape, the root system is not too voluminous. The plant grows very slowly, however, it can reach a height of 20 m. In young specimens, the bark is smooth, red-brown in color, but with age it becomes brown. In older plants, the bark peels off and narrow strips extend from the trunk. Thuja produces fruits in the form of scaly cones, the diameter of which ranges from 8 to 12 mm. These cones emit a pleasant pine aroma.
How to grow thuja from seeds
For those who are going to propagate thuja in a quick and easy way, it is better to choose planting cuttings, since germinating seeds is an extremely labor-intensive and time-consuming task.
For propagation, only fresh seeds are required. They are collected in the fall from September to December. There is a simple way to extract seeds from cones. To do this, the cones are placed in a warm place on paper. During the night they open and the seeds spill out on their own. All that remains is to collect them and start growing them.
Important! First of all, you need to get rid of diseased seeds. To do this, they are placed in the refrigerator for 2-4 months. When spring comes, the seeds are taken out of the cold environment and soaked in warm water. An alternative would be to place the seeds in damp sand for 10-12 hours. The grains, swollen with moisture, can be planted in the soil.
Soaked seeds are planted in the ground
Growing thuja from seeds at home
There are two ways to propagate thuja from seeds.
- sow seeds in garden beds;
- use boxes for planting. In this case, you can grow seedlings at home or on the loggia.
Pebbles are placed at the bottom of the box as drainage, a layer of sand is poured on top of it, and only after that the boxes or pots are filled with prepared soil.
The seeds are planted taking into account the 4*4 pattern. All manipulations should be performed carefully, since the root collar should be located at ground level. If this requirement is not taken into account, most of the seeds will die upon germination.
Thuja seeds give good germination
To ensure good soil moisture, the soil should be regularly sprayed with a spray bottle, but the seeds should not be over-watered. Feeding must be done regularly - once a month.
Having studied all the features of how thuja reproduces, anyone can plant a garden with their own hands or prepare seedlings for sale. Despite the length of the process, financial investments in this case are minimal.
Dates
Winter is the only time of the year in which it is unacceptable to carry out the procedure of thuja cuttings. Opinions on this issue do not agree. But it is important to know that the choice of planting period determines the rate of formation of the root mass. Each option has advantages and disadvantages.
Features of choosing a suitable planting period are summarized in the table.
| Season | Duration of root mass formation | Advantages / Disadvantages |
| Spring Can be planted immediately after the melting of the snow cover and after the end of frost. | Roots will form in about two to three months. | The main advantage is the accelerated formation of the root system. The main disadvantage is that the plants will go into winter with an insufficiently strong root system. |
| Summer You can plant in early June, that is, until the active growth of shoots begins. An alternative planting option is the last two weeks of summer, when growth processes slow down. | The roots take approximately two to five months to form. | The main advantage, according to experienced gardeners, is that long and warm summer nights have the most positive effect on the development of the root mass. One of the disadvantages of June rooting is that the growing period is shortened due to the late formation of the root system. As a result, plants enter winter weakened. Another significant drawback: summer temperatures increase the likelihood of root system rotting. |
| Autumn In southern latitudes, planting is carried out in November, and in middle latitudes a little earlier - in October. | Roots can form from three months to six months. | The advantages include the possibility of planting for growing in the spring. In other words, thuja seedlings will have enough time to strengthen and have a favorable winter. The main disadvantage is the slow growth of roots. Another possible drawback is the increased likelihood that the roots may begin to rot. |
The main condition that will determine the period for starting the preparation of cuttings is the cessation of the process of active growth in the coniferous plant.