Home » Site » Buildings
Published: 05/19/2020
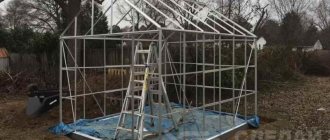
Amateur gardeners, like farmers, prefer polycarbonate greenhouses, during the construction of which a number of nuances should be taken into account.
- 1 Advantages and disadvantages of polycarbonate greenhouses
- 2 Types of greenhouse structures
- 3 Choosing a location for the greenhouse
- 4 Criteria for choosing polycarbonate for a greenhouse
- 5 Options for making a foundation for greenhouses made of polycarbonate 5.1 Strip
- 5.2 Pile and grillage
What is cellular polycarbonate
Cellular polycarbonate
This material is made in the form of two-layer plastic sheets with different thicknesses. As a rule, sheets with a size of 6x2.1 m and a thickness of 4.5 mm are used.
Polycarbonate has a number of significant advantages compared to glass and polyethylene film:
- It is highly durable and remains intact even with minor impacts (its strength is approximately 200 times higher than that of ordinary glass).
- It completely protects the plant in the greenhouse from the adverse effects of ultraviolet rays.
- Resistant to temperature changes from -40 to +60°С.
- The material is capable of scattering incoming sunlight, and, accordingly, burning of plants is excluded.
- Two-layer plastic has high thermal insulation properties.
- The material is easy to process and easy to cut and drill. Both self-tapping screws and an electric screwdriver can be used as fastening elements for the structure.
- The weight of polycarbonate is less than glass, which greatly facilitates its installation and transportation.
- The surface of the material has a dust-repellent quality, and any contaminants that appear can be removed using ordinary water.
- Polycarbonate is not flammable, but when exposed to fire it begins to melt.
- Its cost is similar to that of ordinary glass.
In order for a polycarbonate structure to be durable, you need to follow some requirements:
- When cleaning the surface of the greenhouse from dirt and dust, use detergents without alkali, ether and chlorine, and also do not use abrasive pastes for these purposes;
- to prevent the formation of mold and mildew, it is necessary to ensure that the end part of the greenhouse is always closed from insects and moisture;
- in winter, ensure that ice does not form on the surface of the greenhouse, which can subsequently lead to deformation and even destruction of the structure.
What is the best way to make a greenhouse?
Just a couple of decades ago, such a question might have seemed simply inappropriate. At that time, the frame for the greenhouse was made from any suitable materials at hand, and the covering material was non-alternative polyethylene film (which you still had to try to find in stores). The film was fixed on the arcs, and by raising and lowering it the temperature level inside the greenhouse was regulated. Among the disadvantages of such a greenhouse, one can note the short service life of the polyethylene film - it was rarely enough for more than two summer seasons; One of the advantages is the comparative cheapness of polyethylene.
Frame covered with plastic film
On a note! A glazed greenhouse was considered a more advanced and convenient design. Glass transmitted sunlight better and had a much longer service life. The main disadvantages were fragility and the danger of introducing sharp fragments into the soil.
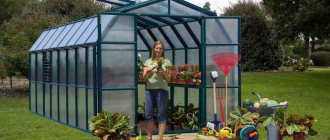
Today, the first two types of greenhouses can still be found in summer cottages, but polycarbonate greenhouses, without a doubt, took the palm. This material has amazing properties - it is light, durable, flexible, transparent, conducts heat well inside the greenhouse, but very reluctantly releases it into the atmosphere. The only thing that still keeps some summer residents from buying it is the fairly high cost.
Above ground greenhouse
Greenhouse design diagram
Caring for a polycarbonate greenhouse
It is best to draw a drawing of the greenhouse and also mark the place in the garden where it will be installed. The greenhouse needs a lot of free space away from trees and structures to ensure good ventilation and a large amount of light and heat.
The drawing must show what shape the greenhouse will be. There are several options available here:
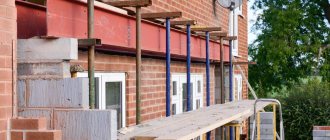
- to save materials and conserve heat, sometimes a wall-mounted greenhouse is installed connected to an existing building;
- According to the shape, greenhouses come with a single- or gable roof;
- the most common is an arched roof, especially if it is made of polycarbonate, but there are also difficulties in making an arched roof. The arch is made from metal corners and pipes, and for this you will need a special pipe bender or you will have to purchase ready-made arch structures.
How to choose a place
Even in the most modern technological greenhouse, plants will not feel well if it is not positioned correctly. A few points to consider when choosing a location:
- It is better to orient a room with an arched structure in the direction from north to south, while a straight-walled room should be oriented both from west to east and from north to south.
- Install the building in a quiet place, protected from prevailing winds, away from large trees and tall buildings.
- The area under the greenhouse should be flat or slightly sloping to the south.
- The groundwater level should not be closer than 0.8 m to the soil surface.
In the southern regions there is no shortage of sun, on the contrary, there is too much of it. In this case, you need to shade the beds in the afternoon. Use reflective screens and plant tall plants to protect from direct sunlight.
Construction technology
Drawing of the greenhouse
There must be ventilation openings in the form of window and door openings. The roof should be made in the shape of an arch, thereby increasing the volume of air in the structure. The built-in lever system will allow you to open the windows built into such a roof.
The size of the window must be at least ¼ of the entire roof surface. Additional air circulation will be provided by doors located in the end or side walls of the structure.
To pave the paths, choose paving slabs, and enclose the ridges with high borders, which will greatly facilitate the process of caring for the plantings. Under the ceiling space, secure the rods that will be needed to secure some plants.
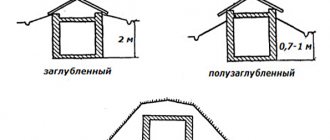
Types of greenhouse structures
Based on the shape of the structure, we can distinguish four main types of greenhouses: wall-mounted, gable, polygonal and arched.
With the wall option, the gardener can save building materials due to the fact that part of the house or other structure on the foundation will act as one of the walls of the structure. Often, when designing a house, the location of the greenhouse is included in the drawing.
The gable type is classic. It represents a structure with vertical walls and two slopes. Convenient and practical. Allows rational use of ceiling space, for example, for placing shelves.
Polygonal structures are aesthetically pleasing and characterized by high light transmittance.
The arched variety allows you to better retain heat and also withstand heavy loads during a snowy winter thanks to its smooth slopes.
Arched greenhouse on a concrete foundation
Foundation work
Dimensions of a polycarbonate greenhouse
The first stage is laying the foundation, in parallel with which the fences for the ridges are poured. For the frame it is better to use square pipes or metal corners. First, the harness is made and then secured to the foundation.
The metal structure must be carefully painted before installation, otherwise it will succumb to corrosion.
The harness is fixed to the foundation using anchor bolts.
Construction and types of foundation
- lumber;
- brick;
- stone;
- tape
Foundation drawing for a greenhouse
The timber foundation is made of wooden beams. It is financially inexpensive, but will not last long, up to a maximum of 5 years, despite treatment with an antiseptic. Over time, the tree will begin to rot. Installation of a timber foundation occurs as follows:
- steel corners are driven in around the entire perimeter;
- wooden supports are attached to the corners and driven into the ground;
- pre-prepared wooden blocks measuring 10 by 10 cm are laid around the perimeter of the base of the greenhouse.
The brick foundation is distinguished by its quality and service life. If such a foundation is built correctly, it can serve for a long time, but its manufacture will require a lot of bricks to support the weight of the greenhouse. First, a cushion is made with waterproofing to protect against the destructive effects of moisture from the soil. When building a brick foundation, ordinary cement-sand mortar is used.
In order to make a brick foundation more stable, it needs to be plastered.
A stone foundation is also suitable, since such a foundation is durable and designed for any load.
It should be taken into account that laying natural stone of unequal shape requires certain skills, and making a stone foundation yourself is not an easy task. It is best to use a clay-sand mixture for the solution in a ratio of 1×1. Such a solution will promote heat conservation. To prevent the clay from being washed away by water, the foundation must be plastered, and if it turns out to be too uneven, then formwork must be installed and concrete poured along the edges.
The advantages of a strip foundation are that the funds, as well as the time and effort spent, are relatively small, but the result is excellent. This type of foundation differs from others in durability and reliability. To make it you will need:
- cement mortar;
- board formwork;
- a cushion that protects the foundation from subsidence.
The construction of a strip foundation occurs as follows:
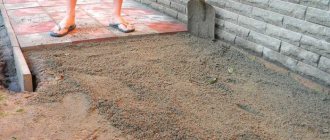
- The pillow is made of gravel or sand.
- Then the formwork is laid in the shape of the greenhouse.
- The solution is poured to a width of 30–40 cm and a depth of approximately 0.5 m.
This technology will ensure high strength of this foundation.
Any of these foundations must be built at a distance of 25–30 cm from the ground level. This will protect the foundation from destruction and the structure will last a long time.
Which type of polycarbonate do you prefer?
Today there are two types of polycarbonate on the market:
Monolithic polycarbonate resembles a flexible sheet of glass and can be of different thicknesses and colors. The service life can reach several decades. With equal thickness, it costs slightly more than a cell phone. Most often used in the construction of fences, canopies, canopies, etc.
Monolithic polycarbonate
Cellular polycarbonate is structurally composed of two thin polymer sheets connected to each other by stiffening ribs located at equal intervals. Air-filled cavities provide this type of material with amazing thermal insulation qualities, which makes it an ideal option for the construction of greenhouses and greenhouses. It differs from monolithic in slightly lower cost and shorter service life.
Cellular polycarbonate
Prices for cellular polycarbonate
cellular polycarbonate
Installation work
Timber foundation for a greenhouse
- First of all, you need to build a frame. Plastic, aluminum and galvanized profiles are used for the frame. But taking into account seasonal loads, for example, the weight of a large amount of snow on the roof of a greenhouse, it is better to use wooden blocks for the frame, since the properties of wood can withstand heavy loads.
- After the frame is ready, the arched elements are fastened together.
- Then the front parts of the greenhouse are installed - a door and always a window so that the room is well ventilated.
- At the end of the work, the frame is covered with polycarbonate sheets. They are laid end-to-end and connected using a connecting profile using rubberized thermal washers to protect the fasteners from dirt and moisture.
Recommendations
- If the foundation is not level, when laying polycarbonate, bulges and unevenness will form, then cracks.
- The most reliable greenhouse design that can withstand winter loads in the form of snow accumulation is a dome-shaped greenhouse with a sharp “Drop” ridge. It has one drawback - complicated installation.
- Buy greenhouses with arc spacing of at least 0.65 m if you do not want to find your greenhouse with broken polycarbonate after a snowy winter.
- It is better to secure polycarbonate with galvanized metal tapes. Since this simplifies the installation/dismantling of polycarbonate.
- It is better to use polycarbonate with a thickness of 6 mm or higher, depending on the available funds.
- When installing a greenhouse 6 meters or more in length, immediately install additional side windows. If possible, with automatic opening.
Greenhouse frame options
Greenhouse made of profile and polycarbonate
Installation of the frame
An important role is played by a correctly assembled frame made of reliable materials, one of which is the profile. We will not dwell in detail on factory profile structures, since in the purchased kit you will find detailed assembly instructions. Let's focus on a more economical option - a frame made from a profile for plasterboard. A design with rounded shapes will not work, but the frame will be strong enough to withstand snow and wind loads.
Let's consider the advantages of using such material for making a frame:
- Low profile cost.
- The profile is galvanized, so it is not afraid of moisture.
- Possibility to assemble the frame without the help of assistants.
- The design is quite light.
- It is convenient to attach polycarbonate sheets.
Profile frame
First, you need to make a drawing or at least draw a sketch of the future greenhouse indicating the dimensions. After this, using the resulting data, cut the workpieces. Now you need to secure the profile to the foundation with anchors, which will serve as the basis of the entire structure. After this, you can begin installing the frame.
Drawing of a greenhouse frame from a profile
As for assembling the frame, everyone decides to do what is convenient for them. We recommend assembling the arches on a horizontal, flat surface, and then mounting and tying. How to attach sheets is already written in the article.
Greenhouse made of pipes and polycarbonate
Assembling the frame
The frame for the greenhouse can be made from several types of pipes. If the frame is metal, then it is better to use profile pipes, welding them with electric welding. The arched structure experiences less snow loads, but in order to give the pipe the required shape, you need to use a pipe bender. If you don’t want to bend pipes or buy ready-made arches, then you can make the shape of the greenhouse the same as from a metal profile - with a sloping roof.
The racks are attached to the corners and walls of the frame by welding. At the same time, doorways are installed. An upper frame is made on top of the racks and door structures, onto which the arches are attached. After this, proceed to install the arched vents on the roof and secure the hinges to the ridge. Build a lever system to lift the windows, and then start painting the frame.
Frame of the future greenhouse
It is not advisable to make a greenhouse frame from round pipes, because when screwing polycarbonate, the self-tapping screw may slide to the side and damage the sheet.
It is easy to screw a self-tapping screw into a square pipe.
You can quickly and easily assemble a simple frame from polypropylene pipes. Again you will need to make a drawing and cut the blanks. To assemble the frame, you will need a soldering iron, and a certain number of pipes and fittings will need to be purchased in accordance with the chosen shape of the greenhouse.
One of the advantages of a frame made of polypropylene pipes is the excellent combination of strength and flexibility of this material. Flexibility allows you to give the frame the desired shape, and strength allows you to withstand considerable loads.
Deciding on the sizes
To better imagine how to make a greenhouse from a profile with your own hands, you must first decide on the dimensions. And in order not to encounter excessive consumption of material and a large amount of waste, it is advisable to correlate these dimensions with the standard dimensions of corrugated pipes and polycarbonate sheets.
In construction markets and metal depots, profile pipes are sold in 6-meter lengths. In stores you can find a different length - 2 or 3 meters. It is more convenient for independent transportation, but it is more difficult to assemble an arched structure from short sections: there is a need to make additional joints.
If you have no problems with how to bend a profile pipe at home for a greenhouse, it is better to purchase standard whips. Each will make an arch about 2 meters high and with a distance between the legs of 3 meters. This is enough to accommodate two beds and a central passage inside.
Optimal ratio of width and height of arched and rectangular greenhouses Source www.agro-parnik.ru
How to properly heat
Greenhouse door
Now it is important to take care of the insulation and heating system of the greenhouse. Modern technologies involve the use of transparent or bubble plastic to insulate the greenhouse from the inside and outside. The benefit of this solution is that this material does not absorb sunlight and looks decent.
Heating methods:
- Stove heating - for this purpose, a stove or barbecue is built, and ventilation is installed to ventilate the room. The disadvantage of this method is that the heat is distributed unevenly over the area of the greenhouse.
- Electric heating is carried out using a convector and heating elements. In this case, ventilation is not needed.
- Water heating is carried out by installing pipes to which hot water is supplied using a pump from a boiler, which is heated by electricity, gas or coal. Ventilation is required when using gas and solid fuels. This method is also labor-intensive and expensive.
- Gas heating is produced using catalyst burners. This requires constant ventilation and ventilation throughout the greenhouse.
Heating in a greenhouse may not be entirely economical, but, as they say, the goal, and in our case, to reap a rich harvest, justifies the means.
Do you need to build a foundation?
To ensure that the greenhouse is not blown away by a strong gust of wind, and that the entire structure is sufficiently rigid and stable, it is necessary to make a foundation. This will take very little time and will allow you to easily move the greenhouse to a new location if necessary.
Here, as you can see, the greenhouse is installed on a wooden foundation
Here is a simple set of materials that will be required to build a foundation:
- wooden beam 12x12 mm;
- roofing felt;
- wood screws;
- hacksaw;
- roulette;
- antiseptic;
- shovel.
A trench is dug along the perimeter of the structure being erected, its width and depth exceeding the timber by 5-7 mm. Roofing felt is laid in the trench. Next, pieces of timber of the required length are prepared and treated with an antiseptic composition. After this, the timber is laid in the trench, and the edges of the roofing material are wrapped towards the foundation (if necessary, the roofing material can be secured to the timber with a construction stapler). All that remains is to securely fasten the beams with self-tapping screws - the foundation is ready.
Example of a foundation for a greenhouse
Prices for roofing material
roofing felt
Tips for building a greenhouse
Heating a greenhouse
Sheets of material are laid strictly along their length, fixed with self-tapping screws or special thermal washers. They reliably attach the polycarbonate to the arch of the frame and will save it from deformation when expanding in winter. The role of the pressure plate will be played by the corners for the plastic arch, which you can buy at a building supplies store.
Before starting installation work, you need to remove the polycarbonate from the packaging film, coat the edges with glue and secure the plastic corner. The open edges of the material are treated with tape or sealing tape, and the bottom edge with perforation will provide the necessary drainage effect.
Types of fasteners for assembling a greenhouse
To connect two sheets of polycarbonate to each other, use a connecting strip designed for this purpose. Then you can begin attaching the polycarbonate sheets to the greenhouse frame.
Initially, the roof is sheathed with polycarbonate sheets, and only then the remaining part of the arch from the ends. Next, the walls and doors of the structure are finished with the material. The connections at the corners are closed using metal or plastic corners. After this, remove the remaining protective film.
The finishing touches include the installation of fittings, handles, latches and fixing hooks on the door, as well as a rubber seal on the windows for complete sealing.
Even if you, having no experience, are forced to entrust some part of the work to professionals, a larger volume will fall on your shoulders. Therefore, try to approach the process responsibly in order to continue to enjoy natural products grown in a greenhouse.
Caring for a polycarbonate greenhouse
The lifespan of a building largely depends on how it is cared for throughout the year.
After harvesting in a summer greenhouse, you must:
- remove plant remains;
- treat the frame and walls from the inside;
Rust of the greenhouse frame
- disinfect with special antiseptic agents;
- clean the outside covering.
Such measures will prevent the appearance of mold and moss on the polycarbonate and will maintain the high light transmittance of the polycarbonate.
Cleaning the greenhouse roof from snow
To prevent structures from deforming and collapsing during heavy snowfalls, you can remove and store the polycarbonate sheets under a shed or in a shed. If the greenhouse is not dismountable, wooden supports in the form of the letter T or frame are placed under the frame from the inside. Regular snow removal using a soft brush or a scraper with a rubber tip will help avoid the appearance of ice.
Drawings and diagrams
Fastening polycarbonate to steel pipes
Installation of sheets
Types of greenhouses with single-pitched, gable and multi-pitched roofs
Drawing of a table from a profile on an elevated foundation
Greenhouse assembled using a metal profile
Drawing of a greenhouse made from a profile pipe
Briefly about the main thing
Such a task as welding a greenhouse from steel profile pipes cannot be called simple. At a minimum, you need a welding machine and the ability to operate it. But you can do without it if you use galvanized profiles that are connected with bolts and special plates. Conventional pipes will require additional anti-corrosion treatment. Another necessary tool for creating arched structures is a pipe bender. But you won’t need it either if you choose a greenhouse with a pitched roof or use the DIY bending methods described in the article. Before starting work, you need to decide on the size of the structure, focusing on the standard parameters of corrugated pipes and polycarbonate.
Ratings 0
Photos of interesting solutions
Drawing of a frame assembled with bolts
Drawing of an arched greenhouse
Greenhouse installation
Polycarbonate greenhouse
Greenhouse with windows
Did the article help you?
What is more profitable - buying a ready-made greenhouse or building it yourself?
To understand the difference, it is enough to compare the total costs of purchasing materials for self-construction with the cost of a factory kit.
Table. What is needed to build a standard medium-sized greenhouse.
| Name | Quantity, pcs. | Cost per piece, rub. | Total cost, rub. |
| Standard 4mm thick polycarbonate sheet | 1 | 2000 | 2000 |
| Galvanized square pipe 20x20x1.5 mm | 22 | 50 | 1100 |
| Self-tapping screws, electrodes, hinges, other consumables | — | — | 500 |
Total: the total cost of building a lean-to greenhouse with dimensions of 3x1.2x1.8 m will cost approximately 3,600 rubles.
Scheme of a lean-to polycarbonate greenhouse
In stores, a kit for installing a similar greenhouse will cost significantly more. However, if funds allow, and you really want to save time and effort, you can prefer this option. Another advantage of a factory-made greenhouse is that all its parts fit perfectly together, and the owner of the dacha will be spared from possible errors during design/assembly.
Some useful tips
- If the greenhouse being built assumes an arched structure, you should remember that the polycarbonate sheet should be bent only across the direction of the stiffeners.
- You should not save on building a frame. If the frame is wooden, the wood should be chosen even and dry. If it is metal, it is better to take a galvanized profile.
- It is necessary to try to avoid the formation of cracks in the greenhouse structure. Through these cracks the structure will inevitably lose such valuable heat.
- The optimal time to build a greenhouse is early spring or late autumn. During these periods, the average air temperature is as close as possible to the ideal for working with polycarbonate (from +10 to +12 degrees Celsius).
Technical characteristics of polycarbonate
Despite its popularity, the properties and characteristics of polycarbonate are not known to everyone. Let's look at some of them.
Strength
This indicator depends on the thickness of the panel. Modern honeycomb sheets are available in different thicknesses: 4, 6, 8, 10, 16, 20 and 25 millimeters. Moreover, each of these blocks has its own internal structure. The table shows linear dimensions, specific gravity, maximum permissible bending radius and other linear dimensions that may be useful for working with the material.
Linear dimensions of cellular polycarbonate sheets
The type of internal "grip" affects strength. Thanks to their “layered” structure, such panels can withstand heavy loads.
Indicators of mechanical strength of polycarbonate
If installed correctly and using the recommended fasteners without changing the structure, a polycarbonate greenhouse can last at least 5 years.
How does polycarbonate behave depending on temperature?
Most polycarbonate panels are resistant to high and low temperatures. The thermal expansion index changes slightly. Maximum expansion when heated is 1 mm per 1 m2.
Change in the linear dimensions of a honeycomb polymer with temperature changes
Permissible temperature range: from −4 to +130˚C, but there are also particularly frost-resistant thermoplastics. They do not lose their properties even at extreme temperatures - minus 100˚C.
UV resistance
Polycarbonate sheets transmit light differently. The thicker and more complex its structure, the more scattered the light. Unpainted panels have high light conductivity, above 85%, colored panels - no more than 65%. Each polycarbonate panel has a protective coating on the outside that prevents dangerous ultraviolet rays from entering the greenhouse.
Protective properties of polycarbonate
Polycarbonate in a roll with a protective layer
When installing the polymer, you should pay attention to the markings and lay the sheets with the protective side up. There is no need to be afraid that the coating will lose its properties; the varnish is “fused” into the polymer, which allows you to maintain the protective function for at least 10 years.
Chemical protection
Polypropylene is resistant to alkali and ammonia-based sealants. However, it is easy to clean with alcohol solutions or neutral, non-alkaline liquid cleaning agents.
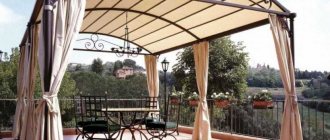
Summer veranda made of polycarbonate
Dries well and does not lose its appearance. Such coatings can be watered with water from a regular hose.
Moisture resistance
Polycarbonate sheets do not allow or absorb water. This makes them an indispensable material for roofing work - such canopies are used in summer cafes, for the construction of gazebos and verandas.
Polycarbonate gazebo
Polycarbonate pool dome
Anti-vandal telephone booths are made from polycarbonate; canopies at public transport stops are made from it, as well as advertising signs.
Thermal insulation characteristics
In terms of heat retention characteristics, polycarbonate is the best material. It is indispensable for glazing greenhouses. Photos of greenhouses made of cellular polycarbonate on the Internet prove the popularity of this material among summer residents.
Polycarbonate greenhouse: inside view
The viscous structure of plastic is much denser than film, glass and other similar materials. The heat transfer coefficient depends on the thickness and structure of the sheet. Average values are 4.1 W/(m² K) (for 4 mm) to 1.4 W/(m² K) (for 32 mm).
Noise insulation
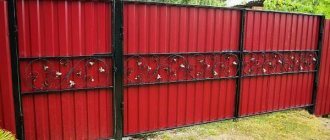
A polycarbonate greenhouse is the best place for secret negotiations. Multilayer panels will provide reliable noise suppression. The panels are 16 millimeters thick and can absorb sound vibrations up to 21 dB. Therefore, it is often used to build fences - such a wall can muffle street noise.
Polycarbonate fence
Remember that for building fences it is better to take polycarbonate sheets with a thickness of at least 16 mm. This will ensure the durability of the structure and protect it from damage. The service life of such a fence is at least 15 years.
Fire resistance
Polycarbonate is a highly flammable material. In the European classification it is classified as category B1 - this means that the material does not burn. Its structure is such that when exposed to a point of fire, it “melts” and contracts, holes appear on the plastic, which prevents further spread of fire. An important feature: when melted, polycarbonate does not release caustic or toxic substances. And the combustion products immediately “evaporate” through the resulting holes.