original bird feeder idea photo
There are many types of bird feeders and different ways to make them. They must be durable, safe, easy to maintain and, of course, attractive from the point of view of our feathered friends. These are the basic conditions, but who said that the canteen for birds should look like a boring “diner”.
If your imagination works, you can always figure out how to make an original bird feeder with your own hands . This article presents just a few dozen examples of homemade feeders, just to spark your imagination. I hope you will have your own ideas after watching it.
Orange bowl
You can come up with some pretty original bird feeders. For example, use an orange for this purpose. Cut the fruit in half and eat the pulp.
And make four holes in the skin opposite each other. Stretch the twine through them, connect them crosswise and tie the upper ends to a tree branch. The result is a container into which you can pour the grains.
Simple feeders
The simplest bird feeders can be made from plastic bottles or tetra bags (for example, milk or juice). Wash the plastic containers, cut out the doors, leaving small sides at the bottom, and make holes on top for the twine.
That's basically it. All that remains is to hang the feeder on a tree and pour in food or crumble bread. The sides will prevent seeds or bread from scattering and protect from rain or snow.Tin cans can also serve as bird feeders. To do this, they are tightly tied with ribbons, which are attached to a tree branch.
The only inconvenience of all these models will be their light weight, so the feeder will sway from gusts of wind.
Apple pendants
A good idea for a feeder would be apples cut into rings and hung on strings from a wire rack.
If you want to add some nutrition to your bird's dinner, brush the apple rings with melted pork fat. You don’t have to take fresh apples – dried ones will do.
Pumpkin arbor
Work on the pumpkin just like you did for Halloween. Cut a solid hole and discard the seeds and pulp. Pour treats inside, and hang the pumpkin itself from the branch by its tail.
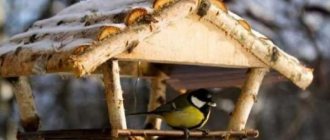
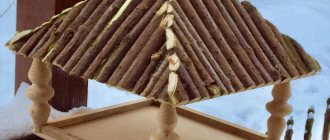
Popsicle stick house
If you often buy ice cream for your kids, don't throw away the sticks. You don't need a bird feeder drawing. Lay out two parallel rows of sticks. Insert the sticks perpendicularly on the sides between them. It should look something like a log house.
Tie the resulting product at the corners with twine. Connect all four ends of the rope at the top above the branch where the feeder will be located. Attach the bottom from a piece of plywood. Now you can call the birds for lunch.
Unusual feeders
A bird feeder for a kindergarten can be made from half an orange or from a pumpkin.
To make an orange feeder, you need to remove the pulp from half an orange and make punctures in the peel. Thread the twine through the holes from the outside in and out again on two or three sides. Connect the twines into one knot.
But such a craft will also not last long.
We recommend reading:
- Crafts from sweets: the best options and the most interesting crafts from sweets and candy products (90 photos)
- Wood crafts - step-by-step instructions on how to make wooden crafts with your own hands (200 photos + video master class)
Mushroom craft - a review of interesting crafts and a master class on making a simple mushroom (100 photos and videos)
Instead of orange, you can use pumpkin. It will last a little longer. To create a fun craft, cut two sides of the pumpkin and remove the pulp. You can cut windows on the remaining parts and install a pipe from a piece of a small plastic bottle on top.
The finished feeder-house just needs to be placed on a table or bench.
A cup and saucer feeder would be interesting. In order to create such a miracle, just glue the side of the cup and saucer with superglue and hang the structure by the handle of the cup. You will get a very unusual feeder.
A feeder made from thermal tissue will be just as unusual. To do this, you need to bend it slightly and simply attach it to any pallet or board using glue or self-tapping screws.
Birdhouse made from clocks
Did you inherit a rare pendulum clock from your grandmother? Their strong base makes an excellent bird feeder. Remove the pendulum - there will be a dining room in this place. And in the small hole where the cuckoo once crowed, organize a “bedroom” for your flying friends. Get a birdhouse with your own hands. All that remains is to attach it to the tree trunk.
What types of bird feeders can be made?
Even the most beautiful bird feeder bought in a store cannot replace one made by yourself, especially if children are involved in the manufacturing process.
From improvised means and inexpensive materials, you can build a variety of models that differ in certain design features:
- hanging structures with easy access to grain feed;
- tray feeders with a practical canopy to protect the tray;
- full-fledged feeding houses with roof slopes and perches;
- bunker crafts and peelers with original and non-standard designs.
Interesting models can be tied to the branches of trees or bushes, fixed on a balcony or stair railing.
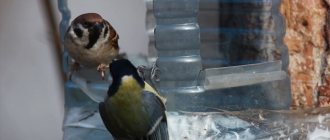
To fill feeders of any type, you can use a variety of food, grains and bread, nuts and seeds, not forgetting the taste preferences of birds living in a given region.
Feeder "Avoska"
Often in supermarkets, vegetables and fruits are packaged in nets. Previously, our ancestors used to go shopping with these and they were called “string bags.”
Now it’s time to use them for good deeds by putting bird food in the net. True, you will have to work hard to make a bird's dinner that will not fall through the holes.
Mix the grain or grain mixture with unsalted lard, after melting it. You can use peanut butter instead of lard. Roll the resulting mixture into a ball, put it in a string bag and hang it on a tree.
The fat will harden in the cold and the food will not spill out. But it will be convenient for sparrows and tits to peck it through the net.
To prevent the food from getting wet and softening under the influence of precipitation, you can attach a gable roof over the string bag.
Drawing master class for children 9-10 years old step by step with photo “Bird's dining room”.
Master class on painting with acrylic paints “Bird's Dining Room”.
Author: Malevannaya Natalya Nikolaevna, additional education teacher, MBOU DOD “Station of Young Naturalists”, Ussuriysk, Primorsky Territory. Description: the master class is intended for children 9-10 years old and older; it will be useful for teachers, additional education teachers, parents and all creative people. Nowadays, many people are interested in painting by numbers. Acrylic paints are included in the kits for this painting. And very often they remain. You can use them for drawing on regular paper. Which is what I propose to do. It is not necessary to paint this subject drawing with acrylic paints. You can also do it with gouache. True, the execution technique will be slightly different, but not much. The fact is that acrylic paints dry faster on the brush while painting, so you have to paint them more often. Another feature of acrylic paints is that they practically do not mix (unlike gouache), that is, it is unlikely that you will be able to mix, for example, red paint with white paint in order to get an orange color. But acrylic paints fit on top of each other just as well as gouache. And what I like about them is that their colors are very rich and bright! But it’s better to see once than to read a hundred times, so try, dare, and you’ll understand everything. Purpose: use in environmental classes and drawing classes, for competitions, for interior decoration. Goal: learning to draw a plot picture. Objectives: 1.Teach how to build a composition and sketch a drawing on a large format sheet (A3); 2.Introduce methods of painting with acrylic paints; 3.Develop thinking, imagination, creative imagination; 4.Develop aesthetic perception, artistic taste; 5. Foster hard work, independence and activity at work; 6. Foster love and respect for nature; Tools and materials: 1. A sheet of A3 paper;
2.Acrylic paints (leftover from paint-by-numbers kits); 3. Brushes for painting; 4.Water glass; 5.A simple pencil and eraser. Conversation about birds before the master class.
With the onset of winter, birds stay closer to human habitation.
Why do you think? On cold days, birds search for food throughout the day. In winter, birds are not as afraid of the cold as they are of hunger. During the short winter day, the birds barely have time to satisfy their hunger. In the winter cold, hungry and weak birds easily freeze. If a bird does not eat for 6 hours in winter, it dies. Out of ten small birds, only two remain in severe winters. Therefore they need help. - How can we humans help birds? - Certainly! We can save birds from hunger and feed them. — Guess the riddle: What kind of table is there among the birches in the open air? In the frost he treats the Birds with grain and bread. - That's right! This is a bird feeder! — What is a bird feeder for? “We can’t do without a feeder if we want to feed the birds.” In a feeder, if it is made correctly, the food we give to the birds is protected from snow and wind. And the birds themselves, having flown to the feeder, can easily eat without fear of predators, who would easily catch them if we gave the birds food on the ground, because the feeder is located high on the tree. — Look at what types of feeders there are: Wooden feeders in the form of houses: Feeders made of cardboard boxes:
From plastic bottles: And from many other materials:
“It’s not enough to make a feeder, you also need to know what you can put in it.” Watermelon and melon seeds can be collected in the fall. They are loved by tits, nuthatches and woodpeckers.
— Pieces of lard are not suitable for all birds. Tits love lard. Just lard should not be salty.
- Tits and sparrows will readily eat oats. — Sunflowers, especially small ones, but not fried, are the best food for bullfinches, tits, nuthatches and sparrows. It is better to crush them slightly before adding them to the feeder. You can give millet and bread crumbs.
— Do you think birds have natural dining areas in winter?
— Birds have natural dining areas. For example, rowan trees. Take care of the rowan! Do not break its branches, so as not to destroy the bird's dining room. — I suggest you draw a bird feeder with different birds flying to it to dine. And we’ll call our drawing “Bird’s Dining Room.” There will be five different birds in total in our “dining room”, let’s see what they look like. Waxwing
Nuthatch Great tit Long-tailed tit Bullfinch
Master class “Bird dining room”
1.First we will make a pencil sketch. Lay the sheet horizontally. The first thing we will do is draw a horizon line. To do this, we visually (or using a pencil) divide the sheet into approximately three parts: two thirds at the bottom - this will be the earth, one third at the top - the sky. 2. We begin to build the composition of the future drawing. Let's start with the largest object in the foreground - this will be the feeder. First of all, you need to draw an axis of symmetry. It will be located in the middle of the sheet. So, we draw a line from the bottom edge of the sheet upward. It will go slightly beyond the horizon line. Using small transverse lines we will immediately outline the upper and lower parts of our future “house” (the feeder will be in the form of a house standing on a pole). 3. In order to draw that part of the “house” that is in the foreground, we will mark the place where our roof will begin, as well as the lower part of the front wall. It is advisable that the wall be slightly higher than the roof, take this into account. And also that our wall will not be rectangular, but in the form of a trapezoid, so the roof line will be slightly longer than the wall line. 4. Draw the roof and wall. 5. We finish drawing the side wall and roof, not forgetting about the laws of perspective. We erase the line that marked the beginning of the roof of the “house”, since our wall smoothly passes into the roof, and does not consist of separate parts. 6. Give one of the boards (the one closer to us) volume. We finish drawing a stand at the bottom of the “house” - a thick board on which the feeder stands. And also a pole that goes down, beyond the boundaries of the drawing. 7.Use light lines to outline the birds. There will be five of them in total: closest to us, on a stand, are a waxwing and a bullfinch, on the roof are a nuthatch and a tit, and on the edge of the stand is a long-tailed tit. 8.Draw the details of the waxwing’s body: draw a crest, a “mask”, a “tie”, a stripe at the end of the tail, feathers at the end of the wing, and of course – the eye, beak and paws. 9.Draw the details of the nuthatch’s body. It has a long beak and a short tail. A stripe runs from the beak to the wing through the eye. Draw the details of the wings. Note that nuthatches have long, clawed toes. You can draw a seed in his beak. 10.Draw snow on the roof.
11.Draw a titmouse; we see only its upper part from behind the roof.
12. This is what our roof looks like now with two birds on it. 13.Draw a bullfinch. 14.Draw a long-tailed tit. Its body is almost round, its beak is very small and its tail is long.
15.We drew birds with a pencil. This is what they look like.
16.Draw a sketch of fir branches with cones along the edges of the leaf. 17.We make a sketch of two houses with a fence and trees in the background. 18. Paint the sky with blue paint, and pale blue paint for the snow.
19. We paint the walls of the house and the windows with blue paint. Using blue paint a little darker, we draw a path near the houses. 20.Using different shades of brown paint, paint over the walls, part of the stand and the roof that are not covered with snow. We also use a thin brush to draw a “pattern” on the boards.
21. We draw cones on the branches and a fence near the houses. 22. Using a thin brush, we draw pine needles on the branches on the left (here I made a small mistake - I accidentally dropped green paint on the nuthatch, but that’s okay, then we’ll paint it over).
23.Draw snow on the branches.
24. We paint over the titmouse, nuthatch, waxwing, bullfinch and long-tailed tit. 25.Draw branches on the right side and Christmas trees near the houses. 26.Use black paint to paint a tree and a bush. 27.Draw snow on the trees, bushes, on the fence, on the window frames (at this stage I decided to add more snow to the roofs of the houses). Using a thin brush we paint snow on the spruce branches. 28. Using a thin brush, draw the feathers of the nuthatch, outline the legs and contours of the body with black paint to give volume. Add a highlight to the eye. 29. We do the same with other birds. Plus, we finish drawing the seeds - spots of different shapes and colors on the stand near the “house”.
30.Our drawing is ready. I wish you creative success!
We recommend watching:
Waxwing on a rowan branch step by step drawing Bird of happiness. Drawing with watercolor pencils for children step by step Drawing an Owl in stages for children Firebird. Drawing step by step with children
Similar articles:
Summary of a drawing lesson in the senior group on the topic Birds
Drawing birds in elementary school
Feeder "Coconut"
If you eat a coconut, do not throw away the shell. Look on the Internet for a photo of a coconut bird feeder and do the same.
Not everyone can make holes in the thick skin of a coconut. But if you manage to do this, the well-fed birds will thank you with morning singing.
Those who have not managed to cope with this matter can use half a coconut as a “plate” for the birds.
Schoolchildren hung bird feeders in Mytishchi park for Titmouse Day
RIAMO (MYTISHI) – November 12. Pupils of grade 2B of school No. 14 Mytishchi took part in the “Titmouse Day” campaign, they hung feeders in the Central Park and poured seeds into them for birds, reports the RIAMO in Mytishchi correspondent.
The Titmouse Day event took place on Tuesday in the city's Central Park. At the event, children not only set up bird feeders, but also recited poems and showed drawings. Each child received as a gift a book with Elena Zurek’s ecological fairy tale “Khranimir. We are not pigs."
“We started preparing for the event in advance, a feeder competition was announced, some of the kids made it themselves, some did it together with their parents. Then they visit these feeders in the park and always put food and seeds there. There were still a lot of feeders left in the classroom, we couldn’t bring them all,” said primary school teacher Inna Golosova.
By tradition, every year the children hang feeders in the school yard.
“Every day, when we go for a walk with the children, we make sure to put seeds and food there. We even have people on duty on weekends; children come of their own free will and pour food for the birds while they are walking in the school yard,” noted Golosova.
The event was attended by Deputy Head of the Municipal Administration Svetlana Lysenko. She helped the children hang up the feeders and also provided the children with food for the birds.
“This tradition is taking root well, it can’t help but take root. This all-Russian holiday is supported by absolutely all constituent entities of the Russian Federation, including the Moscow region. Everyone is involved in the issue of supporting birds, hanging feeders, telling children and adults how this should happen, what to feed the birds. I am very glad and touched that almost all schools in our district are participating in this event,” said Lysenko.
She noted that a similar campaign is taking place in schools and kindergartens.
“Today we are making a start; we will deal with this issue throughout the winter and hang and replenish the feeders until the end of March. This is a very interesting event, and the younger generation needs to be taught this, who will then understand the importance of this issue,” added Lysenko.
Titmouse Day is one of the new environmental holidays in Russia, whose roots go back to antiquity. It was created on the initiative of the Russian Bird Conservation Union and is celebrated on November 12. This holiday is designed to develop a love for nature in people and encourage them to care for the environment.
Feeder from a 5 liter bottle
It’s difficult to work with coconut, but almost anyone can make a feeder from a bottle. Take a 5 liter plastic bottle.
Draw three or four squares on the same level so that the bird can fit. Cut out three sides of each square, leaving the top line intact.
Fold the resulting square outward to create a canopy. Pour some bird treats inside the bottle and wait for your guests.
Food plastic products
Ordinary plastic bottles and hard juice bags can become valuable materials for the creative process. Sharp scissors or a stationery knife will also be useful in the work, with which the master will cut out windows for laying bird food.
Such bird feeders are distinguished by their simple execution technique and practicality (available consumables, low manufacturing costs).
Feeder from a 2-liter bottle
Take two or three wooden spoons. Make two through holes in a 2-liter plastic bottle so that the handle of each spoon pierces right through the bottle. At the same time, so that the spoons come out with the scoop in different directions.
Pour the beans into the bottle. Through the holes, food will be poured into spoons, and birds will be able to peck it without difficulty.
Coffee stirrer feeder
Coffee stirrers are a great material for making an extraordinary bird feeder.
Before making a feeder, you need to stock up on a large number of coffee stirrers, and also prepare: acrylic paint and brushes, a glue gun and sticks for it, tape, scissors and strong rope.
Plan for creating a feeder:
- Paint the coffee stirrers on all sides in the desired color and let dry.
- Take 15 pieces of mixers, place them on the surface next to each other and secure with tape - this will be the bottom of the feeder.
- Attach a stirrer to the two edges opposite each other.
- Attach a stirrer to the other 2 edges as well.
- Perform 10 layers using this method.
- Glue 4 stirrers on the outside, near each corner, and carefully make holes in them.
- Thread a thread through the holes and secure it to the tree.
If desired, such a feeder can be supplemented with a roof.
What and how to put in the feeder
When trying to save birds from the harsh winter, do not go too far, so as not to harm the birds with your ill-conceived care. Avoid giving your winged pets salty, fried, rancid or moldy food. You cannot feed birds millet and black bread.
But for sunflower seeds or oatmeal, the birds will be incredibly grateful to you. The wards will not refuse raisins, peanuts, and soybeans.
If you don’t know what to feed sparrows and titmice, purchase a balanced grain mixture at a pet store. There you can select food for each individual bird species that lives in your area. Just don't pour in a whole mountain of food at once. It's better to add a little each time.
Don't wonder if you need a feeder. Be sure to make the simplest one with your children and instruct the younger generation to ensure that it is always filled with bird food.
How to make a grain bird feeder
In order not to waste time making massive or large crafts, you can engage in a truly creative process.
Simple step-by-step instructions will help you make an interesting grain feeder, for which you will need a glass of grain, cereal and bread crumbs, three tablespoons of flour and an ice cream stick with twine:
- a mixture is prepared from seeds and sunflower seeds, cereals and bread crumbs; a thick dough must be kneaded with the addition of warm water and flour;
- the well-molded mixture is kneaded, several round balls are formed from it (to round it, you need to moisten your hands with water);
- an ice cream stick is inserted into the center of each ball; you can use a pair of sticks crossed with each other;
- a string is tied to the polar ends of the sticks; it will be used to hang the grain feeder from the branches;
- grain balls must be thoroughly dried so that they do not fall apart and retain their shape even under unfavorable weather conditions.
Another option for making such feeders would be to use a vegetable net; several balls can be placed in it at once.
Particular attention can be paid to filling grain feeders, supplementing it with pieces of lard, which titmouses love so much, cereals of various types and seeds of certain plants.
Photos of bird feeders
Total
Category: Small architecture