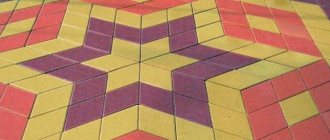
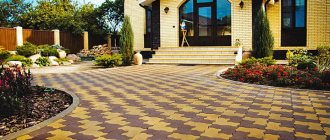
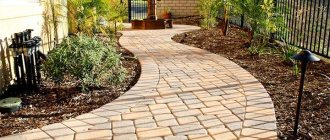
In order for the design of a personal plot to be attractive and easy to maintain and operate, it is necessary to competently approach the arrangement of paths. They are found not only in the front area, but also in flower beds, vegetable gardens, and gardens. Despite the huge selection of materials for their arrangement, paving slabs are still in greatest demand when paving paths. This is explained by its high technical qualities, aesthetic appearance, and a wide variety of shapes, designs and colors.
In this article we will look at how to correctly place paths on a site, what advantages and disadvantages paving slabs have, how to choose them correctly, what tools and materials will be needed in the work process when laying paths yourself.
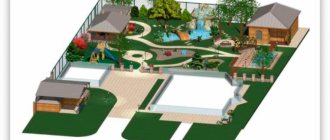
Path layout
To make using your own yard much more comfortable, it is worth considering a competent and functional arrangement of paths throughout the entire area. Particular attention is paid to the front area leading from the gate to the house. It is also worth considering the location of paths in the garden, in the backyard, in the flower garden.
When planning paths, it is worth considering that they are all divided into:
- functional . Connect all routes of movement around the site into a single whole;
- walking _ Designed for relaxation and admiring the landscape design;
- economic . Necessary for access to communications, fences, and outbuildings.
Each individual type of path requires its own location on the site and its own dimensions. For example, for several people to walk, it is enough to make the path width from 50 to 100 cm. For the passage of a garden wheelbarrow, it is worth making the path width at least 80 cm. The same applies to the shapes of the paths. If we are talking about purely decorative features, then any winding shapes are chosen for walking paths (the main thing is that it is comfortable for you to walk along them). But driving a wheelbarrow or motorcycle along curved paths will not be very comfortable.
Attention: when choosing the location of paths on the site, carefully and carefully weigh everything. Plot proposed routes in advance, walk along them and evaluate how practical and easy to use they are. The main thing is to sketch everything on paper in order to get a clear result before starting construction work.
Reasons for weeds growing between slabs
Usually, before laying a path, each owner digs up the soil, removes all weeds by the roots, hoping that they will not appear in this place in the future. But there are gaps between the tiles, which are usually filled with sand. And this is a fertile environment for the growth of weeds.
Several natural factors contribute to the appearance of grass. Weed seeds are transferred and retained in the cracks between the tiles:
- by the wind;
- droppings of birds feeding on seeds of wild plants;
- on the soles of people's shoes.
Grass grows most densely on paths running in the shade under trees. In open sunny areas, weeds grow less frequently.
Therefore, no matter how carefully the place for paving stones is prepared, after a while the problem of removing weeds still arises.
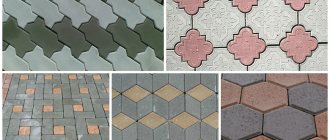
Which tile to choose
Before you buy tiles for your yard, you need to decide on its purpose, loads, cost and other factors. According to the type of production, this material is divided into:
- vibropressed . It is made from semi-dry concrete and has the highest strength. But at the same time, it has a limited selection of shapes and colors;
- vibrocast . It is made from concrete and comes in all sorts of shapes, sizes and colors. But this material is not so resistant to negative environmental factors.
Therefore, when choosing tiles, each owner of a personal plot must set priorities for himself and make a choice based on personal wishes, the scope of use of the material and his financial capabilities.
Also, before deciding how to make a tile path in your dacha with your own hands, you need to decide on its shape and size. If we are talking about walking trails that are not used by vehicles, it is enough to choose a less durable material, up to 5 mm thick. If vehicles will travel along the paths, the thickness of the material should be at least 10 mm.
Form for garden path. Where can I get molds for casting?
DIY garden path photo.
Start reducing your garden path costs with tile molds. Instead of purchasing ready-made plastic molds, stockpile frozen food containers that are made of non-crisp soft plastic and can withstand many casting cycles.
Paving elements made in such substrates differ little from factory ones and are well suited for paving pedestrian paths in the garden.
Options for molds for casting concrete tiles.
To cast large concrete products, build wooden forms with a bottom or frames from bars, placed on a flat surface when working. Homemade slabs with a thickness of 80 mm or more, reinforced inside with wire, can withstand significant loads and are suitable for constructing areas for barrels or covering parking lots for passenger cars.
Place for plastic barrels.
Make round shapes by cutting old buckets (pots, trays, basins) into rings 35–60 mm wide. The elements of the original configuration emerge from narrow tin strips connected by a ring and bent at random. By laying tiles of different diameters, you will get an interesting path.
Photo of a garden path at low cost.
Path base
So, how to make a path in your country house from tiles so that it is durable, functional and wear-resistant? To do this, you need to take care of a level and high-quality foundation for it.
When preparing a site for laying tiles, special attention is paid to arranging drainage from the foundations of buildings. And only after this the foundation is prepared in the following sequence:
- The territory is being marked.
- The top layer of soil is removed to lay the pillow (about 20 cm).
- Next, a cushion of crushed stone and sand about 15 cm thick is laid.
- The surface of the pillow is leveled with a rake, compacted and thoroughly watered.
Attention : if the path is intended only for walking, it is enough to make the thickness of the cushion about 15 cm. If vehicles will travel along the path, the thickness of the layer will need to be increased.
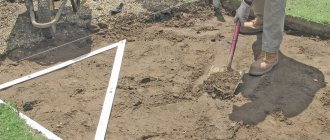
Bed preparation, soil excavation, compaction
After preparing the area for the future path, you can begin to excavate excess soil. The soil is selected to a depth determined by the thickness of the tile plus 3-5 centimeters of sand cushion
If, for example, your tile is 10 cm thick, then the excavation depth will be 13-15 cm
The result is a path flush with the surrounding surface. To excavate the soil, first vertically pierce the soil with a bayonet shovel along the entire perimeter of your path, then excavate the soil directly from the area of the path itself, controlling the depth of its excavation. After excavating the bulk of the soil, clean the path bed using a shovel. Next, compact the soil in the path bed using a log.
Tools and materials for work
Laying garden tiles requires the following materials and tools at the construction site:
- sand and crushed stone;
- cement;
- paving slabs and curbs;
- spatula and trowel;
- building level;
- cord and wooden pegs;
- rubber hammer;
- Bulgarians;
- construction gun for seams.
What it is?
Experts call this tile a lawn lattice. This material has recently appeared on the construction market. With its help, you can arrange areas near residential buildings, parking lots and other public places. Grass hole tiles are a concrete block that is made using a casting or vibropressing technique. It differs from standard paving stones by having a through hole in the center.
These products can have a diamond-shaped, square or other shape. They are produced in standard dimensions 60x40x10 cm.
Using this type of paving stones, you can protect the lawn from vibration and pressure, as well as provide free space for parking cars or organizing public events on the street.
Such gratings can easily withstand a load of 1200 kg/m². At the same time, when laying the road surface, there is no need to remove plants from the territory.
How to do it yourself
Country house paths made of paving slabs require compliance with certain rules and technologies when laying. It can be installed using two methods:
- using a concrete screed;
- without cement mortar.
The process of laying tiles without cement is as follows:
- To begin with, the area is carefully prepared.
- The top layer of soil is removed.
- A sand and crushed stone cushion is laid.
- The curb is being installed.
- The tiles are laid using wooden pegs and a stretched cord.
- Drains are being installed.
- The joints between the tiles are filled with sand.
Technology for laying paving slabs
The paving procedure is simple. No special knowledge in construction is required. The technology for laying paving slabs in the courtyard of a private house is within the capabilities of every summer resident. He can handle it on his own if he sticks to the rules. One of them is that the tiles are laid away from themselves to preserve the base. Laying is carried out along a diagonal plane with a tight fit of the elements to eliminate uneven seams. Finally, the “swelling” of the tiles is removed by leveling the surface with a rubberized hammer and level.
Each stage has its own sequence. It all starts with preparing the site and ends with cleaning the finished surface, giving it a finished look. The main technological processes include marking and compacting, laying tiles, and filling joints. Additionally, curbs are installed, drainage and storm drains are installed.
Preparatory stage: marking and compacting the site
Initially, the dimensions of the site are determined and the nuances are taken into account. A drawing of the placement of paving slabs in the courtyard of a private house is created, a photo of the colors is reviewed in advance, as is the pattern. The volume of material is calculated. Marking is carried out using pegs and rope.
The soil is being prepared. The top layer of soil is removed. The uneven surfaces are leveled, the soil is compacted, and a sand and gravel cushion is created. For the sidewalk area, choose a depth of 20 cm. For car parking lots and entrances, 27-30 cm.
After deepening, compact the soil. It is watered with a hose using a sprinkler. Then they are tamped. The procedure prevents soil subsidence and ensures even laying of slabs.
How to prepare a solution for paving slabs
Many owners of country houses can easily make it at home, having the necessary tools, materials and equipment. The composition of the mixture contains building elements that can always be bought on the market.
The composition of the mortar for paving slabs includes cement, sand, crushed stone, water, and plasticizers. Each element is important in its own way. Together they create a solution that meets the basic requirements:
- make it resistant to environmental influences;
- give it strength and reliability;
- endowed with a low level of porosity and a low coefficient of moisture absorption.
The ratio of materials must be observed in order to obtain a high-quality composition. Sand and cement should be in a ratio of 3 to 1. If a two-layer type tile is made, the proportion of the components is expressed as 1 to 1.
It is important to follow the solution recipe and proper mixing for pouring. I follow the cooking procedure following the instructions:
- The main components are mixed: sand and cement.
- A plasticizer is added to the resulting mortar composition.
- The next stage is adding crushed stone.
- The addition of liquid is carried out so that the mixture has an ideal thick consistency.
The prepared solution is filled into molds made to look like paving slabs. They are placed on a special vibrating table designed for compacting the mixture. Next, a 48-hour drying procedure is carried out, observing a temperature range of 15 to 25C.
Laying solid tiles
On the finished base, paving stones are laid according to the established technology. The paving stones are fixed on cement mortar with maximum filling of the joints, with a gap thickness of no more than 3 mm.
An important condition when performing paving is that the masonry should be carried out “from oneself”. The layer moves forward along the previously laid tiles, laying the mortar mixture in front of him. After completion of the masonry, the seams are sealed to obtain a continuous monolithic coating.
The process of paving with sand is similar to using mortar. But the method is already called “self-directed”. The layer moves along the sand, stepping back from the already laid tiles, laying the next row of tiles in front of him.
When it comes to laying paving slabs correctly, every step is important. To level the surface, sand is added or excess bulk material is removed. Level the surface in each case using a rubber hammer, check the evenness of the surface using a building level.
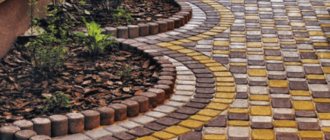
Installation of curbs
When the drainage layer is completed, the next working stage is marked by the installation of curbs. The use of any materials is practiced. External fencing of paths is made of laid stones, concrete, plastic, bricks, wood, slate, and other flat materials. You can use other types of paving stones that match the main coating in shade and shape.
With curbs, a geometrically flat area is created. The top of the laid main tile should not have a rise above the stone, which is laid on a mortar of at least M100 grade. The sides of the curbs are filled with mortar. Sprinkle a small layer of sand on top.
The traditional design involves installing a ready-made concrete curb. A new proposal from manufacturers is the use of plastic curb fences. They are durable, easy to install, and have a low price.
Drainage and stormwater system
The rules for installing paving slabs include the development of drainage and drainage. Geotextiles are placed on the compacted bottom of the trench. On top of the geotextile, a crushed stone layer 15-18 cm thick is laid out. Such drainage will collect and drain melt and surface water. Moisture will not accumulate in the road base and if the soil begins to freeze, swelling of the surface can be avoided.
The crushed stone is compacted and a thin layer of sand is poured on top. The top of the drainage is lined with a second layer of geotextile to allow moisture to pass down irretrievably.
The drainage of water from the laid paving stones is carried out by a storm drain. Take paving slabs that have an extruded gutter or a concrete, plastic or metal channel with a depth of 5-20 cm. The tiled gutter drains water from paths 1-2 meters wide. Channels do not allow moisture onto wide sidewalks, areas that are more than two meters wide and have an area of more than 20 m2.
Trimming and filling seams
The cut is not needed in the area where the shape is straight. Trimming is performed where the abutment nodes are located:
- in the area of curbs, at the foundation, plinth;
- near the storm water inlet, at the intersection;
- where there are radial, winding sections.
For trimming, use a diamond disc or an angle grinder for stone.
Some modifications of FEM tiles are available with halves, which eliminate the need for trimming.
Filling the seams protects the track surface from shifting during use. Quarry sand or marble or quartzite is poured into the seams in heaps, which makes the design of the decorative coating more attractive. Sand compositions in joints can self-weed. They are not afraid of downpours, they cannot be blown out by strong winds.
After compacting and leveling the surface, the remaining sand is swept away with a brush.
Interface with blind area
If you plan to lay paving slabs throughout the local area, the blind area is decorated with similar material. The nuances are taken into account:
- the width of the blind area is taken with the calculation of an increase from 15 to 20 cm, moving away from the projection of the house covering onto the ground;
- the blind area should deviate from the external walls by 4 - 7 degrees;
- if the terrain has a slope towards the house, a surface linear storm drain is installed around the perimeter. Or the drains go in the direction of point storm water inlets occupying the lower points of the yard, with paving stones sloped towards them.
Grouting joints
Sealing the seams between tiles when laying without cement is done as follows:
- Dry sand is sifted through a metal mesh.
- Using a wide brush with hard bristles, sand is swept along the entire length of the path into the cracks between the tiles. Excess sand is swept away.
- To ensure that the sand fits more tightly into the seams, the garden path is watered with water from a hose.
If we are talking about grouting joints when laying tiles with cement, then work can begin only after the mortar has completely dried. The seams are rubbed with the same compound that was used during the laying. It is best to fill the joints between tiles using a special gun. After the concrete has dried, its remains are removed with a stiff brush.
Attention: it is much more difficult to remove concrete from the colored surface of the material.
How to properly care for a tile walkway
In the future, tiled paths need to be properly cared for in order for them to last longer:
- keep them clean - sweep, remove garbage;
- In case of heavy contamination, water with a hose;
- When clearing snow drifts, do not use shovels or other metal tools to avoid damaging the coating;
- do not sprinkle salt during icy conditions, because when the ice melts, this substance spoils the tiles;
- if there are places where the tiles have risen, then it is necessary to remove them and reposition them;
- For additional protection from moisture, you can treat it with a special solution - a water repellent.
Concrete tiles are most often used for laying garden paths. You can lay it out yourself. Before work, you should draw up a site plan and pay attention to the quality of the soil. Then you need to choose a installation method, calculate the consumption of materials, purchase them and get to work.
Decoration, coating care
Paving stone paths in the country are beautiful in themselves and do not require additional decor. But to give the area a cheerful mood, you can use bright colors. To make the paths neutral and not too conspicuous, you should choose materials of the same shade.
Caring for paving stone paths is quite simple:
- Dirt and debris are periodically swept away from them;
- In winter, snow is not swept away with metal objects;
- Do not pour salt or other salt-containing mixtures onto icy tiles. For safety, it is best to cover the snow with sand.
In conclusion, it is worth noting that garden paths made of paving slabs are universal. They are suitable for any landscape design, are distinguished by high technical qualities, and are easy to install and maintain.
TOP 7 types of slabs for step paths
In this article we will not consider paths made of natural stone and wood, but will focus on high-quality factory solutions.
Rectangular slabs
The most common size of large-format concrete slabs for step paths is 600x300x80 mm.
The main use of such a slab is urban paving, parking lots or step-by-step garden paths. In the warehouse remains of factories, it is found mainly in plain, cool colors. In order to decorate the local area of a private house, we recommend using slabs from the Color Mix, Leaf Fall or Artificial Stone collections. 1439 rub. per sq. m.
Old Town Landhaus Braer 60 mm Pride
Go to catalog
1481 rub. per sq. m.
Classico circular Braer 60 mm Malva
Go to catalog
1765 rub. per sq. m.
City Braer 600x300x80 mm Pride
Go to catalog
Step-by-step path made of City slabs 600x300x80 mm in a minimalist style
Square slabs
The sizes of square slabs, which are suitable for comfortable movement around the garden, vary from 300 to 600 mm.
Our clients prefer squares 400x400x60 mm or 500x500x60 mm. It is convenient to step on such slabs, placing them under the average step of an adult. In the warehouse of the Choice plant you can find square slabs for step-by-step paths from the Artificial Stone, Stonemix or Granite collections. 2014 rub. per sq. m.
Quadrum Choice 400x400x60 mm Basalt
Go to catalog
Paving with paving slabs Quadrum produced by Vybor
Wood textured slabs
Concrete paving slabs with a wood-like texture are especially popular. The relief surface of such slabs blends organically with wooden houses and gardens in a rustic style.
380 rub. per piece
Planks White Hills 50 mm C915-45
Go to catalog
Step-by-step paths from White Hills paving slabs
The largest manufacturer of vibrocast stone and paving slabs, White Hills, offers 6 standard sizes of slabs and 5 colors: from light beige to dark brown.
420 rub. per piece
Planks White Hills 40 mm C905-44
Go to catalog
Step-by-step paths made of paving slabs with wood texture
The choice plant's assortment includes large-format Stonewood slabs with a texture that imitates natural wood: cedar, plane tree, walnut or wenge. Such slabs are suitable for creating original step-by-step paths.
Adviсe
To ensure that the creation of paths goes without surprises, you should take into account the recommendations of experienced builders
If you plan to further regulate the height of the grass using a lawn mower, then you need to understand that the slabs or stones of the path should not rise too much above the level of the lawn. They will interfere with the movement of the lawn mower; in this case, cutting the grass is only possible by hand.
The thickness of the material to form the path must exceed 4 cm
Thin elements should be removed immediately, since such slabs often break during operation and cracks form on them.
You need to pay attention to the surface of the material. For example, the stove should not be slippery in winter so that it can be used all year round without the risk of falling
It is better to give preference to materials that are characterized by a rough surface, then in any weather conditions the trail will be stable and safe for use.
You need to choose the right distance between the elements of the trail, then it will be quite convenient to move along it.
The correctness of the path paving can be checked using a building level. As a result, the trail will have an ideal surface.
Areas of use
The most common uses of pavers with openings for vegetation include:
- Sidewalks in the city. The concrete grate ensures efficient water drainage and comfortable walking for people. In addition, when the plants grow a little, walking on such a surface becomes even more comfortable.
- In areas where good drainage of rain and melt water is required, liquid drains quickly and easily through a concrete grate.
- In places where it is necessary to build a parking lot, but not impede access to communication systems underground.
Stage 2
We begin it when the concrete is completely dry - that is, no earlier than in a month!
Let's do the final sealing of the seams, because... while the concrete in the seams is still noticeable.
In hot sunny weather, thoroughly wash the path (I used Karcher) and let it dry completely (3-4 days in dry, sunny, hot weather).
We select small pebbles with a diameter of 10-15 mm for backfilling, after also thoroughly washing them in a basin or under a hose. I recommend the very beautiful and textured smooth “Caspian pebbles”. Place the washed pebbles on film in the sun or under a canopy and, stirring occasionally, dry until 100% dry.
It is very important!
We take reliable glue. I chose Stonegrip - a 2-component translucent polymer adhesive that grips very tightly. One set is enough for 20 sq.m of track.
Pour the glue into a bottle and spread it in a thin layer along the seams onto open concrete over an area of up to 5 sq.m. Don't stain the stone and then you won't be able to wipe off the glue!
We pour the backfill “with a heap” on the areas that have been spilled with glue and after an hour, sweep away the unadhered residues with a brush.
You need to work with glue in dry, hot weather, with a completely dry surface and materials, otherwise it will foam and will not be able to harden completely.
Let's look at the resulting masterpiece and rejoice! I got it like this:
Other interesting ideas for landscape design can be found on Konstantin Ovcharov’s page.
Options and types of coatings
The formation of a pedestrian path depends on the purpose, style of landscape design, size and topography of the site:
- The original path in the garden is made from separate fragments, between which there are gaps filled with earth. Green grass, moss or planted plants (sedum, purslane) emphasize the naturalness of the composition.
- The path to the house is made into a single structure, in which the fragments are placed on a bed of gravel, crushed stone or pebbles. When decorating a path, they fill the gaps between stone tiles or wooden dies.
For comfortable walking, the minimum size of each laid fragment of a walking trail must be comfortable for the human foot. The optimal width is more than thirty centimeters, the length is at least forty - you can stand on such a platform with both feet.
Reference. To reduce construction costs, it is allowed to lay two or three smaller slabs, tightly joined to each other.
Paving material is selected based on financial capabilities:
- flat natural stones (porphyry);
- flagstone (slate, sandstone);
- granite or marble tiles;
- paving slabs;
- tree cuts;
- concrete plates;
- brick (regular, clinker);
- ceramic tile;
- plastic tiles;
- timber or slab;
- wooden sleepers.
Important! Wooden dies for the path must be impregnated with an antiseptic to protect against rotting and fungus.
The color and shape of the covering elements must be in harmony with the overall style of landscape design:
- large light stones of irregular shape and green lawn - an English classic;
- gray paving slabs with gaps filled with crushed stone or gravel, and ridges with modest flowers and herbs - this is a path for the French taste, rough and refined at the same time;
- wooden cuts among an overgrown garden, a well-recognized eco-style;
- small colored tiles, randomly laid out in large patterned fragments of paths, simple and good-natured country.
Advantages of flagstone for laying paths
Flagstone is a natural stone, therefore it is environmentally friendly and does not emit toxic substances when the temperature changes. This material is also durable, reliable and has a long service life.
The flagstone has an original natural appearance, its surface is rough, that is, in frosty times, it will not be slippery. The stone has no pores, so it does not absorb moisture; it is also resistant to frost, that is, at low temperatures, it does not crack or deform.
The material is not prone to fading and wear, therefore it is reliable for use. All work can be done independently, this helps to save on costs; if this is not possible, then you need to seek the help of specialists.
Popular articles How to clean a pond with a dredge
Stone allows you to create a path of any size and unusual shape; this material fits into any landscape solution. The base on which the flagstone is planned to be laid is selected depending on the load and type of soil. To preserve the original appearance of the constructed path, it must be isolated from the germination of weeds, which constantly retain moisture.
Flagstone can withstand various types of loads, but it is necessary to choose the right base on which it will be laid.
Thanks to the strength and natural coloring, you can create an original design on the site, cut slabs of the required shape with a grinder, and perform both even and shaped installation.