Where to begin?
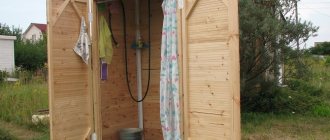
If you have thought about building a summer shower at your dacha, then you already have a rough idea of what it will look like and what you need to purchase. In addition to the design itself, very important parameters are:
- Choosing a location;
- Shower size;
- Water tank volume;
- The nature of the construction is temporary or permanent.
Many people try to choose the most secluded corner behind the house or in the shade of trees in order to hide such an intimate structure from prying eyes. This is precisely the main mistake! By building a shower among the trees, you will be subject to constant attacks from insects that love moisture and coolness, and will deprive yourself of the possibility of natural heating of the water in the tank. Therefore, the site for the future structure should be in an open, well-lit area and under no circumstances be in a hole or lowland. Even if you plan to use a heated tank, it is more rational to refuse to use electricity in order to save money on hot days. The building itself should not be located at a short distance from the house. When taking a shower late in the evening, you need to get home as quickly as possible so as not to get sick.
As for the size of the future building and the volume of the water tank. The recommended height of future walls is 200-300 cm. It is necessary to build on the height of the tallest family member, who should not rest his head on the shower head. The width and length of the shower space is calculated depending on whether the building will have a dry changing room or be limited to only a wet area. The option with a changing room is, of course, more convenient; your clothes will be protected from getting wet, and you will have the opportunity to change clothes comfortably. This way, your shower will consist of two sections separated by a partition. An area of 220x120 cm is quite enough for these two zones, even taking into account the cladding.
When choosing a water tank, you need to consider the number of people who will use the shower and the intensity of its use. If you come to your dacha only on weekends and use the shower after a hard day at work, then a container that will hold the amount of water at the rate of 40 liters per person is quite sufficient. This will allow each user to continuously pour water for approximately 10 minutes. If many more people take water procedures in a row, you should think about a larger tank. But keep in mind that temporary buildings will not support containers with a volume of more than 200 liters. You can use iron or plastic barrels as the tank itself, or purchase ready-made country models with a built-in watering can. A little advice - if you paint the surface of the tank with black paint, the water in it will heat up much faster due to the ability of black color to attract heat.
So, let's highlight the main points:
- Location: in an open, elevated, bright area, at a maximum distance of 2-4 meters from the main building;
- Room size - the height is selected taking into account the height of the tallest family member, the minimum comfortable perimeter is 100x100 cm;
- The size of the water tank capacity is 40 liters for each user, multiplied by the number of people who will consistently take water procedures.
The nature of the future construction - temporary or permanent - must be chosen based on the following parameters:
- Intensity of shower use. If during the planting season you move to your dacha, using it as a full-fledged home, then you should think about a permanent building made of brick or at least wooden elements. The walls should provide good protection from the wind.
- The budget you plan to allocate for the construction of the structure.
- Materials and tools you have. For example, at your dacha you have bricks left from dismantling an old outbuilding. In this case, it will be much more economical to use them than to purchase new materials for the frame. Or you have a lot of wooden blocks or old corrugated sheets, tin sheets or wooden lining. Use the resources you already have. Regarding tools - if you have old iron pipes that you would like to use as a frame, but do not have a welding machine and tools for cutting them, then purchasing these tools will cost a lot of money. Even if you borrow them from friends during construction, without any experience in using them, you may be wasting your time. Therefore, you should sensibly evaluate your skills, the tools that you have, and, in order to save money, use available materials. Under such conditions, construction will not take much effort and money.
What to do if it gets dark
“Rest” at the dacha often ends when it gets dark. Therefore, it is worth providing not only a window, but also some kind of lighting option for the shower.
An autonomous lamp with motion and presence sensors is optimal, as it is the safest.
How to choose a phytolamp for indoor flowers- Flowers are the best gift
Advantages of corner kitchens with a sink and what to consider when choosing them
You can also make regular electric lighting, taking into account safety precautions. It is better to entrust the solution to this issue to specialists.
We equip the foundation and ensure the outflow of water
The basis of any structure, of course, is a reliable foundation. In the case of a summer shower, the foundation must not only protect the structure from being washed away by groundwater and subsequent subsidence, but also be able to quickly drain used water in large quantities. The construction of any foundation begins with markings. It is necessary to draw an outline in the selected location. For example, the size of the shower will be 120x120 cm - a person of any size will be comfortable in such a space. You need to drive pegs into the corners of the rectangle, pull the cord around the perimeter and check the dimensions using a tape measure.
This marking is universal and is performed before the construction of any type of shower.
Now let's look at the types of foundations for various buildings.
Foundation for a simple temporary shower
For temporary construction, it is enough to remove the top layer of soil 15-20 cm deep within the outlined rectangle and level the area. Now you need to make a pillow that will help drain the water. To do this, prepare a mixture of crushed stone and sand. You can simply fill the hole halfway with sand and add a layer of crushed stone on top. Small stones will allow soap scum to settle on their surface. Additional filtration with a sand layer will avoid rapid mulling. This design can also be placed near the garden without harm to the plants. Wooden pallets are usually laid on top of such a base, which serve as the floor in the summer shower. To prevent rapid rotting of wooden materials that will often come into contact with water, it is recommended to place pallets or boards knocked together at a height of 15-20 cm above ground level. For formwork you can use old bricks or paving slabs. They are laid out around the perimeter of the base, leveled and compacted using a mallet.
Wood can be used for finishing walls or floors only after appropriate treatment to make it moisture resistant. The most effective method is impregnation with hot oil and subsequent opening with drying oil or varnish. Arranging such a foundation will allow you to use a summer shower for more than one season.
Foundation for capital construction
If the shower will be used frequently and not by one or two people, you need to think about constructing a permanent building. The most expensive method would be a brick construction. But it is easiest to heat it in the cool season. To do this, it is enough to insulate the walls with foam plastic. The best option would be a frame building made of metal or wooden beams. Particular attention should be paid to establishing a reliable foundation. In this case, it is necessary to pour concrete foundation .
According to the markings, you need to dig a hole about 30-35 cm deep. You need to make mortgages around the perimeter of the rectangle. For these purposes, you can use old iron pipes. The larger their diameter, the stronger the structure will be. In the places where the pipes are located, using a drill, a hole up to 30 cm deep is made, into which pipes or wooden beams are driven. If you use wood, you need to protect its surface by wrapping it in roofing felt or treating it with hot bitumen. After this, the cement-sand mixture is poured. Wooden mortgages can be made not only in the corners, but also along the entire perimeter of the base. To do this, use logs of sufficient width, which can ensure further installation of the floor. The base must be level. This will help prevent water from accumulating in sloped areas. Filling is carried out using floor screed technology. Use special construction beacons and rules.
The disadvantage of a poured foundation is that you can begin arranging the interior space only after it has completely dried. For brick buildings, you can use a solid reinforced concrete slab with a thickness of 170-300 mm as the base. This will significantly reduce construction time.
Arrangement of water drainage
Any capital building needs high-quality water drainage.
- Best suited for waste collection septic tank, which must be placed next to the shower stall, but in no case under it. If you decide to save space on your site and still place the septic tank under the shower, after a short period of time you will begin to feel a sharp, unpleasant odor inside the building. In addition, there is a risk of soil collapse around the septic tank and, as a result, destruction of the foundation. The recommended distance from the shower stall is 1-2 meters. A drain pipe is removed from the shower tray or a drain ditch is drawn into a septic tank, which must have a sump and drainage tank. A pit is dug for the receiving chamber. It must be sealed. This could be a tin barrel or concrete rings. It is recommended to cover the container with a lid to prevent rain or groundwater from filling it. There is a leaky drainage container nearby. It should be installed on a bed of sand and gravel. These two compartments are connected to each other by pipes.
- Another option for collecting waste water is cesspool. To equip it, you need to dig up about 2m3 of earth. This is the optimal volume that will ensure long-term use. A drainage cushion of sand and gravel is made at the bottom of the pit, and the walls must be strengthened and made waterproof. You can line them with bricks, use ready-made concrete rings, or you can reinforce the hole with old rubber tires. When setting up a drainage hole, do not forget that it needs to be pumped out. In this regard, it must be located in a place where unhindered access for special equipment will be ensured. In addition, the pit must have a distance from the residential building of at least 3-4 meters, as characteristic odors may form.
- For simpler types of shower that will not be used with great intensity, it is enough to equip drainage well. It will be located directly under the shower stall. A hole is dug, 2 meters deep, a layer of crushed stone is poured at the bottom, and then a plastic pipe with perforation is inserted. Such a well is filled with material that will act as a filter. It can be gravel, crushed stone, old broken bricks, slag. The well is filled to the very top, then covered with a layer of geotextile and covered with soil. A wooden pallet is already installed on top of the formwork, which has slots for water infiltration. This is the most affordable, but no less effective method that will ensure the necessary outflow of water.
Garden shower made of slats with a roof and a polycarbonate window, measuring 2 by 1.5 m
The shower made from slats looks very nice. Here the water tank is installed on top of the structure, and on the sides of it there is a sheathing and a roof covering. The size of the shower cabin is 2 by 1.5 meters, the height of the racks can be chosen at will, at least 190 cm. Since the design is quite complex, it is worth drawing a detailed drawing first.
You can build this summer shower for your dacha using scrap materials with your own hands. Main stages:
- Prepare a place for installing the booth, make markings, dig a hole for drainage 100 by 100 cm, 80 cm deep. Install a frame of slats covered with corrugated sheets into the hole.
- Place blocks or bricks along the edges of the future shower.
- Lay the strapping - logs around the perimeter of the shower, lay roofing material under them, and treat with an antiseptic.
- Build a wooden frame. The height of the racks must be at least 190 cm, the lintels must be 2 m. The parts can be connected using corners and self-tapping screws.
- Screw the beams onto the slant to strengthen the structure.
- Cover with clapboard.
- Make the door from 9 210 cm linings, connect them using jumpers with self-tapping screws.
- Place the door on the hinges. Make a hook.
Trim the lining where necessary and begin installing the roof:
- Make a sheathing.
- Cover with corrugated board.
Also read: How to make a shower without a tray with a drain in the floor
All that remains is to make windows by covering the holes between the roof and walls with polycarbonate. And the last thing is to install the tank and drain the shower.
Tips for choosing a water tank
The simplest way to ensure a water supply is to install a plastic tank or an old iron barrel on the roof of the shower, paint it black to increase the rate at which the water heats up from the sun's rays, and connect a hose to it to supply water to the tank. A water supply hose is required, especially if the tank volume is 100 liters or more. The disadvantage of naturally heated tanks is that their use is problematic in the cool season. Therefore, many people prefer heated tanks . There are three types of such systems:
- A metal tank with a heating element located inside. The advantage of this design is the presence of a pump that provides a constant supply of water. The heating element constantly maintains the set temperature and does not allow the water to cool. This way you will have access to hot water at any time. The disadvantage is obvious - if there is no running water at the dacha, such a tank is useless.
- Tank made of galvanized steel, which is designed for low showers. It has a flat shape and a short built-in shower head. Its volume is 100 and 200 liters. This tank operates like a boiler and requires a constant water supply.
- A simpler version is a heated plastic tank. It has a compact shape and low weight, which greatly facilitates its installation. The system does not require a constant supply of water, which is both a plus and a minus at the same time. Because it turns out that the heating element in this design must turn off after heating.
Installation of the selected tank can be done in two ways - placing the tank directly on the roof of the cabin or on a special frame. The second case is rational to use if the volume of the tank is impressive, and the building may not support its weight. It is enough to make a frame from old iron pipes over the shower roof or from wooden beams. This method of placement will help to avoid significant heat loss and speed up the heating time of water.
Mobile shower
The first option is made as a mobile shower with a foot pump, in which you don’t even need to build a cabin and install a large tank of water. You can use a bucket or tank as a source from which water will flow. One end of the hose is lowered into the container, and the other is connected to a foot pump, which most often resembles a mat.
A hose and watering can are connected to the output of such a pump. In order for water to flow through the watering can, you should stomp on the mat, alternately pressing the pump pads with your feet.
The advantages of this type of mobile shower are that you can take it with you anywhere. If the weather is warm, you can swim outside; if it’s cold, you can swim indoors. Another plus is that it is easy to transport. It is light and compact, so it can fit into a regular bag. In addition, you can choose the water temperature yourself. To cool off in the summer heat, you can pour cooler water, and to wash well, pour warm water into a container. This is quite a decent option for a summer shower.
The simplest ways to organize a summer shower
It happens that a summer cottage is visited very rarely, and then not for work, but more for relaxation. In this case, the shower can be a simple design that you can even bring with you.
- Portable shower. This design looks like a large heating pad and is made of the same material. After filling the container with water, it is twisted with a special nozzle, at the end of which there is a mini watering can. There is a loop at the opposite end, which is convenient for hanging the container on a tree or hook. By placing the container in a well-lit place, the water will heat up very quickly. The volume of such a “shower” is 10-15 liters. This entails restrictions regarding the duration of water procedures and the number of people who can use it. But this is a very convenient and inexpensive option for one person.
- Shower stand is an iron pipe on legs, which is equipped with a shower head and a hole for connecting a hose. This rack is convenient because it can be placed in any convenient place and, if necessary, brought into the utility room for storage. disadvantage is the lack of a water tank. That is, if there is no warm water on the site and normal pressure in the system, you will have to take a cold shower.
- Using a shower system. The shower column is a metal rod to which the overhead shower and mixer are attached. In order not to bother with arranging a special room for its placement, many attach the shower system directly to the wall of the house or outbuilding. To do this, water is drained from the wall. The wall of the building is protected from moisture. You can cover it with tiles, siding or other materials that are available. For convenience, you can separate the space with a curtain, and place a wooden pallet or rubber mat on the floor.
Let us remind you that this is an option for rare use. For the time when you are not at the dacha, the system can be removed and the output can be closed with a special plug.
All of the above types of showers are good because they do not require a foundation or drainage. But the drawback is obvious - the possibility of their use depends entirely on weather conditions.
Plan
Detailed plan of the shower room from different angles
Before you go to a hardware store and purchase materials, you need to find out a number of questions for yourself:
- determine the features of the foundation
- select available materials for the manufacture of walls, doors and floors
- select a tank of sufficient volume
- think over a way to supply water and heat it if necessary
Before starting construction, large or small, it is necessary to draw up a detailed plan. It will help you visually see the object on a scale, draw up an estimate and calculate the full cost of construction.
In small summer cottages, to save space, it is convenient to combine several buildings under one roof at the same time, placing them in sections. Such buildings take up little space and are easy to maintain.
Do-it-yourself summer shower made of wood
To build a wooden building you will need:
- Related timber;
- Fastening elements;
- Rubber hose;
- Shower head or shower set;
- Crushed stone.
Construction begins with the construction of a pit for water drainage. It is necessary to remove the top layer of soil 30-40 cm deep and fill it with crushed stone. This way, the soil under the shower stall will quickly absorb water, and the soap residue will remain on the rubble. Now you need to make formwork to protect the wood from rotting. Cinder blocks or bricks are placed in a level at the corners of the pit. The height of the formwork must be at least 15 cm.
Now we move on to the construction of the frame. You should start from the foundation. It requires boards 15 cm wide and at least 3 cm thick. The size of the base must correspond to the size of the pit. To fasten boards together, it is better to use threaded connections. Over time, the joints will not weaken even under significant weight, unlike ordinary nails, which can “slip” out of the mounting hole. 4 beams with a cross section of 7×10 cm are attached to the base.
The frame is ligated using side and two transverse jumpers, which are inserted into the grooves. The same jumpers will strengthen the frame from above, which will ensure stability after attaching a heavy water tank to the roof. At your discretion, you can add a few more jumpers if you think that the design is unreliable.
For
wall cladding, you can use thinner wooden planks, lining, false beams, blockhouse and other timber.
The main thing is to leave small gaps between the parts, 3-4 mm thick. This is necessary so that the planks can freely expand when wet, without deforming each other, and also shrink freely after drying. Remember that all wooden parts that will be exposed to constant exposure to water must be carefully primed and varnished. You can soak them in drying oil or hot oil. It is especially important to prime the surface before painting. There is a special antifungal antiseptic impregnation. You can start painting after the primer has completely dried. When the shower is completely ready, you can hang the tank. You can simply lay it on the cross beams and secure it with straps. If the tank is homemade, do not forget to cut a hole in the bottom for the watering can and a hole for the hose in the top. For convenience, several shelves for shampoos, soaps, etc. can be provided inside the cabin. and a couple of hooks for towels and clothes. Such a shower can be built in a weekend, and if the necessary materials were already on site, then the costs will be minimal. The service life of a wooden shower depends entirely on how well you treated the wood and protected it from moisture before construction. Therefore, this point deserves special attention.
Step-by-step instruction
Instructions for creating a summer shower design in the country are presented below.
The size of the structure will be 1x2m.
Materials required: 50 mm and 25 mm boards, 3 m high,
Making a columnar foundation
- In the corners of the building, holes are made of arbitrary depth, for example 1 m (the deeper, the better). To prevent the foundation from warping after frost, theoretically you should dig a hole deeper than the ground freezes.
In Central Russia this depth is 1-1.3 m. But you can make a hole 80 cm deep, pour 20 cm of crushed stone on the bottom, and then 20 cm of sand, then the water will not stagnate and the columns will not warp.
- On top of the cement mortar we lay columns of solid brick measuring 25*25 cm 10-20 cm above ground level. An anchor steel strip 3-4 mm thick is embedded in each column. The lower frame and vertical posts made of 50*150 mm boards will be attached to it.
Building frame
The lower frame, as well as vertical posts made of 50 x 150 cm boards, diagonal jibs (made of 25 x 150 mm boards) for structural rigidity - we attach all this to the anchor strip with M8-M10 bolts. This is necessary, because at a given height, even a slight wind can knock down an unsecured structure, because it has a small base area and a decent height.
Roof
A gable roof is made from 25 mm boards. A 50 cm elevation of the center of the roof above the edges will be enough to allow rainwater to drain. The same slope can be made for a pitched roof.
- Two 50x50 mm bars are placed along the roof.
- They are equipped with 2 black metal barrels of 200 liters each.
- In sunny weather, the water can heat up to a temperature of 30-35 degrees, and if they have a cap made of transparent film, then up to +45. An empty barrel can be blown away by the wind, but when it contains 100 liters of water or more, it stands well even without additional reinforcement.
- A 25mm polypropylene pipe is used for water supply. The pump is installed in a well, at the outlet of which there is a check valve so that water does not flow back when the pump is not working.
- The end of the pipe should rise 5-10 cm above the edge of the barrel; a corrugated hose 1-1.3 m long is hermetically connected to it.
- Its second end should always be under water at a depth of 5-10 cm, where the warmest water is located (this is achieved using a foam float and a weight)
- A plastic pipe is thrown over the edges of the barrels, which reaches to the bottom and is full of water. Thus, communicating vessels are obtained, the water level in the vessels is the same. Water is drawn from the same pipe. This saves pipes and allows you to wash with clean, settled water.
- The outside of the building is sheathed with plastic panels and the inside with film. Thanks to translucent plastic, the shower is light and comfortable.
- One of the internal walls can be reinforced with chipboard panels to securely install all plumbing fixtures.
- The drain goes into a pan, from there through a 50 mm sewer pipe into a drain hole 2 m deep, lined with tires.
- To heat water in cold weather, it is recommended to install an electric water heater.
Watch the video! DIY country shower
Shower cabin made of polycarbonate
Polycarbonate is commonly used to create greenhouses. Therefore, many people associate this material with the greenhouse effect, and, consequently, with inconvenience. This opinion is wrong. To create showers, there is a special, opaque type of polycarbonate. The most durable building will be one made of metal profiles. Working with them is no more difficult than with wooden beams. A profile pipe with a cross-section of 40×20 mm and a wall thickness of 2 mm is suitable for constructing a frame. You will also need a steel angle 50x50 mm. The number of profiles is determined depending on the area of the future shower. The only thing worth considering when cutting is that the racks should be 10-15 cm larger than the expected height of the shower. This is necessary so that you can concrete them and not lose height. The work plan will look like this:
- The frame assembly must be performed on a flat surface. Two side drains and two overlapping crossbars are laid on the ground. The level checks their straightness. The parts are connected to each other using welding. The second wall is assembled in the same way.
- After welding, finished structures must be installed vertically at the required distance from each other and connected to each other by two transverse profiles. Maintain a 90 degree angle between the walls. The crossbars only need to be fastened on one side; the door will be welded on the other.
- After the frame is assembled, a hole of the required size is dug. The top layer of soil 10-15 cm deep is removed, leveled and a concrete screed is poured. Once the screed has been poured and leveled, it is necessary to install the assembled frame on top so that the posts, which were initially longer, are immersed in the concrete. The level checks the verticality of the installed structure and adjusts it if necessary. If the length of the legs exceeds the height of the concrete screed, it is necessary to drive them into the ground until they are completely immersed.
- To collect water, you can install a special steel pan or provide drainage ditches during concreting.
- For this design, it is better to use flat-shaped plastic water tanks. They are easy to install and, moreover, they eliminate the need for arranging the roof.
- Separately, you need to weld the door frame and weld the hinges to the frame. It is more convenient to immediately sheathe the door separately from the walls.
- When covering the walls, attach the polycarbonate directly to the profiles using self-tapping screws.
The color range of polycarbonate, which is used for lining shower enclosures, is very diverse. Therefore, the design can turn out to be very attractive. Caring for this material is very easy, and in the evening it will protect you from the cool wind.
Preparation for construction
Next, we will consider the process of constructing an all-weather shower, as the most in demand throughout most of our country.
Choice of frame material
Before starting construction, you need to select the frame material. As was said, plastic pipes are no longer needed due to insufficient strength, so you have two options to choose from: wood or rolled metal.
Wood
Positive sides:
- low cost;
- ease of processing.
The disadvantage is a short service life due to susceptibility to rotting and drying out.
Beams of a certain cross-section are suitable for the frame
Specifically you will need the following lumber:
- for the bottom trim: insulated shower - timber with a section of 150x150 mm, lightweight - from 60x60 mm (optimal - 100x100 mm);
- for racks, oblique connections and top trim: board with a section of 100x40 mm.
Rolled metal
It is important to understand that in this case we are not talking about galvanized metal profiles with a thickness of 1.5–2.5 mm - this material is not suitable for such tasks. A channel with a height of 50–80 mm is used as the lower frame; the posts and other frame elements are made of a square pipe from 25x25 mm with a wall of 1.5 mm to 40x40 mm with a wall of 2 mm.
A shower with such a frame will cost much more than a wooden one, and it is more difficult to build - steel is more difficult to process, and electric welding will be required to connect the parts. But the gain will be significant: the frame will be stronger and more durable.
Metal construction is more durable
Calculation of shower sizes
A building with plan dimensions of 2 x 1.2 m can be considered optimal. The height can be taken to be from 2 to 3 m. It must be remembered that the higher the water tank, the stronger the water pressure in the watering can.
The drawing shows the dimensions of the shower
Choosing a waste disposal method
Even if a cesspool or septic tank for a toilet has already been built on the site, the shower room must be equipped with a separate structure. This is explained by the presence of large amounts of alkali and surfactants in shower drains, which can destroy beneficial microflora in the septic tank.
Sanitary standards require making cesspools with a volume of 2 m3 or more. But this requirement is relevant for standard drains. In the case of a shower, their value will be much smaller, so the volume of the pit can be reduced. Since, due to the need to heat the water, showers one way or another have to be taken with long pauses, its size can be taken equal to the volume of the shower water tank.
Another important question is how deep wastewater can be dumped into the ground so that the chemicals it contains do not poison the fertile layer. With a volley discharge of up to 50 l or a gradual discharge of up to 100 l/h, the safe depth is two thicknesses of the fertile layer. A country shower fits well into these figures.
Therefore, instead of a full-fledged cesspool, you can make a drainage well from a metal barrel with a height of 0.85 mm and a volume of 200 liters. We can guarantee that such a height will certainly be enough, since a fertile layer with a thickness of over 40 cm is quite rare in summer cottages.
If the thickness of the humus is small, you can use a smaller plastic barrel, the main thing is that it is not smaller in volume than the shower water tank.
You can build such a well directly under the shower stall.
The volume of the wastewater receiver must be no less than the storage tank
If you decide, as is often advised, to make a drainage well from old tires, then do not forget to periodically disinfect it with bleach: water will stagnate in the interior of the tires.
Preparing tools
The builder must have the following available:
- pegs and a roll of twine - for marking the territory;
- garden auger;
- shovels and bayonet shovels;
- bubble and water (hose) levels;
- plumb line;
- roulette;
- wood hacksaw;
- grinder with cutting disc for metal;
- drill;
- hammer, screwdriver (or screwdriver);
- marker, chalk or pencil for marking materials.
Country shower made of corrugated sheets
Another good material for covering a summer shower is corrugated sheeting. This material is characterized by high strength and durability combined with lightness. It is windproof. And when its walls warm up throughout the day, it will be comfortable to shower in. Both wooden beams and metal profiles can be used as a frame. Metal is, of course, more durable. Therefore, if you still need to purchase materials, give preference to it.
Making the frame is similar to the examples from points 5 and 6. The only difference is that you need to add more cross bars. This is necessary to securely fix the sheets and impart rigidity to the structure, since the corrugated sheet itself is considered a soft material. Fasten the sheets using self-tapping screws. Be sure to use spacers to avoid damaging the sheet. You can cut corrugated sheets with metal scissors or using a grinder and a toothed disc. It is not advisable to use other circles. During cutting, the polymer coating, which protects the coating from corrosion, may burn through. The roof is also covered with corrugated sheeting, and the tank is located under it. The gap between the walls and the tank will provide natural ventilation in the cabin and prevent the formation of mold and unpleasant odors. An unheated tank can be placed on top of the frame. Then there is no need to build a roof.
Results
Each of us has faced the annoying summer heat. It would seem that you need to do something useful for the house, but you have absolutely no energy left. It is at such moments that a DIY summer shower comes to the rescue. A simple structure will solve the problem of heat and fill the body with strength.
And thanks to our article, you learned a little more about how to make a structure with low costs and maximum results.
We remind you that a competent plan and preliminary calculations will help in the implementation of this idea. Also on the Internet today you can find a huge number of photos of a summer shower that will develop your imagination and guide you towards making the ideal decision.
Water drainage schemes
Despite the fact that water consumption per bather is usually small - about 30...50 liters - if there are two or three users, simply discharging liquid into the soil can become a problem. Therefore, it is better to decide in advance how to dispose of wastewater.
One way is to install an open ditch or closed pipe.
But it is more reasonable to carry out a full-fledged withdrawal to a septic tank, treatment center or centralized sewer system. You can read more about how to perform a drain here. You will also find useful information about installing a septic tank yourself if you prefer this method of getting rid of wastewater from a summer shower.