Let's talk about how to make a platform for a car at your dacha with your own hands, if for some reason you haven't done it yet.
I will immediately note that we will not consider methods for constructing a large site for a car using various equipment, such as an excavator and others. For the reason that in this case you will most likely hire a team of builders who, even without my advice, know how to do this work.
We will be interested in options that can be used to solve the problem on our own at relatively low cost. Therefore, we will not neglect simple methods, such as the construction of a plank platform. Let's start with this, and then consider other available options.
How to make a platform for a car at the dacha from boards
If you need a small area for one passenger car, and you do not want to deal with heavy concrete work, and are also limited in funds, then this option may be suitable for you.
And so, let's decide on the size of the area for the car.
A size of 2800x5300 mm will be sufficient.
The next step will be to mark the site on the summer cottage.
To do this, take a tape measure, measure the required distances, and hammer pegs made of wood or pieces of reinforcement into the corners. Moreover, we take the dimensions with a small allowance of 3000x5500 mm.
Now you need to check how rectangular the marked area is.
To do this, use a tape measure to check the length of the diagonals. They must be equal to each other.
If this is not the case, then we make the necessary adjustments and finally hammer in the pegs.
Now you need to stretch the twine onto the pegs around the perimeter of the site.
We will assume that the marking of the future site for the car has been completed.
The next step will be to remove the turf from the marked area to a depth of about 10 cm.
Now it is advisable to lay geotextiles or agrofibre on the bottom.
But if this complicates your task, then you don’t have to lay it.
Next, you need to pour medium-fraction gravel about 15 cm thick inside the future site and lightly compact it so that the embankment is several centimeters higher than the surrounding soil.
The preparatory work has been completed and construction of the site for the car can begin.
To begin with, you will need four wooden beams with a length of 5.3 m and a cross-section of approximately 150x150 or 100x150 mm.
Instead of timber, you can use four logs with a diameter of 150-180 mm.
Now you need to evenly lay the prepared timber on the gravel to a width of 2800 mm, but first it needs to be impregnated from below with some kind of water-repellent agent.
In the simplest case, it could be used automobile oil.
You only need to coat the bottom of the beam with oil and a third of the sides.
There is no need to saturate the entire surface of the timber, since the wood must be able to “breathe” and evaporate moisture. We do the same with logs.
When the timber is laid and leveled in a horizontal plane, you will need to begin installing the flooring.
For this you will need boards 40-50 mm thick.
We cut them to size 2800 mm long and nail them to the laid timber with nails 150 mm long or screw them with self-tapping screws.
It is preferable to fasten boards with self-tapping screws, because the nails will gradually come out of the boards due to possible movement of the flooring under the weight of the car.
You will end up with something similar to this.
Along the perimeter of the finished site, you can nail a block with a cross-section of about 40x40 mm or a board. This will make it safer for you to maneuver on the flooring, especially at first, until you get used to the dimensions of the platform.
And finally, at the entrance to the site, you will need to attach a couple of boards at an angle or otherwise facilitate the entrance to the site so that there is no springboard.
If this option does not seem simple to you, then you can simplify it even more.
In this case, we will do without a gravel cushion, but simply cut off the upper part of the turf, level the area and place strips of double-folded roofing material under the beam.
You can coat the lower part of the beam with hot bitumen. Then no substrate will be needed at all.
Canopy
If you want to shelter your vehicle more safely from external signs, then you should install a shelter. You can only install a roof, but your car will feel more comfortable and protected if you install small fences.
The material also depends on your financial capabilities. But keep in mind that you cannot do without a canopy; in any precipitation it will be much easier for you to get around from all sides, and this applies to both owners of large cars and compartment versions.
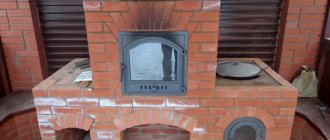
How to make a platform for a car in a country house from old bricks
If you have a used brick or even broken brick at your disposal, then you can also use it. In this case, make a platform for the car in the country.
To do this, we carry out the preparatory work as described in the previous case. That is, we mark the future site and remove the turf, if any, or the fertile layer of soil to a depth of about 150 mm.
Then we lay agrofibre or covering material.
We fill the sand with a layer of about 100 mm, spill it with water and compact it.
Now we lay the brick on the sand, depositing it with a rubber mallet.
It will turn out something like this.
Now you need to take cement grade 300 or 400, mix it in half with sand and fill all the cracks between the bricks with this dry mixture.
After this, generously, but slowly, spill the area with water and remove excess mortar from the brick with a brush.
The end result will be something like this.
The platform may not look very aesthetically pleasing, but it turned out to be quite functional and durable.
But if your brick is old, but not broken, as in the previous photos, then you may get an option that is more attractive in appearance.
Of course, you shouldn’t start exploiting it immediately after the construction of such a site. It is necessary to give the solution time to harden for at least two weeks.
How to make a platform for a car at your dacha with your own hands from crushed stone
This option for a site for a car has a number of advantages. Now I will list them:
Such a site can be built on any type of soil. It will not swell or crack, unlike a concrete pad
A platform covered with crushed stone can withstand even trucks without damaging the surface.
Water does not accumulate on such a site, so there is no need to deal with drainage
A platform made of crushed stone can be built in 2-3 days with your own hands without the use of special equipment
Well, an important factor is the low cost of building such a site
Construction work begins as usual.
It is necessary to mark the site and remove soil from it to a depth of 200 mm.
After this, you need to fill in sand 100 mm thick, spill it with water and compact it.
Now it is advisable to install curbs around the perimeter of the site so that the crushed stone along the edges does not spread to the sides.
You can purchase ready-made concrete borders, you can make formwork and pour it yourself, or you can limit yourself to a budget option made from boards or strips of slate.
The next step is to lay crushed stone in a layer of 150 mm. Moreover, it is advisable to lay crushed stone of a coarser fraction on the bottom in a layer of about 100 mm, and on top with a fine fraction, which will fill the existing cracks.
Now all that remains is to compact the site using available means and you can start using it right away.
It must be honestly said that the example of the site that you see in the photo is intended for further laying of paving slabs. This is indicated by the high sides of the curbs.
For our case, they need to be buried deeper.
Another simple example of a platform for a car made of crushed stone can be seen in the photo below.
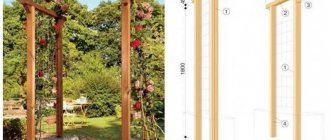
Dimensions of carports
The minimum dimensions of a car are 1.6 by 3.6 m, the maximum are 1.8 by 4.9 m. The height of the canopy is such that a person can easily pass under it - at least two meters, but, depending on the design of the structure, this figure can be increased to 3.5 m. In order for the car to freely move in and out from under the canopy, and its doors to open, without the risk of damage, the distance between the supports is 2.5-3.1 m. A comfortable roof length that allows you to protect the car from rain - 4.2-6.5 m, depending on the size of the car.
To assemble a carport with your own hands, you need to be able to draw up a plan, as well as process materials.
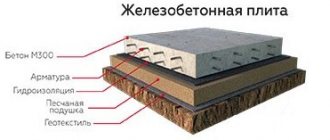
Place for a car at the dacha made of monolithic concrete
The construction of such a site begins traditionally. That is, we remove the soil to a depth of 300 mm.
Next, you need to lay down non-woven material and cover it with a 100 mm layer of sand.
After this, we level the sand, pour it with water and tamp it.
Next you need to install curbs. The height of the curb should be such that it ends up on the same level as the finished site.
Now we lay medium-fraction crushed stone 100 mm thick, level it and tamp it.
If installing curbs is not part of your plans, then it will be enough to make formwork from boards of the required height.
The next step is to lay the reinforcing grid and you can pour concrete in a layer of about 100 mm.
It’s good if you have the opportunity to bring ready-made cement mortar. Then all you have to do is first level it on the site and, using the rule, finally bring the surface of the site to an acceptable condition.
For example, before this.
A platform for a car in a country house made of natural stone
If you can find flat natural flagstone in your locality, then you can use it to make a very good platform for a car, which will not only be durable, but will also fit perfectly into the landscape design of your dacha.
The work is carried out in the same way as in the case of a concrete platform, only natural stone will need to be laid on the concrete layer using cement mortar.
The gaps between the stones are sealed in the same way as in the case of a brick platform, that is, with a dry cement mixture followed by pouring water.
By the way, flagstone can be laid without cement mortar. Nowadays special glue is sold for these purposes, as well as decorative grout of different colors for sealing seams.
Improvement of parking space
Your car always needs to be looked after. It will be easier to do this if you make the parking lot both comfortable and beautiful at the same time. For this, experts recommend:
- Provide electricity to the parking lot (this is not a whim, not a waste of time, light under a canopy or in a garage will allow you to park safely at night, repair your car, and load and unload the trunk without any problems).
- Bring water to the parking lot (you can simply run and throw a watering hose, install a pump, then you can simply wash your car and save on trips to car washes).
- Take care of the drainage system (it is installed on the water discharge side).
- Carry out landscaping of the surrounding area.
The last point is not mandatory, but if the parking lot is properly designed using landscape design, it will turn from a purely technical object into one of the design elements of the local area and will become part of the summer cottage. If the parking lot has a canopy, it can be decorated with climbing plants. Anyone who chooses them correctly will be able to create a cozy green office for their transport space.
Landscaping of a dacha parking lotSource autotrader.ca
The open area needs to be landscaped along the entire perimeter, branched trees and shrubs should be planted along it. Conifers planted in a row (arborvitae, dwarf fir, juniper) look very decorative. When there is a desire to create a joyful mood, the entire area around the entrance should be turned into a flower garden. Flowerbeds in which redbeckias, petunias, and zinnias were planted always look great.
A platform for a car in a country house made of paving slabs
The last option in this article will be a platform for a car made of paving slabs.
First of all, we prepare the site, that is, we remove the soil to a depth of 150 mm.
We install ready-made curbs or pour concrete and then lay crushed stone or gravel 100 mm thick and compact it.
You can use brick as a border, but in this case it must be laid on top of crushed stone.
Now pour sand in a layer of 50-80 mm, level it, moisten it and lay the paving slabs, leveling and lightly settling them using a rubber mallet.
The seams between the tiles, if they turn out to be of significant width, can be carefully filled with a cement-sand mixture and moistened by finely spraying water.
It may end up looking something like the one in the photo.
You should not choose paving slabs that are too large and less than 40 mm thick. These tiles are more suitable for garden paths. For a car area, tiles with a thickness of 50 mm and a size of 300x300 mm or less are more suitable.
Let's get to work: make a visit to the site
First of all, it was necessary to prepare an entry into the area, which is separated from the road by a deep ditch. We laid a reinforced concrete pipe with a diameter of 40 cm in the ditch, filled it with sand, compacted the sand and laid a layer of crushed stone on top.
Instead of a reinforced concrete pipe, you can use a two-layer corrugated plastic pipe: it costs less than concrete, and you can bring it on the trunk of a car.
Plastic pipe can also be used to repair a broken concrete or asbestos cement pipe. In this case, a plastic pipe of smaller diameter is inserted into the lumen of the damaged pipe. At the entrance to the site, concrete curbs were cast to keep sand and crushed stone from falling into the drainage ditch. The ends of the curbs were beveled at an angle of approximately 15 degrees to prevent damage to the car body when steering onto a relatively narrow gardening road.
Plastic pipe at the entrance to the site.
A pit for a parking lot, lined with geotextile, with 110 mm drainage pipes in filters.
Summarize
In this article, we looked at six ways to make a platform for a car in your country house with your own hands. I think that of the proposed options there will be at least one that suits you to a greater extent.
Well, in the end, it is worth recalling that when installing a parking lot in a dacha, you should think about water drainage. To do this, you need to either lay drainage pipes or make a platform with a slight slope towards the gate.
Whatever method you choose, I wish you good luck and satisfaction from the work done.
Best regards, Alexander Tkachenko.
Eco parking or lawn
This type of parking is also one of the most common types of parking. Not the cheapest.