In some regions, groundwater is very close to the surface. So close that they threaten the integrity of buildings (their foundations) and prevent plantings from growing. All these problems are solved by site drainage. In general, this event is costly both in terms of the amount of funds required and the time required. A considerable part of the time is spent on planning. If you do everything wisely, then you need hydrogeological research data and a project drawn up by a specialist. But, as usual, only a few do this; the majority make the drainage system with their own hands.
Site drainage can be designed as an element of landscape design
When is it necessary to drain the area?
Large puddles appear in a suburban area when water does not seep into the ground during rains or floods. This happens if the soil is clayey or the groundwater level is high. And if the area is in a lowland, water flows onto it from above. The presence of large bodies of water or swamps nearby also affects the humidity level.
In all these cases, for normal living and harvesting, it is necessary to drain the area from groundwater. The problem can be detected in spring or autumn. Flooding usually occurs in the off-season, when the snow melts or there is a lot of rain. You can see places where moisture accumulates.
If a plot of land is purchased in the summer, you can also understand that it is flooded. This is detected by the following signs:
- doors and frames are warped, cracks are visible on the walls;
- smell of dampness, mold visible in the corners;
- there is water in the basement;
- a lot of mosquitoes, snakes, frogs;
- Weeds are dominated by nettle, wormwood, hemlock, and also a lot of reeds.
Prolonged accumulation of moisture near the house will lead to the appearance of mold, unpleasant odor, and deformation Source stroyfora.ru
What water is removed by drainage?
Drainage of a site is a costly and labor-intensive undertaking that requires a large amount of excavation work. The best time for construction is the process of planning and arrangement of the site. Late deadlines lead to a lot of chaos, which doesn't make everyone happy. However, if there is water on the site, you have to do this too.
There are several types of water on the site that bother us and that need to be drained. They are of different nature and require different measures.
Surface water
They are formed during snowmelt and heavy rainfall, during work on the site (watering, washing paths), discharge of water from a reservoir, etc. What all phenomena have in common is their one-time nature: surface water appears after certain events. A more reasonable way to drain them is to install a storm drain. She copes with the task “excellently”, and the costs of arrangement are much lower.
Storm sewers are responsible for the removal of surface water.
To drain surface water, mostly open channels are installed; water intake is point-wise under storm pipes or linear along the entire roof overhang. From these receivers, water is carried through solid plastic (asbestos-cement) pipes into a drainage ditch or discharged into a river or lake into a ravine. Sometimes we allow output to the ground.
Groundwater
Those groundwaters that have a seasonal level (higher in the spring after a flood, lower in the winter), have a recharge zone (where they come from) and an outflow zone (where they go) are called groundwater. Typically, groundwater is present on sandy, sandy loam soils, less often in loams with a small amount of clay.
The presence of groundwater can be determined using self-dug pits or several wells drilled with a hand drill. When drilling, a dynamic level is noted (when water appeared during drilling) and a steady one (some time after its appearance, its level stabilizes).
When the groundwater level is high, strip foundations are also made, but the waterproofing must be high
If we talk about draining water from a building, then a drainage system is installed if the groundwater level (GWL) is only 0.5 m below the foundation. If the groundwater level is high - above the freezing depth - then a monolithic slab foundation with measures taken to drain water is recommended. At a lower level, other options are possible, but careful and multi-layer waterproofing is required. The need for foundation drainage should be assessed by specialists.
If high groundwater (groundwater level above 2.5 meters) prevents plants from growing, drainage of the area is required. This is a system of channels or special drainage pipes laid in the ground at a certain level (20-30 cm below the GW level). The depth of laying pipes or ditches is below the ground level so that water flows to lower places. In this way, the adjacent areas of the soil are drained.
Verkhovodka
This groundwater occurs on soils in highly located impermeable layers, but its appearance is often a consequence of construction errors. Usually this is water that, being absorbed into the soil, encounters on its way layers with a low ability to absorb moisture. Most often this is clay.
If after a rain there are puddles in the area and do not go away for a long time, this is perched water. If water accumulates in dug ditches, this is also perched water. If, a few years after building a house on clay soils or loams, the walls in the basement begin to “cry”, this is also high water. Water has accumulated in crushed stone pockets under the foundation, in blind areas, etc.
To avoid this situation, site drainage is required.
The easiest way to drain high water is with the help of ditches, but it is better to prevent its occurrence - backfill the foundation not with crushed stone and sand, but with clay or native soil, carefully compacting it in layers. The main task is to eliminate the presence of pockets in which water will accumulate. After such backfilling, it is necessary to make a blind area that is wider in width than the backfill and an obligatory touch is the drainage of storm water.
If the site has a slope, consider installing terraces and retaining walls, with the obligatory installation of drainage ditches along the retaining wall. It is most difficult to deal with perched water in low areas, which are located at a level lower than neighboring ones. A reasonable solution here is to add soil, since there is usually nowhere to dump water. Another possible option is to drain the drain through neighboring areas or along the road to the point of possible discharge. You have to decide on the spot, based on the existing conditions.
Selecting a drying method
Often, a moisture problem is discovered after purchasing a property. It needs to be resolved as soon as possible, before the water damages buildings and destroys plants. It is not difficult to drain a swampy area of water, but choosing a method for this, you need to take into account several factors:
- cause of flooding;
- soil features;
- the depth of groundwater and the direction of its movement;
- presence of bodies of water nearby;
- size of the flooded area;
- presence of buildings and vegetation.
Each case may require different methods. For example, if the site is in a swampy area, raising it or installing an open drainage system will help. And when the groundwater level is high, closed drainage systems are used, possibly even with a well and a pump for their forced removal. This method is also used in areas that are located in lowlands.
Important ! After draining the area, it is recommended to enrich the soil with fertilizers, since all nutrients are washed out of it with water.
Before choosing a method for draining a site, you need to study the characteristics of the soil and the reasons for moisture accumulation Source aquakomfort-spb.ru
Tips and tricks
As practice shows, it is most advisable to arrange deep and surface drainage at the same time. In this case, both systems will work simultaneously and with greater efficiency. Timely cleaning and proper care of inspection wells and wells will significantly extend the life of the system and the integrity of the foundations of buildings.
It is definitely worth considering that the soil in the trench area will shrink significantly in the first season. Therefore, it is not worth decorating it with permanent plantings right away. It is better to survive at least one flood season and re-level the terrain with an additional layer of earth.
To significantly reduce installation costs, drainage pipes in a dacha can be replaced with a bunch of dry branches or a structure made of PET containers.
How to arrange drainage
A drainage system is the most common and effective method of permanently draining a swamp in a summer cottage or near a country house. Drainage ensures the outflow of water outside the land. Typically, open or closed drainage systems are installed. There are also deep and point drainage, but they are used less frequently. The point of such drainage is that the water is discharged through a pipeline outside the site.
Open drainage
Open drainage is a system of ditches located on a slope. Through them, water flows into drainage wells or beyond the boundaries of the site. The distance between them is at least 6 m. It is better not to do them around buildings, this can lead to deformation of the foundation. Such ditches are made with sloping walls, the depth is at least 40-50 cm.
A variant of such a system is backfill drainage. The bottom of the ditch is laid out with geotextiles, then filled with gravel or stones to 2/3 of the depth. Fine gravel is poured on top, and then a layer of sand and soil.
The easiest way to drain the area is with trenches filled with gravel Source strojdvor.ru
This method is most often used if the soil is clayey. It helps drain water during floods and heavy rains, preventing the soil from becoming saturated with moisture. For soil with a lot of sand, this system is not used. This method is also not suitable for high groundwater levels.
The disadvantages of such a system include a reduction in the usable area of the site. This can be avoided by breaking a ditch near the fence. In addition, such trenches quickly become clogged with debris and leaves, and they have to be cleaned regularly.
See also: Catalog of companies that specialize in landscape design and gardening.
Closed drainage
A closed drainage system is a more complex but effective way to remove excess moisture. It will quickly help remove water and prevent its further accumulation. This method is also used to lower the groundwater level.
Closed drainage is installed using special PVC pipes buried in the ground. There are holes on their walls through which water from the soil enters them. To prevent clogging, the pipes are wrapped in geotextile. They need to be buried below the soil freezing level. The ditches are located at a slope, directed towards drainage wells.
Do-it-yourself drainage installation around the house
It is quite possible to install drainage around the house yourself. For this, basic drawing knowledge and the ability to perform simple construction and installation work are sufficient.
Before starting work you must:
- conduct geodetic and geological surveys of the site;
- determine the type of future drainage system;
- draw up a project.
This work must be performed by specialists. Without the appropriate skills and equipment, drawing up a project yourself can lead to serious mistakes. As a result, all the work will have to be redone.
If drainage is built incorrectly under the foundation, this will lead to premature destruction of the building and the need to demolish and rebuild the house.
On topic: Site drainage, step-by-step instructions on how to do it yourself in 5 steps.
Selection of materials and their estimated cost
The selection and purchase of materials is carried out when the project is ready.
For a DIY drainage system around the house you will need:
- geotextiles with a density of 100 -150 g/m2; price from 17 rub./m;
- drains; price from 50 rubles per meter of plastic pipe;
- crushed stone or gravel larger than the size of the holes in the drains; from 200 rub/m3;
- sand; from 100 rub/m3;
- plastic inspection well; from 950 rub.;
- plastic collector well; from 10,000 rub.;
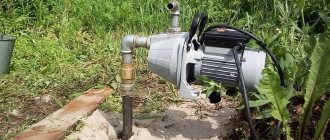
- drainage sediment; submersible type from 3000 rub.;
- fitting.
Drains are made of plastic, asbestos-cement and ceramic. Preference should be given to pipes made of high-strength plastic that can withstand significant loads.
There are plastic drains on sale, wrapped in geotextile or coconut copra.
Asbestos-cement pipes are heavy and require special equipment for careful and correct installation. Ceramic ones have a high drainage capacity, however, they are fragile, difficult to install, and may not withstand the pressure of frozen soils.
What tools will you need?
Before you begin, you need to prepare your tools. You will need:
- bayonet and shovel shovels;
- garden wheelbarrow;
- level;
- roulette;
- manual rammer.
Video description
You can see how to properly arrange drainage on a site in this video:
Step-by-step work on arranging a closed drainage system looks like this:
- First you need to plan on paper the optimal passage of the ditches. They should be located no closer than 2.5 m from trees.
- Then mark the area according to the plan.
- Dig trenches.
- Pour a layer of 10-15 cm of coarse sand.
- Lay geotextiles and pour gravel on it.
- Lay pipes wrapped in geotextile.
- Fill the space around the pipes with medium gravel until there is 20 cm left to the ground level.
- Cover with the edges of geotextile, fill the trench with small pebbles and soil.
To install a closed drainage system, special pipes are laid in trenches Source landscapevkazan.rf
Purpose of storm drain
A storm drain is installed to drain rain and melt water. It belongs to the point type. It is used as an independent structure and in combination with a drainage system.
Installing a storm drain is not difficult, but it is important to design the future system well.
Selection and calculation of materials for storm drains
When the project is ready, it is necessary to purchase building materials. You will need:
- sand;
- crushed stone;
- cement;
- sealant;
- storm drains;
- water collection tanks (storm water inlets);
- pipes;
- gutters;
- sand traps;
- gratings;
- observation wells for monitoring water levels;
- adapters for turns;
- plugs;
- brackets.
Drainage trays are made from asbestos cement, cast iron, stainless steel, and plastic. For self-installation, it is better to choose plastic. It is lightweight, pliable, and does not require complex equipment for installation.
The profile of the trays comes in the form of U, U and slotted. U-shaped is the most convenient for a private home. It is quite capacious and has no corners where dirt accumulates.
The calculation of materials for a stormwater system depends on the amount of precipitation, the design of the house, the area and characteristics of the land plot.
The diameter of the drains is chosen:
85 mm – for 10 l/s
100 mm – 20 l/s
150 mm – 50 l/s
200 mm – 80 l/s
The length of the gutters depends on the height of the house.
Drainage trays and gratings are calculated based on the linear footage of the storm drain using design calculations or tape measurements.
The volume of bulk materials can be approximately calculated using the formula:
V=abc
where a, b are the width and length of the trench, respectively,
c – layer height.
For sand, it is worth taking an amendment for compaction of about 20%. For crushed stone - about 5-10%.
Wells are selected based on the amount of precipitation. They are calculated using the formula:
M = (20A)Sk,
where M is the mass of precipitation;
20 – time, in minutes;
A – precipitation intensity over a period of 20 minutes;
S is the area from which water is collected;
k is the moisture absorption coefficient of the material.
The amount of sediment mass must also be known in order to correctly select the depth of drainage trays and their number on the site.
Do-it-yourself storm drain installation
Installation of storm drains is carried out after preparing the site (collecting garbage, eliminating all unnecessary things).
- Dig trenches up to 30-50 cm deep. The trenches must be clearly aligned with the projection of the location of the drains.
- Pits are dug under the drains. They are equipped with water intakes with a capacity of 5000-10,000 ml with special containers for collecting waste.
- Plastic rotary and inspection wells are installed.
- The trenches are filled with sand. Drainage trays are laid on the sand and grates are installed.
- Every 10 meters of a straight line, at all turns and at the exit from the tray system, sand traps are placed.
- The collected water is either discharged into a ditch/storm sewer outside the site, or collected in a container and watered with it in the garden. Draining rain and melt water into sewers for disposal of household wastewater is prohibited by SNiP.
If water is discharged outside the site, permission is required from the Department of Natural Surveillance, the Central State Hydrometeorological Service, the UPN, the Fisheries Department, and the Basin and Water Management Department. It is necessary to provide the stormwater drainage design to these services. Construction should begin only after its approval.
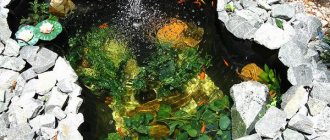
Construction of ponds, sewage pits or ditches
Owners of country houses are often interested in how to dry a plot of water with their own hands without drainage. This is also possible, but it is best to use such methods in the country, and not in a country house. This is digging ditches, sewage pits or decorative ponds. They can become not only a means of draining water, but also an element of landscape design. The choice of method depends on the characteristics of the site and the reason for the accumulation of moisture.
Note ! The disadvantage of this method is the need to regularly clean the resulting reservoirs. Without this, they will bloom, mosquitoes will appear, and there will be an unpleasant smell.
Wells
The easiest way is to dig holes in the lowest flooded areas. They should be cone-shaped, tapering downwards. The diameter at the surface is 2 m, the depth is at least 80-100 cm. Such pits can be decorated by turning them into decorative ponds. To avoid shedding and silting, their bottom is covered with gravel.
Ditches
Ditches are more difficult to dig, but such a system will drain excess water more efficiently. They are organized around the perimeter of the site. To prevent the walls from crumbling, they are reinforced with boards or concrete slabs. You can put a metal box on the bottom.
Drainage ditch beautifully designed to look like an artificial stream Source kndlandscaping.com
A variant of this drainage method is the installation of decorative streams. This is appropriate if the site is located on a slope. The bottom of the artificial stream is laid out with pebbles, pebbles or geotextiles. It is recommended to arrange streams under trees, as in a sunny place the water will bloom.
Turnkey installation of drainage around a private house
If you are not sure that you will be able to carry out proper drainage and storm drainage around the house with your own hands, you can order turnkey work. To do this, you need to choose a reliable contractor and find out the cost of the service in advance. You can buy all materials and components for installing a drainage system from a warehouse in Irkutsk.
How to choose a contractor
When choosing a contractor, you need to consider the following points.
- Famous name. The organization or team must have a certain reputation in a given locality/region.
- Positive feedback . It is necessary to find as many reviews and information about this contractor as possible.
- Official registration with tax and other authorities. Serious contractors have the status of individual entrepreneurs or legal entities. All information about them is transparent.
- Portfolio. The customer has the right to demand examples of work.
- Agreement. It is necessary to conclude an agreement. Before signing, the document is read carefully. All unclear points must be clarified immediately. If the conditions are not satisfactory, the customer must demand that they be changed, or refuse the services of this organization.
- Acceptance. Acceptance is made after inspection.
How much does high-quality turnkey drainage cost?
The cost of turnkey drainage depends on many factors. Before drawing up the project, no one will tell you the exact cost. The approximate price of a surface linear system is from 900 rubles/linear meter. Deep - from 1500 rubles/linear meter. Deep ring-shaped drainage costs from 3,000 rubles per linear meter. Storm drains – from 1200 rubles/linear meter.
Moisture-loving plants
If you are wondering how to drain a site with your own hands at no cost, you can consider the option of planting moisture-loving plants. This method will be effective only in small swamps and if there is no urgent need to remove water.
By using plants that require a lot of water, you can lower the groundwater level and speed up the drying out of the area after rains and floods. This will also help decorate the area. Willow, maple, poplar, alder and birch are used.
If you need plants that grow faster, you can plant shrubs: hawthorn, viburnum, serviceberry, rose hips. This is an ideal way not only to reduce the amount of water on the site, but also to create a hedge. There are also moisture-loving herbaceous plants. These are perennial flowers: iris, aster, aquilegia. You can plant cranberries and blueberries.
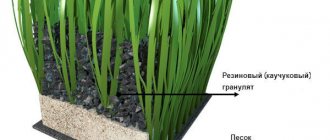
To remove excess moisture, moisture-loving plants are planted on the site Source yandex.net
Creation of ring and deep drainage
In areas where the house has already been erected, and preparing a trench close to the foundation is impossible, ring or deep drainage is used. A trench up to 1.2 meters deep is dug around the foundation, the distance from the house is from 1 to 10 meters - at this distance the pipes will run. The choice of distance depends on the composition of the soil in the area: the higher the moisture permeability, the greater the indentation.
The first step in preparing drainage is to form a trench around the house, which should be at least 30 cm below the foundation level. Pipes and rotary wells are installed in the trench itself using the same technology as for wall drainage. The top layer is filled with sand in the same way - like a pipe to a collector near a wall drainage.
The main difference between ring and deep drainage is the absence of work with the foundation of the building. All pipes run underground at a distance from buildings.
Raising the area
If the groundwater level is high or if the area is very swampy, only raising the site can help. It is backfilled with soil. This is a complex and expensive method, but effective. It consists of several stages.
- Drawing up a detailed plan indicating aquifers, clayey areas, voids.
- Demolition of all buildings, clearing of debris.
- Laying a drainage system, preferably a closed type.
- Before backfilling begins, a strip foundation is laid around the perimeter of the site.
- Then the soil is covered in layers of 10-15 cm. Sand and crushed stone are usually used. Each layer is laid with geotextiles, compacted, and compacted. After this, you need to wait 2-3 weeks for the soil to shrink.
- Fertile soil is poured on top.
- Then you need to sow the soil with cereal crops. They have an extensive root system that will secure the fill.
To get rid of excess moisture, you may need to raise the level of the area Source marc2000.ru
Types of drainage ditches according to construction method
We will not consider options for installing vertical wells and wells; we will only focus on options for protection from water, which involve the construction of a drainage ditch.
All the first methods of dealing with excess moisture and flows after precipitation were based on the use of open-type structures. In the simplest case, they are ordinary trenches dug in the most dangerous directions and flooded areas. This solution involves practically no financial costs; everything can be implemented on your own. But before you make a drainage ditch of this type, think about the fact that you will have to constantly clean it; they silt up very quickly.
In addition, there is a problem with constant ground collapses. In order for the system to serve for at least several years, it will be necessary to strengthen the drainage ditch, or rather, its walls. The choice of materials for these purposes is extensive, and you can choose an inexpensive solution. We should not forget that in this case it will be difficult to enter the site through the drainage ditch, and this problem will also have to be solved.
It is for this reason that closed drainage ditch has become more widespread. Moreover, now polymer pipes for these purposes have appeared on sale. Thanks to this, the service life of a properly planned structure can easily reach ten years or more.
Features of open drainage ditches
But despite all the objective disadvantages that an open drainage ditch has, most summer residents choose just such a solution the old fashioned way. And this is due to a number of objective reasons:
- This option is ideal if you need a drainage ditch along the fence, on the back side of the area, where it does not bother anyone.
- The problem with transport will be solved by a pipe for a drainage ditch for the drive-in; there are corrugated polymer and reinforced concrete options.
- The appearance can be improved by covering the surface with special grilles.
- It is also easy to prevent rapid destruction of the walls; a tray for drainage structures will help.
- You can order all services from searching and purchasing materials to turnkey installation.
The main advantage that open drainage communications have remains is that installation requires less excavation work. And when such events take place in a landscaped courtyard around the house, this becomes a decisive factor.
Differences between closed drainage ditches
Such a drainage ditch is located under the surface of the earth and does not spoil the surrounding landscape at all. It makes no sense to make it to drain powerful flood waters, since the productivity will be limited by the diameter of the main drain. Such drainage ditches are mainly used to protect the foundations of buildings and other structures from the effects of high-level groundwater. The arrangement of such a drainage ditch along the building (along the perimeter) allows you to almost completely remove moisture from the foundations located in the ground.
Among the advantages that a closed drainage ditch has, we highlight:
- long service life, unlike open ones, it is less susceptible to silting;
- there is no difficulty in entering the site through it;
- does not affect the appearance of the yard, can be covered with paths or simple soil.
We also note the main disadvantage - the arrangement of a drainage ditch of this type requires a large amount of excavation work. Of course, all this can be done with your own hands, but to get results faster, it is worth ordering the installation of such drainage on a turnkey basis from a specialized company.
On topic: 4 plot drainage schemes: mistakes + how to do it right
Briefly about the main thing
If the site is located on clay soils or in a lowland, it may need to be drained.
This procedure is complex, but quite feasible. If you choose the right drainage method, taking into account the characteristics of the soil and the depth of groundwater, you can get rid of the problem.
For this purpose, open or closed drainage is most often used, ensuring the outflow of water into drainage wells.
If the area is very waterlogged, it may need to be raised. And to get rid of moisture during rains, it is enough to plant moisture-loving plants on the site.
Ratings 0
Drainage on a slope
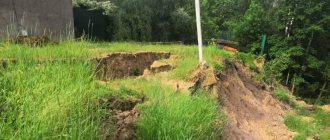
From areas located on slopes, it is also necessary to drain excess water from the surface and from inside the soil. After all, large amounts of precipitation and water formed as a result of melting snow cause land erosion, contribute to landslides, and also erode the foundations of various buildings, paths, retaining walls and steps. For such areas it is necessary to combine open and deep types of drainage.
Actually, the installation of a deep drainage system in areas on a slope is not much different from that carried out in horizontal areas. But still, there are some points that should definitely be taken into account when performing these rather complex works. With this location of the site, it immediately becomes clear that the well for collecting water or sewerage should be located at the lowest point. The main or main trenches are dug, if possible, next to the fence.
Auxiliary trenches are directed to the main one at a certain angle. It turns out something like a Christmas tree. If the slope of the terrain is not enough for good drainage of water, then trenches are dug, gradually deepening so that the overall slope is from 2 to 4 cm per 1 linear meter of drainage.
If the area on the slope occupies a fairly large area, then it is worth dividing it with a transverse drainage trench, which will collect water from the area located above. The water from it will flow through buried drainage pipes into the lower water intake or sewer system.
It is worth remembering that the construction of a drainage system on a site located on a slope requires preparation, attention, careful execution and, of course, financial costs.
Don't be upset if you get an uneven piece of land. Thoughtful landscape design on a site with a slope and proper drainage will help turn the disadvantages of your garden into advantages.
How to choose pipe diameter
When choosing the diameter of the drains, it is necessary to take into account the size of the house. If the waters are low and rise sharply a couple of times a year, then you can rely on the following practical data:
- with a house area of 50 to 70 sq. m. – drain diameter 100 mm;
- over 100 sq. m. – 150 mm:
- more than 120 square meters – at least 150 mm (preferably 200 mm).
If the water is located at a level above the bottom of the foundation or the site is located in a swamp and water drainage from the entire area of the site is required, then you should contact specialists to develop a project.
It is impossible to independently calculate the parameters of the drainage system, and any miscalculations will lead to large material costs. But you can install the drainage yourself - technically this is not a very difficult job.