A greenhouse is an indispensable element in any summer cottage. Thanks to this relatively small but very necessary structure, you can provide favorable conditions for the rapid growth of seedlings, protect tomatoes and cucumbers, as well as other garden crops from frost, and get an early harvest - the greenhouse will always take care of your plantings. It can be of any shape, among which you can easily choose the one that suits you and your site best. At the same time, it is not at all necessary to buy this house for plants - you can make a greenhouse with your own hands quickly and easily, if you know how.
DIY greenhouse
DIY small greenhouse for cucumbers
What you need to know about greenhouses
Purpose
Like a greenhouse, a greenhouse is used to create a favorable microclimate when preparing seedlings or when fully growing tomatoes, cucumbers, cabbage and other plants.
In a broad sense, both structures are perceived as the same thing, although in fact a greenhouse is a small and unheated structure. A greenhouse is a larger building with a heating and ventilation system, which allows for the cultivation of many crops at any time of the year.
Design
The structure of greenhouses is quite simple. A frame is assembled from pipes, metal or wood, which is covered with film, polycarbonate, glass, acrylic and other light-penetrating materials. If the weight of the structure is very large, it is additionally installed on the foundation.
For ventilation, removable panels or opening transoms are provided. Heating is carried out using water heating with radiators, infrared heaters or hot air from heat sources outside the greenhouse.
Installation
Since sunlight is vital for plants, the greenhouse should be built on the south side. It is advisable to place it on a slope and closer to other buildings in order to protect it from the wind and have access to utilities. It is better to stay away from high fences and trees: they provide shade, and falling leaves reduce light transmission.
Choosing a location and solving other issues
Before you go to the barn to assess the availability of materials and tools or to the store to purchase them, you need to inspect the garden plot and choose the place where the greenhouse will be built. Of course, the structure can be portable, but most often it is made stationary. In addition, the size of the structure will depend on the choice of location and the availability of free space, and this factor greatly influences the amount of materials required for construction.
Greenhouses made of arcs with covering material
The location for the greenhouse should be selected according to the following principles.
- This should be a flat piece of land. Installation of the structure on steep slopes is unacceptable. If there are snags and stumps in the area allocated for the greenhouse, then they must be uprooted and all holes filled with soil.
- Growing and fruiting plants need good lighting. That is why a greenhouse is not installed where shadows from trees, shrubs, greenhouses, houses and other buildings fall on the ground. Lack of light will negatively affect both seedlings and adult crops.
- It should be convenient for the gardener to carry out all the work in the greenhouse. Therefore, you need to try to calculate the location in such a way that there is sufficient passage around the structure and the greenhouse can be easily opened.
It is important to be comfortable at work
- It is best to orient the direction of the greenhouse from east to west. In this case, the sun's rays will illuminate the plants in the structure as efficiently as possible. But if there is a desire to ensure that the plants receive the sun in excess only in the morning and evening, then the greenhouse is installed from north to south. In this case, the plantings will be protected from the scorching heat at noon.
A simple wooden greenhouse is very convenient and practical
On a note! If the greenhouse is planned to be used for permanent cultivation of plants, for example, tomatoes, then care should be taken to build a second greenhouse, if space allows. The fact is that it is undesirable to grow the same crops, especially tomatoes and cucumbers, in the same place year after year. Usually the plantings are swapped. In this case, a second greenhouse would be very useful.
A greenhouse doesn't have to be big
The optimal time to build a greenhouse is mid-spring. The snow has already melted, but the plants are not growing much yet. Although if there is nowhere to rush, then you can build a greenhouse at any time of the year, except winter. In winter, it is very difficult to carry out any construction, not only because of the cold, but also because of the hard ground.
Greenhouse box
How to make a greenhouse with your own hands from agrofibre and reinforcement
youtube.com
- Assembly complexity: low.
- Foundation: not required.
- Cost: low.
- Variations: the frame can be replaced with plastic pipes, and the covering material with film.
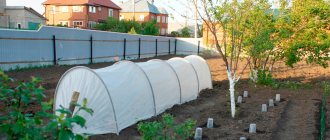
The simplest design option, which is ideal for a small greenhouse. A frame made of reinforcement is installed directly on the bed, and agrofibre or, as it is also called, spunbond, is stretched over it. This material protects from the sun while retaining heat and moisture.
1. The dimensions of such a greenhouse are chosen arbitrarily, depending on the footage of available materials. For example, it is convenient to cut six-meter reinforcement in half. With such a length of arcs, the width of the greenhouse is about 80 cm. The arcs themselves should be installed in increments of 1.2–1.5 m.
teplica-exp.ru
2. Arcs are bent from reinforcement with a diameter of 8 mm. Next, drip irrigation tubes or an old hose are put on them, leaving 10–20 cm at each end so that it is convenient to insert the structure into the ground.
ebayimg.com
3. After marking the installation locations for the arcs, scraps of steel pipes or drilled wooden pegs 20–30 cm long are driven into the ground, and the reinforcement is inserted into them.
stopdacha.ru
4. Spunbond can be stitched on a sewing machine, forming pocket folds that fit directly onto the arches. Another option is to install plastic pipe guides on the sides of the beds and attach agrofibre to them using purchased clips or cut pieces of pipes. The covering material can eventually be easily lifted by simply removing them.
stblizko.ru
5. If desired, you can attach the arcs not to pipes driven into the ground, but to metal guides rigidly fixed at the edges of the base. This design will allow you to fold the greenhouse like an accordion, simply by moving the arcs.
must.kz
6. The free ends of the spunbond at the ends must be collected, tied in a knot and secured with a peg, earth or other means.
samara.kinplast.ru
Here are step-by-step video instructions.
Greenhouse materials
It's time to discuss the main types of materials from which it is easy to create a greenhouse with your own hands. The frame itself can be of three types.
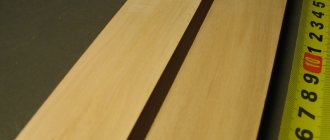
- Metal . This material is the longest-living and durable compared to others. He is not afraid of either wind or snow. Metal arches can support more weight than plastic or wooden ones. Metal has two main drawbacks: difficulty in processing (certain devices are needed to work with it) and a tendency to corrosion (this drawback can be corrected if the frame is painted). Also, if the greenhouse falls, the metal base will simply crush the plants.
Sketch of a greenhouse with metal arcs
Film mini-greenhouse
Greenhouse made of plastic arcs
After constructing the frame, it must be covered with a covering material that will retain heat and protect the plants from wind and cold. Let's consider the possible options.
- Glass . Heavy, but high-quality and durable material with increased fragility. It is easily damaged by impacts, breaks when dropped, but does not bend, and therefore can only be used for greenhouses with smooth walls. Does not retain ultraviolet radiation and retains heat worse, difficult to process.
- Polycarbonate . Recognized as one of the best covering materials. It has a certain strength, it is not afraid of moderate wind/snow loads, it bends well, and therefore can be used for the construction of curved structures. The material has a protective layer that prevents ultraviolet rays from penetrating into the structure, and due to its honeycomb structure it retains heat well. The service life is shorter than that of glass, but in some ways the material is even stronger, since it is not so fragile and will not break if dropped from a small height. Polycarbonate is also very easy to process.
Above ground polycarbonate greenhouse
DIY polycarbonate greenhouse
A simple greenhouse covered with plastic film
Arc greenhouses are often covered with spunbond
DIY cucumber greenhouse
Cucumbers are demanding when it comes to growing conditions and produce a good harvest only when the air and soil temperatures are stable. Providing cucumbers with the necessary microclimate is quite simple: you need to install a permanent or seasonal greenhouse in the garden. We will tell you how to make a greenhouse for cucumbers with your own hands in this article.
Also, to connect individual elements, you may need angles, self-tapping screws, washers, corner profiles, and clamps. To make it easier to open greenhouses with doors, handles and awnings are used.
DIY greenhouse with convertible top
Prices for cellular polycarbonate
cellular polycarbonate
How to make a greenhouse with your own hands from masonry mesh and film
dachadecor.com
- Assembly complexity: low.
- Foundation: not required.
- Cost: low.
- Variations: instead of film, you can use agrofibre, and make the door on a wooden frame.
A budget option for a greenhouse made from masonry mesh and regular film, which is quickly assembled and has a number of advantages. The design does not require a foundation; due to its elasticity, it is resistant to wind loads, and is also convenient for tying up plants from the inside. At the same time, by folding the mesh, you can get different sizes depending on your needs.
- Wooden beams, steel angles, pipes or channels are used as load-bearing posts. They are hammered at a distance of 1.2–1.4 m.
- The greenhouse arch is formed from two pieces of mesh laid overlapping. From below it is attached with wire to the posts, and from above it is fastened together with the same wire or plastic ties.
- To strengthen the structure, T-shaped supports made of wooden beams 50 × 50 mm are installed in the middle of the passage. If desired, they can also be driven into the ground.
- A film is put on a dome assembled from a mesh, which is held in place by strings of twine or rope stretched over it.
- The side walls are also made of film, which is folded up and attached to the dome with tape. In several places at the top and bottom, small windows are cut for ventilation of the greenhouse.
- The door is made on a wooden frame or made from the same film, which is cut and attached to the side wall with magnets in the manner of door mosquito nets.
How to make a greenhouse with your own hands from stretch film with a wooden frame
stroydachusam.ru
- Assembly difficulty: average.
- Foundation: not required.
- Cost: low.
Another way to quickly build a greenhouse. A wooden beam is used as a frame, and stretch packaging film is used as a covering material. With a large number of layers, it transmits light a little worse than ordinary PVC film, but on hot days this is even a plus.
- The film is sold in rolls, so the dimensions of the greenhouse are selected according to the cutting of the timber and taking into account your wishes.
- For the base, steel corners 40 × 40 mm are used, in which holes for attaching the frame posts are pre-drilled. They can also be treated with bitumen or painted to extend their service life.
- The corners are driven into the ground, and pieces of timber are screwed to them with self-tapping screws. A lower frame, in turn, is attached to the beam, on which the side walls and roof are assembled. All corners are reinforced with additional inclined sections of timber.
- The door is assembled on a wooden frame in one of the side walls and installed on hinges.
- Film wrapping is done in parts, in several layers and overlapping. First, the gables are installed, then the roof slopes, and only then the walls. You need to start wrapping them from the bottom so that running rainwater does not get inside the greenhouse.
- After wrapping with glazing bead or river, the door and its outer contour of the door are trimmed, and then the film around the frame is cut through. In the same way you can make a window in the opposite wall.
How to make a greenhouse with your own hands from old window frames
teplica-piter.ru
- Assembly difficulty: average.
- Foundation: desirable.
- Cost: minimal.
- Variations: you can combine frames with film to make a roof, side walls or doors.
The main advantage of this design is its low cost. Old window frames can be found, if not free, then for a nominal price. In addition, glass transmits light much better than film and polycarbonate. The windows already have vents for ventilation, and if you select a balcony block, you will also have a ready-made door.
- The size of the greenhouse depends on the size of the frames and the interior space you need. Aim for a width of about 2.5 m to give a passage of about 60 cm and two beds of 80–90 cm.
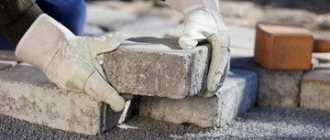
- Windows and glass have considerable weight, so it is advisable to install them on a solid base. This can be a shallow strip foundation, a massive wooden beam or a metal profile.
- A wooden frame or pillars are installed on the foundation at the corners, and frames are attached to them and to each other. The gaps between each block are covered with putty and clogged with strips of laminate backing or a thin wooden strip.
- A door is made in the front wall. Its role can be played by one of the windows, a balcony door or a wooden frame covered with film. Ventilation is provided through window vents.
- To reduce weight, it is better to make the roof from wooden beams and film. You can use the same window frames, but in this case you will have to reinforce the structure with supports in the middle of the passage so that it can withstand a lot of weight.
Options for greenhouses for seedlings
Greenhouses at the dacha can be very diverse, and it is not necessary to build an arc one if there are more interesting options, and for some, more convenient.
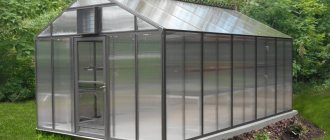
Polycarbonate structure
The most practical greenhouse that you can buy and simply plant the necessary crops inside. With him there is the least amount of hassle and only positive emotions. But except for one thing, you have to pay for practicality, and a lot.
Arc greenhouse made of film
This is almost the same design that we decided to build today, but it comes in a ready-made kit. All you have to do is bring the kit to your dacha, place it on the site and assemble it. Convenient and fast, but again at a cost.
Greenhouse thermos
We have studied the thermos greenhouse inside and out, and the conclusions are clear - an excellent model, functional and practical. Now you can build a similar greenhouse by referring to our diagram or creating your own. The structure can be covered with old windows.
A simple greenhouse made from windows
A greenhouse made from windows is also a past stage, but now you can, based on previously acquired knowledge, create something similar for growing seedlings. The only difference is that the design will be several times smaller.
Wooden greenhouse with glass
The image below shows how to knock down the box and install it on the bricks. It’s a good idea, especially if you then cover it with glass and fill it with high-quality seedling soil.
Cheap option for a summer residence
There is nothing easier and cheaper than assembling a place for growing seedlings from scrap materials. Today these are old refrigerators and old windows. As you can see, it doesn't look very good, but it functions great.
How to make a greenhouse with your own hands from film and polypropylene pipes
maja-dacha.ru
- Assembly difficulty: average.
- Foundation: not required.
- Cost: low.
- Variations: the film can be replaced with agrofibre or polycarbonate
A greenhouse made of polypropylene pipes attracts with its simplicity, reliability and low price. The materials are sold at any hardware store, and assembly does not require any special skills or tools. You can even do without a soldering iron if you connect the pipes not with fittings, but with through bolts.
- As always, sizes are selected based on needs and available materials. Polypropylene pipe is usually sold in 4 m sections, and it is easy to cut and splice using couplings.
- The first step is to calculate the length of the pipe and the number of fittings required. It’s better to take it with a reserve so that you don’t have to run to the store later.
- The main parts are soldered from pipes, tees and crosspieces - arches with crossbars and longitudinal inserts.
- Next, the greenhouse is assembled from the prepared parts. If a soldering iron is not at hand, you can use bolts with nuts and washers to connect, which are inserted into pipes drilled through.
- The film is secured to the edges of the frame using purchased pipe clamps or homemade clips made from slightly larger diameter pipes cut along sections.
Design parameters
Before starting construction, you can draw up a work plan or just a diagram in which you outline the optimal dimensions for length and width, choose the height and select the material.
Let’s say right away that the standard size of a greenhouse can be considered 1 m wide and 2-3 meters long. The height of such a structure is approximately 50-70 cm.
These are the most comfortable dimensions not only for working on the site, but also for construction. The minimum costs for material, the load on the frame, the convenience of covering with polyethylene, and so on are calculated here.
How to make a greenhouse with your own hands from film with a wooden frame
legkovmeste.ru
- Assembly difficulty: average.
- Foundation: not required.
- Cost: low.
- Variations: the film can be replaced with agrofibre or polycarbonate.
A classic version of a greenhouse, used for decades and not losing popularity. Wooden beams are easy to process, have low weight and sufficient strength, and also retain heat well. The structure does not require a capital foundation - you can get by with a frame made of timber of a larger cross-section or use steel corners as a base.
- The standard cutting of timber is 6 m, so they start from this figure. Most often, greenhouses are made 3 × 6 m, but if desired, the dimensions can be either reduced or increased. The finished project with material calculations is available at this link.
- The assembly of the frame is the same as for a greenhouse made of stretch film. Steel corners are driven into the ground at intervals of about 1 m at the points where the posts are attached. In each of them, two holes are drilled for self-tapping screws or one for M8 or M10 bolts.
- Vertical posts are fixed to the corners along the entire perimeter, which are tied with an upper contour made of timber. To add rigidity in the corners, one jib is added on each side
- Triangular roof trusses are installed and secured opposite the racks. The slope angle is selected depending on the snow load. So, if there is a lot of snow in your region, the angle of inclination should be greater (the roof is higher and sharper).
- The door and window for ventilation are assembled on wooden frames and installed in the front and rear walls, respectively.
- At the end, the frame is covered with film, which is attached to the beam using a lath stuffed on top. All sharp parts on the wood are rounded off or covered with a soft material so that the film does not tear during operation.
What is the difference between a greenhouse and a greenhouse?
- A greenhouse is an unheated structure, most often made independently, of small size. Just like a greenhouse, this structure is used for cucumbers and other vegetable crops that are grown from seedlings.
- The maximum height of a greenhouse is 1.5 meters, in contrast to a greenhouse, which is about 3 meters high.
- Greenhouses are heated artificially, greenhouses are heated by the rays of the sun and the heat released during the oxidation of biofuels. You can raise the temperature inside the shelter using biological fuel - unrotted manure, which is buried 20 cm deep into the bed and releases heat during the process of overheating.
- Tunnel shelters are most often classified as a separate category. In the article, these structures will be considered as one of the types of greenhouses.
- Greenhouses, especially heated ones, can be used both for a certain period and throughout the year. Greenhouses are installed for a short period of time - from early spring to May.
Installing greenhouses in a summer cottage greatly simplifies the process of growing vegetable crops from seedlings for gardeners, since the expenditure of effort, money and time becomes minimal. Today, we can distinguish 3 (or 6 as described below) types of greenhouse structures, which differ both in the complexity of their structure and in their efficiency.
How to make a polycarbonate greenhouse with a metal frame with your own hands
- Assembly difficulty: high.
- Foundation: required.
- Cost: high.
- Variations: the foundation can be made of wooden beams or use steel reinforcement, angle or pipes driven into the ground.
The most popular and modern version of the greenhouse. This design is much more expensive than others and is difficult to manufacture, but it will last for decades. Polycarbonate can withstand the open sun for 10–12 years, and the frame made of a profile steel pipe is almost eternal.
1. The standard size of polycarbonate is 2,100 × 6,000 mm, so it is convenient to cut it into four or two parts with dimensions of 2.1 × 1.5 m or 2.1 × 3 m, respectively. Such pieces will be optimal for a greenhouse measuring 3 × 6 meters.
2. For reliable fastening and distribution of wind loads, a foundation is made under the greenhouse. This can be a shallow strip foundation, a frame made of antiseptic-treated wooden beams, or steel corners driven into the ground.
YouTube channel of Evgeniy Kolomakin
3. The design of the greenhouse consists of an arch, which is formed using arcs from a profiled steel pipe 20 × 20 mm, located at a distance of one meter from each other.
4. The arcs are fastened together by longitudinal sections from the same pipe, which are connected by welding.
5. A door is installed at the front end: a frame measuring 1.85 × 1 m is welded from a pipe, which is attached to the frame on hinges. A window for ventilation measuring 1 × 1 m is made according to the same principle and is located at the rear end.
6. Covering with polycarbonate begins from the ends. The sheet is cut in half, attached to the profile using special self-tapping screws with thermal washers, and then trimmed along the contour of the arc with a sharp knife. After this, the side wall sheets are installed.
Instructions for assembling a greenhouse model “Snowdrop”
As an example, consider a model that is perhaps the most popular. The design features of this greenhouse are described above, and the installation procedure itself is not complicated, so anyone can handle it.
Below is an algorithm of the required actions.
Step one . First of all, we form a bed on which the future structure will be located. The width of the bed should be within 1.1-1.15 meters, since it is necessary that it eventually be completely covered by the greenhouse.
Step two . Now we carefully open the package and remove all the elements contained there. We do this carefully so as not to damage the agrofibre.
Important information! We recommend not throwing away the packaging - it may be useful for storing the assembled structure when the summer season ends.
Step three . We take out the legs and install them in the arches (to do this, we simply insert them into the end holes).
Step four . Now we can straighten the greenhouse over the prepared bed, carefully spreading it out.
Step five . We install the first arc at the very beginning of the bed. For fixation purposes, we simply insert this arch into the ground.
Step six . We install the remaining arcs in the same way, trying to ensure that they are located at approximately the same distance from each other.
Note! The arcs, as noted earlier, are sewn into the covering material, so complete assembly of the greenhouse as such is not required in this case.
Step seven . We tie the fabric, stretching it, at the ends of the structure, for which we use twine.
Step eight . Now, using a couple of pegs, we fasten the ends of the structure, threading them into a knot of rope, which we tie the material together. At the same time, we make sure that the material between the arches is somewhat stretched.
Step nine . We attach clips (they should also be included) on two sides of each arch.
That's it, the design is ready for further use! You can already plant seedlings, care for them and reap good harvests. The assembly procedure is described in more detail in the video below.
Video – Installing a greenhouse “Snowdrop”
How to make a polycarbonate greenhouse with a galvanized profile frame with your own hands
techkomplect.ru
- Assembly difficulty: average.
- Foundation: not required.
- Cost: low.
A simpler and more affordable option for a polycarbonate greenhouse. It does not use expensive metal pipe that needs to be welded. And galvanized profiles for plasterboard systems are used as frame material. They are easily cut with metal scissors and fastened with ordinary self-tapping screws.
- When choosing sizes, as usual, we start from the parameters of polycarbonate sheets. Since the profiles lose rigidity when bent, it is better to choose a gable greenhouse rather than an arched one.
- By analogy with arches made of a metal pipe, a frame made of galvanized profile is assembled from ribs in the form of a house.
- The assembled modules are installed on a frame made of wooden beams and tied together with sections of profiles. Doors and a window for ventilation are made in the front and rear walls.
- At the end, the frame is sheathed with polycarbonate sheets, which are secured using special self-tapping screws with plastic thermal washers.
How to choose the best project
The best project - ideally suited to your needs.
When choosing a building, carefully consider its purpose. Cucumbers and tomatoes require a tall structure, while strawberries or radishes feel great in a small box with a transparent lid. A seasonal shelter is also suitable for a dacha, and permanent residents of a private house can think about a year-round greenhouse or vegetarian garden.
The location of the green house also matters. Young plants need more warmth and light, which means we choose the south-eastern side of the site and stay away from spreading trees. The long side of the building faces from west to east.
If you are attaching it to your home, make sure that the open lid does not block your view from the window or passage. The building located in the center of the site should also not create inconvenience for walking along paths and cultivating ridges.
It is convenient to “settle” moisture-loving plants close to the tap, so as not to pull the hose across the entire garden. In greenhouses designed for long-term use, you can consider a drip irrigation system.
How to make a glass greenhouse with a metal frame with your own hands
juliana.ru
- Assembly difficulty: high.
- Foundation: required.
- Cost: high.
- Variations: to make the structure lighter, you can make the top from polycarbonate or film.
The most correct, but rather labor-intensive and expensive option for a greenhouse. The main advantage of glass is its excellent light transmittance and durability. However, due to the heavy weight of the structure, a strong metal frame and foundation are required. In addition to arranging a strip foundation, the difficulty also lies in the need to use welding.
- When it comes to choosing sizes, a glass greenhouse is no exception - everything is strictly individual and taking into account the available materials.
- The impressive weight of glass and metal frame requires a full foundation. Usually a trench 30 cm deep and 20 cm wide is dug around the perimeter, wooden formwork 20 cm high is installed on top and the whole thing is filled with concrete. Also, before pouring, anchor bolts are inserted into the formwork to secure the frame.
- A metal channel or corner is attached to the resulting base using anchors. Then racks 1.6–1.8 m high are welded to this frame from two folded corners 45 × 45 mm. At the top they are fastened with longitudinal sections of the corner.
- Next, rafters from the same double corners are placed on the resulting box. At the bottom they are welded to the posts, and at the top - to another corner, which acts as a ridge beam.
- A door is inserted into one of the walls, and a window is installed in the lid or wall for ventilation.
- The glass is installed in the frames obtained by using double corners and secured with homemade gluers - thin aluminum or steel plates bent in the shape of the letter Z. The gluer is attached to the corner with one hook, and to the glass with the second.
Greenhouse “Breadbox” and “Butterfly” - photo
This design is called a “bread box” because it looks exactly like a plastic bread container. Its lid also rises upward, hiding behind the second half. If you look at the photo, you will understand everything.
You can weld such a greenhouse-breadbox with your own hands from a profile pipe
There are two types of such products: opening on one or both sides. If it is shallow, you can work with a lid that opens on one side. If the width is more than a meter, it will be easier to work if there is access from both sides. This design with two opening sides has its own name: “Snail”.
A film or spunbond is stretched over the manufactured frame, but polycarbonate is more popular for this design.
The second design differs in the type of door opening. Its vault is also made on arches, but opens on hinges upward (see picture).
Butterfly greenhouse: when open, the lids resemble wings
They can be installed directly on the ground or on a prepared foundation made of bricks or timber. In some cases, the lids do not open immediately from the ground, but there is a small side of 15-20 cm.
How to make a dome greenhouse with your own hands from film with a wooden frame
pinterest.com
- Assembly difficulty: high.
- Foundation: desirable.
- Cost: high.
- Variations: the film can be replaced with polycarbonate or glass, and the frame can be made of profiles or pipes.
A domed or geodesic greenhouse attracts primarily with its unusual appearance: it consists entirely of many triangles and hexagons. Other advantages include high structural strength and best light transmittance. The geodesic dome has only one drawback: it is difficult to manufacture.
- The dimensions of such a greenhouse are selected individually, based on the required area. Since the frame design is quite complex, calculations are the most time-consuming part of the project.
- In order not to get confused and take into account all the nuances, it is convenient to carry out the calculation using a special calculator. In it you can set the dimensions, select the “thickness” of the frame and get a list of all the necessary parts for assembly with dimensions, as well as their approximate cost.
- Regardless of its dimensions, a domed greenhouse is highly durable and is not afraid of winds, so there is no need to make a foundation for it. However, since the construction of a structure is very labor-intensive, it is rational to extend its service life and equip a lightweight strip foundation for attaching the frame.
- The ribs of the structure consist of triangles, which, in turn, are assembled from a wooden batten according to a template. First you need to prepare the required number of such triangles.
- The greenhouse is assembled like a magnetic construction set from childhood. Starting from the bottom, rows of triangles are assembled one after another, which are fastened together using self-tapping screws and form a dome. If everything is calculated correctly, it will close at the top and will be perfectly shaped.
- One of the triangles in the roof is made folding or removable to provide ventilation. The door is either installed in a polygon shape, or made in a traditional shape with a mortise frame.
- The film covers the finished dome or is stretched over each triangle at the assembly stage. In the first case, it will be easier to replace the film when it breaks. The second one gives a more aesthetic appearance. Which one to choose - decide for yourself.
Common types and forms of greenhouses
When choosing the shape of a greenhouse, you need to start not only from personal preferences, but also be guided by some other considerations.
For example, if you are going to build a greenhouse in areas where there is a lot of rainfall in winter, the structure should have a well-thought-out shape so that the snow does not lie on the roof and overload the frame.
If we talk about the most common forms of construction, the most popular among summer residents are greenhouses and greenhouses of the arched type and with straight walls (one- or two-slope).
Various country greenhouses in the shape of polygons and pyramids are rarely used, mainly due to the complexity of assembly. But some people prefer such designs.
Let's look at all the most popular types and forms of greenhouses, so that it is clear what to focus on when choosing.