The construction of country houses and cottages quite often lasts for years, so at the very beginning of this complex process it is necessary to install temporary residential and non-residential structures. Such buildings include garden houses and cabins, which greatly facilitate life and work on the site until permanent structures are erected on it and all the necessary communications are provided. As practice shows, a properly assembled shed with a veranda can serve for years, and by slightly changing its design, you can create a living or storage space, a utility block or a bathhouse.
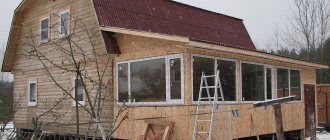
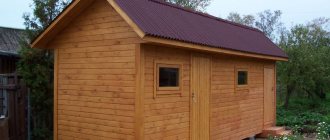
Ready-made project of a change house with a veranda covered with siding
A distinctive feature of the cabins is their versatility and ease of installation. Summer residents, builders, hunters, and foresters have long appreciated the benefits of cabins. This is exactly the case when maximum returns are obtained with a minimum of costs. But in order for this advantage to be fully revealed, you first need to clearly define what exactly the change house is for.
How to build a shed with a veranda
If you decide to build a change house on your summer cottage yourself, first draw up a work plan (it can be found on the Internet from many manufacturers of change houses) and draw a preliminary drawing or sketch of the structure. The standard two-room cabin design has the shape of a “vest” with a hallway.
The durability of the cabin depends on a reliable foundation (of course, if we are not talking about a mobile structure on wheels). If a standard strip foundation is not possible (for example, if the site is located on a slope), it would be better to use screw piles. In such a situation, do not forget about drainage, which will protect the site and the buildings on it from the destructive power of groundwater. Compacted gravel, sand and crushed stone are suitable for this. The most common type of foundation for such structures is columnar, it is made of concrete or brick.
The frame of the cabin is made of beams and is mounted from the corners, then it is the turn of the roof. The vertical beams along the facade are made higher, and the roofing itself will be supported on rafters connected by sheathing. At the same time, do not forget to drain the water.
The roofing covering is laid on top using bolts and screws. To make your roof reliable, practical and energy efficient, cover it with roofing iron and galvanized sheets, and you can insulate the roof with isospan. For those who do not like the sound of drops on an iron surface, we can recommend coating with soft ondulin.
Next comes the turn of insulating the walls and ceiling and installing windows and doors. Beams adjacent to the ground should be treated with an antiseptic to prevent exposure to fungus or insects. For the facade it is worth using roll insulation. And all sorts of cracks in the structure can be masked using polyurethane foam.
In order for the fire safety of a building to be high, it is necessary to apply a special impregnation to the wood and use glass wool of a high fire resistance class for insulation. In this case, the thermal insulation material must be distributed evenly everywhere, the layer must have a thickness of at least 10 cm.
When finishing work, pay attention to the fact that protective wood stains will not only provide your cabin with a modern and attractive appearance, but will also protect the structure from the negative effects of ultraviolet rays, temperature changes and all kinds of precipitation. At the end, an insulated floor is made (mineral wool is suitable as insulation)
Afterwards, treat the floor with antiseptics that will protect it from external influences.
Construction stages
Having prepared the desired plot of land, you can begin the most labor-intensive and lengthy process - construction. Conventionally, it can be divided into five stages: laying the foundation, lower frame, installation of supports, top frame and creation of the roof, as well as finishing. Each of them is relevant to any type of construction mentioned earlier, since the construction technique is not particularly different. By studying the recommendations and tips below, you can simplify the task.
Read how to attach a veranda to a house made of foam blocks or aerated concrete.
Laying the foundation
If the foundation was not laid at the design stage of the cabin, it is advisable to do this now. In the case of a terrace, this step is optional: the previously prepared crushed stone base is watered with cement mortar, wooden logs are laid on top, which protect against dampness, and covered with a special waterproofing mastic.
The wooden frame is attached to the cabin itself using metal corners. If we are talking about a porch or veranda, you need to place ready-made concrete blocks under them or create a strip foundation - it is universal, and using a closed scheme, you can prevent future subsidence of the structure.
Did you know? Despite the fact that cement is an extremely important and integral material in the construction process, it has one significant drawback
—
its production creates the emission of large amounts of greenhouse gases.
The foundation is laid as follows:
- Purchase or create yourself a durable formwork from beams according to the dimensions specified in the drawing. Install it in the ditch.
- Use reinforcement (several rods need to be fastened with wire) to make reinforcement.
- Fill the structure with cement and let it harden completely.
In the case when you give preference to blocks, then they need to be placed at each extreme point and in the middle, while maintaining a step of 2-3 meters.
Bottom harness
The wooden frame often begins to be erected from the bottom frame, preferably double. For this purpose, beams with a thickness of 100 mm are used. To fasten them together, screws and metal corners are used. At this stage, the piping should completely repeat the foundation. It is attached to blocks or fittings. Fixation to the change house itself is also done using corners and screws.
Important! It is worth installing waterproofing between wood and cement
—
materials such as roofing felt or foamed polyethylene will come in very handy.
Installation of supports
At this stage, vertically located wooden supports are installed, following the drawing. The distance between them should be the same; using a level gauge, everything is checked for compliance. The process uses temporary fixation of supports with prepared strong beams (jibs).
When the supports are securely fastened, it’s time to start arranging the subfloor: lay the boards and then secure them with screws or special fasteners. On top of this, it is recommended to immediately carry out insulation work (glassine flooring would be the optimal solution).
Top frame and roof
The design helps strengthen the frame in general. The organization of the upper harness is based on the same principle as the lower one. First you need to dismantle the decorative elements of the change house. It is definitely worth measuring and taking into account the slope of the existing roof. It must be at least 10 cm.
Learn how to make a railing for a terrace or veranda with your own hands.
Next, the previously installed temporary cuts are removed. The upper frame bars are connected to the vertical supports using angles and screws. After this, select locations for windows and doors, if any. Along the width of the openings, you need to secure additional posts and nail horizontal lintels.
Before installing the roof, it is worth removing the screws from the edges of the existing roof of the cabin. The rafters are laid with the lower end on the frame, while the upper ends are connected to the rafters or rested on the purlin. Next, lay out the roofing sheets under the corrugated sheeting.
You can make the required number of recesses in the racks to make railings.
Finishing
The final stage of construction of the extension is finishing the walls and floors. This is necessary to give the room an aesthetic appearance both outside and inside. To begin with, lay the finished floor and also insulate the walls.
Next, the outer corners are rounded, visible defects, if any, are corrected, roughness is removed, and often an unusual shape is given to some decorative elements, for which an electric planer is perfect. Other finishing elements are also installed: skirting boards, fillets, as well as platbands and strips if windows and doors are to be installed.
We invite you to find out how to beautifully decorate the interior of a veranda and terrace with your own hands.
By following the step-by-step instructions for the proposed technology, you can add a terrace, veranda or porch without much difficulty, and the appearance will be no worse than with professional help. And using modern power tools, you can speed up the process several times.
Building options
In most cases, a change house is an auxiliary room, entering which a person immediately finds himself in a room. There is no free space for a hallway, so an additional building will be very useful.
Did you know? One of the most unusual buildings is rightfully recognized as a room built from paper blocks, which, in turn, consist of banknotes that have gone out of circulation. This attraction is located in Ireland.
There are three types, which differ from each other in purpose and, therefore, functions:
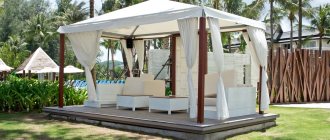
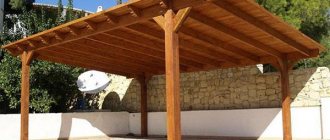
- A veranda is a closed, often glazed, small room. Suitable for placing kitchen appliances. If you install a heating system and insulate the walls, then such a building will be relevant all year round. In addition, you can choose a summer version of the kitchen and make it a reception area. Often used as a summer cottage option.
- The terrace is an open area delimited by railings or balustrades; a canopy is used instead of a roof. Often the room is used for relaxation in the warm season; it contains a sofa, armchairs, tables, elements of garden furniture, sun loungers, etc.
- Another way to increase your storage space is to build a porch. This is a small open area (maximum 1.5 m) with steps and a canopy. It can be used as a hallway - in this case, the size of the living space increases significantly.
Features of the internal arrangement
Experienced people, using the example of their successes and failures, can tell what mistakes can be avoided when converting a change house into a garden or country house. But you don’t have to go through the entire construction experience yourself; you can use ready-made little tricks.
If you increase the size of the windows, the issue with illumination will be resolved; in a bright room everything looks more solid. Sliding structures are also used in country houses, which simultaneously serve as both a window and a door.
But the best examples are visuals, photos and illustrations that more eloquently show how other people were able to make a beautiful country house out of an ordinary cabin. And this country house is attractive not only from the outside, but also from the inside.
Photos of country houses
Types of cabins for summer cottages
When choosing a summer cottage, you should be guided by the purpose of the building. Today, manufacturing companies offer a wide selection of cabins for any need.
Panel buildings
This type of temporary housing construction is the simplest and most economical. This structure is being built without stiffeners, so it is not resistant to strong gusts of wind. The roofing material is a metal sheet.
Frame change house
This type of structure is durable, but needs to be dismantled with the onset of winter. Has stiffening ribs. The structure easily copes with the vagaries of nature. Insulated dacha cabins of this type can be used at any time of the year. For assembly, timber and metal profiles are used. They are insulated with mineral wool, and a special film can also be used for waterproofing purposes.
Summer cottages made of timber
They are made using massive logs. Such a wooden object is more capital. Such buildings perform a large number of functions. They can store a variety of tools; you can arrange a cellar, garage, temporary housing, bathhouse, etc. You can also attach a veranda to such a change house. A country house with a veranda will fit perfectly into the design of a summer cottage.
Container cabin
Since the walls of such a cabin are multi-layered blocks, the assembly of such buildings is carried out using a metal channel. The cabin is reliable and can retain heat for a long time. If necessary, the structure can be dismantled and it can be moved from one place to another.
When planning the construction of a wooden cabin, you need to take into account a large number of important factors:
- Convenient access to the building must be organized.
- Use high-quality material, then the service life of the building will increase significantly.
- If the cabin is made of wood, then you should not forget to treat it with an antiseptic.
There are no high requirements for choosing a location. The main thing is that the structure does not block the passage and is removed from the house for fire safety reasons. The foundation is not a requirement. As a rule, it is possible to build a building without it.
The two-room complex consists of two well-lit and equipped rooms. Both rooms can be used as you wish. For example, one can be residential, and the second can be used to store a variety of tools. Cabins with shower and toilet are very convenient and practical to use.
Often, cabins with a terrace are installed in summer cottages. Arranging them is not difficult. This building looks attractive. On the veranda you can sit comfortably in the hot summer and relax. The design of a change house with a veranda or terrace assumes that there are four entrances from a small area. Two entrances communicate with the room, and the other two communicate with the utility room. The two rooms do not have a door between them.
Projects
- Change houses with a veranda installed in the country have small dimensions of 3x6 m. The roof can be pitched or gable. Some projects contain a terrace, which can be built above the house and have a common roof. Inside the house, the entire space is divided into 2-3 rooms. This is an entrance hall to which a kitchen is attached, as well as two living rooms. If the project contains a veranda, then in the summer it will become an excellent place for meals or serve as a hallway. But what it will look like and how turnkey log cabins are made can be seen in the contents of this article.
Change houses with a veranda 3 by 6
- There are also projects that allow you to build an additional room using an attic. Then construction will take place in several stages. In the first year, you can install a regular shed, and then, as funds become available, you can complete the veranda or attic. The roof is common and pitched.
Change houses with veranda and attic
- To protect the house from uninvited guests, metal containers are used. But you can only live in such a building in the summer, because in winter it is quite cold. So you have to take care of insulation. For these purposes, it is worth using mineral wool or rolled heat insulation. Some projects involve finishing with clapboard, siding or metal sheets. By analogy, block containers are produced. They are used for housing workers at construction sites.
Container cabins with veranda
- A change house with a toilet and shower is a structure with which you can live all year round. If you correctly draw up the design of the structure and fulfill all the installation requirements, the veranda can become an additional room that can be used as a dining room in the summer. There are a large number of projects for creating a residential cabin. In addition, each person has the opportunity to independently build a shed or purchase a ready-made option, for installation of which you simply need to select a location and assemble the structural elements.
What types of cabins are there?
The choice today is not so scarce; you can find a housing option that can be modestly and as succinctly equipped as possible for temporary living. You can not limit yourself to this pass-through option, but purchase a change house that will turn into a real country house. Yes, a small but large dacha is, rather, a wish rather than a strict condition for a country home.
The cabins are divided into the following options:
- intended for country utility premises;
- residential, in which workers or the owner are temporarily located;
- as an office for the construction manager.
Finally, there are construction cabins, country cabins, and also a group called block containers. Structurally, they can be panel, timber, frame. Although not the most respectable buildings in appearance, if they are properly decorated, they turn into cozy country houses. They can be equipped with a mini-bathroom and zoned inside.
Not all containers are strictly metal, although the word itself is associated with this material. The walls and ceiling of modern cabins of this type are insulated and finished on all sides. Metal structures are used for construction, but wooden ones are easier to convert into a country house. Some people use the wooden version as a utility room, others as a summer kitchen, but many live in them for the entire summer season.
It’s easy to guess that wooden structures are warmer and weigh less than metal ones. Both outside and inside they are decorated with wooden lining. The dimensions and sizes of windows for both metal and wooden household structures are the same.
Moreover, craftsmen even build modular houses from these structures, connecting them to each other, removing partitions. If you think through the project, involve specialists or simply experienced people in the project, you can get a two-story structure with a terrace.
Special dacha structures can be wooden or metal. The inside can be finished with classic wooden lining or fiberboard, which is cheaper. If we talk about lining, then a change house finished with it will be more suitable for living. If you purchase a ready-made country house, then it will include a room, and even a toilet, shower, and utility unit.
There are different options for country cabins.
Shield ones. The cheapest houses are not designed for long-term use, but their owners often purchase them as a temporary shelter while the main house is being built. For the exterior finishing of such structures, lining is usually used; the inside walls are sheathed with fiberboard. The insulation is glass wool or polystyrene foam.
When you decide on the type and purchase your own cabin, ideas for its design will become relevant. After all, it is the arrangement, thoughtful interior, decor, and not just the interior and exterior decoration that turn the “box” into a country house.
ca2539423e0a0a615f7e077c24c914c3.jpe a41afe9b7af4c0a27b89ce7fe2852f64.jpeWhat is a veranda and what does it look like?
This name refers to a covered extension to a house (much less often to an apartment, mainly in the southern regions), which has a separate foundation and structures. It is believed that the name of the term comes from the Indian (Bengali) word baranda. The veranda can be open and glazed, usually not heated and does not have utilities. Ventilation is carried out naturally.
The addition of a veranda to the house is carried out either at the stage of construction of the building, or already during its operation. In both cases, the unity of style and materials should be maintained; the veranda designs should not increase the load on the building itself.
The peculiarity of the veranda is its separate foundation. Therefore, you can build/rebuild it at any time. Columnar bases are most often used. This is due to the relatively small load on the structure, because the veranda usually does not have bulky and heavy furniture or equipment, and the walls themselves (even when they exist) have significantly less weight.
Cabins with a veranda
It is very convenient if there is a clean covered area in front of the change house - a covered veranda. Here you can work or relax while it rains, here you can put a table for eating. It's really very convenient. So it’s better to plan everything at once and make the foundation for the veranda at the same time as the house. The veranda can be added later, but it will cost more. The foundation will be separate, unconnected, and you will have to think about how to connect the roof.
You can do even more - there is never too much space on the veranda
It is better to immediately consider the veranda along its entire length - from edge to edge on the south or east side. Even better is to make it in the shape of the letter “L”, covering two adjacent sides. Believe me, there is never too much space. By the way, part of the veranda can be sewn up, doors installed and used as a pantry/dressing room. The areas inside the cabin are quite small, so finding a place to store things is problematic. And this way you don’t waste space inside, and things/tools are accessible.
Part of the veranda can then be glazed and the kitchen can be moved here to create a dining room. This is exactly what happens over time. It’s really convenient, and as you settle into your dacha cabin, you’ll gradually enlarge, add, and complete it.
Playing with the square
Depending on the dimensions of the house itself, the dimensions of the veranda will differ. The internal content of any space will be dictated not only by its size, but also by the functional purpose for which it was built. The average dimensions of a comfortable veranda are 170 by 400 cm, but there are also small options, the length of which will be about two meters.
When there are unlimited possibilities for the construction of additional buildings, their size will depend on what is supposed to be done in the room
If the veranda is planned as a gathering place for family and friends, as a place for summer celebrations and cozy gatherings in the evening, then it is very important to build a room with sufficient dimensions. It should easily accommodate a table and a sofa, you can arrange a mini bar, and in some cases even provide a barbecue
Thus, the optimal area of such a room will be 25 m2, and the length of one wall should not be less than five meters.
When only a few people live in a country house and there is no need to make large additional rooms, the veranda can be made so that you can easily place a comfortable chair and a coffee table there, so that you can enjoy nature alone or in the company of one or two people. The dimensions of such a room can be half as large.
The area of the veranda also depends on the type of construction. If it is a rectangular room, then most often the length ranges from four to six meters, and the width from three to four. A square will have all its walls the same length. This option is rarely used across the entire width of the house; most often it is a side extension of small dimensions. For lovers of unusual shapes, you can build a veranda in the form of a semicircle or triangle.
If the plot of land on which the house stands has unusual dimensions and it is very difficult to build a veranda near the house, you can make this room in the form of a separate building that shares a common passage with the house. Usually it is made in the form of a glass corridor, but combined compositions can also be used. In this case, it is possible to create a large veranda of an original shape. It can be a circle or a polyhedron, and the distinguishing feature will be an almost complete overview of the area around it. The size of such a structure can be any, the main thing is to fit it harmoniously into the existing territory, so as not to spoil it and give you the opportunity to enjoy it every day.
Why do you need a change house at your dacha?
Agree, on an ideal summer cottage with flowering flower beds, a fountain gushing out of the ground, paths paved with natural stone, a chopped bathhouse, a dilapidated shed for equipment will look somewhat comical. Moreover, next to a solid cottage or a neat brick house. We make every effort to ensure that complete order and harmony reigns on the site. Therefore, today I propose to talk about how to build a change house at your dacha yourself.
A change house, or utility room, is a small house for storing various gardening utensils. And everything else that has no place in the house - children's toys, sun loungers, a folding bed, a change of clothes and shoes for country work. And also a lawn mower, fishing rods, a folding table for gatherings by the fire... You never know what all sorts of things we use at the dacha for work and relaxation! It is precisely these items that can be stored in the change house so as not to clutter up your own living space in the house.
Some craftsmen adapt a household building into a mini-garage, and also, during the cold season, install a rabbitry or poultry house in it, and place hives for wintering. In short, this simple structure has many options for functional use, it all depends on the specific needs of each individual owner. Regardless of what kind of activity you are developing on your site, the dacha cabin will become your reliable assistant.
The basis
It is important to correctly approach the issue of building dimensions, which depends on the tasks being performed. If you need a place where you can store equipment, you don’t need a large shed for this. When you plan to further transform it into a summer house, you should set the dimensions correctly.
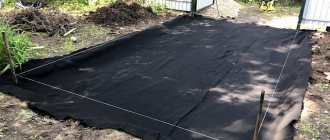
On the marked area, remove a layer of soil 20 centimeters thick. Remove rocks and cover the ground with a moisture-resistant material such as geotextile. Pour and compact sand in a layer of about 10 centimeters.
- We buy and install an air conditioner
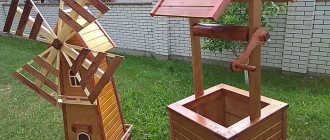
- Do-it-yourself windmill - the best ideas and instructions for building decorative windmills in the garden and on the site (105 photos)
- Do-it-yourself walk-behind tractor - how to make a simple and reliable homemade walk-behind tractor for farming (105 photos)
Cinder blocks need to be installed symmetrically, occupying the perimeter. Of course, their number depends on the selected sizes, but the optimal distance remains 90 centimeters. Next, add another layer of sand and level the cinder blocks.
Inexpensive turnkey summer cottages with on-site assembly
Not every summer resident can independently make a change house on the site. As a rule, there is simply not enough time. The best option is to contact a specialized company that will help you choose a high-quality cabin. To make it convenient for you, manufacturers have come up with websites where you can view products and get acquainted with their characteristics.
Companies offer services in which the cabins are assembled and delivered to the site. Sometimes the price includes transportation and installation services. A lot of people take advantage of popular discounts on cabins during the warm season.
So, for a small country house 3 by 2.3 meters you will have to pay about 30 thousand rubles. If you order a structure 6 by 2.3 meters, you will have to spend 48 thousand rubles. For a change house made of timber, you need to allocate 81 thousand rubles - the minimum. The most expensive is considered to be a change house with a porch, with all the amenities - approximately 200 thousand rubles.
A simple do-it-yourself change house on the site:
https://youtube.com/watch?v=2v89QS2xSQw
Do-it-yourself outbuildings, cabins and country houses
As a rule, people order non-standard cabins. They are delivered to the site disassembled. Assembling the structure with your own hands is real. Suppliers themselves are happy that you will free them from work. Do-it-yourself assembly is chosen when it is impossible to bring the structure onto the site in one piece.
As a rule, if you order the installation of a change house from specialists, the work lasts about three days and its cost is up to 25 percent of the cost of the change house itself. However, you need to assemble the structure yourself only when you have the skills of a builder or at least self-confidence.
Country houses made of containers, photos of layout and appearance:
Photos of outbuildings or summer cottages made from containers
Residential cabins for the dachaFull-grade residential cabins with insulated walls for the dacha
Interior of a container house Do-it-yourself cabin made from a metal container
So, a two-room change house in a country house can be a full-fledged home. In order for everything to be exactly like this, you need to correctly decide on the layout in order to eliminate heat loss and make it comfortable to stay in the toilet or shower at the dacha. You can save money on purchasing a cabin only if you choose an ergonomic design that will be convenient for all members of your family (if you live permanently in the cabin). In addition, money is saved on self-assembly of the structure.
Country house with a terrace: should the two buildings be connected?
Immediately after the construction of a house, natural processes occur that lead to the building sagging. The amount of shrinkage gradually becomes smaller and soon stops. Since the house and the terrace have different weights, the amount and rate of shrinkage will be different. If they are tightly coupled, this will lead to the destruction of one of the buildings.
Typically, a one-story house with a terrace is built on separate foundations. Moreover, the depth and strength of the foundation for them can differ significantly. How to choose the right foundation, read this article https://domdir.ru/kakoi-fundament-vybrat/. To make the structures look like a single whole, they are held together using dilatation sutures. This way it is possible to achieve a free displacement of the terrace relative to the dacha.
Variations in designs of cabins for summer cottages
In principle, as in any matter, with regard to the construction of a change house there are two ways. Buy a ready-made industrial version or go hand-made and build the building yourself. First, let's look at what types of summer cottages the industry offers us.
1. Panel room
The simplest, “budget” option. As a rule, disposable. The rather presentable appearance is deceptive, since due to the lack of special stiffening ribs, the building can become deformed and even collapse like a house of cards.
The fact is that panel technology involves the construction of a frame from thin wooden beams, and the outer cladding from clapboard. The interior is covered with chipboard, and the roof is covered with low-density iron sheets. As a rule, a panel shed cannot withstand gusts of wind and frost; it is better to use this option in the summer - for example, for cooking or as a utility unit.
2. Frame
This is a more reliable, but financially expensive option. Advantages - the use of deformation-resistant wooden beams, visual appeal. Disadvantages - using mineral wool for insulation dries out the air inside the house. Also, due to the dense layer of vapor barrier, the useful area of the change house is reduced.
3. Brusovaya
Luxury offer. It differs from its relatives in its high price. But this is understandable, since massive logs are used for construction.
6105e34b706444d2b267476d520582d5.jpeA log cabin is a capital structure designed for more than one year of operation. It makes sense to spend money on its construction once in order to solve several dacha problems at once for a long time. In addition to the function of storing equipment, such a nice wooden house can serve as a bathhouse. Only in this case should you worry about all internal communications in advance (for example, about partitions, installing a stove or water heater).
4. Container
A completely acceptable type of country house that can organically fit into any design style of the site. The frame is made of a metal channel, and the side walls are made of panels of a modern material called sandwich in English. The advantages of the container model are reliability, durability, and the ability to retain heat inside.
Construction of a foundation for a summer house
When veranda projects are being drawn up, it is necessary to decide what foundation for construction will need to be laid.
And this will depend on how the future wooden or metal extension (including summer) will be used.
For projects as a solid building, it is better to make the foundation as similar as possible to the foundation in the main house.
In other cases, such as in a shed or when the design calls for it to be used as an outdoor kitchen, a simple columnar foundation is ideal.
When choosing the first option, there is always a big risk that over time the foundation of the veranda will tear away from the main house.
In the photo below you can see the mistakes made during the construction of the veranda.
Unequal operating conditions, different weight categories of buildings, heaving soils - all this leads to unequal shrinkage of buildings, accordingly, the integrity of the walls (photo) and foundation are compromised, the overall design is deteriorated, and in the photo such a dacha looks like a mutilated private house.
Trying to avoid all these troubles, summer residents, most often, try to do separate construction, in which a columnar foundation will be an ideal option.
It is not difficult to build a columnar foundation.
It is only important to follow the technology and all stages of work:
- Dig meter-long holes for posts;
- At the bottom of each, form air cushions from sand or pour a layer of crushed stone. Bitumen is poured. This is how waterproofing is carried out;
- Concrete base is poured into the pits. It should be within 15 cm;
- Next comes the laying of brick pillars. The factor determining the height of the pillars is the floor level, but not on the terrace, but in the house. It should be 30 cm above the floor of the veranda. This will help blend both roofs smoothly.
Video:
The number of pillars depends on the number of corner posts of the veranda base. If you follow all the technology, laying a solid foundation will not be a problem.
Finishing work
Once the roof is ready, windows and doors can be installed.
Next comes the turn of the floor. It will be double layered. The first, as builders call it, rough, is made from boards, laying them tightly parallel to each other.
The boards must be treated with a special antiseptic that will protect the wood from pests and extend the life of the flooring. Lay a film over the boards, attaching it with a construction stapler.
Then a layer of waterproofing - mineral wool - is laid.
On top is another layer of film.
And then again the boards. This is already a finished floor.
The boards for it must be clean and dry. Because the floor will be varnished or painted on top.
The external cladding of the cabin follows a similar principle. The walls are covered with film to insulate from the cold.
It is recommended to carefully seal all joints with tape. You can sheathe the outside of the walls with siding, composite panels, wooden boards, or plastic imitation. This, as they say, is a matter of taste.
To make the country house look as presentable as possible, craftsmen advise using such practical material as a block house. This is a planed board in the form of segments of polished timber. It looks very nice, perfect for a major household space.
The final stage is interior finishing work. You can’t do without electrical wiring here; you can install a water supply system inside and install a sewer system. Ventilation and heating – for those who want to add as much comfort as possible.
After completing the renovation, you will decide how you will use the change house in the future. Will it be just a utility warehouse or a cozy house.
Do-it-yourself change house for a dacha with a veranda: manufacturing
All temporary structures, without exception, both wooden and metal, are made using frame technology, and their base is the most problematic part. At least, it may seem so at first glance - in fact, building the frame of a country house is not so difficult. And this process can be represented in the form of the following sequence of actions.
- To begin with, a columnar foundation is made - holes are dug at key points of the structure and filled with concrete. Brick columns are built on this concrete. The only nuance here is the single horizontal plane of the upper part of all supports.
- The second stage is to assemble the bottom of the cabin on this foundation - a rectangle is knocked together or screwed together from boards, the space inside of which is reinforced with crossbars, which, among other things, will serve as floor joists. Upon completion of assembly, the floor is immediately laid - it is better to use OSB sheets with a thickness of 20-25 mm.
- Next are the walls. The manufacturing principle is the same as for the floor - first the frames are twisted according to the size of the house, and then they are installed on the bases and attached to it and to each other. The internal jumpers in them are located according to the width of the OSB sheets - that is, with a pitch of 62.5 mm in the center. As for the material, it is better to use an edged board with a width of at least 50mm - if the winters are cold and you plan to live in such a temporary shed, then 100mm.
- Next is the roof. The simplest option is a single-slope structure. We lay the rafters, cover them with waterproofing film, fill the sheathing and sew roofing material to it.
And the entire process of building a summer cottage with a veranda is completed by external and internal cladding with insulation. Basically, inside the frame you will need to place a layer cake made from various building materials. Mineral wool is placed inside the frame; outside and inside it is covered with a vapor barrier film installed in the direction of removing moisture to the outside. OSB is sewn from the inside (immediately on top of the vapor barrier). Outside, you need to make a ventilation gap, that is, fill the racks with a beam with a cross-section of 20 mm and only screw the OSB onto it. Then the temporary shed can be sheathed on the outside with clapboard, and on the inside either, again, with clapboard, or with plaster and wallpaper. Both the roof and the floor are insulated in the same way, which we forgot to write about above.
And to conclude the topic about how a country house with a veranda is arranged, I will say a few words about metal buildings of this type. The principle of their manufacture is exactly the same, with the exception of the materials used; the frame in such temporary huts is made from a profile pipe - that’s it. And secondly, the outer cladding of the building is made of profiled metal. In principle, everything except for the power supply - wiring is installed to the internal lining of the building. At the same stage of work, water supply lines are also laid if you provide a kitchen and shower in the change house. By the way, this is another advantage of making such buildings yourself - you have the chance to make temporary housing, taking into account all your requirements and the wishes of your loved ones.
Ceiling and roof
A change house is a small structure that can be rationally covered with a pitched roof. It is easy to manufacture and economical in terms of material consumption.
To create a slope, one of the long walls needs to be made higher to provide a slope for water drainage. This is usually the front façade. To create the required drop, you can immediately make the front pillars longer when installing the frame, or attach a wooden panel of the required height to a ready-made box.
The elevation angle is determined by the type of roofing material and must be no less than:
- 3-5° - for rolled roofing, folded metal sheets;
- 7° - fiber-cement sheets, corrugated sheets;
- 12° - metal, ceramic or bitumen tiles.
The footpiles are laid on the mauerlat - the supporting beam of the strapping, secured with corners, overlays, and staples.
A sheathing of 25 mm thick boards is mounted on top of the rafters or a continuous flooring of OSB boards is laid on which a soft roof can be laid.
Arrangement of the change house inside
A very important point is how to decorate the inside of the change house. I want it to be beautiful, practical and inexpensive. It’s worth saying right away that finding a suitable option is difficult. Some of the requirements usually have to be neglected. The options are:
- Upholster the inside with boards or clapboards.
Beautiful and practical, but, alas, not cheap. Interior design of a cabin - there is no better material than wood - Cover it with sheet material and cover it with wallpaper. Cheap and beautiful (maybe), but impractical. Wallpaper gets dirty quickly and has to be re-pasted frequently. And let’s say right away that in a change house, even with the most severe savings, do not use fiberboard as cladding. It’s unlikely that your change house is constantly heated, but moisture causes the fiberboard to move in waves, and the material never takes its original shape. It’s better to use moisture-resistant plywood, even if it’s not of the best quality. Its defects can be repaired with putty - nothing will be visible under the wallpaper. Another option is moisture-resistant drywall or gypsum board.
Other finishing options for country or garden cabins are almost never used.
Sheathing and insulation of cabin walls
If polystyrene foam is used as insulation, no additional waterproofing is required. The material is not afraid of moisture and is practically waterproof. Mineral wool is more capricious because it has greater water absorption. In heated rooms, it must be protected from steam humidification using a vapor barrier, and waterproofing must be installed on the outside.
The thickness of polystyrene foam for winter use of the room must be at least 100 mm. To avoid the appearance of cold bridges and local freezing, it is recommended to lay 2 layers of insulation of 50 mm each with joints spaced apart.
Before covering and insulating, you need to install window and door frames, and additionally strengthen the openings with another row of boards.
To lay insulation, one of the skins - external or internal - must already be ready. The heat insulator is inserted into the grooves between the racks, the cracks are foamed, and covered with the top skin.
Country house with a veranda: design and capabilities
A modern country house is not just a toolbox with the ability to install a table and several chairs in it, it is a full-fledged residential complex, which, in addition to living space (sometimes several), includes such compartments as a shower room, a small kitchen and an entrance hall. If we talk specifically about a change house with a veranda, then it has even more possibilities - as a rule, the kitchen is moved out onto the veranda, and another sleeping compartment is added instead. I will say more - there are even two-room country houses, which in essence are a small country house. By and large, you can even use such a temporary shelter on an ongoing basis.
893d80ddceee6a4ae48d3df886e73b9e.jpe 9a7a7ea72561d0db523d7f1ab108a36e.jpe 2bd39ccea78f5f9bfe633fa2f22d3799.jpe
If we consider other design features of country houses of this type, then we can distinguish several of their varieties - stationary buildings and mobile ones, that is, mobile ones. The latest temporary shelters are made on a car platform and are nothing more than a trailer for a car - it is quite easy to transport it from place to place. It is much easier to sell such a temporary shed - so if you do not intend to use the summer cottage permanently, then this type of such structure should be given preference. Yes, it is more expensive and yes, it may not have enough space for all family members, but this option for temporary housing can be easily moved around a summer cottage, freeing up the necessary space for construction or arrangement of a suburban area. You can see one of the options for country cabins with a veranda in this video.
https://youtube.com/watch?v=qCBTFAfr94U
Documents for the construction of a veranda (permission)
Adding a veranda refers to the remodeling of a house. Therefore, it requires obtaining permits.
To obtain permission to build a veranda (for an extension, reconstruction), you need to submit to the architecture department:
- a document confirming the ownership of the site;
- house project with a veranda;
- consent of all residents registered in the house;
- application for registration.
Note. You need to start processing documents 2-3 months before the planned construction work. According to user reviews, this procedure takes quite a lot of time.
In principle, it is possible to complete a veranda without documents, but when selling, renting or inheriting, problems may arise with this property. The veranda is included in the total area of the residential building; the BTI may regard this as an “Unauthorized increase in living space.” Especially if the veranda is heated (warm veranda).
When building a veranda, you should not deviate from the dimensions specified in the registered project. Any adjustment will entail a change in the project documentation and the payment of a fine. The consequences of unauthorized construction are spelled out in the Law of the Russian Federation “On Architectural Activities in the Russian Federation” and the Civil Code, an excerpt from which is given below.
Excerpt from the Law “On Architectural Activities in the Russian Federation”
The consequences for unauthorized construction are listed below
What will happen to the unauthorized construction of a veranda - an extract from the law
The last thing that will need to be done after the construction of the veranda is to legalize the construction with changes and obtain new documents.
Materials
Although there are many building materials on the market, only the lightest, most practical and inexpensive ones are used in the construction of cabins. Many people initially consider dacha cabins as a temporary option - plans are underway to build a house. But the structure often “grows” so firmly that it is either made into a guest house, or a summer kitchen, or used in some other way. So, even if you decide that this is only a temporary option, choose materials and sizes based on greater convenience.
The dacha cabin is the first to appear on the site
Wood
Most often, cabins in our country are built from wood. They are not so cold in winter, and not so hot in summer. Wooden buildings naturally maintain the required level of humidity. That’s why we feel more comfortable in wooden cabins.
The advantage of wooden cabins is their low weight. Such structures even stand on truck tires or building blocks stacked on top of each other. And they feel fine. In general, a wooden country house with a toilet and shower is a good option.
A wooden country house with a toilet and shower is the most common option
But in order for the structure to look normal, the wood requires regular maintenance. It is necessary to renew the protective and decorative coating. What it will be - paint, varnish, wood oil - is up to you, but you need to renew the coating. Frequency: once a year, once every two to three years. It depends on the type of coverage. Oils are usually renewed every two to three years, paint and varnish - once a year or two. Such a need is far from pleasing. Firstly, the cost of varnish/paint, and secondly, the time required to remove the old coating and apply a new one (there is no need to remove oils, in this case the coating is simply renewed).
A significant disadvantage of wood is its fire hazard. And it’s difficult to fight this. Of course, before construction, the material is impregnated with fire retardants, but if it burns, then even this will not save.
Metal
Metal cabins are fireproof, but living in them is uncomfortable. Firstly, you need a ventilation system. It is not always possible to ventilate the cabin by opening the doors and windows. Therefore, you need to take care of ventilation. It’s not difficult to do it in such a small building, but it does involve additional hassle and expense.
Metal two-room country house with shower and toilet
In addition, as the temperature drops, it becomes very cold in a metal cabin, and it is difficult to heat it - the metal quickly releases heat into the space. But in summer it is too hot in such a building. The sun is heating up the surface and the stuffiness is incredible. Even if it's not hot outside yet. You can partially save the situation by pulling an awning, but this solution will only help partially. The sun will still warm it, albeit to a lesser extent.
Another disadvantage of such cabins for a summer residence is their large mass. You can’t put it on cinder blocks - you need a more solid base that can withstand the weight of metal and the furnishings inside. In addition, it also needs to be painted. Because without paint, metal rusts, and because appearance is also important.
Other options
Wood and metal are far from the only materials from which you can make a summer cottage. Instances made from other materials are rarely found on sale, but you can build them with your own hands in a few days. If you have experience, this will not be difficult for you, but if you don’t have experience, this will be it. A good workout that will come in handy in the future. If you are not going to build a house with your own hands, then you will have to install a gazebo on the site, or make a bench, a children’s corner or something else. And the builders will have to fix the mistakes themselves. So building a shed yourself is a good start.
So, here’s what else you can use to make a change house for your dacha:
- Build using frame technology. The racks can be metal or wood, the covering is moisture-resistant sheet material (OSB, moisture-resistant plywood). The insulation is usually mineral wool, but can be polystyrene foam.
- Sandwich panels. This material is very convenient for the construction of insulated outbuildings. The walls are immediately insulated and finished. The downside is that there are two layers of metal with insulation inside.
Prefabricated structures are made from these materials. Living in a frame structure will be more comfortable. If you plan to use the change house on a long-term basis, then this is the best option. If, after the construction of the house, the change house is reclassified as a utility room, your choice is sandwich panels.
Location Tips
Theoretically, a veranda can be placed on any side of the building. But most often it is placed on the main facade, near the front door. When constructing a building from the end, it is necessary to think in advance about the entrance to the veranda from the adjacent room. Additionally, the aesthetic parameters of the structure and its perception are taken into account so that everything looks natural.
The southern veranda will be flooded with sun and warmed up. At the same time, optimal shade will be created under the roof and protection from rain and other precipitation will be provided. You will be able to relax and warm up as much as possible in the summer months. In Russia, it is the southern location of verandas and terraces that is most justified. This is where they will be the warmest and brightest, regardless of the time of year.
Some people prefer a pleasant evening out. In this case, the western orientation of the veranda is preferable. Then, towards the end of the day, it will be flooded with light and well warmed. But it is necessary to install fences to block the westerly winds. Such protection is especially important in spring and autumn, when the wind is very cold.
According to a number of experts, the eastern junction of the veranda is an ideal option if there are no other wishes. It is very pleasant to greet you there every morning. There is also enough sun and warmth even at the beginning of March or after the end of leaf fall. At the same time, even when the hot summer comes, it is not too hot on the eastern terraces. This is the solution most architects and designers offer.
Occasionally verandas and terraces are oriented to the north. This approach is justified if the room opens onto a large, well-lit garden. It is recommended to place the recreation area in the shade or illuminate it with diffused light. Since severe light eye fatigue is almost eliminated, you can easily:
- use space for children's games;
- paint;
- read;
- write.
The main stages of the construction of cabins
Before starting the construction of a cabin with a shower and toilet, specialists level the construction site. The turf part of the soil is removed. Then the necessary communication is supplied.
A hole is made along the perimeter of the building with dimensions of 50 centimeters by 70 centimeters. Sand is added to the bottom of the pit. Formwork is made from boards, which is subsequently filled with concrete.
Reinforcement is placed in the center of the recess. Waterproofing is carried out. The beams are laid around the perimeter. Then comes the laying in the center. Then the logs are laid, corner and intermediate support posts are installed.
The rafters are mounted on wooden posts and the roof sheathing is carried out. The roof covering is fixed, windows and doors are installed. Next, the building is sheathed from the inside.
As for the interior finishing, it is done after the building has been insulated. Waterproofing is being carried out, mineral wool is being laid. Then the floor, walls and ceiling are finished. The design is selected taking into account the individual preferences of the client. A well-built shed is an excellent help in the household. In such a structure you can store a large number of things, freeing up your country house.