In the modern world there is not a person who does not buy drinks in plastic bottles. What can we say about parents, who often have to purchase large quantities of water or other drinks for their children. We drink drinks, but most often we dispose of bottles as garbage. What if you don’t throw them away, but make amazing things out of them? From plastic bottles you can make original, individual and interesting crafts for kindergarten, for home, for the garden. Believe me, it will be interesting and educational not only for children, but also for yourself. We offer several ideas on how to use plastic bottles for creativity.
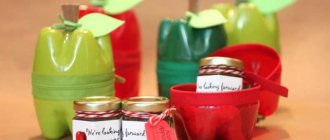
Apples from plastic bottles
In order to make one apple, we need two bottles, you can use colored ones, or you can paste over or paint light ones. Cut off the bottom of the wallpaper and insert it into each other. To make it easier to insert one, you need to make cuts.
To paint bottles, it is better to choose acrylic paints; they apply easily and dry quickly. You can put pebbles, shells, and paper torn into small pieces inside the apples.
Cut a leaf either from a bottle or take real ones or from paper. The twig can be made from a tube or also cut from a bottle.
Crafts for children
Children love to use simple materials at hand for creativity. This is very convenient: you don’t mind spoiling it if it doesn’t work out. You can make many interesting options for toys.
Furniture made from plastic bottles
Houses and furniture for dolls can be made from bottles. In order to make a chair for dolls, you need to cut off the top of the bottle. Use the bottom as the base of the chair, and cut the back and armrests from the cylinder.
You can cut out the openwork back and the girls will be happy with beautiful furniture for their dolls. We insert a chair cushion into the bottom of the bottle; the back can be covered with fabric.
In order to make a table for dolls, just cut off the bottom of a five-liter bottle and attach it to the neck. A beautiful tablecloth will decorate a doll's table.
You can use large bottles or plastic canisters to make doll rooms. To do this, just cut out windows and doors in the wall of the bottle. The young assistant can hang the curtains and paint the walls in the house herself.
You can make a stroller for a doll from a five-liter bottle or canister. Having placed the bottle horizontally, you need to cut out the shape of a stroller from it. Bottle caps can be used for stroller wheels.
Toys for boys
For boys you can make a helicopter, robots and cars.
For the helicopter you need to prepare cocktail straws and a tennis ball:
- Cut off the bottom of the bottle.
- We make a helicopter turntable from two straight parts of tubes.
- We connect it with the cut part of the bottle, placing it horizontally.
- The hole is covered with a ball.
- We make a helicopter support from two tubes: we cut off a strip from the unnecessary part of the bottle and connect the two helicopter supports with it.
- We attach the helicopter frame to the base using a heat gun.
To make robots, you can use not only bottles, but also caps, after first piercing them with a hot awl or nail, and then stringing them on wire.
Dad can always help his child make a whole fleet of different machines, from various bottles and cans. Bottle caps can be used as wheels for cars.
For children's crafts, the edges of the cut bottles must be slightly melted so that the child does not get hurt by the sharp cut. Bottles are used only for food products so that they are safe for the child.
Stand for pencils and pens made from a plastic bottle
Everything here is as simple as your imagination allows. You can color this stand however you like. You can also decorate with anything you can get your hands on: threads, shells, pebbles, buttons, cut out figures from paper or felt.
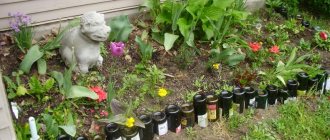
What can be done for a dacha - master class
There are a lot of different crafts for the garden. Here I would like to give examples of furniture making. One of the options - an ottoman - has already been considered. If you have a lot of bottles and you don’t know what to do with them, and you don’t want to make toys, try designing chairs or sofas.
First, the seat itself is made. We choose a size, for example, 6 bottles wide, 15 bottles long. Just as in the description of making an ottoman, we first connect the bottles in a row, and then fasten the rows together. Then we make the back and side walls. The only thing is if you take only one bottle for the seat. The sofa will turn out to be low. Therefore, you need to take two bottles, inserting one into the other or three. Everything, again, depends on the size you make.
How to cut and join bottles for this purpose is shown in the figure below.
The simplest piece of furniture you can make is a chair. If you still have a metal chair frame, and the seat and back have fallen apart, then do not rush to throw away the frame. The back and seat can be replaced with plastic bottles. According to the size of the chair, we fasten the bottles together and attach them to the appropriate places on the chair.
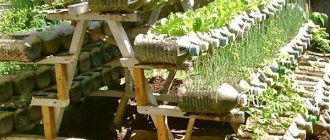
In addition to furniture, you can also build a greenhouse on your summer cottage. Naturally, you can’t do without additional materials, but the main thing here will still be bottles.
It all starts with the construction of the frame of the future greenhouse. Wooden blocks are used for this. Having built the frame, we proceed to covering it. In the standard version, it is either polyethylene or glass. But we will have plastic bottles. We prepare metal pins for the height of the greenhouse; thin plastic pipes are also suitable. The main thing is that their diameter should be smaller than the diameter of the bottle neck.
We cut a hole in the bottom, you can even cut off the bottom altogether. The bottles cut in this way are strung on pipes or pins, whatever you have. The necks should be directed in one direction. We attach the greenhouse wall elements prepared in this way to the frame in any way: with bolts or other fasteners. Having attached the first row, we move on to the second. We install it so that it is pressed very tightly to the first one. There should be no free space between the bottles. Having finished with the walls, we form the roof in the same way.
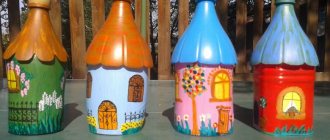
Using this technology you can build a house.
Of course, you can’t live in such a house in winter, but as a summer cottage it would be quite acceptable.
Plastic frog
We will need:
- 2 bottles;
- stationery knife;
- acrylic paints;
- brushes;
- felt-tip pen or marker.
How to do:
- Clean and wash bottles
- We cut off their bottom at a distance of about 7-10 cm
- We insert into each other.
- Cut out the remaining parts of the foot. To do this, you first need to draw their layout.
- We sew the paws with thread, this is the most reliable way
- We color our frog with paints and use a marker to draw eyes and a mouth.
Let's start with preparation
To create animals with your own hands, you first need to prepare all the necessary materials and tools. Below is a selection of the most commonly used materials. However, in accordance with the chosen animal, items on this list may disappear or be added:
- Plastic bottles, possible volumes: 0.5 l, 1.5 l, 2 l, 5 l and 6 l;
- Scissors;
- Knife;
- Paint and varnish;
- Wire;
- Bandages;
- Putty;
- Glue;
- Decorative details: buttons, beads and so on.
It is possible to create any animal you like: a hare, a bear, a frog, a swan, and so on. Whatever animal you choose, the craft will turn out to be unusual and cute, and will also be perfect for the garden.
The methods for creating an animal's body are practically the same among different animals. And the methods for creating wings, ears and tails force you to demonstrate ingenuity; they can be done either from memory or from a textbook with descriptions of animals, depending on the complexity of the animal you have chosen.
We select the volume of bottles based on the desired size of the finished animal. For large products we take five and six liter bottles, and for small ones up to two liters.
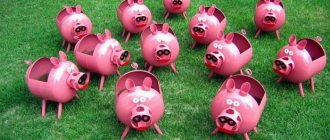
Piglet made from plastic bottles
We will need:
- plastic bottle 1 pc.;
- scissors;
- glue;
- marker;
- acrylic paint.
How to do:
- We paint the bottle pink.
- Cut out ears from cardboard.
- We glue them to our bottle.
- Cut out 4 rectangles from cardboard and roll them into a cylinder, glue them together
- Glue the cylinders to the bottle - these are the legs
- We cut out the tail and glue it.
- Using a marker, draw heels and eyes.
Cute pig
In order to make a cute pig, you will need to prepare:
- Five liter plastic bottles;
- Acrylic paint;
- Varnish;
- Scissors;
- Dish sponge;
- Marker.
Related article: How to sew a bag with a flap from fabric with your own hands: pattern with description
First, we take the bottle and remove all unnecessary parts from it, such as rims and handles.
Now we mark with a marker and cut out an oblong hole almost from the bottom to the throat, and above it on the back side, we make another wider hole. From scraps we make ears and a tail for a piglet.
Now you need to paint our animal in any color you like. We paint in two or three layers, and when the paint dries, it is necessary to varnish the product. Such a pig can be very useful in the garden and can be used as a flowerbed for growing flowers.
Ladybugs made from plastic bottles
You will need:
- Plastic bottles;
- Scissors;
- Marker;
- Beads for the head;
- Ready-made eyes;
- Glue;
- Acrylic paints.
How to do:
- Cut off the bottom of the bottle.
- Coloring our ladybugs
- Glue on the antennae and eyes.
Making a hare
Making such a hare is very easy and quick. To work you will need:
- Five liter bottle;
- One and a half or two liter bottle;
- Marker;
- Scissors;
- Master Class.
First, draw bunny ears on a smaller bottle and cut them out along the intended contour. At the bottom of the ears you need to leave a small piece of plastic for future attachment to the animal’s head. Now we cut holes at the top of the large bottle, where the ears will be inserted later.
It's time to start painting. First, we take a large bottle and paint it like a bunny. The body is gray with a white belly, paws, black eyes, mouth and so on. Now we paint the ears separately. We make the outline white or gray, and paint the rest of it pink.
When all the pieces are dry, all that remains is to connect them. To prevent the bunny from being blown away by gusts of wind, we pour water into it or fill it with sand.
New Year's crafts from plastic bottles
From plastic crafts you can make Christmas trees, snowmen, Christmas tree decorations, snowflakes and much more. Watch and be inspired!
Create an elephant
To make a wonderful baby elephant, you will need the following materials and tools:
- Six liter bottles - two pieces;
- Two liter bottles - six pieces;
- Corrugated tube of small diameter, half a meter long;
- Thick wire 55 centimeters long;
- Sand;
- Glue;
- Scissors.
Related article: Crocheted rug: cord product for the bathroom with photos and videos
First, take four two-liter bottles and cut them in half crosswise. The underside will become the legs of the future baby elephant. Now we take a six-liter bottle and make ears out of it, after which we take a second six-liter bottle and make holes in it to fix the ears. After this, we take the wire and bend it, giving it the shape of an elephant’s trunk, and put a corrugated tube on top of it.
The time has come to paint all the blanks; you can use natural gray, or any other color you wish. When the paint dries, you can assemble the baby elephant.
We take the parts of the legs and fill them with sand, after which we glue them to the body of the animal. The trunk must be fixed to the neck of a six-liter bottle used as a body. Now we insert and fix the elephant ears in specially made holes. All that remains is to take paints and draw the elephant’s eyes and mouth.
Now the cute and funny baby elephant is finished.
Original DIY crafts
A detailed master class will show you how to decorate a room and garden with beautiful, graceful butterflies.
Required materials for figures
For the craft you will need:
Note!
Crafts for February 23: master class on creating interesting DIY crafts for Defender of the Fatherland Day
DIY crafts for February 14th step by step: a master class for beginners, with a description of how to make a craft for St. Valentine's Day. Valentina (140 photos)
Crafts made from jute: 100 photos of beautiful options. Easy instructions with photos and descriptions on how to make a craft with your own hands
- PET containers;
- Scissors;
- Stencil;
- Marker, gel pens, felt-tip pens;
- Paints, nail polish;
- Glue gun;
- Decor.
Master class with step-by-step description
- Step 1. Wash the bottles thoroughly, remove the labels, and dry. Prepare tools, clear a workplace with good lighting.
- Step 2. Transfer the stencil to the container.
- Step 3. Cut out the template along the contour. Draw a pattern of wings and veins from the inside of the bottle.
- Step 4. Repeat the contours with varnish, paint over individual elements.
- Step 5. Decorating the product. Decorate the butterfly with rhinestones, beads, and sequins.
- Step 6. They can be hung on a thread by making a hole in the craft, glued to a magnet and installed on the refrigerator, used as a separate decoration for hairpins, vases, and holiday decorations.
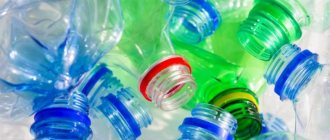
Where to put bottle caps
Along with a large amount of plastic, there remain many caps that can be used in children's creativity for various board games. Thematic pictures for counting material, appliqués, beads, bracelets and garlands will allow children to quickly master the skills of working with various tools, develop fine motor skills, and promote the development of imagination.
Original shades for lamps, color elements are obtained by ordinary cutting. It is enough to cut off the top of the bottle with smooth or carved edges. Paint it in the desired color and attach it to the lampshade or stem. For finishing, twine is used, which is wound in layers that fit tightly one to one, onto a glued base. Beads, ribbons, and buttons are used as decoration.
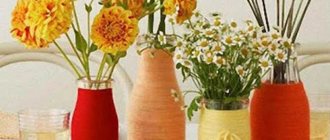
Making flowers
On the website you can find instructions on how to make a craft from a bottle step by step. The resulting chamomile flowers are original and easy to make, which can be installed in the garden or at home. Using this technology, you can make various flowers and collect them into elegant bouquets. This is the simplest manufacturing option that elementary school students can handle.
How to collect an inflorescence
For the craft you will need:
- White plastic bottles. Or ordinary ones, which are then painted;
- Stationery knife;
- Paints;
- Scissors.
- Step 1. Cut off the top of the bottle. The height with the neck, multiplied by two, is equal to the diameter of the future flower. You decide what size flowers to cut yourself.
- Step 2. Cut part of the bottle into 8 petals, forming edges, smooth or rounded. Make three blanks according to this pattern. Leave one with a neck, carefully cut out the middle of the rest. Paint it white.
- Step 3. Bend each petal outward to the same level. Do this with all the blanks.
- Step 4: Connect the three pieces together. Place the rest on the bottom one with the neck and secure with a lid. Spread the petals so that they are evenly distributed in a circle, forming a lush daisy. The flower head is ready. It can be attached as a separate element or installed on a leg or collected into a bouquet.
Cornflowers, chrysanthemums, and carnations are made using this principle.