Flowerpots from bottles
As you have probably already seen, flowerpots for the garden and home can be made from any material at hand, be it building material left over after renovation or old household utensils. Plastic products are also ideally suited for this purpose, because ordinary plastic bottles are something that every summer resident always has in abundance, so in this case you won’t have to purchase anything special.
Options for making flowerpots from bottles
From glass
To create flowerpots, you can use both plastic and glass bottles, however, in this article we will mainly consider options for plastic flowerpots, since due to their strength and sufficient durability, they are most suitable for a garden or summer cottage. Glass is a very beautiful, but rather fragile material, so it is better to use flowerpots made from it as indoor ones and place them in the house.
However, let's see what can be done from glass bottles.
The bottles in this case are simply painted and decorated with lace
If you cut off the neck, you get a completely different version
Photo source: www.pinterest.com
The photo below shows several options for creating original flowerpots. Anastasia is the creator of these amazing works and inspires new ideas
These flowerpots are made from liter bottles
Finished with matt lacquer
A couple more interesting works:
Photo source: www.stranamasterov.ru
Made of plastic
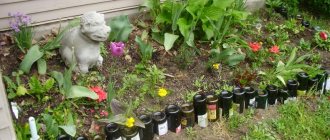
We decorate the flowerbed with plastic bottles with our own hands
How to decorate a flowerbed? The most basic way to design a flower garden is to fence the area for planting. Bottles dug into the ground can not only become a beautiful decoration, but will also prevent soil from washing out.
The container can be used in its original form or painted. Bright enamel will help in implementing any idea. Surely everyone has seen that the bottom of the bottle has the shape of a flower; if you fill it with acrylic paint, you will get a daisy.
To make the flowerbed last longer, pour water or sand into the bottle. You need to dig in the container with the neck down.
If the container is filled with water, the rays of the sun will sparkle with shiny bunnies. A plain or multi-colored border is up to you to decorate the entire garden plot in any case.
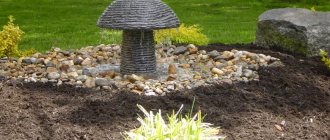
Deep flowerpot made of horizontally stacked bottles
As a basis, you will need to take a rigid support: a polycarbonate sheet, a barrel without a bottom, or a large tire.
Manufacturing procedure:
- prepare a solution of sand and cement in a 2:1 ratio, rinse the bottles and fill them with sand;
- Place a layer of cement along the inner edge of the form;
- lay the bottles using the resulting solution, place the second and subsequent rows in a checkerboard pattern;
- Place drainage at the bottom, after which you can fill the top with fertile soil. Decorate the outside of the finished flowerpot with pine cones, shells or moss.
Photo source: www.101dizain.ru/ozelenenie/cvetnik/klumby-iz-plastikovyx-butylok
Arrangement of linear borders
The simplest way to make flower beds from glass and plastic bottles is to install a linear border. For such a purpose, it is necessary to prepare a shallow trench along the garden path, along the perimeter of the ridge or around the circumference of the alpine hill.
The containers are washed thoroughly; for sufficient fixation, you can partially fill them with sand or soil. The bottles are placed in the prepared rut with their necks down and secured with earth and sand. Before installation, the surface of the future fence can be painted in any chosen color.
Advantages of plastic products
- availability of material;
- bottles are suitable for creating fences, you can plant a variety of seedlings in them, and they can easily be used to decorate an area;
- the created fence helps retain moisture in the soil, so it does not dry out;
- reusable use of such products indirectly protects the ecological environment;
- plastic does not require special preparation before planting. Such products are very easy to process; manufacturing does not require special skills or special tools; they are also easy to modify and correct if necessary.
Flowerpot in the shape of a cat's face
Necessary materials:
- bottles (their number depends on how many flowerpots you want to make);
- marker;
- dye;
- stationery knife, awl;
- prepared template.
Stages of work:
1. to make your work easier, prepare a template for yourself: draw and cut out ears on a thick sheet of cardboard;
2. cut the bottle in half (only the bottom part will be used);
3. glue a cardboard template to the cut part of the bottle;
4. Cover the workpiece with paint, when it dries, add eyes, mustache and nose with a marker.
You can make such a flowerpot with images of any animals.
Another unusual option for such a flowerpot:
Photo source: www.knittochka.ru
We do it ourselves
It’s not hard to think of what you can make pots out of.
Any material is suitable for flower pots, including waste material, which does not allow moisture to pass through and holds its shape well.
Undoubtedly, the most beautiful and comfortable pots are ceramic. If it is possible to make a pot on a pottery wheel, then you should confidently use it. Clay is the optimal material for planting home and ornamental plants. It retains moisture and allows air to pass through, does not overheat and holds its shape well.
If it is not possible to make a pot yourself, then you can purchase a ready-made one and figure out what and how to decorate it. There are many ideas for decorating pots. It is not necessary to paint the pot with paints; you can use your imagination and come up with the most unusual “outfits” for it.
Thrifty gardeners can save money on a ceramic pot and make it from scrap materials. The simplest pots and tubs are made from plastic bottles. It is enough just to cut off the top part, add soil and start planting the plant. However, you can get a little creative and make elegant flower pots from such an unattractive material as plastic.
To make two versions of pots you will need the following materials and tools:
- 1.5-2 liter bottle;
- CD;
- glue gun;
- stationery knife;
- marker;
- hole puncher;
- spray paint.
Progress:
- Draw a wavy line in a circle approximately in the middle of the bottle (you can have a straight line) and carefully cut the bottle into two parts along it (you get two blanks for pots);
Related article: Beautiful interior design with black and white paintings
- Glue the part with the neck to the middle of the disk (before screwing the lid tightly);
- When the glue sets, turn the workpiece over and drip a little glue along the edges for stability;
- Use a hole punch to make holes along the wavy edges;
- Spray paint the resulting pots and wait until completely dry.
The pots are ready! You can plant plants.
To ensure that the edges of the cut bottle are even and smooth, they can be trimmed with a soldering iron. You can also use a soldering iron to give the edges an original shape.
Hanging pots are also easy to make from bottles. The simplest model is suspended from both sides - by the bottom and neck. One side of the bottle must be cut lengthwise, and two through holes must be made on the sides with an awl or soldering iron so that the pot-bottle can be hung.
Plants can be planted directly in such pots, or they can be used as flowerpots. If desired, paint the outside of the bottles with acrylic paint.
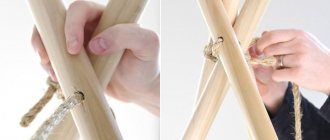
More interesting models are cats. To make them you will need:
- bottles with embossed bottom;
- marker;
- spray paint;
- stationery knife;
- soldering iron or awl;
- ropes or pieces of strong fishing line (4 pcs.);
- sample.
The following steps are performed:
- Cut off the bottom of the bottle;
- Draw ears by hand or using a template and cut them out;
- Paint the workpiece from a spray can and wait until it dries completely;
- Make a muzzle with a marker: draw eyes, ears, mustache, nose;
- To hang the pot, you need to make holes on four sides and thread ropes or fishing lines into them.
Ready! You can plant a plant.
Instead of cats, you can make other animals, for example, a bunny or a bear.
Original pots are easily made using tin cans and clothespins. To do this you need to do the following:
- Peel off the label and wash the tin can and dry it;
- Attach ordinary wooden clothespins tightly to each other to the wall of the jar.
The result was a small pot, reminiscent of a traditional tub. If desired, you can paint the clothespins with acrylic paints, and so that they retain their original appearance longer, coat them with varnish.
Article on the topic: Openwork knitting of a women's blouse: a pattern for a cute pullover with a wrap
Eco-friendly pots and vases can be made from wood. They will decorate both an apartment and a country house. Wood is a cheap material that can be easily processed. However, it is worth remembering that when making a wooden pot, the hygroscopicity of wood should be taken into account. To prevent the tub from starting to rot or deteriorate from moisture, it must be treated in a special way - soaked in moisture-proofing agents, covered with stain, varnish or other means.
The easiest way to assemble a pot is from ready-made wooden beams, securing them with glue or nails.
Unusual outdoor wooden tubs and flowerpots for a summer cottage can be made directly from a piece of log. To do this you need:
- a log or stump of sufficiently large diameter;
- drill with a drill length of up to 25 cm and a diameter of 20 mm;
- chisel;
- file and sandpaper for smoothing the walls of the pot;
- impregnation for wood against moisture and decay;
- polyethylene.
What to do:
- Cut the selected log, making it the desired height (usually ground flowerpots are made from 40 cm);
- Using a drill, destroy the core of the log: make several holes in a circle at equal distances from the walls, and then make holes in the middle;
- Using a chisel, remove the middle of the log and level the walls;
- Impregnate the wood from the inside with moisture-proofing agents, lay down polyethylene and begin planting plants.
You can also use a log pot as a flowerpot: place a plastic or ceramic pot with a plant in it.
You can see a few ideas of what else can be used for a flower pot in the photo:
Choosing paint for decoration
- It is best to paint plastic products with the following types of paints:
- Acrylic: will help protect the surface of the product and add shine.
- Colored acrylic varnish: with its help you will get a bright shade from the first application.
- Aerosol paint: easy to apply, its advantage is that no additional surface treatment is required.
- Car enamel: does not fade in the sun, the painted surface remains unchanged for a long time.
- Enamel compositions: a suitable option for painting large areas, so as not to purchase many colors separately and at the same time always get the right one, you can buy white enamel and add, for example, color pastes to it.
Flowerpot in the shape of a donkey
You will need:
- one bottle of 5 liters;
- a pair of 2 liter containers;
- four half-liter bottles - for legs;
- yarn - for the mane and tail;
- acrylic paint, wire, glue, screws.
Stages of work
1. Connect all prepared containers together. The largest bottle is the base (the body of a donkey), to it from below, through the holes made, we attach 4 small bottles with a volume of half a liter, into which we first pour sand so that the whole structure is as stable as possible.
2. One of the two-liter containers will be used as the donkey's head, the second container needs to be cut so that it turns out to be necks and ears. We also connect all these parts together and attach them to the base.
3. Next, we complement and decorate the product: we color the resulting figurine, make a mane and tail from yarn, and add the necessary elements.
As you can see in the photo, in this case there was no hole for planting flowers, all because the donkey is depicted in a harness, i.e. you can attach flower pots to the figure itself or follow the example given to the end and make a small cart where you can arrange the flowers.
Photo source: www.101dizain.ru/ozelenenie/cvetnik/klumby-iz-plastikovyx-butylok.html
Vertical design
This idea is so simple that even a novice gardener can handle it. Prepare the material: peel off the labels, wash and dry. It was previously discussed that sand is poured into bottles for strength. After the preparatory work, the parts are placed on the borders of the flowerbed.
You need to dig in the elements securely so that they do not fall if they are accidentally caught. Do not allow gaps to appear between containers. Installation is not difficult, and the result will surprise you.