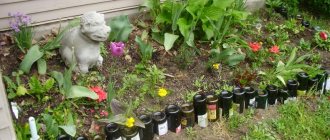
In modern life, we very often resort to using plastic bottles. Plastic has become an indispensable part of the life of a modern person. But it turns out that plastic bottles can be used not only as a container for liquid, but also for making beautiful decorative crafts for the garden.
In this article you will learn how to make flower beds from plastic bottles.
Why plastic bottles?
In recent years, much attention has been paid to the problem of garbage, in particular the large amount of plastic packaging that is thrown away as unnecessary and litters the planet.
Why not put them to work? Moreover, plastic bottles have a lot of advantages:
- You don’t need to pay crazy amounts of money for them, you can simply collect them on the street, call out to friends, acquaintances and friends of friends;
- From plastic bottles you can make not only low borders, but also full-fledged fences, as well as garden sculptures, and use them as containers for seedlings;
- If you cut off the bottom of the bottles and bury them with their necks down, you can sow seeds of ornamental grass in them, you will get an original living border;
- Unlike natural materials, plastic bottles do not absorb moisture, so they are ideal as borders for flower beds;
- You can do anything with plastic bottles: paint (preferably from the inside, trim or cut them, connect them with a stapler, wire or with bolts and nuts;
- If there is a fear that perennials will grow strongly in the flowerbed and interfere with the development of other plants, you can limit the roots of perennials by planting them in plastic bottles and digging them into the ground;
- A damaged element of a flowerbed fencing made from plastic bottles can be easily replaced with a whole one;
- Plastic decomposes very slowly, so the flowerbed will look elegant for many years.
If there is a fear that plastic will release harmful substances, it is better to use food containers for the flower bed.
Preparation
To organize a flower bed or border on your site, the “building material” needs to be washed and cleared of labels. If you need a permanent fence, then containers with transparent walls can be filled with colored sand, sprinkled in layers, or small pebbles can be poured inside. For light fences, it will be enough to unscrew the caps and dig the bottles into the ground.
Some sources recommend filling bottles with water, but this must be done with caution, since water in the sun will quickly bloom and will need to be changed.
Turning bottles into decorative material
The hardest part about making borders from bottles is collecting enough of them. Sometimes this takes several months.
Then the collected material must be prepared for work.
- Sort the collected plastic containers by shape and shade: transparent, brown, blue, green, yellow - the main colors of factory production.
- If transparent bottles are painted with acrylic paint, they will need to be washed with soap.
- Painting a bottle is easy. Just pour a little paint inside and shake the container.
- An interesting way to color a transparent bottle is to pour colored sand or salt into it. You can color the sand yourself by mixing it with crushed colored chalk.
- To prevent lightweight plastic from being blown away by the wind, you need to add a little crushed stone to the bottles to make them heavier.
Installation
- All prepared flowerbed elements are installed and fixed in the ground.
- Next, if the front garden is combined, various flower crops are planted. While bottles play the role of decorative fencing.
- The plastic takes any necessary shape and can be easily repainted in any color you like.
Variety of flower beds
To create a creative flower bed you need to have two things: a lot of plastic bottles and your own imagination. Bottles can be used in their original form, cut in half, or cut into some complex or geometric elements to create a mosaic.
The whole bottle can be dug into the ground with the bottom or neck up. In the first case, the decorative element will be the figured bottom of the container, in the second - multi-colored lids. The flowerbed itself can be traditionally horizontal and vertical.
Cement can be used to securely fix flower garden borders. This way you can create a deep flower bed from glass bottles in the shape of a cylinder.
The work order is as follows:
- Fill bottles of the same shape and size with sand.
- Pour a layer of sand half the thickness of a bottle, moisten and compact it.
- Draw a circle in the sand - the base of the future cylinder.
- Place the first row of bottles along the outer edge of the circle with their necks inward or outward and secure with cement mortar (2 parts sand, 1 part cement, water to obtain a dough consistency).
- Place the second row of bottles on top of the first in a checkerboard pattern. The number of bottles in all rows should be the same.
- Each row of bottles is laid on a layer of cement. Finish work when the desired height is reached.
- Outside, you can decorate the flowerbed with mosaics, shells, pebbles, planting them on cement.
How and with what to cut, paint and glue
Pliable material is by and large easy to cut with scissors. But to facilitate and speed up the process, it is easier to cut the workpieces with a pyrograph or soldering iron, or, in extreme cases, with a heated knife . Then all lines, holes and cuts will be smooth, without dangerous notches.
Painted products look much more attractive, but for plastic you need to choose the right paint
If painting is planned, then clean, dried plastic containers must first be degreased by wiping with an alcohol-containing liquid.
PET products come into good contact only with certain types of paints: acrylic or ordinary enamels (preferably for exterior use) , which do not contain aggressive components that corrode the material.
Glass bottles can be painted with any waterproof paints.
When painting the outside of a product, it is convenient to create arbitrary multi-colored patterns or designs using stencils, using nylon brushes, foam sponges or spraying paint from an aerosol can. With this method, the coating layer will have to be renewed periodically, since under the influence of the sun, rain and other factors it can peel and crack.
To avoid such problems, they use a proven “cunning” technique: they paint the bottles not from the outside, but from the inside . A small amount of paint, diluted with water to a liquid consistency, is poured inside, the lid is screwed on and shaken until completely distributed over the surface. After this, the lid is opened, allowing the residue to dry. If necessary, repeat the procedure.
When applying paint to the inner surface, the appearance of the flowerbed remains bright and tidy for a long time
Acrylic compounds dry quickly enough and are practically odorless, but it is still safer to carry out work in the fresh air.
If, according to a creative idea, you need to glue any additional decorative elements to the craft, then this must be done with a special glue that does not dissolve the surface of the plastic.
Vertical flower beds
A vertical flower bed means growing flowers on a wall or fence. Plastic bottles are perfect for this.
- They are laid horizontally and the sidewall is cut off to form a “boat”.
- Such boats are fixed on a vertical surface in any order.
- Inside each one, it remains to pour soil and sow flower seeds or plant seedlings.
- Climbing plants are best suited.
This design is also suitable for growing garden strawberries.
Planting
Since moisture is often retained below during irrigation, it is recommended to place moisture-loving crops on the first “floor”, and with a certain degree of drought resistance on the upper ones.
A multi-tiered flower garden can decorate a garden, balcony or terrace
The lower tier will serve as a kind of edging. It is better to plant broad-leaved, creeping or climbing varieties in it. Brightly blooming, showy specimens are planted at the top, crowning the middle.
Multi-level flower garden
If you don’t have a suitable idea on how to decorate a flowerbed, you can make it multi-level or pyramidal.
- Fill all bottles with sand.
- Draw a circle of the first tier on the ground and dig bottles, necks down, around the perimeter. Tighten them with wire so that the border does not fall apart.
- Fill the inside of the circle with soil level with the height of the bottles. Inside, draw a circle narrower than the first centimeter by 20-30.
- Repeat steps two and three.
- There can be as many tiers as you like. Flowers are planted in those segments where the ground is not occupied by bottles.
After all the flowers bloom, the pyramidal flower bed will look very impressive.
Execution options
In addition to aesthetic purposes, a man-made structure can have a practical purpose: to prevent the spread of malicious rhizomatous weeds (wheatgrass, sow grass), and rapidly growing perennial plants.
Vertical translucent partitions protect delicate plantings from the scorching sun or cold wind, zone the space, and hide secluded relaxation corners from prying eyes. Compact mobile flower beds in the form of cute fairy-tale characters will fit well into the design of a children's playground. Hanging design installations, placed vertically, as in the photo, or horizontally, decorate gazebos, fences, and unsightly building facades.
In the hands of craftsmen, banal plastic containers turn into original elements of garden decor.
From the cut bottoms and caps they create a temporary mosaic covering - an imitation of a pond or flower meadow, which will be especially relevant in the off-season, when living plants are not yet blooming or are no longer blooming. Using this method, it is easy to lay out various flat figures on the ground (butterflies, ladybugs, goldfish), ornate ornaments, colorful paths leading to shady corners of the garden, and compact the parking area at the entrance to the site.
Fence made of plastic bottles
Of course, such a fence will not be suitable as a fence protecting the yard from prying eyes from the street. It's transparent and flimsy. But it’s quite suitable as yard partitions.
- The bottom of each bottle is cut off and the cap is twisted. Now they can be strung on metal pins stuck into the ground at the same distance.
- Between the pins you can place the same vertical structures, but without a metal base.
- And in order to connect all the fence segments to each other, you can thread a rigid wire horizontally through the bottles.
- It is advisable to run the wire along the bottom, top and middle.
On the Internet you can find many photos of flower beds made from bottles. Any ideas are easy to implement and even improve. The main thing is desire and a creative approach.
Horizontal method of making a border
There is a more difficult manufacturing technique here, so maximum concentration is required. Here you also need to first dig a trench.
The only difference is that here the trench should be much shallower in depth than with the vertical method.
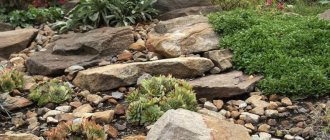
Creating a rock garden - features of application in landscape design. 145 photos of the most beautiful design elementsWe are building an artificial hill on a summer cottage - construction technology and features of application in landscape design (135 photos)
Fruit seedlings: how to choose a variety
It is not recommended to cut off the neck of bottles. The neck of the bottle must be secured and buried with earth. In general, these two techniques are similar to each other.
Photos of flower beds made from bottles
Lake with swans
You can create entire compositions from bottles. Outline the dimensions of the future impromptu lake and make a vertical border.
Inside the lake, draw two small circles by digging a row of bottles painted white around the circumference. Attach swan necks from scrap materials, draw black eyes and highlight the beaks in red.
Pros and cons of using thin plastic
This material has many advantages:
- does not rot;
- moisture resistant;
- durable;
- this is a cheap coating option;
- with a choice of different colors;
- its installation technology is simple;
- dense placement of elements will eliminate the growth of weeds.
When building a path, you can involve children in the work by assigning them simple tasks.
And if you lay out a path of plastic covers with the edges up, you will get an excellent foot massager.
The material has few disadvantages, but they are significant:
- the coating is deformed due to sudden temperature changes;
- a large amount of raw materials will be required;
- plastic is slippery after rain or in the cold;
- cannot withstand heavy loads, so it is only suitable for decorating a pedestrian area.
But these disadvantages can be easily eliminated by coming up with an interesting combination of different materials.
Do-it-yourself pebble garden path step by step
One of the most creative and perhaps painstaking ways to make your own stone garden path is to line it with river pebbles. This material is available to almost everyone - the shore of any body of water is strewn with pebbles of various sizes and colors. Such a path will become a real decoration of any site and will cause admiration among all neighbors.
Making a pebble path with your own hands is quite simple, but painstaking. Before you begin the process itself, you need to use your imagination a little and prepare a drawing of the path. And depending on your design, you need to select pebbles - they can be of different colors and sizes, combined in an ornate pattern or a strict geometric pattern. To create such a masterpiece you will need the following materials:
- pebbles
- plywood
- fine river sand
- cement (M300)
- level
- hard brush
- gravel chips
Before starting work on the marked area for the path, you need to dig a trench. Then pour a mixture of cement, sand and gravel chips onto the bottom, and you can lay out pebbles according to your design.
At the end of the work, you need to pour a mixture of cement and sand into the gaps between the stones and pour it from a hose for compaction. It is better to cover the composition with plastic wrap for a day.
Important: the resulting path will take several weeks to dry, so it is better not to walk on it during this time so that the result has time to take hold.
Photo source stroiremdoma.ru