When arranging a personal plot, there is often a need to remove old and rotten trees, which leave behind unattractive stumps. Knowing how to decorate a tree stump, you can make it an original, key element in the landscape design of a garden, or a useful device for a summer holiday in the country.
As a flower bed and flower stand
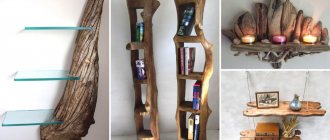
Tree stumps are great for making wooden garden ornaments. You can use them to make wooden paths, furniture, flower stands, and art installations. They allow you to give your garden originality. But whatever you plan, start by preparing the stump for further use. To do this, the future designer product needs to be uprooted. By leaving the stump “as is”, you risk losing the product over time due to wood borers, moisture and fungi.
Did you know? There are more microorganisms in one teaspoon of soil than there are people on Earth. You may think this is terrible, but they are important for maintaining soil nutrients and recycling organic matter.
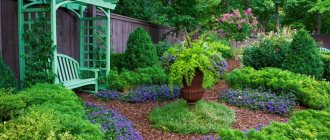
The lower part must be carefully processed by cutting off the roots, and then removing the peeling bark and knots on the sides. Existing deep damage is puttied, the surface is treated with preservatives and varnished. You can paint it any color you want. But the real beauty lies in its natural appearance, rustic texture and grayish hues. The most popular design is a flowerpot. Designers suggest installing a pot in the upper part in which to plant a flower.
For this you will need:
- Make a recess in the internal cavity about 20–30 cm deep. The width is such as to preserve at least 5–7 cm of wood on the walls on each side. Be sure to create several inclined holes on the side for moisture drainage.
- Treat the cavity with preservatives.
- Buy a pot according to the size of the cavity. Fill it with substrate and plant flowers.
- Then install it in the stump.
- Bulbs, ground cover and any other plants are suitable for planting. Petunia, nasturtium, tulips, strawberries, and marigolds look good.
Various ground cover plants can also be planted below at the foot of the stump. They will decorate this space.
Mechanical stump removal
Uprooting trees and stumps is a fairly profitable business, so in any area it is easy to find specialists who are ready to bring equipment to your home and resolve the issue with stumps in a couple of hours.
Stump grinder
A stump grinder is a huge cutter that turns wood into shavings. Its size is comparable to a garden wheelbarrow, so the shredder can be easily transported to any part of the site without damaging neighboring plantings. It works not only with the above-ground part of the stump, but also with the underground part, going 30 cm deep.
Unfortunately, there are fewer high-quality shredders on the market, so not all companies can provide such a service. It is also not cheap and is suitable for removing the stumps of trees that do not produce abundant root growth.
Earthmoving equipment
You can dig up a stump using special equipment: an excavator, a manipulator or a bulldozer. But this method only has the advantages of speed and working with the largest stumps, but there are significantly more disadvantages.
Firstly, the work of such equipment is always very expensive, and the stumps will turn out simply “golden”. Secondly, not every site can be accessed by such a large vehicle - gates and gates may simply not be designed for it. And finally, even in the dry season or winter, these machines greatly damage the soil, and the lawn will be completely left behind.
Therefore, it is good to use such a technique at the stage of preparing a site for development or if there are a lot of huge stumps on the territory and cannot be dealt with in other ways.
Forest decor for the garden
The stump will also be used to create handmade garden decorations. It can become a mushroom if you put a cap on top of it. Any old basin painted yellow-brown will look like this. A pair of plastic pipes with smaller bowls placed on them will expand the composition.
We also recommend reading about the use of pine trees in landscape design of the site.
There are also other design ideas:
- Using available materials, attach eyes, a nose and a mouth to the stump, and you will get a cheerful forest man.
- A tall stump will become a stand to which flower pots are attached. If you plant flowering summer plants in them, it will also be very attractive.
- Attach a ladder to it, put on a roof, add windows and a door made of small slats, and you will get a fairy-tale mansion.
- You can make an octopus from a small stump by adding tentacles from a hose.
Idea #4 – decorate the stump with flowers in pots
We have already told you how you can decorate a stump with flowers that are grown in it, but there is another option for this decoration. If there are several branches left on the stump, you can hang the same flowers on them, but grown in pots. They can look very impressive.
Even if there are no branches, a flower pot can be placed on or around the stump itself, creating a special aura of flowering and ongoing life. Stumps look great as a decorative stand for flower pots with plants, if they are thoroughly sanded, allowing the wood to show its texture.
Despite the simplicity of this composition, it looks very impressive and distinctly rustic: it is perfect for country style
But we should not forget that a tree located in an open area needs protection - impregnations that will resist rotting.
garden furniture
The simplest thing a stump can become is a garden stool. If you place a tabletop on top of it, you get a small table. They will look very natural in the garden. The top of the stump stools is equipped with a soft seat made of leatherette and any padded material for the comfort of the sitter. Each seat made in this way can remain unique in height. Or they are made equal by cutting them down to the same size. It would be a good idea to install garden furniture in the recreation area. But it can also be placed near the garage, on the playground or in the garden. It will be equally attractive and functional everywhere.
Important! When using furniture made from stumps on a playground, make sure to fix the stumps in the ground and carefully sand all the unevenness, and treat the surface with preservatives that prevent the destruction of wood and varnish.
Making a table:
- The stump that will be used in the work must be completely dry. If the wood is fresh, you need to wait at least a month until it dries.
- Strip the bark. A hammer and chisel will help with this.
- Sand the surface. When you run your hand over the stump, you need to feel that it is smooth.
- Attach purchased legs to it using a drill.
- If you do not attach the tabletop, then treat the future table with varnish. You can install the tabletop by placing it on glue or screws. When finished, coat the product with varnish.
To make garden furniture you need a stump, sandpaper, polyurethane, a brush, legs, a drill and a chainsaw.
The legs can be purchased as a set at a furniture hardware store. It is advisable to choose stainless steel products - they will last much longer. You can make a chair from a large stump. To do this, you should use a saw, hammer and chisel to cut out a cavity of suitable size inside - about 60–70 cm for the design of the back, seat and handles. By laying a log lengthwise and cutting out seats in it, you can create not an armchair, but an entire garden sofa.
Idea #3 – funny compositions
Option #1 – unusual sculpture
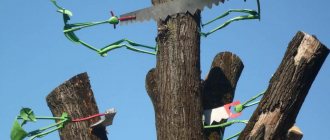
Implementing the following idea is not at all difficult. And now the dry frame of your tree is being sawed by little men who look like green grasshoppers. It’s easy to make these babies yourself, using wire, pieces of tin or plastic for this purpose. Similar fairy-tale characters can also be purchased in a store selling souvenirs and toys.
The figures are made very cleverly, and the whole composition leaves an amazingly positive impression: the little men must be secured securely so that they are not damaged by bad weather
These funny figures can be screwed to the trunk using self-tapping screws, wire or clamps. Such a comic composition will decorate your garden and attract the attention of your friends and neighbors.
Option #2 – decorative fly agaric
If you think that making a fly agaric from a stump is easy, then you are absolutely right. All you need for this is an old enamel or iron bowl and an aerosol. The bowl needs to be cleaned and painted with red spray paint. After it dries, we draw white circles on the red background, exactly like the spots on the fly agaric cap.
Next to the handsome fly agaric, you can place numerous other objects that help revive the composition and make it complete
The stump also needs to be painted white. It would be nice to draw a cheerful grinning face on it. But here it’s up to your imagination to tell you. All that remains is to put a smart hat on your leg and boldly declare that the fly agaric is ready! By the way, you don’t have to make a fly agaric. It could also be a white mushroom. The fly agaric just looks more elegant.
Recent Entries
Lilac perennials that are beautiful, compact and do not crowd out other plants Why when buying seedlings you should not take the sellers’ word for it and how to determine the age of the plant using 3 signs Tomato seedlings have turned purple or whitish: why the color has changed and how to save the plants
To complete the picture, we suggest that you place pebbles, for example green, at the foot of your mushroom. They, like a picture frame, will create an edge to your work. However, you can do without them.
Using stone painting you can also create an original decorative element. Read about this:
These porcini mushrooms are also made from stumps, only in a completely different way: both the stem and the cap of the mushroom are cut from the wood of the stump itself and painted in the appropriate colors
Option #3 – fairytale tower
If a person is not deprived of imagination, then even from a dry stump he is able to make a whole work of art - a fairy-tale castle or mansion inhabited by the most amazing fairy-tale characters. Such a craft can become a source of pride for the owner of the site if you work on it with all your heart.
A nice house made in Japanese style, complemented by a small hut, most likely intended for holding a traditional tea ceremony
The stump itself can serve as the main part of the castle, onto which all additional decor will be attached. In order not to miss anything, we suggest making a sketch of the future structure and subsequently trying to follow it.
Decorating parts can be cut from a piece of fiberboard or plywood. They should be attached to the stump using self-tapping screws. All components must be impregnated to protect them from rotting. In addition, they can be painted in the desired color.
This material on creating crafts from plywood for garden decoration may also be useful:
Such a cute house with figures will really appeal to children, who will undoubtedly immediately adapt it for their fun games
Sometimes in the trunk of a dry tree, very low from the surface of the earth, there are hollows and growths. All these details, despite their natural origin, are easily used in the composition. For example, small toy ladders with funny gnomes on them can hang from a hollow. And on the growth you can place a toy piano with a squirrel-pianist.
Don't forget to pay attention to the roof of the structure. An old leaky bucket will do just fine for her. By the way, artificial or live plants coming out of a hole in the roof of such a structure will look very attractive.
This video is dedicated to a variety of characters made from tree stumps:
Garden lantern
LEDs are installed in the cracks of the stump. And if there are several stumps, then you can create a composition from a table and a pair of stools for evening relaxation. The light shining through the bark will give them a magical and romantic look.
Important! The wood for the lantern stump should not be damp or rotten.
Any type of stump is suitable for making a lantern - pine, spruce. It doesn't even have to be a fresh piece of wood. The presence of cracks will add uniqueness to it. If you carefully stretch them with a chainsaw, the cracks will let in more light.
How to make a lantern:
- Remove all bark completely.
- Be sure to wear protective clothing such as safety glasses and earmuffs if you are intolerant of noise. Protect your hands, legs, and feet with work gloves, cut-resistant pants, and boots with protective inserts.
- Draw marks on the trunk along which you will cut. It is necessary to make the core hollow in order to insert a light source there. The hole in the center needs to be at least 20cm to ensure the LED light is positioned correctly in the middle, so you need to draw a square to start cutting on both ends.
- Secure the log in a yew.
- Now make the cuts. Since you need to cut inward, and this causes a powerful force, make sure that the barrel is well secured before work. Use a chain with a smaller distance between the depth gauge and the saw teeth - this will make the power tool easier to operate.
- After obtaining a through hole for installing the lamp, proceed to sawing the sides. There you need to make cracks through which light will break through.
- Using an angle grinder, smooth the edges of the wood.
- Before installing the lamp, treat the inner surface with hard wax oils.
- Install an independent light source inside. Cover the top with a decorative strip and the wooden lamp is ready.
Video: how to make a lamp from hemp
Stump in the forest
For little sculptors trying their hand, plasticine can be used for creativity. This material is flexible to work with and allows you to correct mistakes.
First, think about the composition and appearance of the forest inhabitants. There are many interesting pictures of stumps for children on the Internet. Then, decide on the materials.You will need a set of plasticine (you can use self-hardening mass), cardboard or a thin sheet of plywood for a stand, twigs for decoration, and a set of stacks.
First you need to practice and draw a tree stump and a forest clearing. Once the idea has taken shape, get to work.
Support for climbing plants
Filling the stump with flowers makes it the center of attention. To do this, you can cut holes on the sides and cut out the middle. To prevent the wood from being damaged by contact with water, a plastic pipe of the appropriate diameter is installed inside the hollow trunk. Using a marker, mark the location of the landing holes according to the holes already made on the trunk.
Did you know? Pollinating insects are attracted to the garden not by flowers, but by nectar, so simple plants like dandelion and clover will attract more bees than beautiful chrysanthemums.
Drill holes in the pipe and, having installed it in place, cover it with a nutrient mixture of compost, peat, garden soil and sand. At the bottom of the stump, inclined drainage holes must be made to drain water. Now you can plant seedlings of flowering annuals or perennials into the prepared structure.
The second method is to attach metal pot holders to the trunk. There can be any number of them. Then containers with flowers are hung around the entire perimeter.
Do I need to prepare stumps to create a flower bed?
If the stump is used in its existing form, then you cannot count on long-term beauty, since weather conditions and time can gradually destroy the wood. That is why it is impossible to do without processing. You should start with disinfection, which should be carried out exclusively with special antiseptics, which are available for sale in specialized stores. And only after treatment should the stump be opened with varnish or paint to give it a more attractive appearance.
Paths and paths
A wooden log can easily become a decorative garden path if you cut it into round pieces and pave the selected alley with them. But in order for such a path to last longer, you will need to carefully approach the issue of its creation.
Important! You cannot use rounds that have lost their integrity and have splits. Such elements begin to deteriorate faster than others, and the path will soon have to be repaired.
Creating a track:
- Prepared round pieces must be treated with an antiseptic. They are then varnished so they can withstand moisture. After which the lower part is covered with bitumen mastic or tar.
- Then they mark the path and remove the top part of the soil with a shovel up to a depth of 20 cm. The exact depth depends on the size of the created dies.
- The bottom of the trench is covered with geotextile, then a layer of gravel is placed on top and a layer of sand on top. And prepared rounds are laid on top of the sand. Each layer must be compacted with a vibrating plate, otherwise the track will quickly lose its shape.
The sides are secured with a layer of concrete and stone. The space between the wood can also be filled with concrete. This is a lightweight, effective and relatively inexpensive solution for garden paths.
Lamp from a stump
To make a cozy lamp for your home or garden, you will need dry stump, varnish (best suited is “yacht” varnish, adapted to changes in temperature and humidity), stain, light bulb, socket, and wire.
And also tools: fortune (hand or chainsaw), chisel, sandpaper of various sizes (or grinder), hammer and soldering iron.
Decorative painting and mosaic
In order to apply decorative designs to tree stumps, all you need is paint and a little artistic talent. The surface of the stump must be cleared of bark and sanded. Then they draw a sketch with a pencil and paint it with paints. After which the surface is varnished. You can also apply a mosaic to the stump. Its upper part is suitable for this. A mosaic can be a pattern or an abstraction without any meaningful design.
Get to know the weigela shrub and its uses in landscape design.
Covering the stump with mosaic:
- Sand the surface. It should be perfectly flat.
- Apply waterproof sealant to it. It is necessary that the finished product does not lose its volume due to changes in humidity. Otherwise, the mosaic will crack.
- Now draw a drawing on the surface with a pencil.
- Buy a mosaic from a craft store or break the tiles into pieces and then lay them out in a pattern on the surface of the tree stump that has been pre-coated with glue. Distribute the glue gradually so that it does not have time to dry while you lay out the mosaic pieces.
- Allow the product to dry for 24 hours.
- Wipe the surface with a clean cloth soaked in white vinegar.
There can be many design solutions for using wood. Each has its fans, so if you still have a stump from an old tree or an ordinary log from a trunk, then do not rush to destroy it. Using imagination and a little work, you can create a number of beautiful products for your garden.
Uproot or leave?
It is difficult to answer such a question with a clear yes, whether to uproot it or not, to leave the stump in its place. If you think that the remaining stump will bring you inconvenience, then the question of removing it is obvious. The main inconvenience is the root system of a tree or shrub, which, even after its removal, may appear in the garden years later. This behavior is typical for fruit trees: cherries, cherry plums, plums. Therefore, when getting rid of such stumps, ask yourself how much this or that cut of the tree will interfere with you. When deciding this issue, it is worth considering several factors:
- the location of the stump and what is next to it. If there are beds nearby, then it is better to remove the stumps so as not to reduce the harvest, and if the stump is next to a flower bed, it will fit perfectly into the landscape;
- frequency of treatment of the area on which the stump stands. If every season you need to dig up the soil and replant the plant around the stump, then its root system will make your work difficult, which means that such a stump should be removed completely from the roots. If perennial flowers bloom around the stump and it does not cause any inconvenience, then it is worth leaving it and improving the flowerbed, taking into account the decorative characteristics, its height, the absence or presence of a tendency to produce shoots, etc. The exception is very rotten, old and rotten stumps infested with pests. Also, pine and spruce are not suitable for a flower garden, since their wood is very short-lived, and the resin contained in it may prevent the plants from developing. Remains of fruit trees, oak, maple, etc. are best suited. Take into account that the thicker the stump, the wider and more luxuriant your flowerbed will be.
Related article:
The art of change, or 4 more tricks for owners of small plots
Decorating a garden plot 281
Chemicals for removing tree roots
Don’t have good physical strength and are not ready to tolerate construction equipment on your site? Then you should know how to remove a stump without uprooting it. Products that are easy to obtain on sale will come to your aid.
Urea
Not the fastest method, lasting a year, is suitable for those who want to get rid of a stump without extra effort. It is enough to drill several holes in it with a diameter of 1-3 cm, pour urea into it and wrap everything tightly with polyethylene.
By next season there will be no trace left of the stump, and the vacated space can be used.
Potassium nitrate
This method is similar to the previous one in its first part: in the cold season during the thaw, holes up to 40 cm deep are drilled into the stump using a drill with a thick drill at the rate of one hole per 10 cm in diameter. Water is poured into them, and then potassium nitrate is compacted for several days in a row. Afterwards, the stump is wrapped in polyethylene and left in this form until spring. Under the influence of saltpeter, the tree dries quickly, and in the spring it can easily be burned without a trace.
Burning stumps (both after treatment with saltpeter and without it) is prohibited on peat soils.
Bird feeders
Photo from the archive of Natalia Platonova
You can place a feeder on an even higher stump. Its appearance depends only on your skill and imagination. The main thing is to securely fasten and make a roof so that the food does not get soggy. Unsalted lard, unroasted pumpkin (squash) or sunflower seeds, cereals (rolled oats, millet, millet), cottage cheese, and peanuts are considered healthy treats for birds. It won't take long for the birds to arrive, and soon your garden will be filled with chirping sounds.
Or you can place two objects on one stump. For example, a flowerpot and a feeder.
- DIY edible bird feeder
You can make these feeders together with your children – it’s fun and educational.