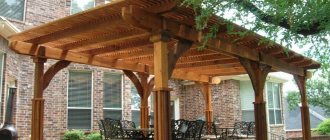
It is well known in the architectural world: a hipped roof differs from other types in that it gives any structure or structure volume, a complete image, and a sense of monumentality. This is what gazebos usually lack, especially if you don’t raise them on massive foundations and don’t build permanent walls!
Whereas an ordinary pitched and gable roof looks a little sparse and monotonous on such small architectural forms. Therefore, if you really want to build something that will later please the eye, believe me: a hipped roof for a gazebo is an ideal option!
Hip roof: ideal geometric shapes
First, look at this simplified version of a hip roof, which is great for small gazebos with a light roof covering:
And for the smallest gazebos, even this:
But, if there is a lot of snow in your area and you are worried whether such a roof will withstand all the hardships, then it is better to give preference to the classic hip rafter system.
So, let's decide how to build a standard hip roof on a gazebo. We start from the fact that the frame of your gazebo house is already ready:
- Step 1. Stretch the cord between the corner posts and determine the center of the gazebo.
- Step 2. Place a long board directly in this center, you can even sew it along the length, and secure it in any convenient way. There is no need to pull too hard, this is just a guideline.
- Step 3: Next, stretch the cords from the top center of the center post to the corners - this will visually determine where your diagonal rafters will be.
- Step 4. Now install the rafters themselves, preferably hanging ones, with a raised tie. To make them, take boards 150 by 50 and stock up on a couple of templates from bars 50 by 50 meters and up to 2 meters and 25 centimeters long.
- Step 5. We proceed to install the second pair of diagonal rafters. In this case, you can remove the temporary stand if it is in the way, or at least move it. The main thing is not to move the center on which all the rafters rest.
- Step 6. Next, install the third and fourth pair between the diagonal rafters. Always check with the template that the layout and installation are correct.
- Step 7. Now we mark and install the spigots. On each side you need to attach the boards using short bars.
- Step 8. Mark the length of their extension on the diagonal rafters, for example 40 centimeters, and pull the marking cord.
- Step 9. You need to cut all the rafters according to the markings, and you can cut the ends of the rafters both vertically and horizontally, and even at right angles - as you want and as aesthetics require.
- Step 10. Now, between the pairs of diagonal rafters, secure ties from boards 150 by 50 millimeters, and cut off all excess.
- Step 11. Next, install ties between the other rafters, but place them higher or lower than the installed ones. But there is no need to install puffs between the spigots.
- Step 12. Nail a wind board to the ends of the rafters and cover the roof with OSB sheets or plywood, or install any other sheathing under the membrane roof.
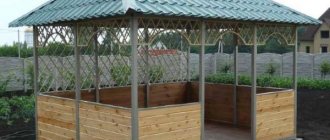
- Step 13. If you have too large spans between the pillars (for example, more than 2 meters), then install jibs or build a skirt from a picket fence, which is quite fashionable today.
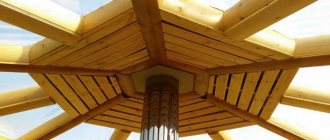
We have prepared for you a step-by-step illustration of how to make the following rafter elements:
The main thing now is to connect them correctly at the roof ridge so that the center remains the same and does not move a millimeter:
Moreover, the hip roof itself does not have to be made so steep - for areas with little snow, a flat one is quite acceptable:
And for strength and a special decorative effect, you can connect the rafters with short bars:
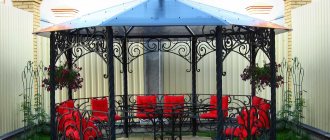
Another interesting point: you can build a hip roof not only from wood. On the contrary, metal rafters will last much longer and are convenient to use for heavy natural tiles:
By the way, in a hip roof specifically for a gazebo, which is not subject to as strict requirements as for a residential building, the rafters do not necessarily have to be positioned only vertically:
Original, isn't it? And the roofing itself has a good hold on such rafters, because they turn out to be transverse to it. Everything ingenious is simple!
Here is a wonderful video master class on how to properly build a hip roof for a gazebo:
A hipped roof can also be spire-shaped, when its triangular shapes are connected at one point at an acute angle. Such a roof is necessary if the construction of turrets is planned. But in itself this is a quite striking architectural solution!
Needless to say, such roofs are ideal for heavy snowfalls; they simply do not linger on them. And even the simplest and most unpretentious gazebo looks amazing under them, but get ready for additional costs for the rafter system and roofing.
How to build a rafter system for the roof of a gazebo
The main load-bearing component for a roof gazebo is most often the rafters, which bear the main load of the roof. After installing the sheathing, the pressure that falls on the roof is distributed to the support posts.
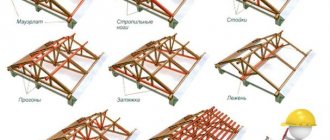
When determining the optimal rafter design, factors such as:
- Rafter length.
- Roof weight.
- Roof slope.
- Distance between rafters.
To create rigidity of the structure, it is necessary to use a rafter transom.
The diagram shows the fastening of the crossbar to the rafters:
Rafter frame with crossbar
On the diagram:
- a – rafter frame;
- b – ridge knot.
Positions:
- 1 – rafters;
- 2 – stiffener for rafters;
- 3 – roof beam;
- 4 – ridge;
- 5 – overlay made of wood;
- 6 – roof covering.
The rafter system for the gazebo can be:
- Inclined type.
- Hanging, without intermediate supports. Their two rafter legs rest directly on the wall of the building and are connected by a tie.
Installation of hanging rafters
On the diagram:
- a – general view;
- b – type of fastening of hanging rafters.
Positions:
- 1 – rafter leg;
- 2 – strut;
- 3 – lining for the beam;
- 4 – beam for support or mauerlat – the connecting link between the rafters and the brick wall of the gazebo. The element is laid on the walls and fixed with brackets to the floor beams and rafters;
- 5 – overlay;
- 6 – bracket for fastening. An alternative to these parts is to fasten the support beam with high-strength bolts or fix it in grooves cut into the construction legs.
- 7 – lower connecting element, which also serves as a support for the rafters;
- 8 – vertical post or headstock;
- 9 – bolt.
When constructing a log structure or a building made of timber (see Gazebos made of timber: from design to manufacture), the rafter legs are supported on the upper crowns. And in brick and wooden buildings, the rafters are laid on support bars and the top frame. A gazebo is a frame wooden structure.
Its dimensions affect:
- Type of supporting structures used.
- Method of placing rafters.
- Type of future roof.
Rafters can be attached:
- With bolts.
- With staples.
- Clamps with tightening. In this case, the ends of the rafters enter the top of the headstock and are bolted using a metal plate.
- Make “sockets” on the headstock, and install “spikes” on the struts, which will create a strong connection between the elements.
- When constructing a gable roof, wooden overlays from a solid board of large thickness are used for connections. The overlay is fixed to the roof ridge with nails.
Chinese roof: edges curved towards the sky
A more complex form of hip roof is the Chinese one. In fact, such a roof also has only four slopes, but the corners are bent upward, which makes building such a gazebo much more difficult. But in itself it is a real architectural masterpiece in any garden.
The edges of such a roof are effectively raised, which gives the gazebo special elegance in an oriental style. To build such a gazebo, you will need not standard rafters, but a post-and-beam structure. You will be interested to know that this is the main system in China and Japan. After all, it is designed, first of all, to withstand the seismic activity of these areas. But this does not mean that you should build such a gazebo exclusively according to strict rules, especially since we are not talking about a residential building.
It is better to use natural tiles for roofing, and in the shape of a cylinder. And the cornices will be the largest. Why are tiles only of this shape? The fact is that only such tiles can be attached to corner joints. If you want to add a Chinese flavor to such a roof, you can additionally use special figurine profiles with oriental images. The ridge of such a roof is built using the same principle, or it is replaced with special oriental elements (they can be purchased at any store), which come with ceramic clamps.
As a result, you will end up with a horned design - this is exactly the most striking distinctive feature of an oriental-style roof. Your main task is to distribute the considerable weight of such cornices and the total mass of the roof so that the gazebo is stable:
Therefore, let's move on to practice. Draw the future configuration of the gazebo roof on a piece of paper. To make it you will need boards and plywood:
- Step 1. Align the vertical support and check it with a level. Its length should be equal to the width of the rafter structure, and the support itself should be located strictly in the center.
- Step 2. Secure the support and attach another board to it so that its end is in the middle of the support beam and just touches the top point.
- Step 3. Again, take another board and connect the middle of the previous beam and the extreme point of the support beam. The technology is actually quite simple.
- Step 4. Install all other trusses using the same principles. It is important that the clearance between the trusses is from 50 to 70 centimeters.
- Step 5. Now install the plywood and make cuts on it to three-quarters of the thickness so that the sheets fit more tightly.
It will be even easier for you to install modern flexible bitumen shingles on such a roof, which will also look quite elegant.
Rules for laying polycarbonate
First you need to mount a frame made of polycarbonate (connecting, end) or metal profiles. When using aluminum metal profiles, the ends of the polycarbonate sheets should be sealed with sealant or tape to prevent debris and dust from collecting there. In polycarbonate profiles, a special tape is provided that reliably covers the longitudinal grooves.
The polycarbonate non-separable profile is attached to the rafters with self-tapping screws with thermal compensation washers every 3 dm. The collapsible profile must be fastened in turn: first, the lower part is screwed, and after laying the sheets, the upper part is screwed.
Polycarbonate sheets are laid over the finished frame. Fastening is carried out either by point method after 3 dm, or using fixing profiles.
Polycarbonate bends well, so it can be used for semicircular roofs
When working with polycarbonate, you must adhere to the following rules:
- Before work, do not remove the protective film from the sheets.
- If condensation has accumulated inside the sheets, they must be blown out with compressed air. To prevent such problems from arising again, store the material in a dry place.
- The permissible minimum slope of a polycarbonate roof is 5%. Completely flat roofs are not permitted.
- It is necessary to install rubber pads under the fasteners, since plastic tends to shrink and expand.
- The diameter of the hole for the fastener should be slightly larger than the fastener itself. To prevent water from leaking in, special gaskets are used.
- The fasteners should not be over-tightened, as the sheet may crack. Also, do not allow the sheet to dangle - it can be torn off by the wind.
- Polycarbonate can be cut with a jigsaw, hacksaw, band saw and circular saw.
The roof of the gazebo, covered with transparent or colored polycarbonate, creates a unique atmosphere in the daytime and in the evening.
Hip roof: foreign classics
According to building codes, on hip roofs it is necessary to install rafters that are directed towards the corners of the walls. These rafter legs are called diagonal, or slanted. The diagonal rafters themselves are longer than ordinary ones, and they also have shortened rafters, which are called sprigs.
It is the slanted rafters that carry a load one and a half times greater than ordinary ones. Therefore, the length of the diagonal rafters is always greater than the length of the boards, and such rafters are also paired.
It is the pairing of slanted rafter legs that solves such problems as the ability to carry an increased load, the possibility of using a long uncut beam and the use of parts of a certain size. Moreover, double rafters also make it possible to use the same boards for their construction as for conventional rafters. In other words, boards of the same height for making rafters simplify the design solutions of roof components. What is important about building a gazebo is if you took on it all yourself!
Here is a version of the simplest hip roof, with a simple but durable rafter system that anyone without any previous construction experience can handle:
As you probably noticed from the step-by-step photographs, the side rafter legs are tightened together with crossbars - for special strength and reliability. It will be convenient for you to attach internal lamps for the gazebo to such puffs or decorate them with some fashionable stylish elements.
Using the same scheme, a fairly strong and reliable hip roof is obtained for large-sized gazebos:
Even the simplest hip roof looks very unusual and original on a gazebo, but with rounded corners:
But keep in mind that the larger the roof you need to build on the gazebo, the more rafters it will have and the more complex its structure will be. For example, here is a standard and proven option that you can even take as a drawing:
But sometimes you have to resort to more complex options:
Look how chic the most standard hip roof looks on a glazed gazebo - it’s a real little house!
By choosing the length of the ridge during the design process (which is only possible with a hipped roof), you completely change the appearance of the roof and its design. Here is an example of a short ridge that makes the roof seem more massive and solid:
Another interesting video of the construction of such gazebos, where each step is perfectly shown:
Appearance and performance characteristics
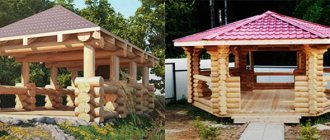
A four-slope roof for a gazebo is a roof consisting of four slopes. For structures of different geometries, you can make different types of roofing with your own hands:
- Square-shaped gazebos require the construction of a hipped hipped roof. It consists of four triangular slopes, equal in size, which converge at one point, without forming a ridge.
- Gazebos, which have a rectangular base, are harmoniously combined with a hip-type hipped roof. It consists of two trapezoidal slopes and two triangle-shaped end slopes. At the top of the roof there is a ridge located along the length of the side of the rectangle.
The design of a hipped roof is more complex and more expensive than, for example, a gable roof, but the cost of building it with your own hands will pay for itself because:
- It protects more effectively from rainwater, diverting flows due to a larger number of slopes.
- The large overhangs of the hipped roof retain the heat accumulated during a sunny day for a long time, which is very useful for long evening gatherings.
- The slopes of the hip roof provide excellent protection from the annoying rays of the sun, while still allowing you to enjoy a beautiful view of the surrounding area.
- The reliability and rigidity of the hip and hip roof structure does not bother homeowners with maintenance and ongoing repairs. It doesn’t even have to be cleared of snow in winter, as it slides off without staying on the roof surface.
- A hip roof makes it possible to build it yourself. Since the gazebo is a small structure, you can cover it yourself with the help of two people.
- The affordable price for the necessary building materials makes a hip roof a very inexpensive solution for a gazebo.
Choosing the right roof covering
In principle, almost all roofing materials are suitable for a gazebo with a hipped roof of any type, but soft roofing and modern tiles look most impressive.
Soft roofing: stylish and impressive
Essentially, bitumen shingles are flexible plates made of fiberglass or techno-fiberglass, which are specially impregnated with modified bitumen. Mineral colored powder – granulate – is directed or rolled onto them from above. And the bottom is covered with self-adhesive concrete. This coating has a huge selection of colors, and with its help it is easy to achieve the desired aesthetic effect.
On a hipped roof, flexible tiles look even better than on a gable roof. The only disadvantage for installation is that a continuous sheathing is required here, because... tiles are flexible and need a base. Therefore, the installation of the hipped roof itself will be a little more difficult for you than if you preferred another covering.
As you understand, it is convenient to cut such sheet material into different shapes. And therefore, the roof covered with it turns out to be of the most unimaginable designs and shades. Moreover, modern manufacturers even offer entire collections made in different historical or architectural styles. Thanks to the colored coating, such a roof can be given any shade, emphasizing nobility or, conversely, modernity. Here is the most popular cut:
Here's the kind of sheathing you'll need to cover your roof with modern asphalt shingles:
And how to bring all this to life, our detailed master class will help you:
Bituminous shingles easily withstand constant temperature changes in Russian latitudes, fungus and mold do not like them, and they last from 20 to 50 years.
Its only annoying disadvantages are the unpleasant odor and the release of harmful substances in the heat, the ability of such tiles to melt in particularly harsh conditions, and granules, which are sometimes torn off by incoming pieces of ice and damage gutters. Well, if we take into account the affordability of such roofing, this option has the right to life, despite all its shortcomings.
Design advantages
The main advantages of a hipped roof for a gazebo come down to the following list:
- Excellent ability to drain water due to the large number of slopes;
- The ability to accumulate a lot of heat on warm days, which will come in handy in case of late events;
- The hip roof provides excellent sun protection without any visibility restrictions;
- A well-equipped roof does not require regular maintenance and cleaning, which is due to its ability to independently remove precipitation;
- Simplicity of installation allows you to assemble the roof even yourself (unless another person is required for high-altitude work);
- The low cost of materials makes a hipped roof quite economically beneficial.
Drawings with dimensions
Most likely, the proposed drawings will not be suitable specifically for the gazebo you are planning. However, they can give a general idea of what a particular option should look like.
Drawing of a hipped roof Hip roof (with dimensions) Section of a hip arbor with dimensions
All images are enlarged, that is, you can click on them and open full versions of these photographs or drawings. If the dimensions are not visible in the picture, then try to make it as close as possible, you can intuitively guess what numbers should be there.
After outbuildings and residential buildings, novice summer residents and owners of private houses strive to create a comfortable recreation area on their plot with their own hands. Since for most Russians the process of recuperation after a working week is associated with cheerful feasts and barbecues in the open air, not a single yard can do without without a beautiful gazebo. It creates a pleasant shade on hot days and protects from rain and wind in bad weather.
If it is quite difficult to make a house with your own hands, then even a novice builder with no practical experience can install a gazebo on his own. The best option for inexperienced craftsmen is a square or rectangular structure, which is suitable for a hipped roof, which makes the simple design original.
Video instruction
On a suburban plot of land, regardless of the size and size of the buildings on it, there should be a comfortable gazebo.
It is where the owners and friends who come to visit them relax and spend time on summer evenings. The decoration and main part of the gazebo is its roof. Before you make a roof for a gazebo with your own hands, we recommend that you read this article.
Preparatory work before installation
To perform installation work yourself, you will need standard plumbing and carpentry tools. If you intend to install ready-made trusses, it is recommended to use a pre-prepared template, which will make all the trusses identical
.
If you want to equip a gazebo with a barbecue, you need to take care of fire safety. To do this, provide a safety barrier that will protect from flames. The grill or stove is equipped with a chimney to remove smoke outside the gazebo space. From a fire safety point of view, the most rational option for roofing decking would be to use metal, ceramic and slate materials.
Before installation work begins, all wooden elements of the future roof must be treated with fire and bioprotective compounds.
To select the slope angle of the slopes, you need to know the type of future roofing material, as well as the region where the building is located. Knowing this data, you can use reference books and tables on the Internet and select the recommended angle of inclination of the slopes.
Photo
Rafter system of a hip roof Rafter structure of single-pitch roofs Rafters of a gable roof Construction of a gazebo with a hip roof diagram Roof installation diagram Assembly of a hip roof with dimensions Calculation of the eaves overhang of a hip roof Formula for calculating the slopes of a hip roof Conical roof of a gazebo Central unit of a hexagonal roof Trellis gazebo with a soft roof Hip with metal tiles Semicircular polycarbonate roof Polycarbonate roof on a metal frame Shed roof for barbecue gazebo Shed wooden gazebo
Sources:
- besedkis.ru
- krovlyakrishi.ru
- stroysvoimirukami.ru
There are no similar posts, but there are more interesting ones.
Calculation of building materials
The amount of material is directly proportional to the size of the gazebo - the larger it is, the more it is needed. I suggest you study the approximate amount of construction resources that were needed to build a 3 by 3 meter wooden gazebo. It is quite standard and typical for most country houses.
The location of the rafters on the roof
Please note that in the previous block of information on the construction of a hip roof, a 4 by 4 gazebo was considered, that is, the amount of material for it was greater than the values given below.
The 100 by 100 beam is used only to create the base; it has only an indirect relation to the upper part of the structure.
- Base - 5 beams (3 meters); Support pillars - 4 beams (2.3 meters); Entrance and reinforcement - 5 beams (1 meter).
The 100 by 50 beam is already clearly used for the construction of the upper part of the gazebo.
- Rafters - 8 beams (2 meters); Cross - 2 beams (4.3 meters); Top trim, railing - 7 beams (3 meters); Railing - 2 beams (1 meter).
In addition to the main structure, a number of other materials are needed: lining, floor and inch boards, slats, roofing, paint, cement, brick, nails, screws, impregnation. Depending on the region and country, prices can differ fundamentally, so it is difficult to estimate an average cost.
A cube of forest costs an average of 7,500 rubles. Based on these numbers, conclusions can be drawn.
Design
The simplest gable design
When designing a gazebo, pay great attention to designing the roof. There are many types of roofs: single-tier and two-tier, dome and tower, single-pitched and hipped and many others.
Let's see in what cases these or other types of roofs are used:
A simple design that can be easily done independently is a pitched roof. They are installed on quadrangular arbors. The roofing material is mounted on the rafters. Rectangular gazebos look good with gable roofs.
For their installation, rafters of layered or hanging type are used. The disadvantage of this design is that it reduces the view of the surrounding area. Semicircular roofs are often installed on rectangular gazebos; in this case, the rafters are made of metal. The metal parts are connected by welding. The hip roof looks beautiful.
In essence, this is a hipped roof; all its slopes are made in the form of triangles. There is no ridge unit on the hipped roof. The round roof of the gazebo looks impressive. When assembling such a roof, bone rafters and circular sheathing are used.
The roof will look like a cone if it has a large slope, and helmet-shaped if the structure has a slight slope. A hip roof consists of four slopes. Of these, two are made in the shape of a trapezoid, and two are made of triangles. When installing hip roofs, use layered and slanted rafters.