Crafts from plaster: how to make sculptures with your own hands
Gypsum is flexible and environmentally friendly, so fakes made from it are increasingly becoming fashionable among handicrafts.
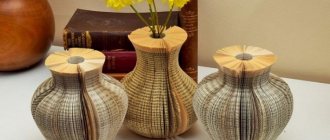
The softness and flexibility of the material allows you to make realistic figures, cut out small details and patterns, which makes plaster crafts excellent decorations for your apartment, garden, and vegetable garden.
Crafts made from gypsum are attractive due to their simplicity and accessibility, and master classes on such creativity can be shown to young children.
Moreover, in the process the child improves his skills in working with bulk materials, repeats or studies colors, and develops fine motor skills.
We purchase plaster for crafts
The decision to make something interesting has been made, and the question arises - where to buy plaster for crafts? It is recommended to go to hardware stores for gypsum, where it is hidden under the name “alabaster”, however, you should note that alabaster contains not only gypsum, but calcite.
You can also find plaster at hardware and craft stores. Online stores that offer a wide selection of high-quality goods deserve special attention, and the prices can pleasantly surprise you, since such sellers do not have to spend a lot of money.
What can you make?
Experienced craftsmen know that the possibilities of epoxy composition are almost limitless. You can create both decorations and more voluminous products. The completed items will be unique, they can be:
- rings;
- bracelets;
- earrings and pendants;
- brooches;
- keychains;
- paintings;
- plates and coasters;
- hanging shelves;
- chair seats;
- countertops of different sizes;
- kitchen aprons;
- any objects where there is a flat surface.
In addition to the listed objects from epoxy resin, methods for casting figurines are known and popular. These can be small figures like refrigerator magnets, or, if you have a casting mold of the required size, large sculptures.
Let's get started
So, the plaster has been purchased, and before you start working, you need to find out how to dilute plaster for crafts. This is very simple to do; gypsum powder is diluted with water in a large container, and then kneaded thoroughly so that there are no lumps.
For more accurate proportions, please refer to the instructions on the package. It is better to prepare a large portion of the solution at once so that the product turns out to be of better quality.
When working with the material, you must remember that the gypsum solution tends to harden very quickly, so you should start working immediately.
How to make a sculpture
In order to sculpt a figurine from clay, you need to prepare it - fill it with water and let it sit for three to four days. To make a small figurine, a frame is not required, but for a large sculpture you cannot do without it. But the foundation is required for any composition. So, the sculpting process consists of the following procedure:
- Draw a sketch or use a drawing as a reference.
- Take a piece of finished clay and knead it well in your hands.
- Roll into a ball if you need a disk shape.
- Blind all the necessary parts and glue them together, wetting the joints with water.
- Level the surface by smearing it with clay.
- Apply the desired design using tools.
- You can decorate with beads, shells, pebbles, etc.
- Air dry.
- Place in the oven and dry over low heat until the work takes on a pinkish tint.
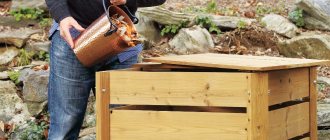
By analogy, you can sculpt a figurine or garden sculpture from concrete, which must first be prepared by adding sand, plasticizer and water. The finished composition matures within two weeks in a dry place.
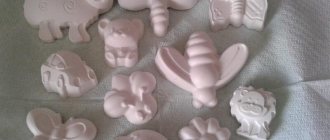
The process of creating a unique mold
In order to please yourself with something truly exceptional, you need to decide what material the form will be made from. When the choice is made, the process of cutting out the texture begins, where the solution will be poured in the future.
To create three-dimensional figures, you need to make two molds, pour the solution into them, and after it hardens, glue the resulting halves together. Please note that to create perfect seams you will need fine abrasive sandpaper.
It is recommended to paint the finished product after completing all the “rough work”, when the halves are connected and the seam is invisible. It is better to entrust such a creative process to children.
If your imagination for creating a form has run out, you can turn to the World Wide Web, where there are a sufficient number of photos of plaster crafts.
Adaptations
To make a high-quality epoxy figurine, you will need to purchase a certain list of items:
- polymer composition of resin and hardener;
- wooden stirring sticks, preferably round;
- plastic cups or other mixing containers;
- molds for filling, homemade or factory-made;
- wipes may be required;
- dye for coloring the composition;
- decorative elements to create a composition, if planned;
- filling for the pattern - stones, cavities in the surface being treated, luminescent powder;
- sandpaper of different grain sizes;
- mini grinder, for example, for nails;
- accessories, if fastening is required.
Useful to know > What dishes can be made from epoxy resin, manufacturing process
Of course, the list may vary depending on the type of shape you are creating. You can also make any shapes at the request of the master, especially if you have something, for example, silicone.
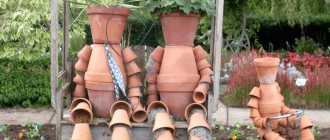
Decorating the garden
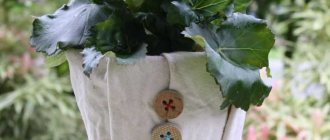
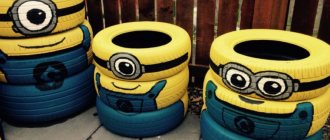
There are a great many options for gypsum crafts for the garden, most often these are smaller representatives of flora and fauna.
Note!
How to make a rose from paper - the best ideas for DIY crafts + master classes on creating a rose from paper (160 photos)Craft letter - TOP 120 photo reviews of craft letter. Simple diagrams + step-by-step DIY instructions
Crafts made from nut shells: the best step-by-step master classes on creating DIY crafts with photo examples of finished works
In the “first couples” you can create and make a decorative path, from, for example, bear paws or traces of small gnomes, a mold for which can be purchased at a specialized store.
When placing handmade gypsum crafts in your garden, you should avoid over-cluttering them. It should also be remembered that figurines that have not been opened with varnish should not be stored in the open air; plaster is a material that is afraid of moisture and will lose its original shape. For this reason, it is better to store the created masterpieces at home.
Safety
Before you start working with epoxy, you need to pay attention to some features of the process. First of all, you should take care of safety, for which you will need to prepare:
- rubber or latex gloves to protect the skin of the hands;
- a piece of plastic, plexiglass or cellophane to prevent it from getting on the work surface;
- a respirator to protect the respiratory system from fumes and dust;
- safety glasses to protect your eyes from particles while sanding the product;
- a thick apron, preferably rubberized;
- clothes that you don't mind getting dirty.
These measures will protect the craftsman and the workplace from the aggressive effects of the polymer. When processing large objects, for example, statues, the prepared sculptor will be protected to the maximum.
It is necessary to work only in a ventilated area; it is advisable to use forced ventilation.
Decorating the house
In addition to decorative figurines, the best plaster crafts for the home include busts and decorative stucco.
Plaster cornices can update your interior and make it unique.
Contrary to popular misconception, gypsum products, once installed, are highly wear-resistant and can decorate the interior of a room for centuries. Decorative stucco throughout its entire lifespan retains its original snow-white color and can be easily restored, if necessary.
Having a certain skill, it will not be difficult to set up your own production. Photos of plaster crafts
Note!
Mushroom craft - reviews of ready-made DIY crafts + step-by-step instructions and diagrams for children (180 photos)Crafts from toilet rolls: step-by-step instructions for creating crafts. Master classes with simple work schemes (140 photos)
Crafts from corrugated paper - step-by-step master classes on how to create crafts from corrugated paper with your own hands + photo diagrams
Origami swan
Take a square white sheet, mark one diagonal and bend the upper and lower corners to it. Fold the ends of the corners in the opposite direction, fold the piece in half and place it on the table like an open book. From a long, elongated corner, form the neck and head of a swan. Make a beak by bending the tip of the head back and forth, and then draw the swan's eyes.
Photo: yboard.ru
Photos of plaster crafts
Modeling and its benefits
The art of giving shape to plastic material is considered unusually alive and, importantly, tangible. Modeling rightfully takes the place of one of the most emotional types of visual activity. Even a child of early preschool age creates a real or fictitious image that can be touched, and not just imagined or seen.
The possibilities of modeling are widely used for the development of children. With its help, the child is able to:
- diversify your sensory experience by getting an idea of the material, its structure, plasticity, shape and color;
- create three-dimensional crafts;
- develop fine motor skills and coordinate the work of both hands at the same time;
- receive aesthetic education.
This is the case when not only the process is important, but also the result. It is interesting for a child to watch how a shapeless lump takes on the shape of a familiar object. He transforms countless times until he is satisfied with the result.
Spiral paintings
Pictures made using the spiral technique look original and beautiful. The photo shows an astronaut, and plasticine swirls provide a fantastic background. Manufacturing procedure:
- A sheet of thick cardboard is used as a base.
- The surface of the planet is painted yellow, and craters made of plasticine are fixed on it.
- Thin cylindrical flagella are rolled out of blue airy plasticine. They are twisted into a spiral and secured to the base. The spirals are closely approaching each other.
- The figure of the astronaut is made from flattened plasticine plates of the desired shape.
The possibilities for making panels from spirals are unlimited. Flowers made from bright materials look very beautiful. Spirals can be used to create sea waves. They can decorate any picture, giving some volume. You can vary the shape with your fingers, flattening the strands to varying degrees.
Girl Masha
- Make your hair longer from brown plasticine and a sponge into a bow.
- The body-blouse is also molded like a boy's, but from blue plasticine. Blind a purple skirt separately - roll it into a thick sausage, flatten it at 2 ends and narrow it a little at the top, forming a truncated cone.
- Make legs from 2 yellow sausages, boots from green cucumbers.
- Wrap a yellow ribbon around your waist. Decorate the jacket with purple ball buttons. Connect the parts in the same way as for the boy. Advice! Make different characters: a clown, a fireman, a princess, a rocker, a doctor, a top model and anyone else you can think of - all the figures are based on a ball, a cucumber and sausages. Put a hat on the skier (Fig. 1), mold his skis (Fig. 3) - to do this, roll up a sausage and flatten it with your finger (Fig. 4). Insert sausage-shaped ski poles into the skier's hands.
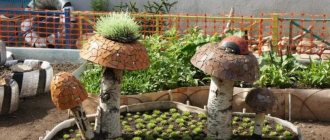
Animal figurines
You can build a whole zoo out of cement in the garden. A few ideas:
- Hippopotamus . The base can be made from large boulders or large basins, or simply pour a pile of gravel and cover it with a mounting mesh. The solution is applied in several layers. This craft looks good near a pond.
- Hedgehog . The figurine is constructed from a boulder or a large piece of foam. In the second case, rounded shapes are formed, and then the mounting grid is laid. The solution is applied in several layers, the latter imitating a needle-like coating. To form the nose, take the neck of a plastic bottle.
A typical example of a frame figure can be considered the “Fish” craft. First, the wire frame is assembled. Thick steel wire outlines the outline of the fish, and then rounded sides are formed. Filler is stuffed inside the frame, and the mounting mesh is laid on top. The solution is applied with a spatula in 3-4 layers.
Cement allows you to create a variety of crafts for the garden and home. A novice master will be able to do simple figures. Complex designs require specific sculptor skills. A creative person is capable of realizing any idea. In the process of work, you need to take into account certain nuances and listen to the advice of experts, and then the summer cottage will become a cozy and favorite corner for family and guests.
When and where to start
Adults will have to stay close to the baby during classes.
Firstly, it’s safer, because the baby is able to try the material on the tooth.
Secondly, it is necessary to help the child master the basics of this type of fine art: show the materials, introduce them to their properties, basic techniques and types of modeling.
By listening to a parent or teacher, the baby actively expands his vocabulary and learns to conduct a dialogue. Assignments must be age appropriate. If an older preschooler is able to create an animal figurine or a beautiful plasticine print on his own, then the little one, at best, will be able to master only the simplest modeling techniques.
You can start at about 9-12 months of age. Of course, it is difficult for the baby to sit in one place, but this is not necessary. It is enough that he receives new tactile sensations and realizes that in his little hands the material can take different shapes. It is important not to force the child to do something that he does not want at the moment, but to offer it later.
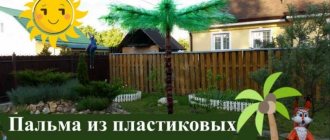
Garden decorations
Cement crafts are very popular in garden landscaping. You can make a fountain from concrete leaves. It is manufactured in the following order:
- A plastic pipe is installed to raise water to a height of 70-100 cm.
- A stencil of a large leaf is made or a natural leaf of a large size plant is selected.
- A hole 4-5 cm deep is cut out in sand or soil using a stencil. The bottom is formed in the form of a concave surface and compacted. A stencil is placed on it.
- A reinforcing frame is made from wire, which simultaneously imitates the veins of a leaf.
- The solution is poured to form a concave surface on top and veins along the wires of the frame.
- At the installation site of the structure, wooden posts of different heights are mounted vertically so that they form a cascade for the water flow.
- Concrete leaves are fixed on wooden posts.
To give the finished look, plants and flowers are planted around the fountain and a stone border is laid.
Patterns
When choosing a topic for a lesson, you need to take into account the age and skills of the children. For kids, a work of 5-7 parts is enough. Schoolchildren can show their imagination; they can only be given the basic details.
A pineapple
You will need: yellow, green, dark green and any color plasticine, stack, toothpick.
Master Class
- Roll a ball of brown plasticine (you can use leftover plasticine of any color for the base).
- Give the ball a pear shape and make the base stable.
- Roll out a ball of dark green plasticine, then roll it into an oval shape.
- Make a larger cake from yellow plasticine.
- Combine the green and yellow cakes, then roll them out.
- Turn the workpiece over with the yellow side up and draw a grid with a stack.
- Wrap the brown pineapple with a yellow tortilla.
- Trim off excess plasticine and smooth the joints with your fingers.
- Make oblong leaves from green plasticine and cut out the jagged outline.
- Stick the leaves to the top of the pineapple as shown in the image.
Plasticine pineapple is ready! Also check out the champagne and candy pineapple.
Modeling techniques
At the very beginning they are simple:
- pinching - separating a small piece from one large piece with the thumb and forefinger;
- kneading - pressing with fingers or hand;
- flattening - compressing a material and giving it a flat shape.
Later the techniques become more complicated and the child learns new ones:
- rolling - creating a ball shape using circular movements of the palm;
- rolling – forming “sausages” with your palms;
- smoothing - giving a round shape;
- indentation - pressing the thumb or index finger makes a depression;
- sharpening - giving a sharp end by pressing with fingers from all sides;
- pinching - pulling and sharpening one edge;
- connection - fastening parts together.