Profiled sheet is a modern, inexpensive, beautiful, high-quality and easy-to-use material. You can make wonderful gates from it yourself. How? Read on!
Do-it-yourself gates made of corrugated sheets
Do-it-yourself gates made of corrugated sheets
Do-it-yourself gates made of corrugated sheets
Profiled sheet
| Brand | Overall sheet width, mm | Useful sheet width, mm | Profile height, mm | Metal thickness, mm |
| S-8 | 1200 | 1150 | 8 | 0,4-0,8 |
| S-10 | 1155 | 1130 | 10 | 0,4-0,7 |
| S-15 | 1200 | 1150 | 15 | 0,4-0,8 |
| S-18 | 1150 | 1100 | 18 | 0,4-0,8 |
| S-20 | 1150 | 1100 | 20 | 0,4-0,8 |
| S-21 | 1051 | 1000 | 21 | 0,4-0,8 |
| S-44 | 1047 | 1000 | 44 | 0,5-0,8 |
| MP-18 | 1150 | 1100 | 18 | 0,4-0,8 |
| MP-20 | 1150 | 1100 | 18 | 0,4-0,8 |
| MP-35 | 1076 | 1035 | 35 | 0,5-1 |
| N-60 | 902 | 845 | 60 | 0,5-1 |
| N-75 | 800 | 750 | 75 | 0,7-1,2 |
| N-114 | 646 | 600 | 114 | 0,7-1,2 |
| NS-35 | 1100 | 1035 | 35 | 0,5-1 |
| NS-44 | 1050 | 1000 | 20 | 0,4-0,8 |
Studying the gate design
We will make the simplest gate of two leaves. Having mastered the technology, you will be able to build more complex structures: sliding, lifting, etc.
The gate leaves can swing inwards and outwards. At this point, focus on the features of the site and your preferences. The most popular option is external plowing.
The structure consists of support posts, frame and casing. Pipes and profiles are usually used to assemble supports and frames. The diameter of the pipes and the dimensions of the profiles are selected individually, taking into account the dimensions and weight of the future gate. The main load will fall on the external elements of the frame. For the manufacture of internal parts, you can use a smaller profile. The cladding is made using profiled sheets.
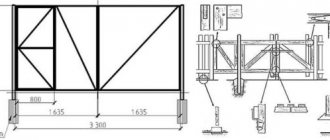
Selecting the size of the sashes
Diagram of a gate frame made of corrugated sheets
Before starting work, it is important to determine the optimal dimensions of the swing doors. At this point, be guided by the dimensions of the vehicle that will pass through the gate being built.
So, for the passage of most passenger cars, a gate with a width of 4 m is sufficient. For a truck, the opening will have to be expanded to an average of 6 m. Based on this, we calculate the width of each door. Select the height at your discretion. Most often, gates with a height of 2-2.5 m are erected.
Helpful advice! Make the dimensions of the gate with some margin, because it is possible that in the future you will buy a new vehicle that will have more impressive dimensions compared to the existing car.
To make the work easier and faster, we draw up a drawing of the future gate indicating the dimensions of all structural elements.
Rule 3-4-5 for marking the goal frame
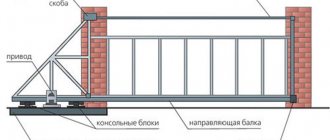
Installation
The progress of installation of swing gates is practically no different from the design of the gate.
Among the features, we note that an excessive number of crossbars (used to impart rigidity) makes the structure heavier and causes the sashes to sag.
When installing such gates, padlocks are used rather than mortise ones.
Making the foundation
First step. We mark the places for installing vertical supports. There will be 3 such posts in total: one for attaching the gate and a pair for mounting the sashes.
Second step. We dig holes with a diameter of about 20-25 cm (depending on the size of the selected racks, more on this later) for installing supports. We calculate the depth of the pits so that it is approximately 30-35% of the height of the above-ground part of the supports. We take into account that the height of the gate leaf is usually 50 cm less than the height of the supports.
Thanks to this reserve, the required 20-30 cm gap between the ground and the lower edge of the sashes will be provided, and the rest of the reserve, at the request of the owner, can be used for installing various decorative elements at the top of the structure.
Third step. We fill the bottom of each depression with a 10-15 cm layer of crushed stone. Carefully compact the pillow.
Fourth step. Preparing the solution for pouring the supports. We take part of M400 cement, a couple of parts of sand and 4 parts of fine crushed stone. Mix the dry ingredients, gradually adding water to them until the mixture has a viscous consistency.
Fifth step. We insert support posts into the holes. They can be made from different materials, namely:
- timber with a section of 15x15 cm;
- round log with a diameter of 20 cm;
- channel beam with walls at least 1.5 cm thick;
- profile pipe with a cross section of 8x10 cm with walls no thinner than 7 mm.
We insert support posts into the holes
The pillar is installed in the pit, its vertical position is achieved using a level.
We set the supports strictly vertically and fill them with solution to the top of the pits. In the case of using wooden racks, we pre-treat their buried parts with an antiseptic and wrap them in roofing felt or tar them.
To make the metal supports more stable, we can first weld 3-4 horizontal strips of steel reinforcement, metal angle or pipes to their lower ends.
Let the concrete set. He needs at least 2-3 days for this. According to GOST, concrete gains strength on average within a month.
While the concrete dries, let's start making the frame.
We weld the transverse fence pipes to the gate posts
We weld the transverse fence pipes to the gate posts
We weld the transverse fence pipes to the gate posts
Making a frame
It is advisable to make the frame from the same material as the supports. Most often, the racks and frame are made of metal products. We assemble the frame from profiled pipe.
To assemble the frame, we find a horizontal platform that can freely accommodate at least one sash.
The process is extremely simple: we need to weld a rectangular frame from a pipe (profile) pre-cut into pieces of the required size. The angles must be strictly straight. We verify this using a square.
Marking and welding frame corners
Marking and welding frame corners
Marking and welding frame corners
Having welded the frame, we strengthen it in the corners using steel angles. To give the frame additional rigidity, we divide it in height into 3 approximately equal parts and weld parallel horizontal jumpers along the marks. We also strengthen the junction points of the lintels with the frame using steel corners. We weld the gate hinges at the same points.
When the frame is ready, we weld a steel strip around the perimeter to secure the corrugated sheet.
Helpful advice! There is another popular option for strengthening the frame. To do this, a horizontal jumper is welded in the center of the frame to its vertical sides, dividing the frame into 2 identical rectangles. After this, the corners of each of these rectangles are connected by diagonal jumpers. Choose any of the two hardening methods discussed, they are both good.
The frame for the gate is assembled in a similar way. If you want to make a gate directly in the gate leaf, assemble the frame in a slightly different order. To do this, weld transverse and longitudinal metal jumpers to the rectangular frame of the selected sash, thereby forming the frame of the gate. The average dimensions of the gate are 80x180 cm. If possible, stick to these values. We shift the places where the hinges are attached to the sash to the upper and lower edges of the frame.
Frame for gate
Wicket frame
Prices for popular models of welding machines
Welders
Materials and tools
To make a gate from corrugated sheets with your own hands, you will need the following materials:
- corrugated sheeting with a polymer coating (acrylic, polyvinyl chloride, polyester, polyurethane); recommended thickness 0.6-0.9 mm; The wave height is usually small - about 10 mm;
- roofing screws with a rubber washer, painted to match the color of the sheet;
- steel pipes measuring at least 80x80 mm for support posts; for a small gate without a gate, you can take a pipe measuring 60x60 mm; with a wall thickness of at least 3 mm; the pipe can be replaced with a structure of two U-shaped channels welded in the shape of a pipe;
- steel pipes measuring 40x40 mm or 60x40 mm for the gate frame;
- anti-corrosion primer;
- weather-resistant exterior paint;
- loops;
- lock;
- crushed stone, sand, cement for mortar;
- gravel or crushed stone of medium fraction;
- electrodes.
List of tools:
- welding machine. You can use the services of a welder - but for the estate it is better to purchase a machine and learn how to do simple work yourself. The price of the device will more than pay off over the years of operation, because the work of a welder is not cheap. For a home craftsman, it is enough to have an inverter welding machine with a welding current of 160-200 A;
- angle grinder (grinder) with wheels for cutting and grinding metal;
- drill and screwdriver - for drilling holes and tightening screws;
- construction tape, metal ruler, level, construction square, plumb line, chalk, scriber;
- clamps – necessary when assembling the frame, when installing hinges and a lock;
- garden drill with a diameter of 250-300 mm - for drilling a hole for support posts;
- concrete mixer or construction mixer and container for mixing concrete;
- shovel - for loading bulk materials into a concrete mixer or for manual mixing of concrete;
- bayonet and shovel shovels - for digging a hole if it is not possible to use a drill; a hole dug by hand will have uneven edges - this will increase the consumption of concrete;
- crowbar - useful when digging pits for pillars to break up dense rock.
We adjust the sashes to the racks
First step. We install the gate leaves on stands, which can be made of timber, brick or other suitable material.
Second step. Align the sash along all planes.
Third step. Our frame already has hinge elements. We mark the places for installing the second part of the connecting element on the supports. We weld the hinges to the posts according to the marks.
Fourth step. We hang the sash. We remove the stands installed at the beginning of work.
We place a board at the level of the gate fastening. Level it up
We set the gate according to the level. We tie them to the posts with ropes
Trying on the gate before installation
We cleaned the places for welding hinges from paint on the poles and on the gates
A board was placed in the middle of the gate to raise the gate a little. When we weld them, they will lower a little under their own weight and take a horizontal position.
We connect the gate from above with a pipe and tie it to the posts
We mount the frame of the second rack in the same way. To make the structure even more rigid, we can weld the two outer gate supports with the posts of our fence.
To increase the stability of the gate to wind loads, we can weld a horizontal strip of metal profile along the upper ends of the support posts. This is only relevant for situations where only passenger vehicles will pass through the gate.
We weld one part of the hinge to the stand, the second to the frame, and make cutouts in the corrugated sheet before fastening.
Loops
Don’t get confused, hinges without a pin are welded onto the folding frame
During welding, you need to ensure that the hinges are flush with the profile
Installing hinges
Loops
Next you need to clean the welds with a grinder and a grinding disc and paint the sash with anti-rust enamel
The hinges must be welded parallel to the pole
First, we grab the hinges and then try to open and close the gate. If the gate opens normally, we finally weld the hinges to the posts and to the gate
Finally, all we have to do is paint the parts of the frame that will remain visible after attaching the profiled sheets. We select the paint color so that it harmonizes well with the color of the corrugated sheet and the fence.
Gate frames successfully welded
Painting the frames
Corners were welded over the top hinge of each gate so that the gate could not be removed
How to make swing gates and wickets: answers to the most frequently asked questions
The portal's users liked the UncleVovan gate. They asked the master questions.
MishaninaForumHouse Member
Can you please tell me what size the profile pipe is?
UncleVovan
I bought this pipe:
- Section 60x40x2 mm - 24 m;
- Section 40x20x2 mm - 18 m;
- Section 40x20x1.5 mm - 24 m.
Mishanina
What is the height of the posts and fence?
UncleVovan
Gate posts are approximately 2 meters. Then I will make the fence from welded mesh. The height of the fence will be 1.8 m.
Mishanina
How did you reinforce the foundation and how much cement did you use?
UncleVovan
Foundation reinforcement – 2 rows of 5 rods + 5 pcs. transverse frames. Together with the laying of the pillars, 15 bags of cement, 25 kg each, were needed. “Ten” fittings. It took 72 m for the foundation and 24 m for the pillars.
We fasten the corrugated sheet
Self-tapping screws for corrugated sheets
Self-tapping screws for corrugated sheets
The width of the corrugated sheet is usually 110 cm. About 10 cm will be spent on the floors. Thus, to cover a two-meter wide door you need exactly 2 sheets of material. If desired, the gate can be sheathed on both sides.
We attach the corrugated sheet to the gate. We make cutouts for the hinges
We attach the corrugated sheet to the gate. We make cutouts for the hinges
We fasten the sheets using hex head screws and nuts or special rivets. It is better that the color of the fasteners and the base material be the same.
If necessary, pre-paint the fastening elements. We place bolts or rivets in the inner wave of the sheet (the one that fits tightly to the frame). We fix it in each wave of the profiled sheet. For greater convenience, we can pre-make holes in the frame to accommodate fasteners.
The gate is sheathed similarly to the doors. You just need to pre-cut the sheets to the size of the gate.
Front side
View from the yard
Useful notes
The fence is ready. To ensure that the work is completed to the highest possible quality, and the finished result pleases you, read a few useful notes and take them into account during the manufacturing process of the structure.
- The gates are installed in a single plane with the fence.
- Wickets and gates must be equipped with reliable locks and comfortable handles.
- Fences and gates should be harmonious in color both with each other and with the surrounding landscape.
The knowledge gained will help you make high-quality, reliable and beautiful gates from profiled sheets with your own hands. Follow the instructions and everything will definitely work out.
Read our new article - “Choosing an entrance gate for a country house.”
Vertical gate locks
Prices for popular types of corrugated sheets
Corrugated sheet
Good luck!
Preparatory stages
Before you make a gate from corrugated sheets with your own hands, you should think through the sequence of actions and prepare.
The first stage of preparation is determining the size of the gate. The height of the door depends on the height of the fence, but usually does not exceed two meters (two meters and ten centimeters if there are tall men in the family). If the fence is very high, then the gate is not made to cover the entire height of the fence, but lintels are made of a steel profile over the door and covered with corrugated sheets. The width of the opening is usually made one meter to ten centimeters - this width allows you to enter the area with large bags in your hands or bring in furniture. A larger gate width requires a heavier and stronger frame with additional crosspieces; not very convenient to open; there is a possibility of the door skewing during operation.
The second step is to think over the design of the door and support posts and draw a diagram with dimensions.
The third stage of preparation is to prepare materials and tools.