The lock for the gate can be different in terms of operation and installation of the internal structure. These parameters affect the level of reliability and service life. Nowadays, outdoor gate locks are used, both classic mechanical models and new electronic products. Before you go shopping for locking equipment, you need to familiarize yourself with what devices exist.
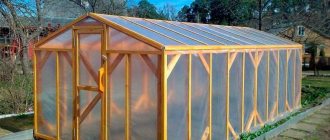
Street gate made of corrugated sheets
DIY padlock installation
Its installation is very simple, it starts with markings.
- Places for fastenings and cores with a rotating tongue are marked.
- Then, in accordance with their diameter, holes are made and the lock body is attached.
- To mark the counter part, proceed as follows: lubricate the bolt with toothpaste, close the gate and turn the key. The groove for the crossbar will be outlined quite clearly. Self-tapping screws are not used here. Fasteners are included in the purchase package.
There are special mortise locks for gates made of corrugated sheets on sale. Their thickness is minimal and they just fit into the profile recess. This greatly simplifies and speeds up the installation process. A welding machine is not required, but a drill is needed to drill holes for the screws and core.
Coded mechanical products can also be installed on your own without the involvement of a specialist. They are placed on the gate, and when it is closed they are triggered automatically. They do not have a keyhole, and there is no need to carry the key in a bulky bunch. The door can only be opened by entering the correct numeric code. The numbers are printed on special rotating rings.
Drawing with dimensions of a mechanical combination lock
combination lock
On the courtyard side they have a button for opening, and on the street side there is a keyboard for entering a code. Some of them can be opened with an ordinary key in the absence of electricity. Their reliability class is higher, but the installation is quite complicated and not every consumer can afford it.
Tags
medieval castle from your own hands medieval with your own hands castle with your own hands castle with your own hands with your own hands with your own hands this was done on the windows are made through. the walls are made into an extension. in the ones made in you will make a special one we made it Do it yourself you need to make holes. Do-it-yourself furniture Do-it-yourself shoes Clothes with your own hands Do-it-yourself candles Do-it-yourself bags Packaging with your own hands We create with our own hands
needpaperarticlescommentsandtowersmasterflowersteethcutsheetsphotospaintclassescrafts
Installation
So, given: the gate for the fence made of corrugated sheets is welded, hung on awnings and sheathed with profiled sheets. Welding is at our disposal; There is also some three-millimeter steel sheet. In addition, it is worth getting out of your bins a drill, a grinder with a cutting wheel for metal, a square and a scriber (any sharpened object made of tool steel will do the job).
Factory-made metal scriber.
Overhead
How to install a padlock? The instructions are very simple if a cross member is welded at the height of the castle (usually 90 centimeters from the ground).
- Attach the lock from the inside so that one of the mounting holes rests on a horizontal profiled pipe, and the core and handle are below or above it. Mark future holes in the frame and a recess for the crossbar. If the post next to the gate is not wide enough or is made of a round pipe, you will have to weld a plate or corner under the lock mate.
- Drill holes - in the frame for fasteners, in the corrugated sheet for a key and, if necessary, for the handle. A hole in the profiled sheet is drilled along the contour and leveled with a roller cutter. In the same way, a groove is made for the crossbar in the column.
- All that remains is to secure the lock and install the core, handles and linings.
Another way is to drill holes of a smaller diameter and cut threads for the screws with a tap.
If the crossbar is located at an inappropriate height, installing a rim lock in a gate made of corrugated sheets will require welding an additional plate under it.
Mortise
How to embed a lock into a gate made of corrugated sheets?
If the frame of the gate is made of a thin pipe (for example, 20x40), the only way out is to weld a box made of steel sheet under the lock. Its dimensions should first of all leave minimal side gaps between the walls and the lock body. Material: three-millimeter steel.
From the end of the gate, a groove is selected for the crossbar and holes are drilled for the fastening screws. It is advisable that they be outside our box, otherwise we will again be faced with the impossibility of screwing the nut onto the screw thread. In the box, key grooves are selected on both sides (or for the entire core).
The counter part is mounted on a pole; as an option, a groove for the crossbar is selected directly in it.
Of course, it is also possible to install a lock in a gate made of corrugated sheets. However, you can’t call her neat; in addition, the mechanism will be exposed to rain and snow.
Finally, it is worth mentioning the most, so to speak, civilized scenario.
On sale for a long time you can find special mortise locks for gates made of corrugated sheets. They have a minimum width and are designed for installation in a profiled pipe measuring 40x40 millimeters.
This narrow-profile lock is designed for professional pipes measuring 40x50 mm.
Inserting the lock is simple and does not require welding.
- After marking, a groove for the body is selected at the end of the gate. Using a grinder, two vertical cuts are made and another one is made diagonally to the future rectangle; then the resulting triangles are bent outward and cut off. The edges are smoothed with a file.
- Holes for screws and a core are drilled in the side surfaces with a drill.
- To mark the mate of the lock, you can use a little trick. Coat the bolt with toothpaste, putty, or any other thick, colored substance. Then, with the gate closed, turn the key - and on the post there will be a clear imprint of the place where the groove should be.
Once all the holes have been selected, all that remains is to secure the lock with screws - and the job is finished. But how to install a fence from corrugated sheets? Read about this in other articles on our website.
The result of our work.
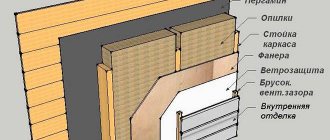
Making walls
To make walls, a rectangle of the required size is assembled from boards, after which it is placed on a flat surface, which is previously covered with a piece of film or roofing felt. The solution is poured into the resulting frame. To make a window or door in the wall, you should pre-position the frames in the desired location.
After the solution has been poured to the required height, stones or crushed stone can be inserted into the lower part to create a kind of imitation of the foundation, or using a knife, draw grooves - characteristic gaps between the foundation stones.
When the solution has hardened, the frame is removed and, if required, details are added: windows, loopholes, etc. After this, the walls are left to dry for another day.
It is better to choose a sunny day to build a castle . It is best to place it on a hill, which can be a pile of stones. To ensure that the walls stand securely, a foundation is built for them, on which a thin layer of cement is then applied. And only after that is it worth installing the walls. They can also be strengthened in another way, for example, the internal cavity is filled with stone, rubble or mortar.
Since simple concrete castles look gray and dull, many people paint them. For this, acrylic paint is used. This decorative element will become a real decoration of the garden, and both children and adults will be happy with it.
Mortise
It is believed that mortise locks for gates are more advanced in design. They make it possible to reliably lock the gate, and opening it will not be very easy.
This lock is secured with 6-10 long bolts, so you should create a reliable gate structure before installation. To do this, sections of profile pipes should be welded onto the standard frame to enhance the rigidity of the structure.
If you want a secure lock installation, you should weld the lock directly to the frame. We recommend contacting an experienced specialist who is well versed in welding structures made of different alloys.
Tips for use
To ensure that the installed gate locks last as long as possible, you need to adhere to the following recommendations:
- periodically check the device for serviceability: if problems are identified, repairs should not be delayed and it is better to immediately find out what the reason is;
- It is recommended to make a protective canopy over the locking mechanism, which will prevent direct ingress of precipitation;
- check the mechanism annually before winter and after frosts; if necessary, lubricate.
Correct installation and operation of the device in question is the key to a long service life without problems.
Electronic devices
Locks of this type are the most expensive and most reliable. The high technologies used in the mechanism make the electronic lock practically invulnerable. The operation of the locking device is coordinated by the control unit, which receives information and sends signals to open, close or block the lock.
Electronic locks from Samsung
The source of information is a scanner mounted on the outside of the gate, an infrared or radio signal receiver. The lock can be configured with the owner's and family members' fingerprints, iris or barcode.
Choosing a locking mechanism
When choosing a locking product, you should first decide on the purpose of the installation. If you want to buy devices with high resistance to failure and moisture, then level representatives will be a win-win option.
Level options are less susceptible to moisture
Also, for ease of use, it is advisable to attach a lock of such a modification that it can be locked from the inside without a key. However, a necessary condition here is unhindered access from the outside using a key after such closure.
The next determining factor when choosing is their dimensions. The closing device for the gate should not be too bulky or expensive. It makes no sense to buy products with increased reliability and complexity of a fence lock made from the material under study. Such a latch will not save you from an attacker who decides to bypass the security device using mechanical force (cutting, chopping) on the profiled sheet.
Optimal ratio of locking device dimensions
The best options for gates made of profiled sheets are overhead and mortise mechanisms. However, the installation procedure for these protective devices is significantly different, which can be seen in the corresponding videos.
Pins and latches for sliding gates
How to make a bolt for a sliding gate. The opening force is directed horizontally. To fix the sash, it is enough to use a vertical pin.
- Take a calibrated rod with a diameter of 10–12 mm. Bend one end of it at a right angle - this will be a handle. Grind the second one onto a cone and round it.
- Weld 2 pieces of pipe up to 20 mm long onto the metal plate along the edges. The internal diameter is selected based on the tight fit of the rod.
- In the extreme position of the gate, mark the point of contact of the end of the pin and drive the tube into the ground. The rod should fit into it to a depth of 50–70 mm.
- On the pin, mark a point in the closed position above the lower ring of the pipe and weld the pin to it parallel to the direction of the handle. Make limiters on the plate. In the closed position, they should not allow the rod to rise up. When the gate is open, just turn the handle parallel to the door leaf, and the latch will hold the bolt in the open position.
Options based on operating principle
A gate lock, like any one installed in a house, has various mechanisms inside. Some are mechanical and can only be opened with a key. Others use electricity, and to let guests in, you don’t have to leave the house and go to the gate.
Scheme of interaction of the components of locking devices of the “cylinder” type
Mechanical
All mechanical models, regardless of design, are opened with a key or by entering a code when a person comes into direct contact with the mechanism. There are several types of mechanical locks for gates:
- latch;
- rack and pinion;
- cylinder;
- level
Diagram of components
The latch simply holds the door closed, but does not lock it. It consists of a wedge-shaped tongue, which, when pressed on the canvas, is pressed out and then takes place in the hole of the bar. Opens on both sides with a handle.
The latch can be mounted independently or together with the lock.
Rack lock
The predecessor of the rack and pinion lock was the ordinary deadbolt. It was installed in two flat brackets on the canvas and, when locked, went into a third on the wall or counter. It only opened on one side.
Inner side of the mechanism
In the upper part of the latch, recesses were cut to allow the door to be locked from the outside. An iron key wound in them and turned. In a few steps the bolt opened. The key was large and consisted of a rod with a ring. On the other edge there is a long narrow plate attached to an axis. It could rotate in the plane of the rod, and was rigidly fixed against rotation in the other direction. It was enough to insert the key into the hole above the bolt, and, getting into the cutouts, turn the key, moving the bolt.
A type of rack-type locking device
Over time, the bolt connected to the rail. On its upper plane there are inclined teeth cut. Similar ones, but with the opposite direction, are cut on the key shaft. Springs hold the bolt closed. It is enough to press the key, the teeth will begin to move and move the rack to the side, into the open state. The bolt lock is activated from the inside.
Installation of the mate
This is the most difficult and important part of inserting a lock into an interior door. It is an incorrectly installed or bad eye that is the most common cause of rattling and skewing of the door, jamming of the lock, loosening of the jamb and damage to the wall finish. To avoid this, a modern lock tongue eyelet consists of 2 parts (except for fastening hardware): the eyelet itself (lining on the jamb with a cutout for the tongue) and a tongue catcher - a plastic box (on sale for some reason it is called decorative, although it is not visible ), pressed by the eye. The box dampens dynamic loads on the tongue and protects the jamb material from direct contact with it. For the same purposes, the eyelet is made with an adjustable mustache, see below.
About markings under the tongue
Marking the tongue of the lock on the door jamb under the mate with a pencil
Installation of the eye begins with marking the end of the lock tongue on the jamb; everything else is not tied to. Usually the tongue on a joint is marked by marks and measurements, see fig. on right. But this can be done much more accurately in other ways, different for flat and round locks. In the first (“flat”) case, a lining with a thickness of approx. 2 mm is the size of the operational gap of a closed door. The simplest way is to fold a piece of paper into several layers, wet your finger, place it on the paper and immediately stick it on the door. Then washable paint is applied to the tongue of the lock (you can smear it thickly with a felt-tip pen). The door is now closed until it slams, i.e. until it stops at a quarter, and with a key push the tongue several times until it stops in the jamb. It will leave a mark clear enough to mark the full outline of the tongue.
Method for marking the center of the counter part of a round lock on an interior door
In the case of a round lock, the matter is simplified again. There is no need to coat its tongue with paint, especially since it is beveled and has a complex cross-section. But you need to take your time at the end of the door to drill a 23 mm hole (socket) for the lock body. They drill a 50 or 54 mm hole in the canvas for the sockets, and for now leave a pioneer hole with a diameter of 4 mm at the end. Then the door is closed until it slams (without lining), a 4 mm self-tapping screw is inserted from the cylinder side and the center of the tongue on the jamb is marked with it. For clarity, what it looks like with the door open is shown in Fig. on the right, but in reality the door should be closed. The tip of the screw will go 1-1.5 mm as the door opens, which will give the required operating clearance.
Installation of eye and catcher
Installation of the counterpart of the interior door lock after marking the tongue mark on the door jamb is carried out step by step. order (see also fig.):
Installing the counter part of the interior door lock
The lock must be fully assembled on site and securely fastened; The eyelet is turned over (it is symmetrical about the horizontal axis), placed in place so that the vertical axes of the tongue and eyelet coincide and its mounting holes are marked (marked with arrows). Do not bend or break off the adjusting tab (also marked with an arrow)! At the same step, a pocket with a depth of the thickness of the eye is selected; Apply the catcher in the same way and mark the outer contour of its tray with marks by hand; The outer contour of the catcher tray is beaten in place; Drill a socket for the catcher. Do this with a pen, as in pos. 5, actually it’s not necessary, especially if the jamb is made of MDF: a through hole from the guide tooth will weaken the jamb
It is better to drill in the corners with a twist drill; Using a chisel, select the catcher's nest; The catcher is already applied in the working position; Mark its outer contour; Choose a trap under the catcher; The catcher is put in place; Cover it with an eyelet already in the working position; Drill holes locally for small self-tapping screws, with a diameter 1.5-2 mm smaller than the standard ones; Temporarily secure the eyelet with small self-tapping screws; Check the movement of the tongue (whether it is stuck) and the play of the closed door - yes, no; The tight movement of the tongue and the play of the closed door are eliminated by removing the eye and carefully bending/bending its adjusting tab; The mating part is finally secured with standard fasteners.
Pinwheel and latch
To make a turntable, it is enough to have a small block of wood. It is nailed to the gate support (which is secured with latches) with a nail or a bolt (through). The spinner has a rotating mechanism.
The latch was loved for its versatility and reliability. It is attached to the frame, the door itself or the leaf. Sometimes it is mounted in the place where the gate opens from the side of the yard (it is not noticeable, it is as hidden as possible).
Making a latch
The shutter is constructed like this:
- It is necessary to fix the pipe (0.5 m length) in the ground.
- Mark the future location of fasteners and mechanisms.
- On the gate canvas, above the pipe, we fix a cable or rod with a through hole (for twine).
- We stretch the cable to a suitable convenient place. When it is tensioned (pressed), the latch rises and the gate opens. The main thing with a snap shutter is to treat it in a timely manner from the influence of the external environment (frost, rain, sun).
Pinwheel
Making a bracket with a hook
Installing the usual bracket with a hook will not cause any trouble. It is built like this:
- We need hardware, which we buy or make ourselves from wire (up to 5 mm).
- We process the wire with fire ourselves, holding it with pliers. We achieve full heat (red burning color) in the place of the future bend.
- We take another pliers and form a hook by bending a hot rod.
- We temper it with fire again.
- Quickly dip into cold water.
- We re-treat the tip of the hook with flame.
- Bend the working part to the desired angle.
- Final processing of the part by fire and subsequent placement in cool water.
- In this way you can make any part for a future latch (bracket, hook...).
- All that remains is to attach them to the gate leaf (usually with nails).
Simple circuit diagram
We treat metal products with a special anti-corrosion compound (if they are not galvanized).
What kind of locks can you install yourself?
Over the centuries of human development, many locking structures have been invented. Each is designed for specific needs and interests of the consumer. Among the variety of modifications, reliable and easy-to-use devices are primarily in demand.
Mechanical
The mechanical device assumes the absence of additional elements, such as a power supply or antenna. A key and a master key can open it, but the degree of protection is affected by the number of fonts and rings; the more complex the mechanism and the more expensive it is, the harder it will be to open it. Installation does not require special skills, just come up with a fastening system. Often there are models with a hook latch, that is, the gate will be closed not only with the help of a puzzle, but also with a hook.
Mechanical lock
Magnetic
The lock includes a bolt system, operation is possible due to magnetic attraction. A special key removes the magnetic field, speeding up and simplifying opening, which makes life easier for household members. It is difficult to hack the structure, even with special equipment. It is possible to carry out the installation yourself.
Magnetic lock
Advice!!! Sharp impacts when closing the gate displace the plates; the device is sensitive to such vibrations, so it is advisable to equip the gate with a closer for a soft and smooth shutter.
Electromechanical
It is considered reliable compared to its previous analogue. The device has one, but significant disadvantage: for operation it is necessary to think over the power supply system. It is permissible to install the gate yourself, but it is better to entrust the connection of the drive or motor to an electrician.
Electromechanical lock
Code
To open it, you need to set the code sequence in a certain way using cylinders or a keyboard, if you have a power supply. The gate key simply cannot be lost or stolen. If necessary, it is possible to change the code. The key can be quickly transferred to a third party, a guest, without the need to involve special professionals, and access for the owner is simultaneously maintained. But the combination is easy to spy on, so entering the sequence requires secrecy. In terms of installation, locks of this group have no nuances. The code gate is an excellent solution for forgetful people.
Code lock
Remote
For active people, know-how for gates is suitable - a remote locking device. The design includes a SIM card to notify the owner about unauthorized hacking, an antenna, receiver and batteries, and a remote control is included in the kit. The remote shutter combines the reliability of an electromechanical one and the convenience of a signal receiver. The internal controller constantly changes the code, so it is impossible to intercept it, and replays of old versions are considered invalid.
Remote lock
Groove type lock
Taking into account that the device itself is not a complex type, it has a fairly high level of protection against hacking and entry of unwanted guests. How the mechanism works: a key that is inserted into a hole in the lock and activates a gear-type mechanism, thereby opening or closing the door. In order for the mechanism to be fixed, clamps are used in the configuration, that is, valves that are equipped with a spring base. With the help of such a mechanism, the lock will be activated without much effort.
Groove lock
Installation of the mortise mechanism
Installation diagram of a mortise mechanism on a gate made of corrugated sheets
Often, narrow pipes, for example, 20*40 mm, are used to make the frame of the gate. Do-it-yourself insertion of a lock for gates made of corrugated sheets can be carried out using two methods.
For the lock, a metal box 3 mm thick is welded, the dimensions of which should be slightly larger than the dimensions of the lock. At the end of the gate frame, you drill a slot for the crossbar with your own hands, as well as holes for fasteners. It is advisable that the fasteners be located outside the box, otherwise it will be difficult to attach the nut to the screw with your own hands.
In the box itself, you should drill grooves on both sides for the core with your own hands, and arrange the groove of the mating part on the post. But this method of installing a lock for a gate made of corrugated sheets is practically no longer used. Most likely, this is explained by the fact that only a virtuoso can accurately perform such an installation, and the box will not provide reliable protection from rain or snow.
The modern market offers mortise locks for gates made of corrugated sheets, characterized by a small width. Their installation is possible even in a pipe with a cross-section of 40*40 mm. Mechanisms of this type are called narrow-profile, and they are installed quite easily in several stages:
- At the end of the gate, a marking is made of the place where the groove for the housing will be located.
- Using a grinder, the long sides of the rectangle are cut out, and a diagonal slot is made in the center.
- Then the metal triangles are folded back and carefully cut off.
- You can level the cut points with a regular file.
- Holes for fasteners and cores are drilled on the side surfaces.
It is easy to mark the location of the mating part using toothpaste, putty or a similar mixture. The bolt is lubricated with the selected substance, the gate is closed and the key is turned so that the bolt rests against the post. An imprint remains, which will later be drilled into the groove.
As it turned out, the process of installing a closing device of any type with your own hands is not so difficult if you have the skills to work with an angle grinder, a welding machine and other auxiliary tools. And the construction market has a lot of offers to facilitate the installation process.
Homemade designs
It is very common to find pinwheels used to lock garage doors. They work like a deadbolt. The design is simple, you can install it yourself. The operating principle is as follows:
- Eyelets must be mounted on the inside of the gate; they can be made of either metal or wood.
- A turntable must be installed in the center of the gate using a through bolt. It will be driven by turning relative to the central part.
- The ends of the turntable should fit into the eyes. This is how they lock the doors as securely as possible from the inside.
There are absolutely no parts of the castle outside. It is almost impossible to hack this design, so its reliability is very high.
What kind of lock to put on a gate made of corrugated sheets
Locking devices are divided into the following types:
- Rack and pinion. This is a bolt that moves in hinges, for which they must be welded to the corrugated sheet. Installation of such systems is carried out on the inside of the gate or wicket.
- Mounted. These locks are also called barn locks. They are preferred to be installed in a summer cottage area where no expensive property is located, since such mechanisms are quite easy to hack.
- Overhead. Such products are reliable and cannot be opened without a special tool.
- Mortise. This type of lock needs to be embedded into the door leaf, thus eliminating the possibility of physical break-in. Before choosing this lock, you need to take into account that installing such mechanisms is not possible for every type of gate.
Mortise mechanism
All the structures described above can be installed in the country. However, we must not forget that the device must be positioned correctly, since the reliability of the locking mechanism will also depend on this. To determine which lock to buy for a particular site, you need to take into account the features of the fence.
In this case, it is difficult for a thief to get close to the latch in order to cut or move it. As a rule, mortise structures are used for gates made of corrugated sheets. They help to reliably protect the dacha from intruders.
in winter
Electromechanical options
These locks can be opened with a key or by an electrical impulse. If you have guests, you can open the gate without leaving your home by pressing the intercom button.
Overlay option before installation
Coded electromechanical products
This lock is called a combination lock. Such mechanisms are more reliable than electromagnetic devices, which is why many dacha owners buy them. These types of products consist of a lock and an instrument panel. To unlock the gate, you need to dial a code.
If necessary, you can change the specified code. The disadvantage of these devices is that they require constant electricity to operate. Therefore, a lock is often installed on a gate made of corrugated sheets, powered by a battery. It is almost impossible to hack this mechanism; this requires expensive equipment.
Reliable option on a welded structure
Electromagnetic
The devices are not used on gates made of corrugated sheets; they are installed on door leaves in the entrances of multi-storey buildings. They are tuned to magnetic tablets, and can only be unlocked using equipment specially made for this purpose. The main advantage of electromagnetic locks is their increased reliability.
In stock
The advantages also include the following:
- cannot be unlocked with a master key;
- can be mounted in places where doors are frequently used;
- there are no moving mechanisms. Due to this, the device has a long operating time.
Electromagnetic locks are manufactured for door leaves weighing 400–600 kg, and separately for leaves weighing more than 1500 kg. Based on the type of operation, these mechanisms are divided into two types:
- Shear.
- Retaining.
Before installation
The latter type produces its work due to “sticking”. So, even during the shrinkage of the house, the functionality of the locking mechanism will not be impaired. These locks are usually placed on canvases that are frequently used throughout the day.
Shear structures are installed on any type of canvas, in particular on gates made of corrugated sheets. Before choosing a specific model, it is worth taking a closer look at the mechanisms used for working outdoors in bad weather conditions.
The photo shows a padlock.
In a hardware store
Locking mechanisms for gates made of corrugated sheets
For sheets made of corrugated sheets, special locks are made, which are small in size and placed in the corrugated pipe. It should be noted that installation of the device will not require welding this structure, as a result of which the fastener is significantly easier.
Diagram of a cylinder mechanism for a mortise product
To install such a locking system, you only need to cut out the wall in the corrugated pipe, then make holes for locking. During insertion, it is necessary to clearly determine the location of the latches.
To do this, you first need to securely fix the structure in the corrugated sheet. Next, you need to try to open the gate by treating the latch and handle with a product that leaves a mark during contact. The cost of these locks is low and installation is quite simple, which is why many homeowners buy them.
The photo below shows a gate made of corrugated sheets with a handle in the country.
In summer
What is BUZ and why is it needed?
If you connect an electric lock on the gate according to the diagram above, it will work, but the calling panel will function intermittently. When power is supplied to open the lock, the voltage to the calling panel disappears completely or drops significantly. There is noise or sound/image disappears. To prevent this from happening, use a separate power supply for the lock or install a BUZ. Full name - lock control unit . The option with a second power source is not bad if you have somewhere to get 220 V. If this is not possible, install a BUZ.
What does the BUZ (lock control unit) look like?
BUS is a small device that stores energy. There is also a diode isolation, which eliminates the voltage drop supplied to the calling panel and intercom. So the presence of a BUZ in the scheme stabilizes the operation of the entire system.
Connection diagrams with BUZ
There are two working schemes for connecting an electromechanical lock with a control unit. In the first, it receives power from the call panel, in the second, from the intercom.
Diagram of serial connection of BUZ with electric lock
In the first scheme, power is supplied to the gate lock through the call panel. The opening button is on the intercom, and the panel only broadcasts the command. What's wrong with this option? Because the lock will not work if the panel or control unit is damaged. That is, the reliability of the system is low. The advantage of this scheme is less cable consumption, but this is not the case when you should save on cable.
We supply power to the BUZ from the intercom
If you supply power to the BUZ from the intercom, you will have to pull two cables to the gate: to the block and to the panel. But this option is more reliable, because it will be possible to open the gate even if the call panel does not work. But you will need twice as much cable.
Gate valves made of corrugated sheets
If your fence is made of corrugated sheets, then the latch for the gate made of corrugated sheets is selected taking into account this material.
There are the following locks for corrugated sheets:
- code;
- cylindrical;
- suvaldnye.
The coded one has a sufficient degree of reliability. It opens from the outside by entering a code, and has a special latch from the inside. The only negative is that the code buttons wear out over time. Anyone can see the secret code.
Regular type
Cylindrical works on a mechanism for matching internal small parts. Advantages: neat small size, if it breaks, it’s easy to fix. But sensitive to moisture and dust.
The lever lock is perfect for corrugated sheets. It has keys with teeth of different sizes that perfectly match the internal parts of the lock. If something doesn't match, it can't be opened.
How to choose the right lock for the gate
To reliably protect your property, you need to choose the right type of gate to install. To do this, you need to take into account several important rules. Among them are the following:
- It is prohibited to use mortise and overhead locks for gates made of corrugated sheets.
- For swing gates it is better to use horizontal type locks.
- Only vertical shutters can be installed on retractable gates.
- If the gate is made of a sheet of metal whose thickness exceeds 5 mm, then any type of lock can be installed.
- When choosing the type of lock yourself, you must take into account all the factors that may affect the degree of reliability of the protective structure.
Electromechanical devices
Secret lock on a gate or wicket
Overlay type lock for gates with a wicket
Automatic locking device These types of gate locks, in addition to mechanical elements, include electrical components. This combination increases reliability and makes wireless remote control possible. When leaving, they are opened by pressing a button protruding from the case, and when entering, they are opened with a key-tablet or an electronic card. During a power outage, you can exit by pressing a button and enter using a regular key. The advantages include convenient use, good security against burglary, the ability to connect an intercom, sound alarm and other security systems. The main disadvantages are the dependence on the availability of electricity and the possibility of failures at low temperatures and high humidity.
The recently introduced magnetic lock is recognized as the most reliable lock. Operates without keys or deadbolts. A powerful electronically controlled magnet holds the shutter firmly in place. It closes automatically and opens with a magnetic key.
Criterias of choice
There are a huge variety of locks, you can choose to suit your taste, but the main thing is that it is reliable
By design, the gate is an outdoor structure, so the choice of lock must be approached with the utmost seriousness.
Now stores offer different models of locks for fence gates.
What criteria should be followed when purchasing a locking mechanism?
Choosing a model of an overhead type lock can be considered the best option for a gate. It can be easily installed on any wicket door by screwing the locking mechanism to the stopper; it cannot be hacked without the use of special tools. But such a castle is negatively affected by weather conditions. To protect the locking mechanism from precipitation, it must be installed in a metal box.
Mortise types of locks are more suitable for massive wooden and metal gates.
When purchasing a lock, you should keep in mind the dimensions of the locking device so that its parameters correspond to the dimensions of the gate leaf.
- The material of the gate (wooden or metal) and the operating conditions of the lock matter; it must be resistant to moisture and frost.
- During inspection, you need to check the lock body - it must be solid and free of defects.
- You should check the operation of the locking mechanism by turning all the keys in the set.
For an electromechanical device, it is necessary to check the presence of a protective corrugation for the electrical cable, since the corrugation protects the wires from the negative influence of the environment.
In conclusion, it should be recalled that incorrect installation of even any high-quality, expensive lock reduces its service life. If you do not have the skills to install locking devices, then it is better to use the services of specialists.
Round lock mortise
Installing a round lock on an interior door is much easier than installing a flat one. First, pioneer holes are marked using a template according to the thickness of the door and the exit of the tongue. The marking is carried out from the side of the larva. If the sockets of the cylinder and the latch need to be swapped, this is done before marking, see above. Then the pioneer holes are drilled. There is one very important trick here, which is discussed below in the section on installing the response part. Then large holes are selected with a crown, and the lock is inserted into the socket. The countersunk is marked along its end plate, selected, and the lock is assembled on site using standard screws.
Marking the door for inserting a round lock and assembling it on site
Drawings of templates for marking doors for round locks with a diameter of 50 and 54 mm are given in the figure. To transfer them to cardboard/paper, the drawing is printed and redrawn to scale so that the distances marked in green are equal to those indicated. This can be done the old fashioned way with a drawing pantograph; homemade will work too. More accurate and faster - in a good vector graphics program, for example. CorelDraw. There you can set the length of the measured segment with an accuracy of literally up to a micron, and scale it in steps of hundredths of a percent. The raster image (bitmap) is imported into CorelDraw, scaled according to a measured segment (CorelDraw also has measuring tools, but in this case it is more convenient to scale as needed) and printed - that’s it, the template is ready.
Drawings of templates for marking doors for mounting round locks
Valve action
The only drawback of such devices is that they are locked only from the inside. Although craftsmen have come up with options so that it is possible to operate the valve on both sides. To fix the sash, metal fittings or rods with bent ends or a welded handle are used, which rotate towards the gate and do not pose a danger.
Manufacturing principle
Simple locking mechanism
On the frame and on the gate itself, if they are metal, arcs with a diameter slightly larger than the reinforcement are welded, so that the gate slides freely. If the product is wooden, then such arcs are cut out of a metal sheet and attached to it with self-tapping screws.
More often, horizontal valves are attached to the gate; this option is convenient to use. You won't have to bend down to the ground to open or close it. In order for the homemade latch to be locked tightly, threaded holes are drilled in the plane of the arc. Bolts corresponding to the diameter will be screwed into them until they stop. This method of securing the latch is convenient for night use, as it becomes immobile.
Required material
To build such a simple structure you will need:
- reinforcement of such length that it is sufficient to connect the frame with the gate, and for bending (similar to a handle);
- metal sheet or the same fittings for creating arches;
- welding machine or self-tapping screws;
- auxiliary carpentry tools;
- dye.
Instead of arches, you can use a profile pipe in which corresponding holes are cut out for free movement of the latch handle. This manufacturing method is clearly described in the video tutorial at the end of the article.
Electromagnetic
Magnetic locks were in great demand about 5 years ago; they were installed in warehouses and garages.
Over time, their popularity waned due to their high cost and one important drawback. Its essence was that the lock functions as long as there is power to the device.
If the power is turned off, the lock will be open. You also need to take into account an important nuance when installing the lock - the tight fit of the main and mating parts. If a small gap forms, the magnetic one will not hold the door well.
In terms of safety, these models undoubtedly justify themselves, but their cost is quite daunting. Therefore, whether to choose this lock or not is up to you.
Installation stages with photos
Driving the lock into the gate is the only feasible method if the frame is made of thin pipe. And this option is the most common. The lock can be installed using a steel sheet box. The dimensions of the box depend on the dimensions of the selected locking mechanism. It is required to leave minimal gaps. So that the lock can be easily put in and removed when necessary. Easy to use 3 mm steel.
- Finding a convenient location; a nail will be useful for marking.
Mortise lock location - Markings required:
- for the housing at the end;
- on the inner, outer side of the gate for the larva;
- door handle attachment points;
- on the bar for the release of the lock tongue.
- To make cuts more accurately and spend a minimum of effort, a grinder is used for the seat, and a drill is used to install the handles and core.
Inserting the lock into a specially prepared place in the gate - First, a small-diameter drill is installed; excessive holes may not be closed with linings and lock elements, so the main requirement is slowness and careful measurement.
- To fit the body into the box, self-tapping screws and a screwdriver are used; it is permissible to use a riveting gun.
Mortise a lock using a screwdriver - The core, cylinder or cylinder is installed in the prepared holes and the fit is secured with a fastening screw.
- Now we cover the internal contents of the mechanism.
- Next, they move on to installing the second sash, where the tongue will be fixed.
Fixing the lock tongue - In order not to make a mistake, you can cheat and smear it with toothpaste, open and close the mechanism, there should be marks on the sash. It is along them that the holes should be prepared and the second bar installed.
- We check the functionality of the system.