It is impossible to imagine a house plot without a fence located around the perimeter. At least a temporary fence is installed before the construction of a private house or cottage begins. It allows you to fix boundaries, performs protective and aesthetic functions. An equally important part of the overall design is the passage, the opening in the fence. It serves not only for passage and passage of vehicles, but also acts as a decoration of the territory. For its manufacture, you can use different materials, but recently the most common gates are made of corrugated sheets.
Features of the correct calculation of gates made of corrugated sheets
The gate or gate in the fence also plays the role of a leading violin. The gate is mainly intended for the passage of people, and through the gate both people and cars are allowed to pass through at the same time.
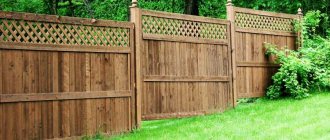
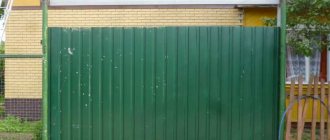
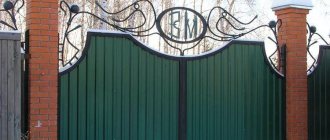
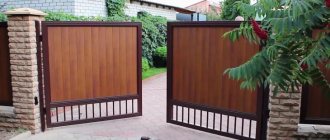
In addition, a beautiful gate will easily decorate the entire appearance of your home. The most modern and popular are gates and fences made of corrugated sheets, as in the photos presented.
Advantages of corrugated sheets
Corrugated sheet or profiled sheet is a composite material with a heterogeneous structure. Externally, it is a galvanized steel sheet coated with polymer.
The main feature of profiled products is their protective polymer layers, varying in quantity. A sheet of metal, galvanized on both sides, is one of the simplest, three-layer models.
If galvanized with 10 layers, the products are considered to be of the highest quality. And the service life of the profiled sheet directly depends on the type and quality of the coating. To make a gate from corrugated sheets with your own hands, first of all, you need to find out what material you will have to deal with.
Based on service life, there are three main types of sheet coating:
- galvanized (service life up to 5 years);
- aluminum-galvanized (service life up to 10 years);
- polymer (from 10 to 20 years of service).
By type, profiled sheets are divided into:
- wall (with small waves of profiles: 8, 10, 15, 20, 21 mm);
- roofing (with medium waves: 20, 21, 35, 45, 57, 60, 75, 80, 90, 100 mm);
- carriers (with wave heights of 75, 80, 90, 100 mm).
The most popular are wall profile sheets.
How to choose a profiled sheet
For the manufacture of gates, wall corrugated sheeting marked “C” is used. It differs from roofing and other options in the height of the waves. The size of the stiffeners is indicated by a number. The higher it is, the stronger the sheet itself and its ability to withstand loads.
The most convenient corrugated sheet for installing gates is marked C-18, C-20, C-21. It can be used in the harshest conditions. When choosing the type of material, you need to take into account the terrain and climatic features. Metal sheets consist of several layers, each of which performs its own function. The steel base can have the following coating:
- From zinc;
- Aluzinc;
- Polyester;
- Plastisol or pural.
Types of gate designs
When choosing gate designs, it is necessary to take into account the ease of their operation, the reliability of protection, and the optimal dimensions for the passage of trucks and cars.
There are two types of gate designs: swing gates made of corrugated sheets, single-leaf or double-leaf, single-sided or double-sided, with or without a wicket) and sliding gates (suspended, rail, cantilever and telescopic).
Structural elements of the design
Preliminary design and selection of optimal dimensions of future gates, on which the total weight of the structure will directly depend, is the key to a high-quality and long service life. The component parts are selected taking into account the total weight, the width of the opening and the height of the facing corrugated sheet.
In addition, important elements of the sliding structure are console accessories, which include:
- top safety roller;
- bottom rollers;
- end roller and beam plug;
- a pair of catchers;
- guide rail.
At the same time, an integral part of the gate is a reliable frame, which performs an important supporting function. In its manufacture, as a rule, metal profile pipes are used, the dimensions of which depend on the dimensions of the opening.
If you want to equip your gate with automation, then do not forget to purchase, in addition to consumables, an electric drive, remote controls, a beacon, and racks. Also, to attach the corrugated sheeting, you will need to use metal screws or roofing rivets at the rate of 15 pcs. per sheet.
Making gates from corrugated sheets with your own hands (step by step)
Making swing gates is difficult, but possible. Even if you are a master with a capital letter, you cannot cope with this matter alone. An assistant with experience in gate manufacturing is simply necessary, because you have to overcome several stages:
- determine the location of the gate;
- make a drawing;
- calculate the need for necessary materials
- prepare the base;
- install racks;
- build a frame and fix it on supports;
- perform sheathing with corrugated sheets.
Gate location and dimensions
First, you need to decide what kind of gate you want: garage or front. Then select their height based on the height of the fence of the site. Ideal option: the gate and fence are at the same level in height from 2 to 2.5 m.
When installing a gate, set the passage width from 1.00 to 1.2 m. When choosing the width of the gate, you should focus on the following factors: proximity to the roadway, turning angle upon entry, fire hazard. The optimal width is 4.00 m.
The procedure for erecting brick pillars
Clean the profile pipe of the required length from traces of rust, if any, and paint it in two layers. After that:
- pour a 100 mm thick layer of crushed stone and a 50 mm layer of sand into the hole, compact the bulk material well;
- prepare concrete from cement, sand and crushed stone in a component ratio of 1:3:4(5);
- assemble the formwork;
- Install the metal stand vertically and concrete it.
Fixation of the rack strictly vertically can be ensured using spacers of a metal rod or fittings.
The upper plane of the concrete pour should be 50-100 mm above ground level. To do this, formwork is installed, the edges of which should extend beyond the dimensions of the future pillar by 50-70 mm. After concrete hardening:
- cover the surface with waterproofing material or bitumen mastic;
- lay a layer of mortar and lay the first row of 4 bricks;
- after 4-5 rows, weld a metal rod with a mounting plate to a vertical metal post to secure the rotary hinges.
The laying of subsequent rows is carried out with the obligatory bandaging (overlapping) of the lower vertical seams. Every 3-4 rows, place a reinforcing mesh that can be placed over the top of a steel vertical post. The thickness of the seams is 8-10 mm.
Constantly monitor the vertical position of the masonry using a building level or plumb line. 2-3 embedded plates should be installed on the surface of each pillar on the sash side. Their number depends on the size and total weight of the structure.
Required tools and materials
When installing gates from corrugated sheets, you will need ordinary construction tools that you probably still have after building your house: shovels, crowbars, a concrete mixer, buckets, an old basin, a drill, self-tapping screws, etc.
The materials you will need are: paint, sand, cement, crushed stone, locking devices for gates, hinges of sufficient power, pipes of different diameters for the frame and support posts, corrugated sheets.
We adjust the sashes to the racks
First step. We install the gate leaves on stands, which can be made of timber, brick or other suitable material.
Second step. Align the sash along all planes.
Third step. Our frame already has hinge elements. We mark the places for installing the second part of the connecting element on the supports. We weld the hinges to the posts according to the marks.
Fourth step. We hang the sash. We remove the stands installed at the beginning of work.
We place a board at the level of the gate fastening. Level it up
We set the gate according to the level. We tie them to the posts with ropes
Trying on the gate before installation
We cleaned the places for welding hinges from paint on the poles and on the gates
A board was placed in the middle of the gate to raise the gate a little. When we weld them, they will lower a little under their own weight and take a horizontal position.
We connect the gate from above with a pipe and tie it to the posts
We mount the frame of the second rack in the same way. To make the structure even more rigid, we can weld the two outer gate supports with the posts of our fence.
To increase the stability of the gate to wind loads, we can weld a horizontal strip of metal profile along the upper ends of the support posts. This is only relevant for situations where only passenger vehicles will pass through the gate.
We weld one part of the hinge to the stand, the second to the frame, and make cutouts in the corrugated sheet before fastening.
Loops
Don’t get confused, hinges without a pin are welded onto the folding frame
During welding, you need to ensure that the hinges are flush with the profile
Installing hinges
Loops
Next you need to clean the welds with a grinder and a grinding disc and paint the sash with anti-rust enamel
The hinges must be welded parallel to the pole
First, we grab the hinges and then try to open and close the gate. If the gate opens normally, we finally weld the hinges to the posts and to the gate
Finally, all we have to do is paint the parts of the frame that will remain visible after attaching the profiled sheets. We select the paint color so that it harmonizes well with the color of the corrugated sheet and the fence.
Gate frames successfully welded
Painting the frames
Corners were welded over the top hinge of each gate so that the gate could not be removed
Gate installation process (do it yourself)
In more detail, the process of installing gates from corrugated sheets is as follows:
We begin installation of supports by preparing the area (clearing and marking). We outline the location for installing the racks. We fix the level with a thread and proceed to the main work.
We make a depth of 1.5 meters. We fill the bottom with crushed stone and tamp it; if necessary, add crushed stone and tamp again. Then we insert the pre-prepared support (primed and painted) into the recess, secure it with bricks and cobblestones, and fill it with concrete mixture (the ratio of cement, sand, crushed stone is 1:3:6, respectively). To ensure that the mixture sets well, let it dry for about 7 days, periodically sprinkling it with water to avoid cracks.
Before starting this stage, it is necessary to measure the width of the wicket and gate again to avoid discrepancies in dimensions or making necessary adjustments. Next, using a grinder, we cut blanks of a certain size from the profile pipe (angle). We clean their surfaces.
On a flat plane, using welding, we connect the workpieces in the shape of a frame. We check the evenness of the structure (this is important!). If the geometry is correct, we proceed to welding the seams. We strengthen the frame with stiffening ribs.
We fix the sashes to the hinges of the supports. The number of hinges is determined depending on the severity of the sashes. We install the doors on the support between the posts and secure the top with a rope. We mark the location of the hinges and lightly weld them to the sashes and supports. We check the functionality of the valves. If no comments are found, we finally weld the hinges.
After fixing the gate, we proceed to installing fittings (handles, bolts, latches) using welding. We install locking devices, automation, alarms and video surveillance systems.
To paint the frame, you need to prepare its base (clean the metal surface and seams with sandpaper, degrease, prime) so that the paint adheres well to the metal. Then paint with a roller and let dry for about 12 hours.
Lastly, the structure is sheathed with corrugated sheets on top of the frame. We cut off the excess and check the level for evenness. We secure the corrugated sheets carefully with self-tapping screws. The gate is ready.
But, if you doubt your abilities, and you are not embarrassed by the price of gates made of corrugated sheets with installation offered by specialized organizations, then feel free to contact the professionals.
Making a frame
It is advisable to make the frame from the same material as the supports. Most often, the racks and frame are made of metal products. We assemble the frame from profiled pipe.
To assemble the frame, we find a horizontal platform that can freely accommodate at least one sash.
The process is extremely simple: we need to weld a rectangular frame from a pipe (profile) pre-cut into pieces of the required size. The angles must be strictly straight. We verify this using a square.
Marking and welding frame corners
Marking and welding frame corners
Marking and welding frame corners
Having welded the frame, we strengthen it in the corners using steel angles. To give the frame additional rigidity, we divide it in height into 3 approximately equal parts and weld parallel horizontal jumpers along the marks. We also strengthen the junction points of the lintels with the frame using steel corners. We weld the gate hinges at the same points.
When the frame is ready, we weld a steel strip around the perimeter to secure the corrugated sheet.
Helpful advice! There is another popular option for strengthening the frame. To do this, a horizontal jumper is welded in the center of the frame to its vertical sides, dividing the frame into 2 identical rectangles. After this, the corners of each of these rectangles are connected by diagonal jumpers. Choose any of the two hardening methods discussed, they are both good.
The frame for the gate is assembled in a similar way. If you want to make a gate directly in the gate leaf, assemble the frame in a slightly different order. To do this, weld transverse and longitudinal metal jumpers to the rectangular frame of the selected sash, thereby forming the frame of the gate. The average dimensions of the gate are 80x180 cm. If possible, stick to these values. We shift the places where the hinges are attached to the sash to the upper and lower edges of the frame.
Frame for gate
Wicket frame
Prices for popular models of welding machines
Welders