chaise lounge for the cottage
If you have a plot outside the city, you probably don’t mind relaxing in the sun on a summer day. For this you simply need a chaise longue for your dacha , because they were invented for this purpose, to enjoy sunbathing. And while some people prefer to buy such a thing, others can make their own and save money. A chaise longue can be made from available materials very simply - even a novice craftsman can handle the assembly process.
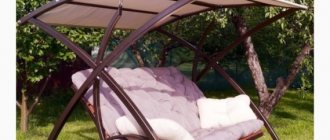
For example, this lounge chair in the photo. Looks like store bought, right? In fact, it is made by hand. Naturally, this is not the easiest option; you will have to tinker with metal tubes, but it is reliable. Basically, if you want to do everything yourself, it is better to make a wooden structure. The simplest thing is a fabric sun lounger, although many people prefer wooden sun loungers.
Requirements for homemade furniture
Any furniture intended for outdoor use must meet a number of requirements:
- Sufficient size. When developing a drawing, it is imperative to take into account the anatomical features of the future user. To calculate the angle of the backrest, it is better to use furniture construction standards. Correctly selected parameters will allow you to avoid pain in the back and neck, while ensuring normal blood circulation and comfort during rest.
- The height of the sun lounger should be optimal, especially for young children.
- Almost all models of sun loungers have a rigid frame (most often made of wooden boards). However, you should take care in advance about sewing a soft mattress or pillows.
- The safety of homemade furniture is one of the most important requirements for a craftsman. During the final assembly of the structure, it is necessary to carefully inspect all parts for defects, chips, cracks, and signs of surface damage by pests. All existing irregularities should be removed by grinding the parts.
- Particular attention is paid to pre-impregnation of all wooden surfaces with an antiseptic, antipyrine and moisture-resistant composition. As the main impregnation, you can use a production solution or a mixture of drying oil, turpentine, and melted paraffin.
When assembling folding models, sufficient attention is paid to the condition of the rotary fittings (reliability of fastening, absence of manufacturing defects, possibility of subsequent replacement).
During operation, preventive inspections of fittings and fasteners should be carried out at regular intervals.
How to make a folding sun lounger out of wood with your own hands
The blanks for making a folding beach chair must be dried in the shade for at least a week before starting work. In summer, wood often dries out, so to speak, “to the point of crackling,” so before you start cutting the pieces, you need to be sure that there will be no further shrinkage or warping.
First of all, we cut out the blanks and adjust them to length.
The next step is to remove the sharp edges and corners of the workpieces using an emery wheel. It is more pleasant to pick up and carry a folding chaise longue when there are no sharp or cutting edges on the frame.
We mark the drilling points and make holes for installing hinges using M8x50 screws.
We treat the parts of the folding frame with varnish and dry them.
The next step is to install the nuts in the holes and assemble the sides of the chaise lounge.
All that remains is to cut in the cross members and pull on the fabric cover.
To adjust the angle of inclination, we screw in several wooden plugs.
For those who like to relax by the water, the design can be supplemented with leg support, but in practice such rationalization has not proven itself to be the best. An additional pair of hinges complicates the folding frame of the chaise longue and makes it inconvenient to carry. Therefore, instead of leg support, ordinary wooden benches are often used, which simultaneously serve as a camping table.
Preparation of the drawing
The first and most important step for the master is to prepare a drawing of the future chaise lounge.
The following parameters must be indicated on paper:
- General dimensions of the sun lounger.
- The height of the main shield above ground level.
- Backrest angle.
- Dimensions of armrests, headrest (if provided for by this model).
For a folding chaise lounge, be sure to note the location of the fittings and its main components. Actually, the sun lounger itself has several mandatory elements: a middle and four side support posts, a support post under the back, a backrest bed, and a lower bed of the sun lounger.
In the photo of the chaise lounge, built with your own hands, you can see that there are diagonal slats between the side supports. These elements also perform a supporting function.
Birch lounger
It’s easy to make an original chaise lounge from birch logs with your own hands.
To work you need to prepare:
- birch logs with a diameter of 75 to 120 mm,
- drill,
- saw,
- fasteners.
Operating procedure.
- Using a saw, make 45 cm long pieces of birch logs.
- Draw the outline of the product on the floor.
- Arrange the birch blanks according to the diagram, placing them in a vertical position.
- Connect the parts using self-tapping screws according to the diagram.
- The backrest is additionally secured with staples.
Selection of base material
To obtain a high-quality product, the master should decide in advance on the consumables. In practice, a home chaise lounge can be made from wooden boards, plywood, PVC pipes, and profile pipes.
Each of the presented materials has a number of features that must be taken into account when carrying out construction work:
- Wood (timber, board) is most often used in work. This base is durable, safe, and does not contain toxic impurities.
- Assembling a wooden sun lounger with your own hands, as a rule, does not present any particular difficulties.
- However, you need to be very careful in choosing the type of raw materials used.
- You should immediately abandon conifers, which, when heated, begin to exude caustic resins.
- Wooden pallets can be used as the main frame. A particular advantage of using pallets is their convenient shape and strength.
- The next most popular material is PVC pipe. In independent work, you can use pipe sections remaining, for example, after repairs.
- PVC is rightfully recognized as a very optimal option for assembling a country chaise lounge. To make a comfortable lounger, it is enough to have welding skills.
The most rarely used material for assembling a sun lounger is a profile pipe.
All metal surfaces must be pre-treated with an anti-corrosion compound to prevent rust. For assembly you will need a grinder and welding.
Lounger made of PVC pipes
When making a folding version of a chaise lounge, the wooden frame can be replaced with a frame made of PVC pipes.
To work you need to prepare:
- two-inch PVC pipe,
- 6 pieces T-connectors,
- 8 pieces L-shaped pipe connectors,
- canvas.
Operating procedure.
Pipe parts measuring 30 and 45 cm are fastened using ready-made connectors. In this case, one horizontal part remains without a T-shaped element. On the vertical sides of the structure, T-shaped parts are installed at an angle of 45 degrees.
For a rotating seat, an additional element is required. Cut a pipe 5 cm long and install it in a T-shaped element, securing it with another similar one. This element is necessary for a horizontal frame. The second part is made of pipes of 30 and 45 cm. The size of the transverse parts is 30 cm.
As a result of fastening all the parts, you should get a structure that is a pair of rectangles, one of which is built into the other. The seat is placed between the long part of the vertical side and the short part of the horizontal edge.
For ease of use, you need to install the seat in the desired position, measure the distance between the free T-shaped connectors. Cut the pipe to the required size and secure it.
After this, all that remains is to sew the seat from thick fabric.
Step-by-step assembly of a sun lounger
Having prepared all the necessary materials and tools, and prepared a drawing, you can proceed directly to work. The set of tools for making a wooden deck chair is standard and includes a jigsaw, tape measure, construction pencil, screwdriver, fasteners, and impregnation compounds.
Instructions on how to make a comfortable lounge chair with your own hands:
- Based on the existing drawing, parts are cut out for subsequent assembly.
- All wooden surfaces are inspected for defects.
- Irregularities and sharp gaps should be sanded.
- Next, impregnation is carried out with moisture-resistant and antiseptic compounds.
- The structure is assembled in the following sequence: a base of four supports, fastening the central or middle support post, fastening the diagonal jumpers. Self-tapping screws or dowels are used to connect adjacent parts.
- It is necessary to make several grooves on the upper contour of the side slats, which will subsequently hold the lifting backrest in several positions. If there is only one position, then the groove must be prepared in the singular.
- The lower part of the stock consists of successive rows of wooden planks. The slats must be fastened on the back side of the stock so that the protruding parts of the screws do not injure human skin or cause discomfort.
The upper part of the bed (lifting backrest) is assembled as a separate fragment, to which a holding post is attached. The bottom bar of the rack must correspond in size to the prepared grooves.
After assembly, you can cover all surfaces with 2-3 layers of acrylic varnish or paint the chaise lounge with acrylic paints.
What do we have?
Comfortable long chairs look completely different. And before you start working directly, you should understand what type of chaise lounge you need to make. They are:
- in the form of a rocking chair (the back is at an angle, so the relaxation process is very comfortable. You can not only sit, but also lie down and even sleep);
- in the form of a regular chair (elements of a folding bed or crib are taken as a basis; armrests can be mounted as desired);
- in the form of a monolithic product (during manual assembly, all parts are tightly fastened, so disassembly is impossible; it is strong and reliable. Back adjustment is not provided, the product itself does not fold);
- in the form of a soldered product with beautiful hand-made inserts (a handmade chaise longue with amazing beauty; can fit into any interior);
- in the form of a sun lounger (a strong and reliable sun lounger made of plastic or wood; beautifully sanded and varnished);
- in the form of a portable product (it is compact and reliable; a position-regulating mechanism is provided).
Sewing a soft cover
Having a soft pillow or mattress on a wooden chaise lounge will be a definite advantage.
- For tailoring, you should choose textiles very carefully.
- For ease of subsequent care, it is better to sew two covers: an inner and an outer removable cover.
- When dirty or before the winter season, the outer part can be washed without damaging the filling.
- The size of the pillow or mattress can vary, but as a rule, it should completely cover the lower and upper bed.
Kentucky chair
The design attracts with its simplicity and convenience. This model folds, so it takes up little space when stored in winter. The Kentucky chair fits harmoniously into the garden landscape. Its graceful silhouette looks good against the background of an emerald lawn, in the shade of an old tree, or in a flower garden.
To make a Kentucky chaise lounge you will need:
- bars with a cross section of 30 * 45 mm;
- staples;
- galvanized wire with a cross section of 4 mm.
Photo of a homemade sun lounger
Kinds
First, you should decide on the type of sun lounger. It can be made of wood, aluminum, plastic and synthetic fabrics. We will focus on a practical and easy-to-manufacture option - a wooden chaise lounge.
The wood for the product and its design is selected depending on:
- your preferences;
- availability of available materials;
- financial capabilities;
- style of your garden.
When choosing wood for a future sun lounger, you should take into account the physical and mechanical properties of certain types of wood. For example, beech, ash, larch or oak will last the longest. These are strong and durable materials, and they also have an aesthetic appearance. But this type of wood is quite expensive and weighs more than other types of wood, which makes the finished products more difficult to move.
A chaise lounge made with your own hands will not only save your money, but will also improve the garden and give it exclusivity. There is a varied variety of wooden chaise lounge designs.
In the interior
A chair-couch for the home is an exquisite piece of furniture. With different types and designs, it can be the perfect addition to any room. A couch chair is a middle option between a regular chair and a sofa; it is suitable for short-term relaxation.
There it will not only perfectly play the role of a stylish decoration, but will also become a comfortable place where the owners and guests can sit down and take off their shoes. There is room for a folding couch in the kitchen. It can easily replace a kitchen corner.
For a bedroom or living room, choose models in the style of the room’s interior. The wide variety of styles of couches allows you to find the piece of furniture that will decorate any setting.
Functional need
Chaise lounges are similar to armchairs, but lower and more stable. You can sit in a semi-lying position, allowing the spine and all muscle groups to rest.
Another advantage is that the garden chair can be folded as needed, adjusting the angle of the backrest for a sitting or lying position.
They are very good for observing nature, and they are light and comfortable, so they are often placed in your garden or dacha. It’s good to take such a chaise lounge outdoors in the summer, and keep it somewhere indoors in the winter, for example, in a closet or in a shed.
The following materials are used in production:
In the photo, a wooden chaise lounge for a summer house, made by yourself
Another interesting solution
This design is completely different from the previous one. But nevertheless, making it with your own hands is no more difficult. Such a chaise lounge is not very convenient to move, but, if carefully executed and carefully processed, it is quite aesthetically pleasing and easy to implement.
The tools we need are:
- drill;
- sandpaper;
- saw;
- roulette;
- marker.
From materials:
- 2.5×8×60 cm – 13 pcs. (slats for seating);
- 5×10×21 cm – 2 pcs. (longitudinal bars for the frame);
- 5×10×50 cm – 2 pcs. (cross bars for the frame);
- 5×10×35 cm – 6 pcs. (chaise lounge legs);
- 5×10×88 cm – 2 pcs. (back of the product);
- 5×10×39 cm – 3 pcs. (back of the product);
- 2.5×8×88 cm – 6 pcs. (slats on the back frame);
- 5×10×60 cm – 1 pc. (bar for fixing the backrest in the desired position);
- wood screws;
- pins for fixation;
- paint or varnish;
- impregnation for wood.
The first step is to treat the wood. Then you need to make a frame. To do this, take 2 longitudinal beams of 215 cm each and 2 transverse beams of 50 cm each. We connect them with screws.
Frame
Next, take 13 60 cm strips and secure them to the frame with self-tapping screws, leaving a 1 cm gap between them. To make the distance even, you can use centimeter spacers in the form of planks. So we got a seat.
Making a seat
The next step is to install 35 cm legs from timber (the length of the legs can be changed as desired). On the seat side, to strengthen the structure, we make double legs.
Next, we make the backrest from two beams 88 cm long and three beams 39 cm long. The frame of the backrest should fit freely into the main structure, and it is also necessary to leave a small gap between these blanks.
Making the back frame
Now fix the back boards in the longitudinal direction. The edge planks can be rounded to give them a more aesthetic appearance.
Sewing the back frame
To ensure that the backrest can be easily raised and lowered, make through holes at a distance of 9 cm from the edge of the seat through both structures. Fastening is carried out using special pins.
Backrest fastening
After this, you need to make 2 grooves in the base of the sun lounger into which the support bars will be placed. Due to this, the backrest can be fixed in different positions. One groove is made at a distance of 9 cm from the stud, measuring 5x10 cm. The next groove is made at a distance of 20 cm from the previous one, 5x5 cm.
Making recesses
A horizontal beam 60 cm long is placed in the first groove, which will hold the backrest in the desired position. If you want to change the position of the backrest, then the beam is shifted into the second groove.
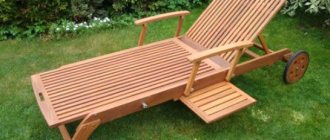
Ready chaise lounge
Following this pattern, the process of making a wooden chaise longue is almost complete. All that remains is to sand the structure, varnish or paint it.