Home » Building a house » Do it yourself
Alexander Korovaev 03/14/2020
33142 Views
Tired of running around with a watering can, hauling gallons of water every day? Organize drip irrigation in the greenhouse yourself. Such a system will not only help you significantly save energy and time. A gradual drip of water will also be beneficial for plants.
System advantages
The drip irrigation method was first used in Israel in the 1950s - in a similar way, scientists tried to cope with water shortages. Later it was found that when serving it in small portions, not only water and labor resources are saved. Drip irrigation allows you to get earlier harvests.
With normal irrigation, water penetrates into the ground to a depth of 10 cm. Its gradual drip entry allows the root system to be more saturated with moisture. The roots grow much faster, which means they extract more nutrients from the soil.
Installation diagram of a drip irrigation system
Since the rest of the soil remains dry, the likelihood of waterlogging is reduced. This has a beneficial effect on the health of plants - after all, most of such dangerous diseases as powdery mildew, white rot, gray rot, blackleg, bacterial spot develop precisely in conditions of waterlogging.
Since water is supplied to the root, the likelihood of plant burns, which usually occurs when moisture gets on the leaves, is significantly reduced. This is due to the lens effect of the small droplets.
Plus, since irrigation is carried out only in the root zone, weeds that do not receive enough moisture spread at a slower rate. This system also prevents soil erosion.
The drip irrigation system for a greenhouse is simple, but with its help you can increase plant productivity by 30-40%. This irrigation method allows you to accurately calculate the time and intensity of watering for each type of plant.
Initially it was used only in greenhouse conditions. Later, this method began to be used when growing plants in open ground.
Advantages and disadvantages
Drip irrigation has many advantages and all of them are significant:
- Labor intensity is significantly reduced. The system can be fully automated, but even in the simplest version, irrigation requires literally a few minutes of your attention.
- Water consumption is reduced . This happens due to the fact that moisture is supplied only to the roots, other zones are excluded.
- Eliminates the need for frequent loosening. With a dosed supply of water to a small area, a crust does not form on the soil; accordingly, it does not need to be broken.
- Plants develop better and productivity increases. Due to the fact that water is supplied to one zone, the root system develops in this place. It has a larger number of fine roots, becomes more lumpy, and absorbs moisture faster. All this contributes to rapid growth and more abundant fruiting.
- It is possible to organize root feeding . Moreover, fertilizer consumption due to point supply is also minimal.
The economic efficiency of drip irrigation systems has been proven many times, even on an industrial scale. In private greenhouses and vegetable gardens, the effect will be no less significant: the cost of creating the system can be reduced to a small amount, but all the advantages will remain.
Do-it-yourself drip irrigation does not cost much
There are also disadvantages, but there are very few of them:
- For normal operation water filtration is necessary , and this is an additional expense. The system can function without filters, but then it is necessary to consider a purge/rinse system to remove blockages.
- Drippers become clogged over time and require cleaning or replacement.
- If thin-walled tapes are used, they may be damaged by birds, insects or rodents. Places of unplanned water consumption arise.
- The device requires an investment of time and money.
- Periodic maintenance is required - blow out the pipes or clean the droppers, check the fastening of the hoses, change the filters.
As you can see, the list of shortcomings is quite long, but all of them are not very serious. This is a really useful thing in the garden, garden, lawn, flower bed or greenhouse.
Disadvantages of drip irrigation
The main disadvantage of do-it-yourself drip irrigation systems for greenhouses is the mandatory control. After all, if the calculation is incorrect and there is an excess of moisture in the area, in addition to excessive water consumption, you will simply destroy the plants. You will need to regularly check the filling of the barrel - it will need to be constantly topped up.
The simplest irrigation system
The disadvantages of drip irrigation include the need to periodically clean the holes - due to their small diameter, they often become clogged. However, this is not difficult to do - just rinse or blow out the system.
It is not recommended to increase the size of the holes, since water will immediately pour out at the beginning of the hose, and simply will not reach the very last nozzle holes.
To protect the system from contamination, a filter is installed at the inlet (that is, at the beginning of the hose located in the barrel). You can even use an ordinary piece of foam rubber as it.
Cleaning the system will become much easier - all you need to do is remove and wash the foam rubber. It is necessary to protect the barrel itself, as well as the receiver-distributor, from debris and insects - they will need to be covered with lids.
Which containers to choose?
Before organizing drip irrigation, you should decide on the size of the plastic container you plan to use.
The choice depends on the type of crops grown. Small containers are inconvenient to use because they need regular replenishment, which forces the owners to frequently come to the site.
The best option is 2 liters . Used drink bottles will do. In greenhouse conditions, the temperature is higher than outside, so the bushes absorb more moisture. Consequently, water consumption will be greater.
Operating principle
We will describe in detail the device of drip irrigation in a home greenhouse. With this method, water is supplied using dispensers-droppers (nozzles). Its simplest version is a hose with 3-8 mm holes made in it and the main spout plugged with a plug.
To ensure pressure, a tank filled with water with a hose lowered into it is raised to a certain height. Depending on the required pressure, it can be from 1 to 10 m. More complex systems are automated, but we will talk about this below.
Drip irrigation scheme
Drip watering should only be done under the roots of plants. When water is supplied between the rows, there will not be enough moisture for the roots, and the crops will develop worse. At the same time, the soil around it will become compacted and loosening will be required. Plus, wet soil under the rays of the sun will overheat, which will adversely affect growth.
The source of water does not have to be a tap or a barrel. They can serve as a well, a well or a reservoir. To do this, you will need to connect a pump to the system.
But in any case, the mandatory installation of a filter is required - otherwise the pipeline will quickly become clogged. When drawing water from an open source (reservoir), it is first necessary to install a coarse filter, and only then a fine filter. In other cases, a single fine filter is sufficient.
But still, to water a greenhouse or vegetable garden, it is better to heat the water in the sun before watering. For this purpose, containers (barrels) of suitable size are used. When it is raised to a certain height, water will flow into the system by gravity.
The pump will only be needed to draw water if there is no water supply or its pressure is low.
Video description
Video about the device of drip irrigation from bottles:
Any of these methods allows you not only to water the plants, but also to feed them - just add liquid or dissolved fertilizer, herbal infusion, mullein infusion, etc. to the water.
Unfortunately, such a system cannot be called perfect, because you still have to fill the containers often and with your own hands. In addition, in extreme heat and when the owners are absent from the dacha for several days, the bottles will not cope with the task of proper watering. And their appearance will not decorate the site in any way.
Types of droppers
Drippers are devices with small tubes at the end that cut into each of the holes in the hose or pipe to regulate the volume of water supplied.
Depending on the type of crops grown, the size of the plot and material capabilities, you can choose one of the types of drip systems.
Compensated drip
They are divided into:
- uncompensated and compensated: in the first case, the water supply at the end of the bed will be lower than at its beginning; compensated drippers, equipped with a membrane and a valve, are capable of dispensing water in doses even at different pressure levels; such devices are ideal for areas with height differences
- devices with a fixed volume of liquid supply (the manufacturer indicates it in the instructions): from 1 l/h
- with manual water flow
- equipped with an anti-drainage (compensated) system : they do not allow water to be completely removed from the system even when its supply is turned off; the pressure in them never drops to zero, so when switching on again there is no time required to displace air
- with spider-type dispensers: more expensive devices with drip irrigation for several plants at once
Whatever type of dropper you choose, always pay attention to the possibility of disassembling it. For such structures, the cover must be removed to clean the device from clogging.
Types of irrigation: different systems
Now let’s figure out what the main types of drip irrigation are. Each system has certain disadvantages and advantages. Here are the main options:
- For automatic watering with separate drippers, branches are supplied to each plant. In this case, the irrigation radius should be small, since such unfolding takes a lot of time. The main elements of such systems are microtubes through which liquid passes to the root system. For installation in a greenhouse, splitters, special valves and racks for fastening microtubes are used;
Option for distributing elements in automatic watering
- drip tapes are used not only for plants, vegetable gardens, but also for trees. In this case, the sprinkler pipes are placed in parallel. Such irrigation methods do not have as long a service life as individual spray drippers. For automatic watering of fields, each tape has holes through which water flows. One edge is placed at the tank, and plugs are mounted on the second. This ensures that the liquid flows out against the desired roots.
Irrigation system using tapes
Also, when choosing an irrigation system, you need to consider different types of hoses, types of sprinklers and sprinklers.
Distance between droppers-nozzles
The water supply in drip irrigation for a greenhouse made by yourself must be carefully adjusted. With low pressure, only those plants located at the beginning of the bed will be provided with water.
Excess water is also undesirable - the plantings will suffer.
For most crops, the distance between droppers is 30 cm
The types of droppers and dispensers and the distance between them should be selected depending on the type of plants being irrigated.
After all, there are no universal devices for watering:
- “spider” dispensers with a large distance between dispensers; they are best used for irrigating perennial greenhouse plants; do not use for open ground and watering seedlings, in this case a smaller distance between the droppers is required; water conduits for “spiders” are made only suspended
- for watering most crops, the distance between dispensers should be 30 cm
- droppers with a pitch of 20 cm are used for watering root crops - carrots, onions, etc.
- for melons and melons, the distance between the droppers is 1 m
Video description
You can watch the video for installation master classes:
Note! The pitch between the holes in the drip tape or between the droppers on the tube is selected in accordance with the location of the irrigated plants. If these are onions, carrots, greens and other crops that grow quite closely, it should be about 20 cm. For tomatoes, eggplants and cucumbers, the distance increases to 30-35 cm, so that each bush has its own dropper.
Also, before auto-watering in a greenhouse or garden beds, you need to decide on the volume of the watering tank, which will depend on the number of plants being irrigated and their need for water. This is especially true in cases where automatic replenishment of the container is not provided in the absence of the owners.
Calculation of water volume and duration of irrigation
To make homemade drip irrigation, you should first draw up a plan indicating the length of the beds and the location of the plants on it. Next, a drip irrigation diagram is drawn, which indicates the location of each of the pipelines and the container for collecting water (barrels).
A detailed plan of the system is needed not only to determine the total length of the pipes, but the number of droppers, as well as adapters, tees and other parts.
For cucumbers, the norm is 2 liters of water per bush.
Next, you will need to calculate the volume of water consumed, that is, the size of the required container (barrel). For example, to lay a pipeline 10 m long with a distance between droppers (nozzles) of 30 cm, 34 of them will be needed. If each of them “gives out” 5 l/hour, then 34 droppers will pass through 170 l/hour.
If the length of the system is longer, then too much capacity will be needed. Therefore, it is better to split the drip system into two or use a constant source of water.
Drip irrigation can be used for any type of planting. Only the scale and type of equipment changes. In addition to greenhouse plants, it can be used to water vegetables and fruits in the open ground, as well as flowers, trees and shrubs.
Water consumption for drip irrigation for moisture-loving plants such as cucumbers is 2 liters per bush, that is, several times less than the usual norm. Drip watering of tomatoes in a greenhouse with already formed fruits is carried out once every 4 days.
Each plant will need 1.5 liters of water. Cabbage and potatoes will need 2.5 liters per day. Thus, when supplying water from a dropper at 3 l/hour, it will take a little less than an hour to water cucumbers, about 30 minutes for tomatoes, about an hour for cabbage and early potatoes.
Components and layout options
Drip irrigation systems can be organized using any water source. A well, borehole, river, lake, centralized water supply, even rainwater in tanks will do. The main thing is that there is enough water.
A main pipeline is connected to the source, which supplies water to the irrigation site. Then it goes along one side of the irrigated area and is muffled at the end.
Opposite the beds, tees are inserted into the pipeline, to the side outlet of which drip hoses (pipes) or tapes are attached. They have special droppers through which water is supplied to the plants.
The drip irrigation scheme from a barrel can be easily implemented with your own hands
It is advisable to install a filter or filter system between the outlet of the source and the first branch onto the bed. They are not needed if the system is powered from the home water supply. If you pump water from a lake, river, rainwater tank, filters are required: there can be a lot of contaminants and the system will clog too often. The types of filters and their number are determined depending on the condition of the water.
How to purify water from wells and boreholes is described here.
Drip hoses
Hoses for drip irrigation are sold in coils from 50 to 1000 meters. They already have built-in water flow points: labyrinths through which water flows before entering the outlet. These oozing hoses provide the same amount of water throughout the entire line, regardless of the terrain. Due to this labyrinth, the flow rate at any irrigation point is almost the same.
They differ in the following characteristics:
- Tube stiffness . Drip hoses can be hard or soft. The soft ones are called tapes, the hard ones are called hoses. Hard ones can be used for up to 10 seasons, soft ones - up to 3-4. Tapes are: Thin-walled - with a wall thickness of 0.1-0.3 mm. They are laid only on the surface, their service life is 1 season.
- Thick-walled tapes have a wall of 0.31-0.81 mm, service life - up to 3-4 seasons, available for both above-ground and underground installation.
Watering can be organized using tapes or hoses
- Diameter. Affects performance and maximum line length. The internal diameter of hoses can be from 14 to 25 mm, tapes from 12 to 22 mm. Among the tapes, the most common size is 16 mm.
- Water consumption . Selected depending on the required irrigation intensity. Hoses can deliver 0.6-8.0 l/hour, thin-walled tapes - 0.25-2.9 l/hour, thick-walled tapes 2.0-8.0 l/hour. This characteristic is the flow rate through each dropper.
- Distance between droppers. It can be from 10 to 100 cm. It is chosen depending on the required amount of water and how often the plants are planted.
- IVs may be with one or two exits. Water consumption remains stable. Only the depth and area over which the water spreads changes. With one outlet, the area is smaller and the depth is greater; with two outlets, the irrigation area increases and the depth decreases.
One or two exits. Selected depending on the root system of the plant - Laying method : above-ground, underground, combined.
- Operating pressure. Varies widely depending on the manufacturer: from 0.4 Bar to 1.4 Bar. You choose depending on whether you have a gravity-fed system, use pumps to supply water, or whether everything is connected to the water supply.
The maximum length of the irrigation line is determined so that the unevenness of the water output at the beginning and end of the line does not exceed 10-15%. For hoses it can be 1500 meters, for tapes - 600 meters. For private use, such values are not in demand, but it is useful to know)).
Droppers
Sometimes it is more convenient to use droppers rather than tapes. These are separate devices that are inserted into a hole in the hose and through which water is supplied to the root of the plant. They can be installed in arbitrary increments - put several pieces in one place, and then several in another. This is convenient when organizing drip irrigation of shrubs or trees.
Separate drippers that are installed in a hose are more convenient to use when watering shrubs, grapes and trees
There are two types - with standardized (constant) and controlled water release. The body is usually plastic; on one side there is a fitting, which is inserted with force into the hole made in the hose (sometimes rubber rings are used for sealing).
There are also compensated and uncompensated droppers. When using compensated ones at any point in the irrigation line, the water release will be the same (approximately), regardless of the terrain and location (at the beginning or end of the line).
There are also spider-type devices. This is when several thin tubes are connected to one output. This makes it possible to simultaneously water several plants from one water outlet point (the number of droppers is reduced).
Spider-type dripper - you can water several plants from one water distribution point
You can read how to make a small greenhouse here. And how to make a garden beautiful is written here.
Main pipes and fittings
When creating a system for laying a main pipeline from a water source to an irrigation zone, plastic pipes and fittings are used from:
- polypropylene (PPR);
- polyvinyl chloride (PVC);
- polyethylene: high pressure (LDPE);
- low pressure (LPP).
All these pipes tolerate contact with water well, do not corrode, are chemically neutral and do not react to the application of fertilizers. For watering a small greenhouse, vegetable garden, or lawn, a diameter of 32 mm is most often used.
Main pipes are plastic. Choose any specific type: PPR, HDPE, LDPE, PVC
In places where the lines are drained, tees are installed, to the side outlet of which a drip hose or tape is connected. Since they are smaller in diameter, adapters may be needed, and their outer diameter should be equal to the inner diameter of the hose (or be slightly smaller). You can attach tapes/hoses to fittings using metal clamps.
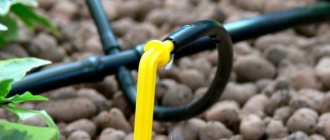
Bends can also be made through special fittings, which are installed in a hole of the required diameter made in the hose (as in the photo above).
Sometimes, after the tee, a tap is installed on each water distribution line, which allows you to turn off the lines. This is convenient if drip irrigation is used for moisture-loving plants and those that do not like excess water.
If you are reluctant to choose components and select sizes and diameters of fittings, you can buy ready-made kits for drip irrigation from various manufacturers.
Required materials
To set up a permanent irrigation system that will be used year after year, it is better to purchase more durable PVC pipes rather than hoses. Since moisture must enter the system slowly, the diameter of the tubes is selected to be minimal - up to 10-16 mm.
It is better not to use transparent pipes or tapes - algae will grow inside them. Metal pipes will not last long - rust will quickly clog the dropper nozzles.
Drip tape
Manufacturers also offer ready-made irrigation systems in the form of polyethylene drip tapes with built-in drippers. With their help, it is easier to dose watering - the micropores inside resemble a labyrinth in which the direction of water flow is controlled.
The wall thickness of the tapes can vary from 0.127 to 0.381 mm. However, such systems do not last more than one season. In the spring you will need to purchase new ribbons.
In addition to distribution and irrigation pipes, you will need:
- a pump that comes complete with a filter (such systems are called master blocks) to supply water at a certain pressure (up to 1.5 bar)
- droppers (we described their structure and types above)
- stands for strengthening dropper dispensers at plant roots
- taps (switches) for adjusting the flow force and shutting off the system in individual modules
- fum tape or tow for sealing joints
- plastic couplings
- adapters
- tees
- plugs: they are located at the ends of pipelines
When drawing water from a well, you will also need a filter. You can buy a regular mesh or disk one. To install automated stations, you will also need a control unit (timer) and a battery.
Parts from medical droppers with a diameter of 1-2 mm can be used as nozzles (droppers).
Homemade system of medical droppers
An equally effective method of irrigation is the use of ordinary medical droppers. Due to the fact that they are equipped with a special wheel, you can adjust the intensity of the liquid supply for each specific plant. To do this, you do not need to make several watering lines, which in turn can reduce the overall costs of organizing an irrigation system. The principle of operation is almost the same as indicated in the paragraph above. Only instead of special drip hoses we will use ordinary rubber or polyethylene pipes.
- Distribute supply pipes throughout the entire area;
- The wiring diagram should be such that you can reach all the plants;
- Use tees to connect elements;
- Now connect the entire system to a water source. This can be either a storage tank or a central water supply;
- Install plugs at the end of each hose;
- Now, opposite each bush, make a hole in the hose.
- It is most convenient to pierce rubber with an awl, and plastic with a self-tapping screw;
- The plastic end of the dropper must be inserted into each hole;
- Place dropper tubes under each bush and enjoy excellent results.
There is an easier way to set up an irrigation system using medical droppers.
In this case, droppers will be used together with a liquid container:
- Install a support for hanging the dropper in the required place. It can serve as an ordinary stick;
- Fill the reservoir with liquid, secure it to the support;
- Medical systems with thick needles or medical hoses with a diameter of 1-2 cm are used as supply hoses;
- Insert needles diagonally into the main hose and place the ends of the tubes in the desired location.
It probably couldn’t be simpler. Droppers clog quite rarely, and even if this happens they are very easy to clean. The disadvantages include the rapid overgrowing of the system with algae when it is exposed to direct sunlight. To avoid this, you can cover the structure with a dark cloth.
System assembly. Main stages of work
Assembly diagram
Making drip irrigation in a greenhouse with your own hands is not difficult:
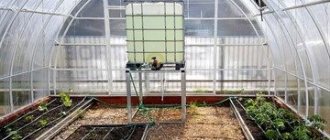
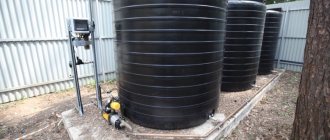
1To install the system, you will need a 100-200-liter barrel, which is raised to a height of about 1-2 meters. If there is a lid, holes are prepared in it for air intake. If there is no lid, it is better to cover the container with gauze.
2To insert the hose, a hole is prepared at the very bottom of the barrel with a tap-tip installed in it.
3Each of the tubes or hoses is laid with a slight slope of 5 cm per meter of length. They are secured to small pegs stuck into the ground.
4You should not pull pipelines that are too long - they will require very large containers. It is much more profitable and convenient to use several systems independent of each other.
5PVC pipes are cut with a hacksaw, pipe cutter or miter saw. To obtain tight joints, the cutting angle must be precise and equal to 90 degrees. Therefore, it is better to clamp the pipes in a vice.
6 Small 2mm holes must be made in hoses or plastic main pipes. In a simple do-it-yourself drip irrigation system in a greenhouse, the droppers can be replaced with pieces of ordinary wire, along which drops of water will descend and be supplied to the plant.
7You can make holes in the hose with an awl or a nail held with pliers. In PVC pipes it is more convenient to do them with a small diameter wood drill.
8When using a pipeline in the form of ready-made strips, they are carefully laid out over the area. To avoid damage, pulling or dragging them is strictly prohibited.
9Pay attention to the marks on the tape in the form of colored lines. Sprinklers are located on this side. The system must be laid with the colored lines facing up.
10Next, the main main hose is secured using a clamp. A plug in the form of a wooden plug is inserted into its outlet (spout) hole.
11When connecting taps, fittings (tees and adapters), to perfectly seal the joints you will need fum tape or tow.
12Before inserting the plug, the system must be flushed to remove any plastic shavings that fall into the pipes during drilling.
13The last stage is checking the system. After starting the water, you need to make sure that water reaches each drip, including the last one in the garden bed. The soil near them should be moistened evenly
.
When installing drip irrigation, adapters, tees and droppers must be inserted with force, quite tightly. A hair dryer will help simplify the process. The heated holes will expand under the influence of heat, and the work will go faster.
Video description
Useful video on the topic:
See also: Catalog of companies that specialize in the installation of metal structures - canopies, greenhouses and others
Timers can operate from mains or batteries, be mechanical, electro-mechanical or electronic:
- The mechanical timer is manually controlled and has only one function. Before you start watering, you need to turn it on and set the time after which it will stop supplying water. This device is convenient if the area is small and is under constant supervision. It eliminates the need to turn off the water on time and generally keep this concern in mind.
- The electronic-mechanical device can already do more: it provides the specified frequency and duration of watering, independently controlling the system in accordance with the program.
Electronic-mechanical timer with output to two lines Source growsvet.ru
- Electronic controllers are capable of executing up to 16 commands when connecting to them additional devices that monitor soil and air humidity, temperature and other environmental parameters. They can be programmed to different modes for each crop. They are expensive, but they allow you to not have to worry about watering at all, no matter what the weather is like outside and no matter how long the owners’ absence.
When deciding how to make automatic watering in a greenhouse with your own hands, you need to decide in advance on the optimal irrigation mode and choose the most suitable timer in terms of price and functionality. It is installed at the beginning of the system on the main line and does not particularly complicate the process of its assembly.
Electronic timer connected to the central water supply Source treetrekkers.com
Automated irrigation systems
When installing a controller (timer), the system is fully automated. That is, it will not be controlled by a person by turning a crane, but by special equipment. At the specified time, it will turn the water on and off.
Automatic watering timer
Large enterprises install systems with a high degree of automation - such devices are capable of monitoring soil moisture, ambient temperature and even humidity.
To install automatic watering on a private property or in a country house, it is enough to purchase a simple device that allows you to set up watering at a given period of time. That is, at a certain time the tap will open and water will be supplied to the system. After it expires, watering stops.
Installation of such equipment is not difficult. The timer, equipped with fitting couplings on both sides, is inserted anywhere in the pipeline. It can also be connected to a pump to control water intake.
Operating principle and varieties
This technology was tested several decades ago. Its results were so impressive that the system became widespread. The basic idea is that water is supplied to the roots of the plants. There are two ways:
- poured onto the surface near the stem;
- fed underground into the root formation zone.
The first method is easier to install, the second is more expensive: you need a special hose or drip tape for underground installation, and a decent amount of excavation work. For temperate climates there is not much difference - both methods work well. But in regions with very hot summers, underground installation has shown itself to be better: less water evaporates and more of it gets to the plants.
Drip irrigation is used in vegetable gardens and greenhouses. It is most effective when growing vegetables and fruits.
There are gravity systems - they require a water tank installed at a height of at least 1.5 meters, there are systems with stable pressure. They have a pump and a control group - pressure gauges and valves that create the required force. There are fully automated drip irrigation systems. In its simplest form, it is a valve with a timer that opens the water supply for a specified period of time. More sophisticated systems can monitor the flow of each water supply line separately, testing soil moisture and sensing the weather. These systems operate under the guidance of processors; operating modes can be set from the control panel or computer.
Subsoil irrigation
This type of irrigation differs from conventional drip irrigation only in the depth of the water supply. A similar method has been known since ancient times - pottery pipes were used for this. Today it is used both on large farmlands and small summer cottages.
Installation of an underground irrigation system
Water is supplied to the roots of the plant using tubes equipped with holes. Since the top layer is practically not moistened, a crust does not form on it, and the soil does not require constant loosening.
Another advantage of the method is that it minimizes the loss of moisture used in the evaporation process. Subsoil irrigation allows you to maintain a more favorable air and thermal microclimate in the beds.
1Same as in the previous case, to install the system you will need a storage tank (barrel) with a tap to shut off the water. To create pressure, it is installed at a height of 1-2 m.
2You will also need 20-40 mm PVC pipes and connecting elements (tees and adapters).
3 In the pipeline, round holes of 2-3 mm or slot-like holes of slightly smaller width (1-2 mm) and a length of 5-10 mm are made every 20-40 cm.
4Water consumption should be small - 0.1-0.3 liters per day. This requires minimal pressure.
5To protect against small particles of debris that can clog the system, filters are installed at the beginning of the pipeline (inside the barrel). You can use either mesh, sand or gravel.
6The depth of laying the pipeline in the ground is 20-30 cm. The minimum distance between them is 40-90 cm. It is not worth laying the pipes higher, otherwise water will seep out and the soil will quickly become crusty.
7Since on heavy loamy soils water flows both into the depths and to the sides, the distance between adjacent pipelines can be made a little larger. On loose sandy soils, when moisture passes mainly deep, the distance between adjacent pipelines should be minimal.
8This parameter largely depends on the type of crops being irrigated. So, for strawberries, whose roots go shallow, the distance between the pipes is 40-60 cm. For watering trees, it is 70-90 cm.
9The distance for specific crops can be determined experimentally. Bury one or two pipelines next to the bed and after a couple of days dig with a shovel in 2-3 places. The soil in this place should be slightly moist.
10On dry sandy soils, so that precious moisture does not go to great depths, a film 10-20 cm wide is laid under the pipes.
11Water must be supplied to the humidifier pipes under low pressure at a water flow rate of 0.1-0.3 l/s.
12To prevent the holes in the humidifiers from becoming clogged with debris, soil particles or silt, you need to supply water to them through mesh, gravel or sand filters.
13 Just like a conventional drip system, an underground (subsoil) irrigation system can be equipped with a pump and timer to provide automatic water supply at a given time.
When using underground irrigation systems, it is advisable to use special herbicide-impregnated hoses. It does not allow plant roots to penetrate the entrance holes.
Types of drip irrigation: prices and purchase features
A drip irrigation system is a durable and reliable option. Operational periods can exceed 10 years. To equip a strip structure for greenhouses, a watering strip is used, which has many holes, as well as a wall thickness of up to 200 microns. Such a hose is attached at one end to the water supply, and a plug is placed at the other end. When water penetrates, liquid comes out of the holes.
When deciding which system to choose, you need to take into account that the irrigation supply cannot be regulated. This option differs from spot irrigation, since it will not be possible to provide irrigation to individual points.
The automatic mechanism is most often combined with a hydraulic valve. In this case, a controller with a timer is used, with which you can even set the exact watering time. Knowing how such a system works, you can use the same principle to install self-watering systems with your own hands.
Let's look at the best irrigation systems that have an automatic machine. To determine which option is better, you need to consider them all:
- watering using sprinklers . This kit allows you to provide an irrigation radius of up to 20 meters. In this case, polypropylene pipes are used. Sometimes polycarbonate structures are used. This irrigation design increases soil and air moisture;
Sprinkler options
- For sprinkling, special drum devices . They are mobile devices. Watering of plants is carried out over an area of 20 square meters;
Automatic option with sprinkling
- For large areas, wide-coverage systems ;
Industrial scale structures
- Micro-sprinkling is used in several greenhouses . Watering can be done from a barrel. In this case, a special flexible hose is used.
Micro-sprinkler device
With proper calculations, a homemade watering device will provide high-quality spot watering. In this case, water consumption can be minimal. Where you can purchase such structures depends on the characteristics of irrigation. Our review of individual models will help you choose the best option.
Table 2. Average cost of drip irrigation
| Models | Image | Characteristics | price, rub. |
| Hose Gardena 01969 - 15m. | Suitable for directional watering. Can be used even at low pressure. Warranty period is one year. | 1900 |
| Water strider system "Eco Volya", 4m | Provides gentle watering on the site. Can be used both in open ground and in greenhouse conditions. Water moves in small portions to the root systems using drippers. The set includes a special water filter. The main set is designed for two beds, the length of which is 4 meters. | 1400 |
| Drip irrigation “Beetle” for 60 plants | The set is designed for micro-irrigation. Allows you to organize the necessary nutrition for different plants. Made from quality materials. The hose can be easily guided to the watering site without twisting or bending. Plastic and polyethylene are used in production. The package includes all parts for fastening, as well as a filter for fine cleaning. | 1800 |
| System without automation "AquaDusya" | The system can be connected to any container that needs to be installed at a height of a meter. In this case, the water can warm up naturally. The liquid moves through the hoses directly to the roots. In this case, pencil-type droppers are used. A branched tee can be installed on the faucet. The design is capable of producing up to 1.5 liters per hour. | 1900 |
| “My Hacienda” 100 m | The design is designed for 100 meters of beds. The kit includes drip tape, faucet, plugs and fittings. The system operates from water supply and from a regular barrel. | 1790 |
| "Drop" design | The design consists of a tape, a regulation tap, plugs and adapters. Such a system can be turned on for 1.5-2 hours a day. The garden uses up to 40 liters of water per day. You can assemble the structure yourself. | 1490 |
Drip irrigation for the Zhuk greenhouse: characteristics
This system is known for its functionality and efficiency. You can use a greenhouse or greenhouse kit. A similar watering kit can be used for a greenhouse or an open area. You can buy a similar design from, which produces it.
Complete set of watering device
Installation of the greenhouse option involves processing 60 plants. With its help you can process a room with an area of about 18 sq.m. The barrel model will cost about 1.8 thousand rubles, and the version for water supply will cost 2.5. Installation of a greenhouse structure can be carried out in various ways. You can use the automatic option with a timer.
Automatic design
Drip irrigation AquaDusya: device parameters
The AquaDusya system is designed for 50-60 plants. You can purchase an automatic start option or a model without automation. There is also a semi-automatic mechanism. The advantages of such equipment include the ability to operate on batteries and small design dimensions. You can install the machine and other variations yourself. At the same time, the Start design can provide high-quality watering without the presence of people. There is an option for connecting not only to the water supply, but also from a barrel. The price will depend on this.
Basic equipment of the model
Drip irrigation in greenhouses: user reviews
When choosing which watering is best for a greenhouse, it is worth studying all the options and reviews. Manufacturer ratings will help you choose the best option.
Review, Zhuk system
Vladimir, Ryazan: “The advantages of the equipment include high-quality materials and assembly. The kit includes a water strider, filter and timer. You can water from a barrel. One of the minuses I would like to note is that the water meter tube in the package is so bent that it never straightens completely. But overall, the design is wonderful. It works like clockwork.”
Review by Gardena
Alexander, Penza: “I have been using the gardena drip irrigation model for several years. The design is made with high quality. Good watering area at normal pressure. Don't forget to clean the injectors regularly. You also need to insert a mechanical filter and drain the water in a timely manner.”
Review by AquaDusya
Alina, Krasnodar: “Last year my husband bought an automatic Aquadusya system. We purchased a kit for greenhouses. At first we wanted to choose a German watering design, but the domestic version also does a good job and at the same time has a lower cost. Installation of the structure was not difficult. The area of our greenhouse is 40 square meters, and next to it there is a tank of 50 liters. The droppers are evenly distributed over the greenhouse area. My husband and I were pleased with this system. As a result, we received a rich harvest.”
Use of plastic bottles
To water small areas, you can make a simple device consisting of a plastic bottle with a small piece of tube inserted into it, suspended with the neck down. It is more convenient to use an empty ballpoint pen.
In addition to the main hole for the tube, you will also need a second one through which air will escape. If the tube is too wide, another, thinner tube or piece of wire insulation, called a jet, is inserted into the main tube to reduce the flow rate of water.
You can do it even simpler. Puncture 8-12 holes in the bottom of a plastic bottle. Their number depends on the type of soil. A minimal number of holes are made on light sand.
Moisture seeps into clay soil more slowly, so the number of holes is increased. However, their size should be minimal, otherwise the water will pour out of the bottles very quickly. It is better to do this with a regular needle.
The simplest bottle watering system
The bottle is filled with water, closed with a lid and buried in the ground, leaving the neck uncovered. As the container empties, you will add water through it. Since it may shrink as water flows out of the bottle, it is better to also make a small hole in the lid.
When the bottle is buried in the ground, the plants will be supplied with water using underground irrigation. The top layer of soil will not be wetted, so the usual crust on it, which needs to be constantly loosened, will not form.
When drip watering tomatoes in a greenhouse using this method, one liter bottle is enough for 5 days. This volume will be enough to water one bush. A 5 liter container will provide them with water for 10 days.
Clay soil can quickly clog small holes. To prevent this, use regular nylon stockings. They are pulled over corks or parts of bottles with holes made in them.
Another method of protecting against blockage of holes is often used - drainage. Before burying the bottle in the ground, throw some hay or a piece of burlap at the bottom of the hole.
Of course, it will be difficult to use such systems for irrigating a large number of plants. But in some cases, for summer residents who rarely appear on the site, this can be a life-saving solution.
It is better to bury the bottle in the ground at an angle of 30-45 degrees so that the water pressure is minimal. In this case, the rate of water flow will decrease.
What does drip irrigation consist of: the main elements of the device
To build a drip structure yourself, you need to buy separate elements.
Individual elements for drip irrigation and their prices
All parts are connected in series to each other:
- disk filter;
- main pipe;
- a mechanism for enriching water with nutritional components;
- drip tapes;
- start connectors for connecting drip tapes;
- splitters for drip tapes;
- plugs for tapes.
Set of components for watering structure
Tape for drip irrigation: application features
A drip tape is a hose through which water moves. In this case, the liquid is purified using different filters. When determining which tape is better, you need to take into account certain characteristics. It is important to calculate the length of the drip tape, as well as the thickness of its walls. Operating conditions depend on these parameters. The distance between the tapes also matters. In this case, the best tape depends on the timing of plant ripening.
Special tape in a coil for self-installation of the system
You need to know how to mount the tape yourself. A drip tape is installed on the pipe, which is tightened with a special nut. To install such a structure, fittings are used. It is with their help that branching is carried out. To perform strip irrigation, such a structure must be mounted so that the holes in it are placed on top.
Complete set with fittings
Watering tape can be different. Here are the main types of drip tapes:
- Outdated technologies include labyrinth-type tape . A continuous labyrinth is formed along its entire length, through which water moves. This option can be purchased inexpensively;
You can watch a video about this technology:
The labyrinth design has a specific structure
- slotted tape is more reliable than labyrinth tape. There is also a labyrinthine channel inside it. In this case, it is necessary not only to decide how to lay this element, but also to apply a special filtration system;
Slit product option
- According to reviews, emitter-type production is a modern solution. Irrigation is carried out using flat droppers. The emitter tape creates currents that move water.
Emitter type products
To purchase such an element, you need to know how to lay it correctly and how much such tape costs. The drip system completely depends on the quality of this element. An important indicator is the price. The Tuboflex system deserves special attention; its cost varies between 2500-3000 rubles.
Tuboflex products
Start connectors for drip irrigation: how to use
To make functional drip irrigation you need to buy a starting connector. Installation for the tuboflex system is performed as follows. Using a marker, the surface of the main pipeline is marked for holes. At the same time, connectors and a starting valve are mounted to them. First, seals are placed in the holes, and then start connectors.
It is worth considering the principle of operation of the device with a tap. This connection diagram allows for manual adjustment. This is important if your greenhouse contains different crops with their own watering needs.
This is what standard start connectors look like
Irrigation drippers: manufacturing technology
For drip irrigation, you can build a structure with your own hands. You can see how to do this in the video below:
This can be a collapsible and compensated model, as well as an adjustable design with water supply control. The dripper irrigation system ensures uniform pressure on different parts of the hose. This ensures uniform watering of the plants.
A similar compensated model can be purchased in the store
You can use medical IVs. Watering indoor plants can be done from a plastic bottle. To make drippers in greenhouses, you first need to install a container and fill it with water. It is also necessary to install a hose and a submersible pump. It is important to calculate how much water you will need. For a tomato bush, 1.5 liters per day is enough, and for cucumbers – 2 liters. The dropper can be made in the form of a tape. This option is suitable if watering is designed for different crops. For example, for flowers and vegetables.
Submersible pump option for drip irrigation
Before installing droppers, it is necessary to make some calculations. If external compensated drippers are installed, then to determine the water flow, the soil is checked for depth after an hour. The price of the structure also depends on this indicator.
Assembling a drip irrigation structure
Drip irrigation for indoor plants
A device like this will come in handy during your vacation. There are many ready-made drip irrigation systems on sale in the form of flasks that look like enemas, capillary trays, wicks, “smart pots”, etc.
Manufacturers also suggest using hydrogel, a polymer that can retain moisture and then release it to plants over a certain period of time, when leaving home for long periods of time.
Automatic watering can for indoor plants
If you decide to do drip irrigation for indoor plants, before going on vacation, be sure to check the functionality of the system. If water flows out of it too quickly, during the first couple of days, in the remaining time the plants will become without water and simply die.
To assemble your drip irrigation system, you will need a large plastic bottle and an old medical dropper or one or more thin, food-grade silicone tubes. They can be found in medical supply stores.
In hardware stores that sell moonshine stills, you can purchase tubes of a slightly larger diameter. The outlet end of such tubes can be closed with a plug, and several holes can be made in the tube itself for irrigation.
Assembling a wick irrigation system is even easier. To do this, place a large container of water next to the flower pot. One end of the wick is lowered into the container, the second is buried in the ground.
Just keep in mind that this method can only be used in loose soil. Water will not seep into dense soil. You should not use wick irrigation for tall plants with large roots - there will not be enough moisture for them.
Automatic watering for greenhouse “Klip-36”
A pulse-local hydroautomatic drip irrigation system operates on the principle of supplying water in small portions lasting 1.5-2 minutes at long intervals throughout the day. Irrigation is fully automated, but there is no automation, which ensures reliable and long-term operation of the device.
Installation diagram of the Klip-36 drip irrigation system
The system is designed to water an area of 36 m². The kit includes a 16 liter water meter tank, which can be connected to a water tap or barrel. It is equipped with a siphon that shuts off the water supply when it is filled. The water is heated and supplied to the plants. Excess liquid flows back into the distribution network. Thanks to the cyclic system, you can adjust the flow of 16 liters of warm water after 1-7 hours, depending on the needs of the plant.
Automatic watering of greenhouses does not require an electrical connection or batteries. The system can be installed at any phase of crop growth. The branched polycarbonate irrigation tubes included in the kit can be shortened, thereby adapting to any length of the bed. They contain special openings and drains, thanks to which a simultaneous and uniform irrigation process is carried out.
The presence of a small container allows you to apply fertilizers simultaneously with watering. The system does not require connection of drains to the placement of plants. It is characterized by reduced clogging, which is associated with an increased flow area of the holes, due to which it is characterized by a long period of operation.
For a large number of plants in a greenhouse, it is better to install an automatic or semi-automatic watering system
Daily water supply can be adjusted within 0.5-20 l/m². When the system is connected to the water supply, it becomes fully automatic. A capacity of 200 liters will be enough for seven days of watering, so the greenhouse can be left unattended. Features of the installation of the system can be seen in the video “Drip irrigation for a greenhouse from a barrel “Clip-36”. Pulse-local watering has a short duration of impact on the soil and intensity, as a result of which the soil moisture is maintained at the level of 85%, which is optimal for plants. The cost of the set is on average 7,500 rubles.
Tips for use
Drip irrigation of tomatoes
Despite the simplicity of the design, the drip irrigation system requires constant maintenance.
To extend its service life, follow these rules:
1Metal under the influence of water will quickly become covered with rust, the smallest particles of which will constantly clog the pipeline. Therefore, it is better to mount the system from plastic. It is not advisable to use metal barrels and pipes.
3Don't forget to protect the pipeline with filters. They can be purchased at any hardware store or made yourself from a piece of foam rubber inserted into the supply pipe located at the entrance to the barrel.
4The filter needs to be cleaned more often, at least once a week.
5 Only clean or settled water should be poured into the barrel.
6Using the irrigation system, you can also apply fertilizers. To do this, they are first dissolved in water. After such watering, for cleaning you will need to run ordinary clean water through the pipeline for 10-15 minutes.
7If the pipeline is damaged during operation, the pipe is cut and connected using an adapter (coupling). Before starting repairs, be sure to rinse the contaminated area with water.
8In autumn, water is drained from the system. The pipeline is completely disassembled and stored in the utility room. Otherwise, in the autumn-winter period the nozzles will be completely clogged with dirt. Yes, and digging up beds next to the pipeline will be difficult.
Preservation for the winter
The process of preserving equipment for automatic drip irrigation for the winter includes the following steps:
- First you need to close all water supply taps. All remaining water is drained from the bottle.
- The current to the pumping system is switched off. All parts of the filter system must be removed, washed and stored in a suitable place.
- All fittings used for tying the water cylinder must be removed and placed in a warm place.
- The pipes through which water was supplied must be purged to remove any remaining water. After this, they are wound up and stored in a warm place. To avoid problems during work, you must use goggles to protect your eyes.
Laying the main line and branches
Since polypropylene pipes are used as the material for the main line and branches, you need to become familiar with how to properly cut and connect them to each other.
You can get a clean cut without burrs or deformations using special pipe cutters designed to work with plastic products. If for some reason it is impossible to purchase such a tool, then as an alternative, use a hacksaw or, when working with small-section pipes, a sharp stationery knife. But at the same time, the quality of the cut will decrease, and this will not affect the durability of the pipe and the quality of the connection with other elements of the system.
Knife for cutting plastic pipes
Things are more complicated with the connection of polypropylene pipes with fittings and other elements.
There are three ways in total:
The first method provides a strong and durable connection that can withstand high pressure in the system. But for it you will need a special soldering machine with a set of attachments and some skills in working with such a tool.
Tool for soldering polypropylene pipes
Step 1. Inspect the fitting and pipe section for defects or defects.
Step 2. Degrease the outer surface of the pipe at the intended joint and the inner surface of the fitting.
Instructions for cutting and soldering polypropylene pipes
Step 3. Install the appropriate nozzle on the soldering tool - the hole in the pipe part should correspond to the outer diameter, and in the fitting part - to the internal section.
Step 4. Warm up the soldering tool and nozzle.
Step 5. At the same time, insert the pipe and push the fitting into their corresponding parts of the nozzle. Wait for the time specified in the instructions for the tool. The soldering iron will heat the outside of the pipe and the inside of the fitting.
Welding table for polypropylene pipes of different wall thicknesses
Step 6. At the same time, remove the fitting and pull the pipe from the nozzle and connect them to each other to the heating depth. Hold for five seconds, then allow the connection to cool for some time.
The main disadvantage of using a soldering machine is the need for a soldering tool. It is quite expensive, and using it only once is impractical.
In addition, such a connection is non-separable. An alternative is to use compression fittings and a crimp wrench. However, in the case of polypropylene pipes, the quality and tightness of such a connection leave much to be desired. A simpler and cheaper connection method is “cold welding” using special glue.
“Cold welding” for gluing polypropylene pipes
Cold welding prices
cold welding
Step 1. Examine the fitting and pipe for defects. If there are no defects, join without glue and mark the depth of the joint using a marker.
Step 2. Degrease and clean the bonded surfaces of the pipe and fitting.
Step 3: Apply glue to the outside of the pipe and the inside of the fitting.
Step 4. Connect the elements together. Make sure that they connect smoothly, without skewing to one side. They should be held in this position for 15 to 30 seconds. Water supply in such a connection is permissible only after 24 hours.
Connecting PP pipes using the cold welding method
The pipelines of a drip irrigation system can be made detachable and easily dismantled using American type fittings.
Before starting the installation of the main line and branches, it is necessary to decide which method of pipe arrangement is preferable - surface or deep. In the first case, all elements of the system are simply laid on the ground (or above it using bracket holders). Pipes lying on the surface are easy to repair and replace, but they can also easily be damaged due to carelessness.
Surface Mounted Pipe
When buried deep, the main and auxiliary communications are laid in a narrow trench with a depth of 0.3 to 0.75 meters. In this case, inspection and maintenance of pipes becomes more difficult, but at the same time they do not interfere with walking around the site and harvesting crops from plants. Having decided on the location of the highways, you can begin to install them.
Laying mains in a shallow trench
Step 1. Attach a fine filter to the water tank and ball valve. If you intend to install a container with fertilizers, a pump and a controller for automatic drip irrigation, install them.
Drip irrigation filter
Step 2. Using an elbow fitting and a piece of pipe of the appropriate size, bring the line to a height of approximately 5-10 centimeters above the ground. Install the holder bracket as a support.
Step 3. Cut pieces of polypropylene pipes according to the distance between the bends. Also take into account the “seams” between the parts of the line and the fittings.
Step 4. Consistently install and connect the sections to the tee fittings. At the same time, maintain the slope - the end of the highway should be closer to the ground than the beginning. This is necessary for effective drainage of water before the onset of cold weather.
Step 5. At the end of the main pipe, install either a plug or a ball valve. The latter is preferable because by opening it, you will be able to quickly drain water or clear the pipes of blockages that have accumulated in them.
Pipeline diagram for drip irrigation
Next, the list of actions depends on which type of outlet you have chosen - a drip tape or a tube with droppers.
Water supply options
After the choice between automatic and manual systems has been made, it is necessary to decide how the liquid will be supplied. With only rare exceptions, food comes directly from a well or water supply. Usually this is a tank or barrel.
When drawing up a pipeline network plan, you need to focus on the location of the greenhouse, soil, topography on the site and compliance with generally accepted standards for organizing proper irrigation.
Getting water from underground sources is difficult and expensive. If you connect to a water supply that has already been installed, this will simplify the task and make it cheaper. The big advantage of this is the purity of the water. But this does not mean that chemical analysis is not needed, since unpleasant surprises can be expected even from wells drilled into sand.
When choosing a system, you also need to understand whether it needs natural pressure or should be equipped with pumps. In both cases, the design will be designed to water a large area of land. With low pressure, watering is possible on 10 meters of the bed. When installing a system with a more intense flow, it will be necessary to invite specialists, since its installation is more complex.
Price
Here are a few examples to give you an idea of the price level for automatic drip irrigation systems:
- “Water strider” system (40 droppers, 12 m of hose): RUB 2,982;
- “AquaDusya Start” (50 droppers, 15 m of hose): RUB 4,900;
- OGO-Rodnik (only controller with soil moisture sensors and electromagnetic tap): RUB 4,000;
- Green Helper (Russia) for 64 droppers: RUB 3,600;
- Gardena (40 drippers, 25 m of supply hose and 5 m of main hose): RUB 3,884;
- Green Line (64 droppers): RUB 7,800.
Operation and Maintenance
The irrigation system is installed after spring tillage, when positive air temperatures are established. After installation, seedlings are planted exactly under the droppers.
During the growing season of plants, filters are cleaned monthly, sections of damaged tape are repaired, and if necessary, replace it.
After harvesting, the water is removed from the system, and the tapes and tubes are left for 5 days until completely dry . Drip sleeves are stored stretched inside the greenhouse. Gardeners recommend attaching tapes to the wall of the structure.
Numerous bends damage the tape, so it does not need to be rolled.
Adjustment
A distinction is made between automatic and manual regulation . After setting the timer, it is adjusted to the required operating mode. They monitor the growth of plants and change parameters.
Manual regulation consists of monitoring the plants and turning on or off the water supply. This method leads to mistakes, excessive water consumption, and loss of harvest.
Preservation for the winter
The system is cleaned of dirt, biological films resulting from the precipitation of salts, and the activity of microorganisms.
Most often, it is enough to rinse pipes, containers, and connections with water . To dissolve sediment of organic origin, use strong acids while observing safety precautions when working with caustic substances.
Pipes and hoses are dismantled and stored inside the greenhouse. Controllers, filters, sensors, and other devices that use electronics are cleaned of dust and dirt and stored in a heated room.
Device
The drip irrigation system can be designed in one of two designs:
- pressure _ Connects to water supply. If irrigation is carried out with drip tapes, a reducer is installed at the inlet to reduce the pressure;
- gravity flow A storage tank is installed, water from it is supplied to the pipes under the influence of gravity. This option is preferable: the liquid in the container has time to heat up before watering begins. Watering with cold water directly from the tap can lead to the development of diseases in plants.
If there is a running water supply, the container is filled like a toilet cistern - using a float valve. If there is no centralized water supply, water is supplied from a well or well by a pump activated by a signal from a level sensor.
Liquid from the barrel enters the irrigation system in one of two ways:
- through the drain valve at the bottom;
- a short-term low-power pump is pumped through a hose over the side of the barrel, after which it follows by gravity (example - the AquaDusya Start model). To stop watering, the equipment switches to reverse mode, creating a rupture in the stream, or pumps air into the pipe.
The signal to turn on the pump or open the drain valve on the barrel comes from the controller. It takes into account the program entered by the user and data received from sensors. The irrigation system itself consists of a main hose (pipe) and drip tapes or drip hoses attached to it. The free ends of the lines are plugged.