The drip method is most suitable for irrigating greenhouse plants. You can purchase a ready-made system, or you can save money and assemble it yourself.
The following describes in detail how to organize drip irrigation in a greenhouse.
The essence of technology
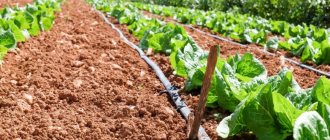
When watering this type, water is gradually supplied through special devices - droppers - to the base of the plants (for surface installation) or directly to the roots (placement of the system in the ground).
Compared to the sprinkler method, the drip method has the following advantages:
- The humidity in the greenhouse does not increase. This is the main advantage of this method of water supply. With sprinkler irrigation, even in a well-ventilated greenhouse, the humidity jumps, causing many plants to suffer;
- water is used rationally;
- it is possible to apply liquid fertilizers during watering (an easily digestible and safe form);
- there is no need to create high pressure in the system: water can flow by gravity.
With drip irrigation, the weeds remain without moisture.
Self-assembly
Having figured out how drip irrigation works in a greenhouse, you can move on to choosing a ready-made kit or assemble the system yourself from individual components.
Drawing up a diagram and calculations
Regardless of the decision made, you first need to draw a diagram, indicating the location of the beds, their length, location of the water source and other details.
On this diagram, the main and distribution pipes are drawn in order to calculate the length of each and determine the number of connecting elements - couplings, angles, tees, plugs, etc.
Approximate diagram Source idei-dachi.ru
When choosing from ready-made kits, it is necessary to take into account the pressure for which the system is designed, the number of droppers in the set, as well as the distance between them. As for their assembly, detailed instructions are included with each kit.
What types of drip irrigation systems are there?
There are such types of systems: with separate or built-in droppers, tapes.
With separate droppers
The main working element of the system is a plastic product with a narrow hole for water supply.
Droppers are available in different designs:
- non-collapsible and collapsible . The latter are more expensive, but they are easier to clean from dirt;
- unregulated and regulated . For the former, water flow depends only on the pressure in the pipeline, for the latter it can vary at the same pressure;
- uncompensated and compensated . In the first, there is only a labyrinthine channel, which, with its high hydrodynamic resistance, makes it difficult for the fluid to flow out. The flow of water through such elements depends on pressure and is therefore uneven along the length of the hose. Compensated ones are equipped with a special membrane, thanks to which they work the same at any distance from the point of entry of the liquid into the line.
Compensated drippers only work in pressure systems. They are not used in gravity flow systems. Installation of drippers occurs like this: a hose, usually a special drip hose, is laid along the bed, and elements opposite the plants are inserted into it.
One dropper can serve several plants - 2 or 4, this option is implemented like this:
- a splitter (manifold) is connected to the working element;
- its outlets are connected by micro-hoses (thin tubes) with uncompensated dropper pegs;
- install dropper pegs near the plants.
The drip peg can be connected to the drip hose directly through the start connector embedded in it. A microhose is connected to the adapter, the free end of which is attached to a hollow rod.
Dripper pegs for watering
Advantages of the system:
- withstands high pressure - up to 6 atm.;
- durable;
- droppers can be installed anywhere, which is convenient when plants are arranged chaotically.
The disadvantage is the complexity of installation.
Drip hose with built-in drippers
Here the droppers are already installed at a certain pitch, so the system is installed much faster and easier. Disadvantage: it is necessary to plant plants at the same pitch as the elements supplying water to them.
Drip tapes
The design is similar to a pipeline with built-in droppers, but:
- they are flat in cross section;
- are cheaper;
- short-lived;
- designed for pressure no higher than 0.8 atm.
Drip tapes can only be connected directly to a gravity system. They are connected to the pressure water supply through a pressure reducer.
Drip tapes are selected according to type, wall thickness, emitter pitch and reduced diameter; according to the first criterion, products are classified into:
- labyrinthine. Outdated option;
- slotted. New type of tapes. They have an affordable price, but are very demanding on water quality (easily clogged);
- emitter The most expensive, but also the most durable tapes. Resistant to contaminants in water.
Emitter drip tapes, like droppers, can be compensated or uncompensated. The pitch of the emitters is selected according to the distance between the plants. For crops planted in a continuous pattern (onions, lettuce, carrots), purchase tapes with a distance between working holes of 15 cm. For individual bushes, for example, tomato plants, use tapes with dropper pitches of 30 or 40 cm.
Emitter strip
Wall thickness varies from 0.125 mm (5 mil) to 0.381 mm (15 mil). Thin-walled tape will last no more than 1 season. In addition, it can easily be chewed by mole crickets and other pests. It is especially recommended to purchase a tape with a thick wall if the site is located on rocky ground.
The given diameter of the tape can be equal to:
- 16 mm: the maximum length of the product is 250 m;
- 22 mm: length - up to 450 m.
TOP 3 ready-made kits for drip irrigation
The range of such equipment is quite large, but 3 models that have already been tested by summer residents deserve special attention.
Delta 3L-KP18
A set consisting of 60 droppers is designed for an area of no more than 18 square meters. There is overflow protection, expansion is possible by connecting several systems (a special adapter is used for this). The equipment is rich, you don’t need to buy anything in addition.
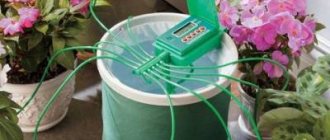
Circle Beetle
An inexpensive solution that has everything you need - from IVs and tubes to a timer. The maximum area of the greenhouse is also 18 square meters. Assembly is extremely simple, the hoses do not bloom. Available in 60 and 80 plant versions.
Start LCD AquaDusya
This set with an original and memorable name is highly appreciated by summer residents. The system is universal, suitable for berries, shrubs, fruit trees and flowers. It is equipped with a timer, droppers (70 pcs.), pump and everything necessary for installation. The only negative is the underground laying of the highway.
Delta 3L-KP18
Circle Beetle
Start LCD AquaDusya
1470 rub.
2765 rub.
5980 rub.
Features of automatic systems
The automatic drip irrigation system operates without user intervention.
The command to supply water is executed by a control unit (controller), which monitors environmental parameters using sensors:
- soil moisture;
- presence of rain;
- water temperature (watering plants with cold water is contraindicated);
- pressure in the pipeline.
There are extensive functions for programming the device: you can set your own watering mode for different days. There are models with a GSM module, controlled remotely from a mobile phone.
The controller controls the operation of a water tap equipped with a solenoid. When power is applied to the solenoid coil, it retracts the core and the valve opens - watering begins.
Calculation of water volume
Agronomy can hardly be called an exact science, but still, approximate calculations of the water needs of a greenhouse can be calculated by the gardener himself, without resorting to outside help
The selected planting scheme must be taken into account, which can greatly influence the actual level of water evaporation by plants. The consumption of each drip irrigation unit must strictly correspond to the total throughput of the pipelines connected to it
The area occupied by each crop is always rounded up
This is especially important if a homemade micro-drip irrigation system is used, because the work of enthusiasts is rarely as effective as the actions of trained engineers
When it is impossible to place the number of blocks specified in the calculations on a site (for technical or economic reasons), it is necessary to make more of its fragments, and, on the contrary, reduce the specific power of one block.
The main pipeline through the irrigation segment can occur:
- in the middle;
- in the middle with a shift;
- along the outer border.
Most professionals are confident that the most profitable scheme is placement in the middle part of the irrigation block, with tubes coming out from both sides, since the pipeline is expensive. Having calculated the diameter of the pipe that will supply the required amount of water, if necessary, it is rounded to the nearest standardized value. If the liquid is supplied from a reservoir, its capacity is calculated so that when filled to 100%, it is enough for one daily watering cycle. It usually ranges from 15 to 18 hours, depending on how long the hottest hours last. The obtained figures must also be compared with the pressure that the water supply can provide.
Irrigation system kit
The drip irrigation system includes:
- controller with a set of remote and built-in sensors;
- one or more valves with an electromagnetic drive;
- pump;
- float valve;
- gearbox (if necessary);
- filter;
- hoses, pipes;
- devices for drip water supply: droppers, drip hoses or drip tapes.
The kit is complemented by fittings for connecting hoses, pipelines and droppers (connectors): tees, 90-degree bends (angles), splitters, start connectors, plugs, taps.
Automatic watering schemes
There are many options and variations of schemes. They are very mobile and allow you to take into account all the features of areas and plantings. Let's consider the case when water is supplied from a source using a pumping station directly for watering plants. This option for automatic watering is shown in the photo below.
Such a do-it-yourself irrigation system at the dacha can be assembled in a day
Water can be supplied to the plants in drops or using sprinklers. There is a fertilizer application unit. It will be useful in an automatic watering system for a vegetable garden, greenhouse or garden, although it will also not be superfluous for a lawn and garden. The number of irrigation lines is determined depending on the need, then the pressure is calculated. Drippers or sprinklers are selected according to the amount of water needed by the plants.
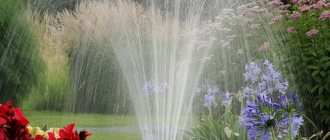
The diagram of an automatic irrigation system using sprinklers is shown in the photo below. These devices have several names: sprinklers and sprinklers, which is why watering is called “sprinkler”.
The sprinkler irrigation system is suitable for watering lawns or small plantings - up to 10-15 cm
The main difference between lawn watering systems is that the pipelines are often laid underground. To prevent sprinklers from interfering with lawn mowing, they should also be hidden in the ground. There are also such models.
The diagram for automatic watering of a vegetable garden, greenhouse and orchard is shown in the figure below. Water is first pumped into the container. From there it can be supplied by gravity if the water supply is drip (which is what is shown). To provide the required pressure for the sprinklers, you will need to install a pump or pumping station.
Irrigation system at the dacha from a container
If your garden, orchard or greenhouse needs moisture, you can arrange everything as in the figure below. It differs from the fact that at the top it has a pumping station that supplies water to the filters, after which the pipeline already diverges to the beds.
Do-it-yourself automatic watering of the garden can be assembled from components or you can buy ready-made watering kits
Device
The drip irrigation system can be designed in one of two designs:
- pressure _ Connects to water supply. If irrigation is carried out with drip tapes, a reducer is installed at the inlet to reduce the pressure;
- gravity flow A storage tank is installed, water from it is supplied to the pipes under the influence of gravity. This option is preferable: the liquid in the container has time to heat up before watering begins. Watering with cold water directly from the tap can lead to the development of diseases in plants.
If there is a running water supply, the container is filled like a toilet cistern - using a float valve. If there is no centralized water supply, water is supplied from a well or well by a pump activated by a signal from a level sensor.
Liquid from the barrel enters the irrigation system in one of two ways:
- through the drain valve at the bottom;
- a short-term low-power pump is pumped through a hose over the side of the barrel, after which it follows by gravity (example - the AquaDusya Start model). To stop watering, the equipment switches to reverse mode, creating a rupture in the stream, or pumps air into the pipe.
The signal to turn on the pump or open the drain valve on the barrel comes from the controller. It takes into account the program entered by the user and data received from sensors. The irrigation system itself consists of a main hose (pipe) and drip tapes or drip hoses attached to it. The free ends of the lines are plugged.
Design of irrigation systems
All smart greenhouses include the same parts that can perform several functions. Often the composition of different prefabricated systems differs only in a couple of unique components. Rain, underground and drip irrigation systems for greenhouses are assembled from the following similar parts:
- Source. Its role is played by a tank, well, borehole, standard household water supply or any large-capacity reservoir. It is important to monitor the temperature of the water supplied to the plants: it must correspond to that of the environment.
- Pump. A device that will pump water from a stationary tank or well. The well and water supply often have their own water supply; to connect to them you need to purchase a reducer. This module will limit excessively high pressure at specified sources so that there is no harm to piping, sprinklers or plants.
- Filter. Often not included as standard with a spot irrigation system. This module will limit the entry of debris into the pipes and purify the water from heavy impurities. There are coal, paper and mesh. Cleaning will help avoid premature failure of the line and a decrease in pressure inside the system.
- Solenoid valves. An automatic tap that blocks and unlocks the water supply based on a signal from the controller.
- Timer (controller). This part helps the network operate in semi-automatic mode and minimally depend on human intervention. Supplementing the controller with soil and air humidity and temperature sensors will make the greenhouse completely autonomous. When the timer or controller is triggered, a signal is sent to the valves, which shut off or open the water supply and turn on ventilation.
- Highway. The main part of greenhouse irrigation. Pipes should be selected according to the type and scale of the system used. Thus, for micro-sprinkling irrigation, a line made of lightweight polycarbonate is ideal. To increase reliability, it is better to provide pipes with supports. In addition to polycarbonate, polypropylene lines, steel (stainless steel), metal-plastic, and PVC are manufactured.
Automatic watering system design
Automatic water supply equipment
A dosed supply of liquid to plants according to a certain schedule or at a given humidity will help to grow a higher quality crop. The signal to the taps comes from a controller: sensors or timer. Their presence helps to save water, avoid exceeding the permissible level of soil moisture, and compensate for changes in the amount of moisture after rains.
A timer is the simplest electronic or electromechanical device for controlling water consumption. It cannot fully automate the irrigation process inside the greenhouse and requires supervision. So, after rain, when the soil is saturated with moisture, the timer will continue to signal the taps to open, which can destroy the plants by oversaturating the soil with water. The cost of the simplest model is from 1000 rubles.
Irrigation system timer
The controller, which has humidity and temperature sensors, can operate automatically without human intervention. The cost of the sensor is from 2000 rubles. The best models are equipped with remote control and sensors that take into account the following indicators:
- Pressure inside the line. If the pipes are clogged, the controller will not allow them to break. The barometer may detect excess pressure and will not signal the valves to open.
- Humidity of air, soil. The controller can maintain this indicator inside the greenhouse at a level specified by the user. Indicators are taken using submersible or mounted sensors.
- Temperature. If the greenhouse is equipped with windows with electromechanical closers, the controller will use them to regulate the temperature.
Water storage tank
Water reservoir in the greenhouse
For irrigation, it is better to use settled or rainwater from a special large reservoir. There it will warm up to ambient temperature, as plants need. You can also add liquid fertilizers or fertilizers, which will make the water more nutritious and beneficial for plants. Three holes need to be made in the tank:
- Upper. Located at the very top. Through it, the tank is filled with running water.
- Average. It is located just above the bottom so that when pumping water through the valve, debris is not sucked in along with the liquid.
- Lower. It is necessary for emergency draining of water or getting rid of debris that accumulates over time at the bottom of the tank.
Pumps and filters
These elements are directly responsible for supplying water to plants. The drip irrigation pump has the following selection criteria:
- Automatic control. The ability to connect a pump to sensors or a timer is an important condition for irrigation automation.
- Power. Installing a pump capable of creating high pressure is not practical for a network with a short total pipe length. The required power should be calculated separately.
- Resistance to aggressive chemical compounds. Allows the use of liquid fertilizers when feeding plants through a tank.
- “Soft start” is an important function of the pump. A sudden surge in pressure can seriously damage or disable valves, sprinklers, and internal line pressure sensors.
Pump design
Filters help rid water of foreign impurities or debris, which can lead to damage to drip dispensers, sprinklers, and tapes. The element is placed immediately after the water supply valve from the tank. There are the following types of modules:
- Reticulate. Does not reduce the pressure inside the system, but does not filter small particles well. Recommended for installation on small irrigation networks.
- Disk. Surpasses the mesh filter in terms of filtration.
- Bulk. Used in the construction of large-scale irrigation networks. The filter element is easily replaced when it becomes dirty.
Watering with a timer
An inexpensive alternative to a controller is a time relay; there are two types of such devices:
- mechanical . The user turns the knob to set the watering duration. Each session requires repetition of the procedure;
- electronic . Not only the duration, but also the frequency of watering is set. So the system can be left unattended for a long time.
The timer, like the controller, controls the operation of the tap at the entrance to the system.
What about the disadvantages?
The main disadvantage of do-it-yourself drip irrigation is the need for mandatory control. If you incorrectly calculate the amount of moisture, this can lead not only to excessive consumption, but also to the death of plants. The water level in the barrel will have to be constantly checked, topping up if necessary.
Note ! Another significant drawback is the need to periodically clean the holes (due to their small diameter, they often become clogged). Although there is nothing complicated about this, it is enough to simply blow or flush the system.
Drip irrigation has its disadvantages
We also note that the system should be protected from contamination, for which a filter is installed at the inlet, i.e. at the beginning of the hose, which is located in the barrel. An ordinary piece of foam rubber is quite suitable as a filter.
System installation: how to install?
Deploying an irrigation kit on a site is simple:
- install a container if the system is gravity-fed. Usually, raising it to a height is not required - the supplied pump during startup creates the height difference necessary for gravity flow. The container is protected from direct sunlight to avoid water blooming in hot weather;
- assemble a pipeline system using connectors;
- the free ends of the drip tapes are closed with plugs;
- a filter is connected to the main pipeline of the irrigation system using fittings;
- the filter, also using connectors, is connected to a hose extending from the pump;
- the pump is installed at the bottom of the storage tank;
- install a controller next to the container and connect it to the pump;
- A float valve is fixed to the container and connected to the water supply.
The drip tape (hose with droppers) is connected to the main pipe in the following order:
- a special seal is installed in the hole;
- install the start connector into the seal and secure it by turning the nut;
- The end of the drip tape is inserted into the start connector and also secured by turning the nut.
Drip irrigation system at the dacha
If the drip tape needs to be laid in an L-shape, it is cut and the two parts are connected with an angle (90 degree bend). It can also be branched using tees and crosses.
To be able to turn off individual drip tapes, they are connected through start connectors with a tap. In areas with a slope, the main hose is placed horizontally, drip hoses and tapes are placed along the slope.
In the pressure system, instead of a container with a pump and a float valve, a gearbox is installed.
Master Class. Using a “crying” PVC hose
To simplify the work, if watering is designed for 1-2 beds, you can use the method described below.
Step 1 . First, unpack the purchased hose. In the example, this is a “crying” (oozing) type model made of PVC.
Unpacking the hose
Step 2 . We unwind the hose and lay it along the plants (the photo shows flower beds, but the method is also applicable to beds).
Step 3 . We connect the hose to the fitting, and it, in turn, to the water source.
Connecting the hose to the water supply using a special fitting
Step 4 . We install a plug at the other end of the hose.
Stub
On a note ! All that remains is to open the tap and start the system. Upon completion of the process, the plug is removed, the remaining water is drained from the hose and it is moved to the next bed.
Price
Here are a few examples to give you an idea of the price level for automatic drip irrigation systems:
- “Water strider” system (40 droppers, 12 m of hose): RUB 2,982;
- “AquaDusya Start” (50 droppers, 15 m of hose): RUB 4,900;
- OGO-Rodnik (only controller with soil moisture sensors and electromagnetic tap): RUB 4,000;
- Green Helper (Russia) for 64 droppers: RUB 3,600;
- Gardena (40 drippers, 25 m of supply hose and 5 m of main hose): RUB 3,884;
- Green Line (64 droppers): RUB 7,800.
Automated systems: what are their advantages and disadvantages
Once the exact fluid requirement has been determined, we need to decide how we want this flow to be managed. Automatically or manually.
Automatic drip irrigation certainly has many advantages. This makes care much easier, does not require physical strength, and gives you more free time. And by installing systems with timers, you can stop worrying about your garden crops drying out.
However, despite the apparent simplicity, everything is not entirely true. In order to install a high-quality automatic system that can make gardening easier, you need to invest a lot of money. Installation and adjustment will also require the work of a professional. Maintenance is required twice a year. In addition, water sources must meet the required capacities and characteristics. So that in the event of damage to the system, a swamp does not appear in the greenhouse. It is important to design carefully and take into account all the smallest nuances.
DIY creation
Buying a ready-made drip irrigation system is not the only option for a gardener. You can assemble it yourself, saving a lot of money. Control units - timers and controllers - are sold separately. For example, the brands “OGO-Rodnik” and “Green Helper”. If you need to set different irrigation modes for individual zones, instead of several blocks, you can purchase one multi-channel (usually 2 or 4 channels).
Scheme
To draw up a specification of all the necessary elements, draw a site plan with the application of beds and carry out a system design on it.
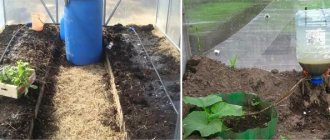
Scheme of drip irrigation in a greenhouse from a barrel
According to the drawing, determine:
- length of the main hose and drip (supply) hoses;
- number of taps;
- number and type of fittings.
Installation materials
In homemade systems, a pipe with a diameter of 32 mm is used as a main line - it is convenient to make holes in it for connecting drip tapes. The preferred material is any polymer: PVC, polyethylene or polypropylene.
Polymer pipes are superior to steel pipes in a number of parameters:
- are cheap;
- weigh little;
- easy to cut and drill with hand tools, welding is also extremely simple;
- do not rust;
- do not become overgrown with sediments;
- polyethylene and polypropylene pipes do not collapse when water freezes.
If you use ordinary hoses, it is better not to use transparent ones: the water in them blooms in the heat. Plastic fittings for hoses of any diameter are sold in a wide variety in specialized stores for gardeners.
Polymers in their pure form are destroyed in the open sun under the influence of ultraviolet radiation. Therefore, we need special plastic pipes for external installation - black. By the way, all ready-made systems are equipped with such hoses.
Connecting the main pipe to the tank
To connect the system to the tank, a tap is cut into the lower part of the latter.
5-7 cm are removed from the bottom so that sediment does not enter the pipes. If the container is large, a separate tap is provided to discharge dirt, now at the lowest point. The tank is installed with a slight slope towards the drain. If the system is supposed to be equipped with a controller or timer, then a fitting is cut into the barrel and the electromagnetic valve supplied with this device is screwed onto it.
Filter installation
The coarse filter is the most important component; without it, the narrow dropper nozzles quickly become clogged; there are two types:
- mesh . Pollution is retained by a metal mesh in the form of a glass;
- disk _ The filter element is a package of plastic disks with grooves, in which, when compressed, a three-dimensional mesh is formed. Water moves through the bag in a spiral.
Advantages of disc filters:
- get rid of accumulated dirt faster and easier;
- better retain long-fiber contaminants;
- salts dissolved in water do not cause overgrowth and destruction.
Water for large irrigation systems is purified using backfill filters filled with sand and fine gravel.
The water purification device is connected to the main tap using threaded fittings.
Pipeline marking
Knowing the distance between the beds, the places for drilling holes for connecting droppers are marked in the main pipeline. All holes should face the same direction, for which it is recommended to first stretch the cord along the pipe.
Creating holes
Wood drill bits are great for drilling plastic. An electric drill is not necessary; holes can be easily formed using a hand drill.
Their diameter should be such that the start connector seal fits tightly enough. The manufacturer indicates the optimal value in the installation instructions.
Tape plug
The free ends of the drip tapes are closed with special plugs. But you don’t have to buy them - you can tie the tube in a knot or roll it up and secure the twist with a rubber ring.
Operation and Maintenance
General care recommendations:
- it is necessary to install a high-quality filter and regularly change cartridges;
- at least once a season it is recommended to take samples of the water used for irrigation to check the pH level;
- if the pipes quickly become clogged, the water pressure should be increased from time to time in order to better flush all the holes;
- You should not skimp on parts for the dripper - taps, filters and pumps - the operation of the entire mechanism depends on their quality.
Throughout the season, it is recommended to check the operation of the irrigation system at least once a week, check and clean the filters, and flush the pipes and hoses to increase the water pressure.
During the operation of a drip irrigation system in a greenhouse, three main problems may arise:
The water supply hole is clogged with sand, silt and other debris.
Most often, such clogging contributes to the rapid closure of the patency of the droppers and requires cleaning or replacing parts.- Clogged holes due to chemicals. The greatest danger is represented by bicarbonates, calcium, and sulfide ions in high concentrations.
- Clogging due to biological reasons, such as algae growth.
In the case of blockage due to algae or sand, the problem can be solved in two ways - you can remove all parts of the system and clean it manually, or replace the parts. However, in the case of chemical contamination, there are many cleanup options.
Based on the color of the plaque, you can determine the type of sediment and solve the problem:
| Plaque color (sediment) | Type of chemical | Way to solve the problem |
| White | Carbonates | Maintain pH between 5 and 7 by continuous addition of acid. |
| Red | Iron | Chlorine precipitation or aeration. |
| Black | Manganese | Add chlorine at the rate of 1 mg/l per 1.3 mg of manganese. |
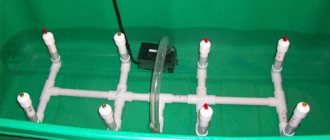
Use of plastic bottles
To water small areas, you can make a simple device consisting of a plastic bottle with a small piece of tube inserted into it, suspended with the neck down. It is more convenient to use an empty ballpoint pen.
In addition to the main hole for the tube, you will also need a second one through which air will escape. If the tube is too wide, another, thinner tube or piece of wire insulation, called a jet, is inserted into the main tube to reduce the flow rate of water.
You can do it even simpler. Puncture 8-12 holes in the bottom of a plastic bottle. Their number depends on the type of soil. A minimal number of holes are made on light sand.
Moisture seeps into clay soil more slowly, so the number of holes is increased. However, their size should be minimal, otherwise the water will pour out of the bottles very quickly. It is better to do this with a regular needle.
The simplest bottle watering system
The bottle is filled with water, closed with a lid and buried in the ground, leaving the neck uncovered. As the container empties, you will add water through it. Since it may shrink as water flows out of the bottle, it is better to also make a small hole in the lid.
When the bottle is buried in the ground, the plants will be supplied with water using underground irrigation. The top layer of soil will not be wetted, so the usual crust on it, which needs to be constantly loosened, will not form.
When drip watering tomatoes in a greenhouse using this method, one liter bottle is enough for 5 days. This volume will be enough to water one bush. A 5 liter container will provide them with water for 10 days.
Clay soil can quickly clog small holes. To prevent this, use regular nylon stockings. They are pulled over corks or parts of bottles with holes made in them.
Another method of protecting against blockage of holes is often used - drainage. Before burying the bottle in the ground, throw some hay or a piece of burlap at the bottom of the hole.
Of course, it will be difficult to use such systems for irrigating a large number of plants. But in some cases, for summer residents who rarely appear on the site, this can be a life-saving solution.
It is better to bury the bottle in the ground at an angle of 30-45 degrees so that the water pressure is minimal. In this case, the rate of water flow will decrease.
Calculation of water volume and duration of irrigation
To make homemade drip irrigation, you should first draw up a plan indicating the length of the beds and the location of the plants on it. Next, a drip irrigation diagram is drawn, which indicates the location of each of the pipelines and the container for collecting water (barrels).
A detailed plan of the system is needed not only to determine the total length of the pipes, but the number of droppers, as well as adapters, tees and other parts.
For cucumbers, the norm is 2 liters of water per bush.
Next, you will need to calculate the volume of water consumed, that is, the size of the required container (barrel). For example, to lay a pipeline 10 m long with a distance between droppers (nozzles) of 30 cm, 34 of them will be needed. If each of them “gives out” 5 l/hour, then 34 droppers will pass through 170 l/hour.
If the length of the system is longer, then too much capacity will be needed. Therefore, it is better to split the drip system into two or use a constant source of water.
Drip irrigation can be used for any type of planting. Only the scale and type of equipment changes. In addition to greenhouse plants, it can be used to water vegetables and fruits in the open ground, as well as flowers, trees and shrubs.
Water consumption for drip irrigation for moisture-loving plants such as cucumbers is 2 liters per bush, that is, several times less than the usual norm. Drip watering of tomatoes in a greenhouse with already formed fruits is carried out once every 4 days.
Each plant will need 1.5 liters of water. Cabbage and potatoes will need 2.5 liters per day. Thus, when supplying water from a dropper at 3 l/hour, it will take a little less than an hour to water cucumbers, about 30 minutes for tomatoes, about an hour for cabbage and early potatoes.
Distance between droppers-nozzles
The water supply in drip irrigation for a greenhouse made by yourself must be carefully adjusted. With low pressure, only those plants located at the beginning of the bed will be provided with water.
Excess water is also undesirable - the plantings will suffer.
For most crops, the distance between droppers is 30 cm
The types of droppers and dispensers and the distance between them should be selected depending on the type of plants being irrigated.
After all, there are no universal devices for watering:
- “spider” dispensers with a large distance between dispensers; they are best used for irrigating perennial greenhouse plants; do not use for open ground and watering seedlings, in this case a smaller distance between the droppers is required; water conduits for “spiders” are made only suspended
- for watering most crops, the distance between dispensers should be 30 cm
- droppers with a pitch of 20 cm are used for watering root crops - carrots, onions, etc.
- for melons and melons, the distance between the droppers is 1 m