Currently, paving slabs are one of the most popular materials used to create road surfaces. And all because this material is much more practical, more environmentally friendly and more beautiful than traditional asphalt or concrete pavements, plus tile paths can be easily repaired (in fragments, without the need to redo the entire area). In addition, modern models of tile coverings are very wear-resistant and can last for decades, and with their spectacular appearance they can enhance the exterior of any area and home.
Tiled paving coverings are most often used to decorate blind areas and areas around houses. Although they will also look great and perform their function when installed:
- garden paths;
- parking area for a car;
- highlighting landscape design elements.
If you are interested in using tile covering on your property, in this article we will talk in detail about how to choose the right paving slabs for your dacha and the nuances of its installation.
Garden path materials
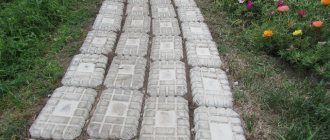
For DIY installation, it is better to take tiles measuring 50x50 cm and 5 cm thick. Then you will need only 4 pieces per 1 sq.m. A large tile driveway is easy to install and maintain, making it an ideal option for beginners. You will also need clean sand. There should be no clay, stones or debris in it, otherwise the tiles will lie unevenly.
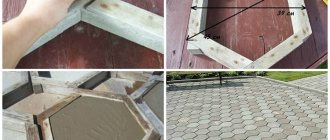
To make a correct and accurate marking of the boundaries of the path, pegs (for example, reinforcement rods with a diameter of 10-12 mm) and rope (twine or any cord) will be useful.
To level the surface, you cannot do without a fairly long straight board and a tamper. You will also need boards as guides.
Materials and tools
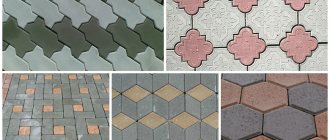
There are 2 main types of tiles used for laying sidewalks:
- Stamped.
- Vibrocast.
- Granite.
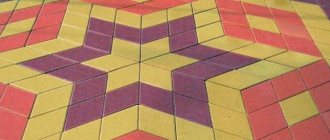
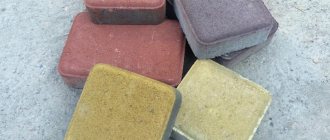
The first type is more budget-friendly and does not require any special production costs, however, the quality of such tiles is often poor. But tiles made using vibration casting technology, on the contrary, are famous for their durability, however, there is a small disadvantage of this type - it is a high price. Tiles come in a variety of sizes and configurations, widths and lengths.
The height varies from 20 mm to 70-80 mm. Considering the purpose of the site, it is worth focusing on the size and height. For small paths, high strength is not required from the tiles, so even thin tiles from 20 mm will do. But for platforms and driveways it is better to use thicker tiles from 60 mm.
In addition to the tile itself, you will need:
- Crushed stone, sand. It is better to use a crushed stone fraction of no more than 40 mm.
- Cement or special plaster mixture.
- Geotextiles. It protects the tiles from sagging.
- Borders are usually sold individually.
Important! To calculate the number of curb stones, you need to know the length of the path itself. We multiply the value by two, and then divide the value by the length of one border, in the end we find out the required number of stones.
What tools are needed to lay paving slabs:
Hammer (rubber). Level (preferably more than 1 m). Grinder with a diamond wheel. Several trowels. Manual "rammer". "Meter". Shovel. Rope (for marking). Pegs.
NOTE Additionally, purchase rubberized knee pads and mittens. There is work to be done with water and electricity.
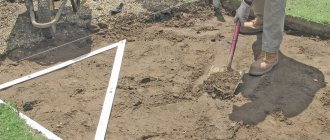
Preparing the base for the path
On the site of the future path, using a sharp shovel, remove the grass along with the soil to a depth of about 20 cm. You should get a trench 17-20 cm deep. Under the turf layer, as a rule, there is clay soil, which freezes in the cold season. If you lay a path on it, the tiles will “disintegrate” after winter. To prevent this from happening, the tiles must be laid on a sand bed.
First, install guides along the perimeter of the future path. Calculate the width taking into account the curb. Pour sand and spread evenly over the surface. If the path is adjacent to the wall of the house, then to drain rainwater you need to make a slight slope away from the building.
Please note: you will need a lot of sand. With a excavation depth for the path of 20 cm, the thickness of the sand cushion should be 15 cm. Thus, 1 cube of sand is enough for approximately 7 sq.m.
For compaction, use a professional gasoline tamper or a homemade tool that can be easily made from a wooden beam. The base area of such a tamper is usually 45x15 cm.
This is what a homemade tamper looks like. Its height should be approximately half the worker’s height.
It is convenient to level and compact the sand using a homemade “mop”. Using several screws and a metal plate, attach a flat planed board about 1 m long and 2 cm thick to an old rake. This device will allow you not to bend over to the ground and quickly compact the sand.
Moisten the well-compacted sand with water from a shallow watering can and smooth it again with a “mop”. This will protect the top layer from washing away.
Mandatory requirements for paving
The main problem of an individual developer is traditionally a limited budget. The technology for laying figured paving elements (FEM) for decorating paths can be simplified. However, some mandatory requirements remain unchanged:
- arrangement of a rigid spatial “trough”;
- removing the topsoil, replacing it with crushed stone or sand with layer-by-layer compaction;
- ensuring the drainage of rainwater due to the slope of the surface.
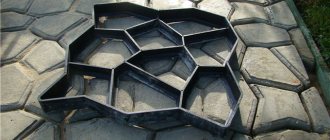
Manufacturers produce latex and polymer molds for tiles; if you have free time, you can make tiles yourself.
Forms for pouring FEM tiles.
Renting a vibrating plate provides additional costs; its installation is simple; most home craftsmen can assemble the equipment.
Homemade vibrating plate.
Manual tamping is easier to make; you will need a log and a block as a handle.
The simplest manual rammer.
Laying paving slabs
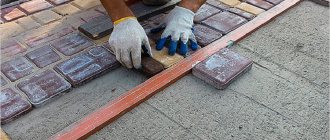
Place each tile in its place and hammer it with a rubber mallet (weighing about 1.5 kg). To ensure that the tiles lie evenly, use a wide spatula to trim and, if necessary, remove or add sand.
It is difficult to place tiles with chips end to end; in this case, seams 5-7 mm wide are left. Then the path will look aesthetically pleasing, despite the flaws in the edges of the tiles. While laying the path, periodically check the slope using a building level and make sure that there are no unevenness.
Construction of a flower garden
If you still have paving slabs, you can make a small but nice flower garden to decorate the area. It is made even easier and faster than the track itself.
You can simply lay tiles on tiles without using cement mortar or tile adhesive, cover it with soil and the flower garden is ready.
If you have the time and desire, you can make a flower garden by fastening the tiles with cement-sand mortar, and you can choose, for example, white cement, then your new flower garden will be beautiful and eternal, but in this case it is recommended to prepare the base with more than 5 cm of sand.
Constructing a garden or personal path in this way is really inexpensive both in terms of time and materials. You can easily make such a path yourself with your own hands without the involvement of specialists and workers. Such a path will serve you for a long time and reliably, especially since something made by yourself is always more pleasing!
Tags
dacha path paving slabs tiling
Sealing joints between tiles
On the finished path, sift the sand through a metal mesh or a special structure (screen). The sand must be dry. If the material is slightly damp, wait until it dries and only then proceed to seal the seams.
Take a wide brush with hard bristles and use it to sweep sand into the cracks between the tiles along the entire length of the path. The extra one - just sweep it away. To make the sand fit more tightly into the seams, spray the finished garden path with water from a hose.
The path is ready! In the same way, you can make an entire area out of paving slabs on your site.
Preparatory stage: marking and compacting the site
First you need to decide on the size of the plot and take into account all the nuances, create a plan drawing for convenience. Choose the type of tile, what pattern or color you would like. Taking into account the dimensions, we calculate the amount of material. It is also advisable to mark the area; for this, use pegs and rope.
Check all the nuances several times, take into account inconveniences and others. Pay special attention to vegetation; trees or shrubs should be bypassed or completely removed from the site, especially if they are young trees. As the roots of trees or shrubs grow, they will begin to lift the soil, due to this, swelling of the tiles will be observed, which will break, rise and sag in some places. Therefore, it is better to make a retreat from the seedling of at least a meter, and preferably more.
Before laying paving slabs, it is necessary to carry out work to prepare the soil. First of all, it is necessary to remove the top layer of soil, which will level out uneven areas, compact the soil and create a sand and gravel cushion. The characteristics of the site depend on the purpose of the site. For arranging sidewalks, make a platform 20 cm deep, and for car parking lots and entrances 27-30 cm.
After the hole has been dug, the soil must be compacted. To do this, you need to water it with a hose with a sprinkler, after which you need to walk with a tamper. The procedure, which is simple to perform, plays an important role in the durability of the paving surface, as it helps prevent subsidence, the process of subsidence of the site, which is observed over time in the operation of the road surface.
Economy option - embankment paths
Although simple, compacted stone stitches offer the following benefits:
- cheap construction;
- absence of puddles on the surface - water goes through the gravel into the ground;
- a correctly laid embankment has an attractive appearance, which is reflected in the photo.
Nice gravel path near a pond
It is difficult to build a crushed stone path on a slope, so for a sloping landscape it is worth choosing a different solution. The second disadvantage is the need for constant care. Needs backfilling, leveling, removal of overgrown grass
These works are carried out annually, usually in the spring, after the snow melts. To implement this inexpensive option, you will need fine crushed stone or gravel, geotextiles and sand.
Foundation construction step by step
To begin, mark the paths on the site in any convenient way - using twine and pegs or sprinkling with lime. Then remove the turf and proceed to laying the base according to the instructions:
- Dig a hole at least 150-200 mm deep along the marking lines and compact the bottom with a tamper.
- Cover the dug profile with geotextile fabric and install borders along the edges.
- Fill the sand cushion to a height of 7-10 cm (a mixture of gravel and sand will also work). Tamp down thoroughly and water.
- Make a base of coarse crushed stone 80-100 mm thick, level and compact. It is allowed to use broken bricks and various natural stones. Large boulders should be broken.
Making the finishing fill
In order for the path to serve for a long time and not sag under load, it must be covered with an even layer of fine crushed stone and compacted thoroughly. Perform the operation in several stages, achieving maximum coating density. Mechanization tools - a manual roller and a vibrating plate - will be very helpful.
There are no more tricks in the construction of embankment paths. Homeowners often lay similar stitches between the beds in their vegetable gardens to ensure they can walk comfortably in wet weather. When laying in a country yard, there is a way to bring beauty: combine a gravel embankment with flat stones or decorative slabs, as done in the photo.
Decoration, coating care
Paving stone paths in the country are beautiful in themselves and do not require additional decor. But to give the area a cheerful mood, you can use bright colors. To make the paths neutral and not too conspicuous, you should choose materials of the same shade.
Caring for paving stone paths is quite simple:
- Dirt and debris are periodically swept away from them;
- In winter, snow is not swept away with metal objects;
- Do not pour salt or other salt-containing mixtures onto icy tiles. For safety, it is best to cover the snow with sand.
In conclusion, it is worth noting that garden paths made of paving slabs are universal. They are suitable for any landscape design, are distinguished by high technical qualities, and are easy to install and maintain.
Path layout
To make using your own yard much more comfortable, it is worth considering a competent and functional arrangement of paths throughout the entire area. Particular attention is paid to the front area leading from the gate to the house. It is also worth considering the location of paths in the garden, in the backyard, in the flower garden.
When planning paths, it is worth considering that they are all divided into:
- functional . Connect all routes of movement around the site into a single whole;
- walking _ Designed for relaxation and admiring the landscape design;
- economic . Necessary for access to communications, fences, and outbuildings.
Each individual type of path requires its own location on the site and its own dimensions. For example, for several people to walk, it is enough to make the path width from 50 to 100 cm. For the passage of a garden wheelbarrow, it is worth making the path width at least 80 cm. The same applies to the shapes of the paths. If we are talking about purely decorative features, then any winding shapes are chosen for walking paths (the main thing is that it is comfortable for you to walk along them). But driving a wheelbarrow or motorcycle along curved paths will not be very comfortable.
Attention: when choosing the location of paths on the site, carefully and carefully weigh everything. Plot proposed routes in advance, walk along them and evaluate how practical and easy to use they are. The main thing is to sketch everything on paper in order to get a clear result before starting construction work.
Which tile to choose
Before you buy tiles for your yard, you need to decide on its purpose, loads, cost and other factors. According to the type of production, this material is divided into:
- vibropressed . It is made from semi-dry concrete and has the highest strength. But at the same time, it has a limited selection of shapes and colors;
- vibrocast . It is made from concrete and comes in all sorts of shapes, sizes and colors. But this material is not so resistant to negative environmental factors.
Therefore, when choosing tiles, each owner of a personal plot must set priorities for himself and make a choice based on personal wishes, the scope of use of the material and his financial capabilities.
Also, before deciding how to make a tile path in your dacha with your own hands, you need to decide on its shape and size. If we are talking about walking trails that are not used by vehicles, it is enough to choose a less durable material, up to 5 mm thick. If vehicles will travel along the paths, the thickness of the material should be at least 10 mm.
How to install formwork
Edged boards or thick plywood sheets with a smooth inner surface are used as formwork.
If the formwork structure is planned to be removable, then before installing it it is recommended to treat the inner surface of the boards with a special lubricant - thanks to it, the formwork can later be disassembled easily and quickly.
If there is no lubrication, you can use used machine oil.
Step-by-step instructions for installing formwork can be presented as follows:
- The boards are installed in trenches on a previously prepared base. The formwork can be installed all at once or gradually, as the boards are freed, the height should be equal to the height of the planned path. The horizontality of the structure must be checked using a building level.
- Layers of sand and crushed stone (if necessary) are poured onto the pre-compacted bottom.
- A mesh of reinforced rods is laid.
- Every 2-2.5 m across the trench, boards up to 20 mm thick are installed, which will take the main load during pouring. They will also serve as expansion joints, thanks to which they will not crack due to temperature changes.
The formwork should protrude 5-10 cm above the ground.
If you need to arrange paths of a curved shape, then instead of boards, plywood or plastic panels are used, which are easy to bend in the desired direction.
In order to save effort and reduce material costs, the formwork can be installed in parts.
Edged boards are suitable for formwork.
Concrete preparation and mixing
Based on the calculations, a mixture of cement, sand and crushed stone is prepared, to which water and plasticizers are added. The composition is mixed and brought to a homogeneous creamy consistency of medium viscosity.
Crushed stone is used in medium fractions, 10-20 mm in size. When constructing paths with increased load, it is recommended to use crushed stone with a fraction of 40 mm.
It is advisable to mix the mixture using a concrete mixer, especially for large volumes of work. If you don’t have a concrete mixer, you will have to make the solution manually. To do this, all the components are poured into the container and thoroughly mixed with a shovel, after which water is poured into the mixture and mixed again until a homogeneous mass is obtained.
Mixing the solution.
It is advisable to use plasticizers in small quantities in order to make it more convenient to distribute the fill throughout the trench. Too much additives can reduce the strength of the concrete grade.
The simplest plasticizer additive can be prepared independently using the following starting materials:
- silicate glue;
- slaked lime;
- PVA;
- any detergent.
Instead of silicate glue, you can use liquid glass, and washing powder or laundry soap is suitable as a detergent.
If the paths are planned to be colored, then pigment dyes of the required color must be diluted with the concrete mixture.
Classic concrete path
Monolithic concrete covering is the most reliable and relatively inexpensive option. If you follow the technology when pouring, the structure will last at least 30 years. The main disadvantages are the labor intensity and length of the process, because the concrete mixture hardens within 4 weeks. During the hardening period, the path cannot be used. Therefore, do not rush to plant flowers near the future path, where you will have to arrange a temporary passage.
To pour concrete paths with your own hands, you need to prepare the base, as described in the previous section. Then proceed in the following order:
- Install curbs or assemble wooden formwork for laying concrete.
- Prepare the tools - a building level, a trowel and a rule made according to the width of the monolith.
- Tie a mesh of reinforcement Ø8-12 mm with cell dimensions 150 x 150 mm and install it on top of the crushed stone bedding, using stands 3-5 cm high.
- Mix 1 part of cement grade 400 with 2.5 parts of sand and 4.2 parts of crushed stone with a particle size of up to 20 mm. After mixing the mixture with water, you get concrete M 200.
- Place the mortar in the formwork to a height of 12-15 cm, leveling it using the rule. The task is to make a flat surface with a slight slope on one side, ensuring the drainage of water from precipitation.
- Divide the reinforced concrete monolith into slabs using expansion joints at intervals of 2-2.5 m, installing transverse boards.
- Wait 7 days and dismantle the formwork. Final hardening will occur after 28 days.
You can beautifully design a concrete path at the pouring stage, using special plastic molds that imitate natural stone. The decoration is simple: a form (preferably several) is immersed in fresh concrete and pulled out after initial setting. In order not to buy ready-made frames, savvy craftsmen have adapted to making homemade items from metal; the technology is shown in the video:
Path made of tiles and ceramic tiles
The remains of tiles after construction or renovation can be used to lay a path in the garden. Moreover, not only whole tiles will be used, but also individual pieces.
Entire paths can be designed either as an independent material or in combination with facing bricks or natural stone.
Pieces of ceramics and tiles can be laid out in a beautiful mosaic or in the form of a thematic picture. However, this will require a lot of perseverance and a lot of time. But the result will please you.
To design a path made of this material, proceed as follows:
- According to established standards, a trench 10 centimeters deep is dug for the path. Rubble is poured onto the bottom in a thin, even layer and compacted thoroughly.
- To strengthen the base and give it strength, reinforcement is made of thick metal mesh.
- Concrete solution is prepared, the path is poured and leveled. The pattern or pattern of tile pieces begins to be laid when the cement composition begins to set slightly. To make the work go faster, the drawing is laid out next to the path in advance. Then it is only transferred to the hardening concrete.
- After laying the tiles, the seams are rubbed down.
If whole tiles and pieces are laid out, then large elements should be placed along the edges and in the center, and the space between them should be filled with smaller ones.
You can use glass bottles with sand turned upside down as borders, as in the photo.