Paving slabs are an ideal option for covering paths and areas in front of a country house. It is characterized by increased wear resistance, practicality of operation, and highly aesthetic appearance. Installing it is not a very complicated process, but laying paving slabs with your own hands requires compliance with certain rules, which are described in our step-by-step instructions.
In our article we will tell you how to properly lay paving slabs with your own hands, what tools and materials you will need for this, and also give useful recommendations in video tutorials.
Advantages and disadvantages
The main advantage of self-installation is the maximum cost reduction of the process. You have to pay for any work, and the services of specialists today cost a lot . In addition, when installing it yourself, you can do everything without haste, following all the recommendations.
At the same time, it is quite difficult to find workers capable of laying the slab efficiently and correctly. The desire of any team is to complete the order quickly in order to receive payment, but quality often suffers as a result. When installing it yourself, the owner will be able to take into account all the features of his site , since only he is well aware of the weak points.
It is unlikely that a team of hired workers will take these nuances into account so carefully, unless they demand exorbitant payment for their work.
The disadvantage of self-installation is the need to carefully study the rules and the additional costs of purchasing a special tool for the job.
Arrangement of the base
It is the quality and stability of the base that primarily determine whether the coating will remain smooth for many years.
Most masters work according to the following scheme:
- remove plant soil to a depth of 20-30 cm;
- compact the bottom of the pit and cover it with geotextiles;
- pour crushed stone to a layer thickness of 15 cm, compact it;
- sand is poured and compacted;
- lay the tiles.
This coating doesn’t even need a slope - the water goes into the cracks between the modules.
This simple method is even described in the instructions of paving slab manufacturers, apparently so as not to scare off a potential client with the complexity of the work. They give a guarantee for a year and the coating made in this way lasts for about 12 months and remains smooth, so everything is fair.
But then unevenness appears on the coating due to a number of factors:
- soil movements: tamping the bottom of the pit does not prevent this;
- frost heaving of soil;
- washing out sand from under tiles.
In order for the coating to remain smooth for many decades, soft soil should be selected completely, to the entire depth. But first things first.
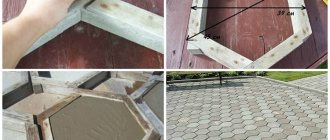
They start by installing a curb or curb:
- mark the area by sticking pegs into the ground and stretching a nylon cord or twine between them;
- dig a trench around the perimeter with a width and depth several centimeters greater than the dimensions of the buried part of the curb stone. You can mark the desired depth on the board and use it as a template;
- mix a thick concrete mortar of grade M100. For one volumetric part of cement grade M400, add 3 parts of filler - sand or granotsev. Add enough water so that the solution falls apart, that is, it is hard enough;
- pull the cord level, indicating the position of the curb. When laying tiles, the border itself acts as a guide, so it is important to install it horizontally. The installation of opposite borders is planned so that a whole number of modules fit between them;
- Having poured concrete mixture into the trench, install a curb stone and tap it with a rubberized mallet.
After tapping, the stone sags by about 3 cm, with its edge ending up at the most stretched string. Leave a gap of about 1 mm to prevent the string from being bent by a stone. The joints of curb stones are concreted on both sides.
Sidewalk boats and curbs
After the concrete has hardened at the site of the future site, that is, between the curbs, all soft soil is removed. They stop at a depth where the shovel enters the ground with great difficulty - usually clay or limestone lies here.
The minimum pit depth is 50 cm, but if the soil remains soft up to 1 m, then you need to dig to this mark. Having leveled the bottom of the pit, it is covered with geotextiles. Next, proceed to the construction of a sand-crushed stone cushion.
The curb for sidewalks does not have reinforcement, like a road curb, and therefore requires careful handling.
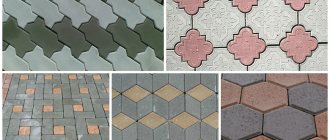
Basic types and selection rules
The composition of the paving slab is a cement mixture with the addition of various dyes, mineral components, and plasticizers. The use of high quality raw materials guarantees compliance with GOST, hence the durability of the coating.
The correct dosage and adherence to technology are a guarantee of quality , so it is worth purchasing material from trusted manufacturers, and not chasing the cheapness of handicraft production.
It is advisable to give preference to an option that has the addition of granite chips, polymers, and high-quality clay. It is better to refuse the option consisting exclusively of a concrete-sand mixture, since it will not last long.
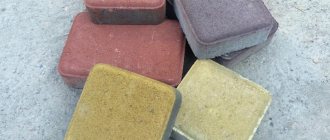
Modern manufacturers offer consumers two main types of paving slabs:
- Vibropressed paving slabs. It most often has a rectangular, square or diamond shape, uniform colors.
- Vibro-cast paving slabs. It is made by hand, therefore it has a larger range of colors and a maximum variety of shapes.
When choosing, the quality of the base and the functional purpose of the coverage areas are taken into account. Experts advise choosing small-sized material, as it is more resistant to cracking. It is important to consider the thickness of the blocks. The minimum is three centimeters, for parking and vehicle driveways – at least 5-6 centimeters.
The color and shape are selected to be in harmony with the decoration of the building , taking into account your own preferences. Installation of diamond-shaped and rectangular slabs is more complicated and requires the use of some work skills. It’s easier to install a curly one because the flaws are less noticeable.
IMPORTANT. When choosing a stove, you should take into account its environmental friendliness, since heating the surface in summer will cause the release of harmful substances, which will adversely affect the health of the family.
Each slab is carefully examined and its quality assessed. It is worth refusing to purchase material that has the following disadvantages:
- Heterogeneous structure of the outer side.
- The color is too bright.
- Uneven coloring.
- Dark spots on the reverse side.
- Clumps of material in the structure.
- Smooth, high-gloss surface.
ADVICE.
By knocking two copies against each other, you can determine their quality: a dull sound indicates the fragility of the material. A high-quality stove should be loud. On the pages of our website we will tell you everything about repairing paving slabs with your own hands! You will learn many useful tips and tricks.
And in the next material you will learn about paving paths with paving slabs! Familiarize yourself with the main stages of the work being performed.
In this article you will find several options for designing paving slabs:.
Installation work step by step
Installation of paving stones or tiles is carried out in the following sequence:
- install curb stones (edge);
- soft soil is removed;
- arrange a multi-layer stable base, mainly from sand and crushed stone;
- lay tiles;
- the seams are rubbed;
- water the coating.
Next, the entire technology is described in detail.
Preparatory work
Before starting work, you need to purchase tiles, consumables, and tools.
How to calculate the amount of material needed
The calculation method depends on the drawing that is supposed to be posted. Complex compositions require a special approach and specific recommendations. The quantity is calculated based on the selected pattern, after drawing up a preliminary sketch plan of the entire site.
If simple shapes are chosen, it is worth remembering the school geometry course and calculating the area of a specific geometric figure that the site or its individual parts represent.
The area of all parts that need to be covered will be taken as a basis. The number of tiles per square meter is indicated by the manufacturer on the packaging , so the required number of sets to be purchased is calculated using simple mathematical operations.
Experts advise purchasing material with a reserve of one square meter for each part of the surface to be coated. This is necessary so that there are fewer joints in oblique corners.
REFERENCE. There are special online calculators that automatically calculate the number of tiles after entering parameters (area of the plot, size of the blocks). Using it, accurate calculations are made.
Additionally, a curb is purchased , which is installed to prevent the blocks from moving along the edge. Its quantity is calculated according to the length of the perimeter of the covered area.
When purchasing material and planning the size of the covering, you need to try to make calculations in such a way that there is no need to lay cut pieces along the edges. The fewer cut pieces there are in the coating, the more aesthetically pleasing it will look.
What you will need
Installing paving slabs with your own hands requires the use of special tools:
- Tamping
- Roulette.
- Rubber hammer.
- Line or cord for marking.
- Rule.
- Level.
- Grinder with discs for concrete.
- Master OK.
- Rake.
- Broom.
In addition to tools, consumables are purchased:
- Sand (for a standard area 2-3 tons).
- Cement.
Preparing the base
Careful preparation of the base is the key to quality installation. After drawing up the plan, markings are made using pegs with a thread stretched over them . The quality of the soil in various parts is preliminarily assessed, and the sides of the slope are determined. If it is located towards the house and yard buildings, a drainage system is first thought through.
The sites are carefully leveled , soil is removed to a height of 15-20 centimeters. Then the surface is compacted. At the same time, drainage and sewer pipes are being installed.
After leveling and compacting, a cushion of crushed stone is poured . For garden paths made of paving slabs with your own hands, the thickness of the layer is 10-15 centimeters; for parking areas and roadways, the thickness of the crushed stone doubles.
The pillow is compacted by a special machine and covered with geotextile, which will prevent sand from penetrating between the crushed stone. In areas with weak, loose soil, geotextiles are additionally laid under crushed stone.
The prepared cushion is poured with a cement-sand mixture (1X5) , sand is poured on top of such a height so that the slabs are 1 cm above the surface before compaction.
ADVICE. To prepare the base, it is advisable to use guides made of boards along the height of the pillow. The foundation requires especially careful preparation if the site has soft soil. It is compacted after moistening.
The entire further process will depend on the quality of foundation preparation.
Important to avoid mistakes! If you want to know how to lay paving slabs with your own hands, watch this video of a man who decided to lay them incorrectly:
Some rules for laying tiles
In order for the laid material to be smooth and beautiful along the entire length of the path, it is necessary to lay out the initial row of tiles especially carefully. You need to stretch the line across the path, maintaining a drainage slope towards the curb. The first tile is installed 0.5 cm from the curb. In the longitudinal direction, laying is controlled by a level.
We also recommend reading
- Landscape design of a small summer cottage
- Design on 6 acres
On the path, the tiles are laid diagonally and compacted with a mallet. Between the elements you need to leave a gap of 2 mm. The laid out row must be carefully inspected and all errors must be corrected immediately. Usually it is enough to adjust the amount of sand under protruding or sinking elements. An evenly laid initial row is the guarantee that the entire path will turn out neat and beautiful.
Tamping will speed up the work of laying paving slabs
If the masonry involves partial tiles, they should be laid out last. To correctly mark the cutting line, the tile must be attached to the installation site. A hacksaw is suitable for cutting tiles, but the work will go very slowly. Therefore, you need to cut paving slabs with a grinder. A diamond disc is installed on it. You can use a special knife. You need to wear safety glasses when working.
Safety precautions
Organization of work requires compliance with safety measures:
- The workplace is cleared of foreign objects.
- If the slab is laid on a concrete base, the notches are made using safety glasses.
- All work is carried out with rubber gloves so that the skin is not injured or corroded by the cement mortar.
- Sorting the material and processing the edges of the tiles is carried out using thick gloves.
- Knee pads are used to protect the legs.
On our website you will also learn step-by-step instructions for laying paving stones with your own hands! How to work with such surface paving elements?
Read about the features of laying porcelain stoneware and how to properly prepare the base for this material in this article.
You will learn how to make steps from paving slabs with your own hands by reading our following material:.
Laying the yard with paving slabs: preparation
Before starting work, you need to think it through carefully and draw up a plan. This will guarantee a long and reliable service life of the manufactured coating. Tiling the entire yard is not very rational or cost-effective.
But paths are necessary on any site - it can be quite difficult to do without them. Therefore, it is necessary to calculate the required number of paths, their size and configuration, so that they connect the residential building with various utility and other buildings.
Then, in any weather, the homeowner and his household will move along neat, clean paths. And green spaces will suffer much less.
Why paving slabs? This material is increasingly used in both industrial and private construction.
The advantages of such a road surface are obvious. The installation work is not particularly difficult. The tiles do not “float” during hot weather and do not burst from severe frost.
It looks beautiful and is easy to care for. The tiled area allows moisture to pass through well, which is beneficial for both the soil and plants.
How to lay it correctly: technology and procedure
After preparing the base for laying tiles with your own hands, the following steps are necessary:
- Stretch the cord along the edges of the paths and platforms using stakes.
- Install borders along the borders, digging them into the soil to the desired height. For greater stability, the curb is fixed with cement mortar.
- To drain water, install drainage. The pipe is wrapped in geotextile and laid in a prepared trench next to the curb.
- Next, starting from the curb, they begin to lay the slabs. The rows can be placed diagonally or in a straight line. The rows are placed away from each other so that the prepared base is not destroyed when workers move along it. The laid paths must be strictly parallel to the stretched cords.
- To ensure uniform gaps between the tiles, special crosses are used.
- The slab is laid on a sand cushion and tapped on top with a hammer to ensure a tight fit to the surface. If any skew is noticeable, the blocks are lifted and a cement-sand mixture is poured under them for leveling. To control the horizontal level, a building level is used.
- If there are corners or obstacles along the laying path, they should be avoided in whole copies. The remaining spaces are then filled with suitable fragments. The tiles of the required shape for these purposes are cut using a grinder with a concrete disc. Filling these areas is done last.
- After laying all the rows in a continuous area, the seams between the tiles are filled with a mixture of sand and cement. Any excess that does not spill into the cracks must be brushed off with a broom.
- After all the gaps are filled with a sand-cement mixture, the surface is watered with water from a hose so that the blocks are fixed together. Be sure to put a diffuser on the hose so that the stream of water does not dislodge the backfill mixture.
You can watch the process of correctly laying paving slabs with your own hands in this installation video tutorial:
Another useful video tutorial on how to correctly lay paving slabs with your own hands - what is needed for this and how to lay them correctly:
IMPORTANT. When laying each section at the end of the day, it is covered with a sand-cement mixture and swept thoroughly. If this is not done, accidentally introduced moisture can ruin the appearance of the coating even before all work is completed.
How to choose a tile
Paving slabs in landscape design are used in different ways. You can lay tiles:
- paths;
- decorative areas;
- small courtyards;
- floor in the gazebo;
- adjoining parking lots for cars.
Different bases for different purposes of paving slabs
The purpose of the area on which the tiles will be laid is a determining point when choosing a material. Thin tiles (up to 40 mm) can be used to line paths and areas where people will walk or cycle. Medium-thick tiles (from 40 to 50 mm) can be used to decorate the entrance and parking area for a passenger car.
Thick tiles (more than 60mm) can support the weight of a full truck. These tiles are usually in the form of small bars. This gives the cladding additional strength.
It’s not difficult to figure out how to lay paving slabs correctly. The main condition for a novice master is to choose a small area for his first experiments. A garden path is best. It is better to choose one-color, square or rectangular tiles.
Coating care
To ensure the durability of the coating and maintain its beautiful appearance, you must follow the following rules for caring for it:
- The slabs are regularly cleaned of dirt and dust using a soft brush plus a special detergent.
- During the operation of the paths, sand may be knocked out of the seams; it needs to be added.
- If part of the coating sags, the warped blocks are removed and a cement-sand mixture is poured under them.
- In winter, the paths are cleared of snow without the use of sharp tools. Do not chip the ice, otherwise the surface will be damaged.
- You cannot sprinkle salt on the surface, it will corrode the ice and at the same time the outer surface. Using special reagents, their effect is first tested in a small, remote area.
- Damaged items are promptly replaced so that they do not spoil the appearance of the entire site.
In fact, this is a simple process that you can completely handle on your own, but you shouldn’t rush it. The work requires thoroughness and painstakingness; it is better to do the work slowly, carefully following the recommendations of specialists.
Advice and recommendations from experts
When working, it is worth considering a number of features:
- If the color scheme is colored, the cement may leave a white coating on the surface. To avoid this, you can fill the seams with clean sand.
Finished coating
- Get started by preparing everything you need in advance. Calculate the required amount, and if you fill the mold on the spot, do not rush to remove it.
- If you make a path with a slope, the yard will appear larger.
From the decorative variety, you can lay out paths of various shapes
Common mistakes
The size and shape of the tiles influence the quality of installation. Large elements in small areas leave a large amount of “trimming”, that is, waste.
It is recommended to use water when compacting the foundation under the sidewalk deck during a dry period of time (depending on climatic conditions). The technology ensures quick drying and fastening of the building material.
During the rainy season, laying paving is not recommended. Sandy flooring will be damaged by moisture.
Safety precautions
When decorating areas with tiles, if you are not a professional builder, you should adhere to a number of safety measures:
- When working with a grinder, it is not safe to cut tiles on your knees. It is better to place it on a hard surface.
- To protect against chips, protect the respiratory system with a mask.
- Actions not related to water are carried out with cloth gloves, this will protect your hands from injuries.
When laying paving slabs, do not neglect basic construction techniques. Compliance with the rules will ensure the durability and aesthetic appeal of the proposed paving areas.
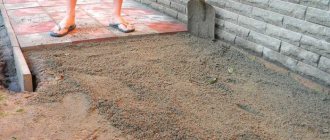
Creating a “pillow” from sand or crushed stone
The pillow is erected in the following sequence:
- pour a layer of sand at least 15 cm thick. If the pit is deeper than 50 cm, sand is poured in such a layer that 30 cm plus the thickness of the tile remains from its top to the ground level. The sand needs to be clean, without clay content. Having poured a layer 5-7 cm thick, it is leveled with a rake, then pressed dry with a tamper or vibrating plate. Afterwards, water well and compact again;
- then pour the next layer to a thickness of 5-7 cm and do the same. The top of the sand cushion should be perfectly flat. It can be formed by a rule based on beacons set by level;
- slabs of extruded polystyrene foam (EPS) 50 mm thick are laid on compacted sand. Ordinary granulated polystyrene foam, which you often encounter in everyday life, will not work - it deforms under load. EPPS can withstand up to 50 t/m2 without significant deformation. Being an effective heat insulator, this layer significantly reduces the depth of soil freezing. This means that the coating will not be distorted by frost heaving forces. It is extremely important to make sure that the foam sheets are stable, and this is only possible with a flat sandy base. If, when walking along the sheets, it is discovered that they are playing somewhere, sand is added here or, conversely, the excess is removed.
- EPS is covered with geotextiles. This is necessary so that the slabs are not damaged and are not moved apart by the crushed stone laid on top;
- pour a layer of crushed stone of fraction 5x20 or 20x40 mm with a thickness of 10 cm, press it with a tamper or vibrating plate;
- geotextiles are laid again;
- pour a layer of sand 15 cm thick. The procedure is the same: compact in layers of 5-7 cm with moisture. Before compacting, the layers are leveled with a rake; they strive to make the surface of the pillow especially smooth.
At this stage, a slope is formed for water drainage. A slope of 1 cm per 1 m of length is considered standard, but practice has shown that water drains well even with a slope of 0.7 cm per 1 m of length. Beacons are installed at the desired slope, for example, PVC pipes or channels, then they are usually moved along them, like on rails, leveling the sand. Next, the sand is watered and compacted, then the beacons are removed and the remaining recesses are filled with sand.
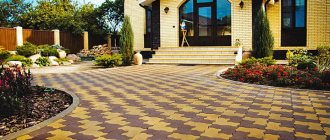
Why paving stones are gaining popularity
Paving stones are gaining popularity every year. This is a beautiful and durable way to pave a path or create an elegant staircase. Pavers also transform patios. Pavers bring richness to an ordinary space and add immeasurable value to a property.
In the modern world, homeowners are increasingly choosing to use paving stones. Its types can be much more economical and can withstand the high pressures placed on them by modern machines. This makes them popular for driveways, driveways and sidewalks.
You can make a path from paving stones or decorate the area with unusual patterns.
Pros and cons of paving stones
The main advantages of paving stones:
- Most cost effective. Asphalt tiles are manufactured either domestically or from anywhere in the world, hence there is no extra charge for export.
- Increased pressure tolerance. Unlike conventional bricks, asphalt slabs have exceptional pressure resistance, making them suitable for specialized applications.
- Variety of options. When homeowners decide to install a sidewalk, they have a wide variety of options to choose from. Some types look like regular red brick, while others resemble granite.
- Uniform production. Because paving slabs are mass-produced, replacement components are easier to find when needed.
- Better drainage. Most paving slabs are manufactured in such a way that they can promote more efficient drainage.
The advantages of paving stones are that they are economical and beautiful, withstand a lot of pressure unlike bricks, and there is a huge selection of design options and materials.
The main disadvantages of paving stones:
- The process of laying paving slabs on sand will take longer than with conventional tiles.
- This may be more expensive than other options. The initial cost of installing paving stones may be higher than other options, but you will save money in the long run thanks to easier and less expensive maintenance methods.
- Over time, weeds grow next to such tiles.
Disadvantages of paving stones: the installation process takes a long time, the cost may be higher than in other options, and over time, weeds grow between the tiles.
Tools and equipment
Before you start, you need to prepare the following tools:
cord and pegs;- planks;
- level;
- shovel;
- rake;
- roulette;
- manual rammer or mechanical vibratory rammer;
- wheelbarrow, broom, trowel;
- watering hose;
- Sander;
- protective gloves and safety glasses;
- rubber hammer;
- sieve;
- wooden wedges, wooden board.
You will also need the following materials:
- sand;
- cement.
Features of pouring liquid solution
If you want to prepare a reliable parking space and have chosen a concrete monolith as the basis, then you need to take into account several nuances:
- The height of the concrete base should be 5-10 cm higher than the cement-sand mixture.
- For a monolith you will also need a “pillow”, but in this case you will need less sand (layer height of about 2-3 cm).
- Since the concrete monolith will not allow moisture to pass through, a drainage system will have to be provided. For holes that drain water, pipes about 20 cm long are suitable (the length depends on the height of the base). For each m2 you will need one piece of pipe.
- The liquid solution consists of sand, cement (M 150-200), plasticizers or slaked lime and water. The finished solution must be liquid enough so that it can be leveled with a rule.
- If heavy vehicles will drive on paving slabs, then the base must be reinforced. In this case, the height of the monolith will increase by 3-5 cm.
Layout of sidewalk blocks
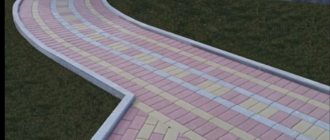
Paving slabs and paving stones are produced in a huge range. The main task is to correctly project the paving stone design and choose the method of its placement. Those who will arrange their own plot of land must first become familiar with the types of tiles, methods of laying them and options for patterns of laying blocks.
There are many known schemes for laying paving slabs, since they are produced with a standard width-to-length ratio.
If figured paving elements of the same type are used, then the following layout schemes are popular today:
- "Linear" masonry. The tiles are placed along the path line parallel to each other, ensuring that the seams of adjacent elements match.
- "Herringbone". The shaped tile elements are laid to each other at right angles.
- "Brick" layout. The orientation of the bricks is maintained in the same way as in “linear” masonry, only a bandage is added to the floor or a quarter of the tile in adjacent rows.
- "Block" tile laying. Two paving blocks are placed parallel to each other, and the two paving elements adjacent to them are turned at right angles.
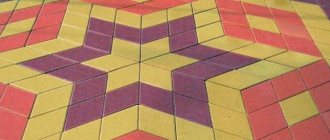
When laying paving blocks of two or more colors, a variety of paving options are used, which allow you to create a stylish and effective design of the local area. When tiles of several textures and colors are used to improve a site, they usually use a “checkerboard” laying pattern that is simple to execute but very effective.
When laying multi-colored paving slabs on platforms or paths, you should adhere to these simple rules:
- In order to accurately lay out a drawing on a paving area, it is worth drawing a sketch in the selected scale or creating a real project with the order of the shaped elements.
- To effectively and tastefully decorate and arrange a large area, an exclusive large-sized pattern is selected.
- If small areas are being developed, then use a small repeating ornament or pattern.
In almost all suburban areas there are winding places that require arrangement with the help of figured paving elements. Paving slabs allow you to quickly and inexpensively create radius patterns. Laying of paving blocks is carried out using a technology that includes the following stages:
- Creation in a special program or on a sketch scale.
- A contact layer is applied to the paving area, which includes beading, granotsev or sand. After unloading the material onto the site, it is carefully leveled and compacted.
- Laying of shaped paving elements is carried out from smaller to larger radius if the paving blocks are located along the path with a side length.
- After paving, the seams are filled with quartz or quarry sand. Then the tile is compacted with an area vibrator.
Important! If the tiles are oriented across the path, then a row of small radius is laid first. During installation, the longitudinal seams of the paving elements are shifted using a wedge of the required size.
Even if a complex laying pattern is chosen and tile trimming is required, and the patterns themselves will contain both small and large paving elements, radius patterns significantly increase the attractiveness of the furnished area and decorative value.
How to design a sidewalk surface?
Before you start laying, you should think about the layout of the path. You need to plan the width and pattern to minimize the need to cut the tiles. This will allow you to work faster and without unpleasant surprises in the form of cracking slabs, curved elements or installation difficulties.
Photo. Cutting tiles is quite a fiddly job, so it's best to avoid it if possible when planning your path pattern
When planning the layout of a deck or walkway, we must also consider water drainage. You can organize different options for water drainage:
- linear outlet;
- in the form of gutters in the sidewalk;
- plan for elevation changes.
The height difference is planned towards the ground adjacent to the tile, for example, into a lawn. It should be borne in mind that the surface of the pavement should be raised above the surrounding area so that we can avoid its contamination by water flows, in addition, this facilitates the penetration of water into the ground. Correct placement will allow the tiles to dry quickly and always be clean even after rain.
When purchasing tiles, you need to pay attention not only to their decorative qualities, but also to their thickness. Different sizes suit different purposes. Tiles with a thickness of 4-6 cm are used for paving walkways, sidewalks, or decorative strips around the house, while for surfaces with increased load (entrances to the house and garage), you should choose an option with a thickness of 6 to 8 cm.
List of styling tools
So, what do you need to lay out paving slabs on your own garden or summer cottage? Here is the most complete list of tools needed to carry out such work:
- Master OK;
- mallet made of rubber or wood;
- manual rammer;
- Bulgarian;
- pegs (wooden ones are best, although metal ones can also be used);
- cord for creating an even line of tiles and borders;
- building level;
- a device for watering the base (it can be a watering can or a hose - it is important that the liquid is distributed evenly and does not lead to blurring);
- rake;
- broom.
Bulgarian