When designing garden paths and blind areas, craftsmen are often faced with the problem of lack of a solid foundation. This applies to areas where there is unstable silty sand, clay or fresh fill. To increase the reliability of fastening, paving slabs are laid on a concrete base.
When laying pavement tiles on a concrete surface is necessary on the street
The desire to arrange paths, parking lots, recreation areas or car areas from paving stones is justified not only by aesthetic functions, but also by practical ones. The traditional paving option involves laying products on a sandy or dry mixture consisting of 1/5 cement and sand.
But this technology is not suitable for areas with unstable soil, so craftsmen prefer a more reliable solution. One of them is laying paving slabs on concrete.
It is in demand in the following cases:
- Soils that are subject to shrinkage. These include compositions with low design resistance (silty sand, peat and embankment).
- Heaving soil - can lead to the destruction of the coating due to uneven swelling.
Craftsmen also have to independently design such elements as flooring in a garage or shed, blind areas, screeds, garden paths and others. It is not advisable to dismantle the concrete base, since it is durable.
When laying polymer sand tiles, you need to pay attention to the following nuances:
- The degree of soil heaving. If the blind area or concrete path has been in use for several years and has not been damaged, you can confidently carry out paving. However, when pouring a new screed, there is a possibility that clay impurities will remain in the freezing layer.
- Moisture. The screed and curbs on the sides look like a rigid body, and rainwater can partially penetrate into the structure. To avoid swelling, you should install an effective drainage system along the outer perimeter and insulate the blind area with extruded polystyrene foam.
Excavation and protective layer
The volume of excavation work depends on the type of soil. If the soil is dense and clayey, it is enough to remove a layer 15-20 cm thick to remove plant roots. When the soil is loose, it is necessary to remove a layer 30-35 cm thick. If you plan to lay paving slabs in winter, the paving trench must be prepared before the cold weather.
Sand is poured onto the surface of the trench. The sand is compacted together with the soil. To prevent plant seeds remaining in the soil from germinating and destroying the coating, a non-woven fabric is laid at the bottom of the trench. The strips of material should overlap each other by 15-20 cm.
Advantages and disadvantages of the method
The arrangement of a concrete base for laying paving stones is in great demand, since this technology is durable and resistant to heavy loads. Such a coating is not afraid of the destructive effects of precipitation (which is not typical for a crushed stone-sand layer or soil) and can withstand heavy loads. It also ensures a smooth surface with clear shapes.
Other advantages of the method include:
- Increased strength properties. Concrete has great strength and does not deform under loads. The service life exceeds 30 years, so preparing the base for laying concrete is suitable for arranging parking lots, car areas and areas where people constantly walk.
- Resistance to precipitation. If the installation rules are followed, the degree of frost resistance will be about 200 cycles.
- No shrinkage effect. During operation, sand and soil subside, which contributes to complete or partial deformation of the coating.
- Reliability. After hardening, the adhesive base provides maximum fixation of the tiles, so they do not move or fall out.
- Affordable price. You can purchase paving stones at a low price, because... Modern and affordable materials are used for its production.
However, the listed advantages appear only if the installation technology is followed.
Among the disadvantages of the method of laying paving slabs on a concrete solution are:
- Difficult to dismantle in case of damage. Since glue is used as a binding additive, if 1 element is deformed, it will not be easy to remove and repair.
- If paving technology is not followed, the coating will be damaged after the first severe frost.
- Poor drainage of water and moisture. Together with the curbs, the concrete covering forms a closed box in which moisture and water begin to accumulate. To prevent such problems, a comprehensive drainage system is being installed around the perimeter. It needs to be insulated at a depth of 30-40 cm with extruded polystyrene foam. Seams and voids can also be sealed with glue.
- Masonry work can require large financial investments when installing decorative borders.
Consumables and tools
To prepare the base for the tiles you will need the following equipment and materials:
- Concrete mixer.
- Sand mixture.
- Cement not lower than M500 grade.
- Crushed stone.
- Construction levels of different lengths.
- Device for manual or automatic compaction.
- Pegs and marking cord.
- Master OK.
- Rubber mallet.
- Watering hose or watering can.
- Broom.
- Rake.
Quantity calculation
In order to correctly calculate the amount of materials for the upcoming work, you need to mark and estimate the perimeter of sidewalks and platforms. Based on the information obtained, further calculations should be made:
- Number of tiles. It is measured by the total area of the future surface with the addition of 8-10% of the reserve. The additional number will not greatly increase the cost of the work, but will save you from the problem of lack of material during the paving process.
- Foundation components. They are calculated taking into account the thickness of the layer by multiplying the area in square meters by the thickness of the required layer in meters. The final value will indicate the optimal number of cubic meters of building material.
- Curbstone. The amount of this material is measured according to the following principle: the length of the perimeters minus the length of the junctions with the base of the house and other objects on the site.
Preparatory work
The technology of laying tiles on a concrete base consists of several stages. First of all, preparatory work is carried out to determine the reliability and durability of the future coating. If all preparation rules are followed, the structure will be durable and resistant to heavy loads.
Preparatory activities are carried out as follows:
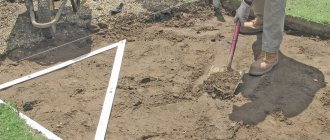
- The site needs to be marked with pegs and a nylon cord, and then soil must be removed at a depth of 25 cm. The bottom of the trench is cleared of vegetation roots and stones. If there is loose soil, the excavation is made in such a way as to remove the entire fertile layer, since it is poorly compacted.
- A rake is used to level the bottom. Then the surface is sprayed with water from a hose or watering can and subject to additional compaction to prevent soil subsidence in the future. After such activities, the construction of the load-bearing layer begins.
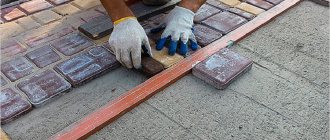
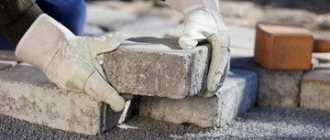
Installation of curb stones
Work on laying paving stones on concrete begins with the installation of curb stones. Framing is necessary so that the tiles do not move apart and are clearly fixed in place. The stone is installed using a cord stretched over pegs. The installation height of the curb is no more than 10 cm above ground level. When marking, you should take into account the slight slope of the paving stone surface towards the edge of the path to drain rain and melt water.
A trench is dug along the stretched thread. The height of the trench should coincide with the height of the curb stone and crushed stone cushion of 3-5 cm. The cushion is needed for better stability of the curb.
Installation of curb stones is carried out on a layer of cement mortar laid on crushed stone.
Leveling individual stones is done using a rubber or wooden hammer. A day later, after the solution has set, the gap between the trench wall and the stone is filled with sand and spilled with water to compact it.
Step-by-step instruction
When figuring out whether it is possible to lay paving slabs on concrete and how to lay different types of this material, you need to read the step-by-step instructions and study each stage of the upcoming work. To improve the quality of manufacturing a concrete pad, it is better to use a three-dimensional geogrid, which is made from synthetic materials protected from putrefactive processes and aggressive environments.
In case of tension, the structure creates a stable frame that reinforces any bulk material in the cells. Its service life exceeds 50 years.
Preparing a concrete pad
You need to arrange the base for the tiles according to the following instructions:
- A geogrid is fixed at the bottom of the recess, and a 15 cm thick layer of crushed stone is poured out. The edges of the structure must be below the level of crushed stone and not interfere with free compaction.
- The crushed stone-based cushion is additionally compacted, and a reinforcing mesh is fixed on top.
- Formwork is placed along the contour of the marking and concrete is poured.
- Next, the concrete mixture is mixed and carefully poured. At this stage, it is necessary to eliminate the appearance of voids and cold seams, which reduce the strength properties of the formwork. Vibrating equipment is used to compact the screed. To prevent rapid loss of moisture from the pillow, it is better to cover it with film. Over the next 3-7 days, the surface is periodically moistened.
- After 2-3 m of covering, expansion joints are left, which are made from boards installed perpendicular to the formwork. In case of temperature fluctuations, they will prevent the pillow from breaking.
- To remove moisture that may get to the surface, you will need to secure pipe scraps made of asbestos cement or polypropylene. Their upper level must correspond to the level of the concrete pad, and the lower end is fixed on the crushed stone layer.
- After the concrete has hardened, the formwork should be removed.
Installation of curbs
When figuring out how to lay paving slabs on concrete mortar, you need to take care of installing curbs. They are placed in the remaining recess after dismantling the formwork and filled with hard concrete. To drive the structures into the solution, you will need a rubber mallet. Voids and cracks should be filled with liquid concrete.
The height of the curbs is made 20-30 mm below the top of the paving stones - this will allow for effective water drainage. After a day, the space between the stones and walls is filled with a sand mixture.
How to correctly lay tiles on a concrete screed with your own hands
If you follow the step-by-step instructions, it will not be difficult for a beginner to figure out how to properly lay tiles on glue and concrete. The dimensions of the slabs are selected taking into account their functions: for arranging sidewalks, structures 4-5 cm thick are enough, but for organizing a car area it is worth choosing thicker paving stones.
A dry mixture or solution of cement and sand is placed on a concrete base under the paving slabs.
If you need to lay tiles on a concrete base using a dry cementitious polystyrene, then pour a cement-sand mixture on top of the concrete in an even layer; its thickness should be 3-5 cm. To level the surface, use a rule or a board with smooth edges. Then the slabs are placed on the pillow.
To prepare a dry cement-sand mixture, take 1 part cement and 6 parts sand. To make the site durable and resistant to destruction, it is thoroughly watered with water, which fills the pores and helps the mixture harden.
Installation on cement mortar
The most affordable method of laying tiles on concrete involves the use of cement mortar. The technology is easy to use and has an extended service life. To ensure high quality paving, you need to consider the following tips and recommendations:
- The optimal thickness of the cement layer is 2-3 cm. In this case, the cladding will be held in one place.
- To speed up the filling process, the solution should be applied within reach of hands and leveled using a notched trowel.
- After this, porcelain tiles, tiles or paving stones for garden paths are laid.
To monitor slopes and surface evenness, a building level and rule are used. First of all, the space needs to be filled with solid tiles, and in the areas of cladding, excess glue must be collected with a trowel or spatula. When the mixture hardens, the scraps need to be cut out and placed at the installation site. Areas with seams are covered with sand or sand and thoroughly moistened.
For tile adhesive
When choosing adhesive for paving slabs on a concrete base (you can find many adhesive base options in Moscow stores), it is important to take into account the type of coating and a number of other features:
- The adhesive base has a relatively short service life, and adjusting the placement of the tiles after fixing will be problematic.
- The composition is mixed in a small volume, taking into account the qualifications of the specialist.
- The diluted glue is applied to a smaller surface in a layer of 0.5-1 cm.
The seams need to be treated with glue or beading, as in the previous case.
Laying on dry mix
The technology for laying rubber tiles may involve the use of a dry mixture. In this case, the technician should follow the following instructions:
- Gartsovka is created on the basis of sifted sand and Portland cement.
- The composition is placed in a trench with a layer of 5 cm.
- The surface is additionally compacted with a vibrating plate, and the tiles are hammered in with a rubber mallet.
- Places with complex geometry are cut out, and the entire surface is compacted again.
- Gartsovka is used to fill the seams.
Using this technology, you can move freely on the surface even during paving. At the same time, it provides good repairability of products in the event of their splitting or deformation under heavy loads.
Sealing seams
Areas with seams are covered with dry cement mixture and moistened with liquid. The action must be repeated until the DSP finally stops shrinking. After 2-3 days, you need to get rid of construction debris and sweep away small debris and dust. You also need to rinse the surface with water from a hose.
Rigid concrete base layer technology
In the paving option under consideration, the paving slabs are supposed to be placed inside a rigid “trough”, the bottom of which will be a concrete screed. The rules for concreting are similar for slab foundations with minor additions:
- the lower reinforced belt can be used in parking lots, the paths are reinforced only in the upper third so that the screed can withstand the forces of possible swelling;
- Concrete can only be laid on non-metallic materials in which heaving forces are reduced, therefore the topsoil layer is removed to a depth of 0.4 m;
- the height of the curbs and storm drainage trays is significantly greater than the thickness of the tiles, so it is necessary to calculate the depth of the trench depending on the thickness of the screed.
Pouring concrete screed before paving with tiles.
For example, with a concrete thickness of 5 cm, a base layer of 15 cm and a tile of 6 cm, the depth of the pit will be 26 cm. And the height of the curb is 20 cm, the height of the storm drain is 13 - 41 cm, you will need to plan the bottom of the trench at different levels.
In addition, for gravity removal of wastewater from the path, slopes of 2 - 4 degrees in the transverse and longitudinal direction are required. In parking lots, slopes are usually created in one direction - towards the roadway or wastewater is collected from the side of the site and discharged into an underground container.
Slopes for paving slabs.
Important! Even when laying tiles on a dry mixture, it will be very difficult to create these slopes, and when using tile adhesive it is impossible.
If paving slabs need to be laid on an existing old base (slab or screed), you can go straight to step 3.
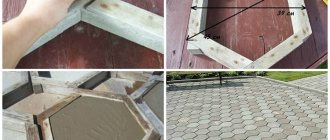
Marking and installation of borders
Materials for paving paths and parking lots must be purchased before this stage. The route of the path and the configuration of the parking lot and recreation area depend on the owner’s imagination. The marking technology looks like:
- the first cord is installed;
- a garden border, a storm drain tray, solid tiles along the width of the path, a second curb are placed on the dry ground close to it, a second cord is pulled;
- on radius/curvilinear sections of the path, markings can be created with paint or lime mortar directly on the ground.
After that, the fertile layer is removed from the inside of the zone outlined by the cord to a depth of 0.4 m.
The cord is installed along the outer perimeter of the curb.
Advice! If storm drainage trays with a height of 30–41 cm are used, a trench of greater depth is created in the places where they pass, taking into account adding at least 10 cm of crushed stone and laying these elements on a 2 cm layer of sand concrete or cement-sand mortar.
Scheme for calculating the depth of the trench.
If the slope of the site is more than 7 degrees, steps are designed inside the paths. If large-format areas are being decorated (front yard, parking lot, recreation area), the area is first terraced with road curb stones, concrete retaining walls or gabions.
The width of the blind area or path.
Slopes are created in the soil, underlying layer (sand, crushed stone) or in the concrete itself when it is laid. Recommended angle:
- 1 - 2 degrees across the path towards the storm drain;
- 3 – 7 degrees along the path.
For large rectangular or square areas (for example, a parking lot), slopes are created from the center to the perimeter or in one direction.
At the same stage, stormwater inlets are installed under the roof drainage pipes or transverse storm drainage trays, which drain rainwater. Mutual mixing of crushed stone/sand with soil can be prevented by laying geotextiles at the bottom of the trench. This material prevents the germination of weed roots, so it is used in most cases.
The minimum thickness of a layer of nonmetallic material for compaction with a vibrating plate is 10 cm. To prevent the absorption of cement lait during concreting, the crushed stone is leveled with sand and covered with rolled waterproofing (roofing felt or Bikrost) or two layers of polyethylene film.
Curbs and storm drainage trays are mounted on the mortar and leveled horizontally with a rubber mallet. After the solution hardens, they actually become permanent formwork for the concrete screed.
The cord is carried inside for installation of borders.
Reinforcement and laying of the mixture
If the developer is lining the blind area, it is recommended to insulate this structure with extruded polystyrene foam (thickness 5 - 10 mm), adjoining the horizontal layer to the vertical thermal insulation of the base/foundation. The laying depth is 40 cm or at the level of the sole of the MZLF. This method eliminates swelling, the blind area does not experience serious loads from pedestrian traffic, so it does not need to be reinforced.
It’s more difficult with paths and parking lots:
- parking lots are subject to loads from cars and are reinforced with two meshes (rebar or wire);
Reinforcement of screed in a parking lot in two layers.
- paths can be reinforced with one mesh to protect the screed from destruction in the event of possible swelling of the clay soils underneath it in the freezing zone;
Reinforcement in one layer.
It’s easier to buy wire mesh; you can knit reinforcement mesh yourself from “corrugated” rods with a diameter of 6 – 8 mm
Step-by-step instructions for reinforcement are as follows:
- the lower protective layer is provided by laying the mesh on plastic or concrete pads, the thickness of which should be calculated individually;
- the overlap of individual cards is at least one cell (10 x 10 cm or 20 x 20 cm).
For example, to reinforce a 15 cm thick screed on a path, 12 cm spacers will be required so that the mesh is located in its upper part. For parking, spacers of a minimum thickness of 1.5 - 3 cm are used, the upper mesh is laid on tables, “spiders” or other special elements.
Expansion joints are created by wooden slats laid 4 - 6 m across the path. They can be placed between the reinforcement or interrupt the mesh in expansion joints, using cards of the required size for each section of the screed. The gap is created throughout the entire thickness of the concrete.
Installation of bars for expansion joints.
To obtain concrete screed slopes, different methods are used:
- for the blind area, you can draw two lines - on the base and the storm drain tray or curb, and follow them as a rule when pulling out the top layer;
- for the path, similar lines are created on the curbs on both sides;
- inside a rectangular parking lot it is easier to place plaster beacons, pieces of pipe, bars, galvanized profiles used in gypsum plasterboard systems.
Advice! Depending on the air temperature, paving can begin 3–15 days after pouring the screed so that the cement stone gains at least 70% strength.
How to avoid mistakes
To avoid troubles at different stages, you need to clarify the laying rules and figure out how to lay tiles with your own hands.
The parameters of paths and platforms must be selected in a timely manner, guided by such a principle that entire tiles can be laid between the edges. This will avoid unnecessary costs and waste.
To cut paving stones, use a grinder with a disc for processing stone surfaces. To reduce the amount of dust, the tiles are first cut and then chipped off. Before this, you need to attach it to the selected place, make a mark and start cutting.
The facing surfaces are placed with a slight slope - this will ensure effective drainage of excess water and moisture. The optimal surface difference is 5 mm per 1 m.
When understanding the peculiarities of laying tiles on old concrete or sandy base, the paths need to be tilted to one side. The central elements should be placed slightly higher than the rest so that all rainwater or other liquid is directed in one direction. Otherwise, stagnation of moisture will lead to destruction of the paving stones when freezing.
Preparing the base for paving slabs made by vibration casting requires the use of special glue. It provides better hold with minimal thickness.
The solution is mixed closer to the pouring site. But if the temperature outside is negative, it is better to refuse kneading.
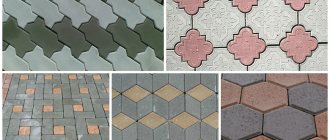
Features of material selection
Paving slabs are one of the most popular materials for covering paths and entrances to buildings. This material is beautiful, aesthetic, easy to use, durable and, moreover, inexpensive.
Laying tiles is easy; this work can easily be done with your own hands. But not everyone knows how to lay paving slabs, and this often becomes the cause of numerous problems.
When choosing paving slabs, most buyers are primarily interested in the price-quality ratio. Cheap tiles, as a rule, do not look particularly attractive and quickly fail, but you will have to pay more for high-quality material
But in order for the path to serve for many years, it is better not to skimp and immediately purchase high-quality tiles than to regret your wrong choice for years.
It is important to determine what the thickness of the tiles that you are going to lay on the site should be. Pedestrian paths, as a rule, are covered with tiles 40 millimeters thick, and for laying a car park you need much stronger tiles - from 60 to 80 millimeters. The same tiles are laid on the road near the site. The thicker it is here, the longer it will last.
Security measures
When planning to concrete a site for laying sidewalks on an old concrete base, it is important to take care of your own safety measures that are typical for general construction work. It is also necessary to take into account the following rules:
- When working with the cement mixture, you should wear a respirator, and when working with tiles, wear safety glasses and gloves.
- After completion of paving, all tools are thoroughly washed.
- Do not cut or chip paving stones on your knees.
When laying tiles, it is important to carefully study each stage and follow the installation technology. This will make the coating durable and reliable. Knowing how to properly make a foundation for a concrete floor or garden path, you can avoid many mistakes and problems.
What requirements must paving slabs meet?
When using any types of products for paving, they must meet the following requirements:
- when laying tiles outdoors, frost resistance ≥ 200 cycles;
- compressive strength ≥ 30 MPa;
- water absorption by weight ≤ 5%;
- abrasion during annual operation ≤ 0.7 g/cm2;
- the purchase of products must be made from one batch, since in different batches, even from the same manufacturer, the tiles will differ in geometric dimensions and color saturation;
- environmentally friendly cleanliness of products, when used both for external and internal work with the installation of cobblestone flooring in warehouses and utility rooms;
- lack of porosity on the surface;
- strict adherence to geometric dimensions with evenness of all edges;
- absence of internal and external cracks, as well as chips;
- naturalness and uniformity of coloring.