When making cement paving slabs, you can do without specific equipment, and to pave garden paths with your own hands, it is not at all necessary to have professional skills.
The budget option for creating a garden path is based on simple technological solutions that provide a reasonable balance between savings and quality.
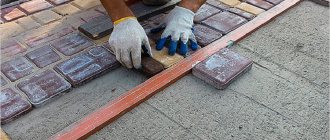
How to install formwork
Edged boards or thick plywood sheets with a smooth inner surface are used as formwork.
If the formwork structure is planned to be removable, then before installing it it is recommended to treat the inner surface of the boards with a special lubricant - thanks to it, the formwork can later be disassembled easily and quickly.
If there is no lubrication, you can use used machine oil.
Step-by-step instructions for installing formwork can be presented as follows:
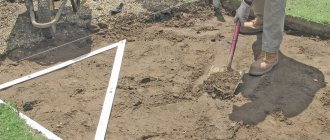
- The boards are installed in trenches on a previously prepared base. The formwork can be installed all at once or gradually, as the boards are freed, the height should be equal to the height of the planned path. The horizontality of the structure must be checked using a building level.
- Layers of sand and crushed stone (if necessary) are poured onto the pre-compacted bottom.
- A mesh of reinforced rods is laid.
- Every 2-2.5 m across the trench, boards up to 20 mm thick are installed, which will take the main load during pouring. They will also serve as expansion joints, thanks to which they will not crack due to temperature changes.
The formwork should protrude 5-10 cm above the ground.
If you need to arrange paths of a curved shape, then instead of boards, plywood or plastic panels are used, which are easy to bend in the desired direction.
In order to save effort and reduce material costs, the formwork can be installed in parts.
Edged boards are suitable for formwork.
Sand cushion device
To begin with, guides from boards are laid along the contour of the path. At the same time, the width of the curb is set. Sand is poured inside and distributed evenly over the surface. If the path runs close to a building, make a small clone so that rainwater does not collect on the path when finished.
Sand consumption will be high. For a given excavation depth, it is necessary to make a sand layer 5 cm thick. Therefore, 1 cubic meter of sand will be used to construct a foundation over an area of 21 m2.
The laid sand is compacted with a professional gasoline tamper. For the same purpose, you can use a homemade tool made of timber with a base measuring 15x45 cm attached to it. To protect the top layer from erosion, the sand is moistened from time to time with water from a shallow watering can and compacted again.
Important!
Only that part of the future path on which the tile parts can be laid without leaving the prepared soil is covered with sand.
Do-it-yourself paving of paths with paving slabs: step-by-step guide ↑
If there is vehicle traffic, the foundation should be strengthened. On top of the crushed stone, you need to pour a layer of concrete 12-15 cm thick, providing drainage holes. Concrete can be reinforced with reinforcing steel mesh or simply with loose pieces of reinforcement:
- The last layer of the base can be made of sand or a cement-sand mixture. Only coarse-grained river sand, well sifted, without pebbles, debris and clay inclusions, is suitable. If you prepare a mixture, the ratio of sand and cement depends on the brand of cement: for M150 the proportion is 1:3, for M400 – 1:6.
- To perfectly level the underlying surface, you will need guide beacons. Such beacons can be already installed cemented curbs. In this case, the surface can be leveled using a flat rule board, in which slots are made at both ends in the shape of an L so that the board rests on both side stones.
- If this method is not suitable, then two pipes with a diameter of 15-20 mm are used as beacons. They are laid along the passage, the surface is leveled with a board, then the pipes are removed and the grooves are filled up.
- Spread the sand or mixture in a layer of 7-10 cm, level it with a rake and compact it so that the laid paving stones are approximately 1 cm higher than the curb. This is the allowance for shrinkage.
- Now you can lay tiles or paving stones on the finished base according to the planned pattern. Each of them is driven in with a rubber hammer and leveled; if necessary, sand is added under the base or excess is removed. The width of the tile joints is maintained at 3-6 mm. A grinder is used to trim and fit pieces.
- Upon completion of installation, sprinkle the cement-sand mixture over the entire surface and sweep it into the tile joints with a broom or brush.
- Rinse the coating with a watering can or hose with low pressure and remove any remaining mixture.
During installation
Of course, it’s not enough to lay garden paths with tiles yourself; you need to properly care for them so that the surface does not collapse. For example, in winter you should not remove snow with metal shovels, much less break ice with a crowbar.
Construction stages
The construction of paths at the dacha can be carried out according to a simplified type, when the material is laid on sand, and using cement mortar. In any case, first the installation site is prepared and marked, the design of the sidewalk is selected, and at the end of the work the joints are grouted. Violation of construction technology can quickly render the coating unusable, so it is important to carry out this process properly.
Important! Before starting work, you should pay attention to the reliability of the soil where the paths are laid. If it is mobile, then geotextiles or a cement-sand mixture with concrete should be used.
Preparing the site
Preparatory work consists of step-by-step implementation of the following steps:
- First, markings are made using pegs and rope. In this case, you should take into account not only the dimensions of the tiles and paths, but also the width of the borders located on its sides.
- The area along which the sidewalk will run is cleared of plants and debris.
- In the marked place, soil is removed with a bayonet shovel to a depth of 20–50 cm. This work depends on the load. For garden paths that will only be walked on, it is enough to remove the soil by 20 cm.
- The bottom of the excavation is cleaned with a shovel and leveled, and then compacted. If you can’t get a tamper, then you can use a log or a homemade product made from a wooden beam.
Reinforcing the edges of the track
Curbs are laid along the edges of the path. They protect the path from deformation and spreading. Curbs can be laid at the level of the tile or slightly above its surface. Heavy parts are deepened along the edges of the path at the beginning of work. It is recommended to plant them on cement mortar. Small curbs are installed after laying the slabs. In this case, the markings are made without taking into account their sizes. When the tiles are laid, recesses are dug along the edges, slightly deeper than the height of the curbs. Their bottom is covered with a layer of sand. Then the curbs are hammered in with a mallet. Between them and the tiles leave a small distance equal to the size of the joint between the tiles. It will be covered with sand.
Find out also how to create a landscape design around a house with a porch.
You can strengthen the edges of paths without curbs:
- Bury the tiles with the surface at ground level. The sides of the trench are additionally compacted; they act as natural formwork.
- Place welded together corners treated with an anti-corrosion agent along the edges. Holes are drilled into them, through which pegs are driven, securing them to the ground.
- Fix the outer row with cement mortar. In this case, a beginner should choose a coating in the shape of a large square or lay the slabs in parallel. In this case, first lay up to 10 tiles on the mortar from each edge, and then fill the space between them.
Laying sand cushion and tiles
When the preparatory work has been carried out, a layer of sand from 10 to 20 cm is poured into the recess. For the access road, which will bear the load from transport, a sand cushion or a layer of crushed stone of 20 cm is made. In this case, 2–3 cm should be taken into account for the subsequent shrinkage of the bulk material. The poured layer of sand must be leveled with a board and moistened with a shallow watering can. Then, after a few hours, level again.
Important! If a path or sidewalk is made near the walls of a building or structure, then it is necessary to make a slope. Otherwise, rainwater will wash away their foundation.
It is optimal if the path has a slope of 5 mm per linear meter. At this stage of work, communications, storm drains, etc. are also being installed.
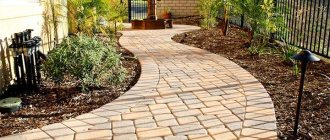
Choosing a styling design
An interesting option would be to make paths with patterns. This will decorate the garden area well. But to create a styling design, you need to try and spend more time. The easiest way is considered to be straight laying. In this case, the elements should be mounted diagonally in order to better maintain the evenness of the horizontal line. When laying in a circle, you need to lay out the material from the center of the pattern; for this, purchase the appropriate tile. When creating a mosaic pattern from shaped pieces, you need to purchase more sand, since in this case the gaps between them will be larger than usual.
Check out the use of paving slabs in landscape design.
Step-by-step installation instructions
Installation of tiles is as follows:
- The tiles are pre-applied between curbs or markings.
- The tiles are trimmed for better joining of the elements. It is performed with a grinder using a diamond-coated disc.
- The tiles are being laid. If laying is carried out on leveled sand, then it must be moistened beforehand. Then they tighten the cord or put the guides. Laying rows is done from the curb. The tiles are hammered into place with a mallet. To ensure even seams between them, special “crosses” should be used. After each row, the evenness and slope of the laying is checked with a level. If any tile is not level, then it is removed and sand is added or removed.
Video: laying paving stones on sand with your own hands
Laying on sand is considered the easiest way. Professionals prefer to lay tiles on a cement-sand mixture, since heavy rains and meltwater wash away the sand, and the coating begins to sag. First, a layer of fine crushed stone is compacted onto the prepared recess, and a mixture of sand and cement in a ratio of 3:1 is laid on top of it and then leveled. Then the cement-sand cushion is moistened and the tiles are laid. If the soil in the area is unstable and loose, it is recommended to add concrete.
Did you know? Mankind has known concrete for 4,000 years. It was used back in Mesopotamia, and the ancient Romans used it in mass construction.
Grouting joints
The final work is to fill the seams between the tiled elements of the paths. To do this, place a small layer of sand or a cement-sand composition on top. This type of flooring should be spread with a brush into the voids between the tiles. Then you need to remove the remaining sand (cement-sand mixture) and water it from a hose with a divider. If after this, subsidence of the filler between the seams is detected, then you need to add sand into the resulting voids.
To increase the service life of such paths, the tile material should be tamped after the grouting process. For this purpose, you need to use a vibrating plate (weight up to 100 kg). This procedure will make the surface smoother.
Path made of tiles and ceramic tiles
The remains of tiles after construction or renovation can be used to lay a path in the garden. Moreover, not only whole tiles will be used, but also individual pieces.
Entire paths can be designed either as an independent material or in combination with facing bricks or natural stone.
Pieces of ceramics and tiles can be laid out in a beautiful mosaic or in the form of a thematic picture. However, this will require a lot of perseverance and a lot of time. But the result will please you.
To design a path made of this material, proceed as follows:
- According to established standards, a trench 10 centimeters deep is dug for the path. Rubble is poured onto the bottom in a thin, even layer and compacted thoroughly.
- To strengthen the base and give it strength, reinforcement is made of thick metal mesh.
- Concrete solution is prepared, the path is poured and leveled. The pattern or pattern of tile pieces begins to be laid when the cement composition begins to set slightly. To make the work go faster, the drawing is laid out next to the path in advance. Then it is only transferred to the hardening concrete.
- After laying the tiles, the seams are rubbed down.
If whole tiles and pieces are laid out, then large elements should be placed along the edges and in the center, and the space between them should be filled with smaller ones.
You can use glass bottles with sand turned upside down as borders, as in the photo.
Making paving slabs using the molding method: step-by-step instructions
Making tiles for paths in your country house with your own hands is a fascinating and creative process. Some DIYers find it a lot of fun. And the result (a high-quality, durable and beautiful path in the yard) will please all household members.
Making molds
The tile molds themselves can be bought in a store or made with your own hands from scrap materials. Among purchased forms, silicone, plastic, and polyurethane products are in great demand. If we are talking about making molds ourselves, then for this we use: timber, boards, and various plastic containers. You can also make a base for the tiles from cut plastic strips. Here it is quite possible to achieve complex ornaments and polygonal shapes. The main thing is to make forms so that they are easy to work with.
Attention: when making wooden forms, it will not be possible to give them complex geometric bends. The easiest way is to make them in the form of: square, rectangle, rhombus, triangle.
In addition to making the molds, they should also be prepared for pouring. Each individual element is carefully lubricated with special compounds, which are applied to all internal sides to make concrete products easier to remove from it. After lubricating all sides, remove excess grease with a dry and clean cloth (otherwise, stains may remain on the finish coat).
Composition of the solution
To make your own tiles for your dacha wear-resistant, durable and practical, you need to properly prepare the concrete mortar. All materials included in it must be of high quality. This is especially true for cement, because the strength of paving stones directly depends on it. Therefore, experts recommend using cement brand M500, which is characterized by moisture, frost resistance and other high technical characteristics.
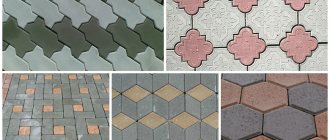
Choice of material - types of tiles
For paving garden passages, materials are chosen depending on the traffic flow. For wide paths where vehicles can pass, durable coatings are needed. Narrow paths are decorated with light tiles.
The highest quality and most durable path - bounded on both sides by curbs pre-installed on the concrete mixture
A natural stone
Stone garden paths are a classic. The stone will fit into any landscape design, it all depends on the shape and color of the stone:
- durable granite with a variety of textures is offered in the form of tiles and bricks;
- marble amazes with its variety of shades, most often used in the form of natural cuts of blocks;
- The choice of slate for installation is hard, quartzite, the palette of shades is wide from gray to marsh, pinkish-salmon to carmine;
- quartzite is harder than slate, rougher, cut into tiles or paving stones;
- shungite is smooth, smooth, gray like asphalt, sometimes there are pieces with shiny quartz veins;
- sandstone is cut into bars and tiles of various formats, moisture saturation is higher than that of other stones, but it is very decorative, the rough texture creates an anti-slip effect;
- flagstone is quartz rocks that form layered deposits, textured, yellow to reddish in color.
Stone tiles with a relief surface look elegant and expensive
A combination of stones with a rough and smooth surface is allowed. The best option is the joint laying of sandstone and marble.
Fake diamond
For paving stone paths in the country, clinker bricks and concrete tiles are used. Clinker is made from plastic clay, looks like a solid brick, and comes in shades of brown and red-brown.
Clinker paving stones are one of the most durable materials for country paths
Porcelain tiles vary in texture, color, and are produced:
- in the form of tiles of various formats;
- torn plates imitating natural pieces of stone.
Most often you can find porcelain tiles in medium and large formats
Garden path made of porcelain tiles with imitation of natural stone
When working with flagstone, it is recommended to install curbs on paths after laying to reduce the number of trims.
Concrete
The concrete is made smooth or with an anti-slip surface (the hardening concrete is treated with sand). They imitate the texture of flagstone and clinker. Concrete paths made of tiles in the country are an economical design option. When making fragments yourself, ready-made molds are used.
Concrete tiles are produced in different sizes, textures and thicknesses
When making it yourself, concrete tiles are poured directly on site
Polymers and plastics
Modern manufacturers offer many types of decking - artificial deck boards or parquet. Paths made from such tiles look like wooden flooring and are not afraid of moisture or temperature contrast.
Garden decking or parquet are panels with a pattern made from a mixture of plastic and wood flour.
Plastic covering made of modules is suitable for constructing paths and decorating recreation areas
Lawn tile gratings are created in the form of modules; they are usually green, easy to install, and will preserve the green carpet.
A path made of plastic lattice can be made directly through the lawn, or it can be laid on a sand bed and the cells can be filled with fine gravel.
Site layout
To begin with, they draw up a sketch of the site and mark paths on it in order to understand the overall picture. It is convenient to do this from a photo in which all the buildings are visible. It helps to analyze the objects available at the dacha and will help to correctly position the paths. They should be laid in such a way that it is convenient to walk around the site and do the necessary work. According to the drawn up plan, the approximate amount of work and the required amount of materials are determined.
When drawing up a design for paths in a country house made of paving slabs, their width is taken into account. In places where there are a lot of people, it is better to make paths 1 m wide so that it is convenient for two adults to separate. In areas where there are fewer people, it is enough to make paths 80 cm wide.
Then they move on to marking the site. To do this, pegs are driven in at the beginning of the future path and then marks are placed every 2 m. Ropes are pulled between them. If the configuration has many bends, marks are placed more often so that the outline is more accurate. The cord is pulled at a height of 15 cm from the ground surface.
Laying paving slabs on a paving stone path
How to lay paving stones correctly with your own hands. There are several options for choosing a starting point to begin laying tiles when constructing a structure. Where to start laying tiles? The most correct option seems to be choosing the starting point for laying the tiles depending on the important visible elements. In this case, it is the intersection of lines of movement.
Tip: the beginning of installation can also be done from the lower to the higher point, from an optically important boundary or other significant visible elements - porch, entrance, etc.
Use tool No. 2 - (height 6 cm) to create a flat surface for the leveling layer. Move the device along the curbs as if along guides, removing excess sand.
Lay the tiles starting from the center. Using a rubber hammer, press the tiles into the sand until they are level with the curb. Recess the tiles by about one centimeter or a little less. Further compaction will eliminate minor unevenness. Check the flatness of the tiles using a building level.
Continue laying paving slabs until the entire surface is completely filled with tiles. At the end of the paving stone path, if necessary, use a grinder with a diamond-coated wheel to cut the curb stone to the desired length.
Preparation of materials
It is necessary to purchase the following building materials:
- sand;
- granite crushed stone;
- geotextiles (if the soil is mobile);
- cement grade from M-400 and more;
- tiles and curbs for sidewalks.
Did you know? The first mention of paving tiles was in Holland at the beginning of the 19th century. Since natural raw materials for building roads were expensive, local craftsmen were able to produce this building material from concrete for the first time. They paved the road from Amsterdam to Harlem.
Be sure to make sure there is electricity and water. It is recommended to carry out work wearing rubber knee pads and gloves. First, in order not to make mistakes in the calculations, you need to draw up a site plan and outline the location of future paths. To calculate the number of paving slabs, you must first measure the entire length of the planned paths. But the width should be chosen depending on the size of the purchased building material in order to minimize waste from trimming and cutting.
To calculate the amount of border, the length of the path is multiplied by 2 and divided by the length of this material. 20% should be added to the calculated quantity to take into account the breaking and trimming of building products.
Safety precautions when working
When working with cement, one of the most harmful factors is dust. Therefore, before preparing the mixture, you should wear protective clothing: gloves, a respirator or a protective mask.
But it is also important to ensure that diluted dye or plasticizer does not come into contact with your skin or eyes.
You need to be careful when the concrete mixer is working. You should check the integrity of the wires and sockets, do not test the quality of the concrete and do not correct problems when the equipment is plugged in.
Although the process of preparing paving slabs is labor-intensive, the result is worth it. In a month, garden paths laid out with a beautiful exclusive coating can turn your garden plot into a small masterpiece of landscape design.
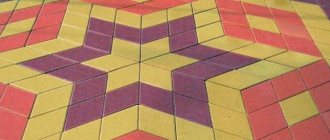
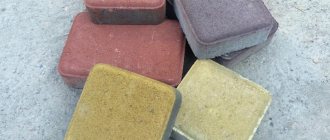
Manufacturing of colored concrete tiles
The natural gray color of concrete does not greatly decorate the garden plot, so many dacha owners prefer colored paving slabs - both bright and pastel shades. To obtain an attractive color coating, dry or liquid pigment should be added at the mixing stage of the solution.
You can also decorate boring gray concrete by “encrusting” the surface with decorative elements such as broken ceramic tiles, pebbles, mosaics or multi-colored glass pieces.
After the concrete pour has completely dried, the mold should be removed and the space between the tiles should be filled with sand or small gravel chips. You can walk on self-made concrete tiles within a couple of weeks, and it is recommended to drive a car or park it on such tiles after about a month.
Drawings for laying paving slabs and paving stones - design solutions
There are several types of paving; installation technology is chosen depending on several factors:
- relief features;
- the width and contour of the path, on a wide one you can create large mosaic designs, on winding ones, chaotic laying is appropriate;
- architectural features of buildings located on the site;
- purpose of the zone being designed.
Using paving slabs, you can make paths with unusual patterns, different colors and textures
Manufacturers produce tiles in various sizes:
- square;
- hexagonal;
- in the form of fish scales;
- rectangular - this shape is considered traditional.
Paving slabs are convenient to use both on narrow paths and for paving large areas
Paving the recreation area with large-format natural stone tiles
Combining different tiles allows you to create beautiful patterns on garden paths
Patterns are created by alternating the position of the tiles, using coatings of various colors and sizes.
Errors when marking the area for tile laying lead to an increase in the consumption of coatings. The number of tiles that need to be cut increases.
Typical installation options with step-by-step instructions can be easily found on the Internet:
- Direct laying is the formation of narrow strips that set the direction of movement. In rows, the seams are combined with adjacent ones or made with a shift of half or 1/3 of the tile.
- “Herringbone” - installation of covering fragments at an angle, one of the popular methods of paving paving stones, clinker bricks (by changing the angle of the “herringbone”, the width and length of the path are visually adjusted).
- A chaotic laying order is welcome if the tiles in the packs do not match in shade (before installing the covering, it is recommended to open all purchased packages, only then begin laying).
- “Checkerboard” – alternating light and dark fragments. For chessboard, tiles of any shape are used, the main thing is that they match in size.
- Diamonds are created for visualization; they can lengthen and shorten the sidewalk.
- Circles and segments are formed by radial laying; colored square tiles look especially decorative.
- The curly ones are laid out according to a prepared template, and interesting images of birds and animals, intricate patterns, and ornaments are obtained.
Path made of clinker bricks laid in a herringbone pattern
Garden paths laid out with rectangular tiles “staggered”
Working with natural stone, selecting pieces to fit the format of the path, sawing off or chipping the excess. If desired, smooth the sharp corners of the stone with a grinding machine. The fragments are laid end-to-end or with a gap filled with sand or concrete mortar with the addition of dyes. For whiteness, fluff is added, shades of gray are created with ash. You can add water-based or acrylic paint colors to concrete.
The trend is zoning using a combination of natural paving with other types of coatings; transitions are decorated with different green spaces that complement the unified picture of the landscape.
What to make paths from
The path surface can be hard or loose. To create a hard coating, the following materials are used:
- Concrete. Concrete walkways are more than just plain gray tape. In addition, there are dyes and you can decorate it if desired. There are also forms for filling immediately on site. It turns out homemade paving slabs. Another option is to pour small concrete slabs of the required size yourself, then lay them on the bedding. See photos for design examples.
Everyone in the household has forms for such a path - cut water bottles into cylinders, place them as needed and fill them with solution: beautiful and cheap
Large pebbles as backfill and slabs of colored concrete Another option for laying homemade concrete slabs on a garden path
Concrete path with expansion joints. If you look closely, you can see that there are stripes across it. Another ready-made shape for homemade paving slabs. Due to the border and non-linear shape, it looks attractive
A simple concrete strip can be decorated to your liking
This is how they pave a path in a country house or near a house using ready-made forms into which
Plitnyak concrete mortar is poured. This is a natural stone that has been cut into plates. It is laid on a prepared base (more on this later), the gaps are filled with backfill. It turns out beautiful, reliable, non-slip. It’s not for nothing that landscape designers love flagstone paths so much.
Backfill is one of the important elements that shapes the appearance
In this form, the flagstone path does not break up the lawn, and it is comfortable to walk
The color of the stone can be any
Brick. Ordinary ceramic brick is a beautiful material, but not for paths. It absorbs moisture, and if it then freezes wet, it breaks into pieces. If you are planning to make a path out of broken bricks, then you can walk on it more or less normally only for a couple of years. Then you'll have to redo it. The resulting cracks will need to be filled with coarse sand or fine crushed stone. Clinker bricks will last much longer on the path, but this option cannot be called low-cost: the cost of one piece starts from several tens of rubles.
Quite nice paths made of old brick. And if you do the backfill on the sides and in the seams, it will be absolutely beautiful
These are two types of bricks - ceramic and crushed granite
A clinker brick path is beautiful, to say the least... but maybe too beautiful for a garden?
Tree . Such a seemingly unsuitable material, but with proper processing it can serve for a long time. Moreover, many hand-made wooden paths can be classified as low-cost. For example, they came up with the idea of using stumps and tree cuts as borders or coverings. They also make flooring from well-treated boards - better than a terrace, but if not, an old floor will do.
Building a tree can become an excellent path. This option for a wooden pavement for a summer house
Properly treated wood can last for several years. Combination with pebbles makes it comfortable to walk on.
Gorgeous path for a plot near the house
And this is how to make a path from boards
Plastic. There are tiles for garden paths made of plastic - polyethylene or polypropylene. It has a square shape and a system of locks that is attached to one another. It can be laid directly on top of the lawn or previously trodden paths in the country house or on a plot of land. This is an option - fast and cheap. It can definitely be called “Low Cost”. It is better, of course, to make the filling according to the rules from crushed stone and sand, and lay plastic elements on top. It's a little longer and more expensive. There is also an immodest, but very beautiful option for plastic tiles for paths. There is also “garden parquet”. These are slabs or boards made of wood-polymer composite - WPC (they are in the photo, they look exactly like parquet). This material appeared relatively recently. It looks and feels like wood, but is essentially a mixture of wood flour and polymer. These are very beautiful coatings, but their cost is by no means modest. Although not fabulous.
The good thing about a plastic path in a country house or on a plot is that it can be made in a few minutes
Another type of plastic tiles for paths
This is garden parquet. Gorgeous, but overpriced
And another option for polymer tiles for garden droshky
This is a bunch of plastic garden tiles
Pebbles. These are rounded natural stones that can be found on the banks of rivers or lakes. Flatter stones are more suitable for making paths. There are different shades of gray, black, white, and sometimes you can find burgundy. These stones, laid close to each other, create amazingly beautiful mosaic paths. But this is an activity for the diligent and persistent. Those who lack patience can find large flat boulders or large pebbles and place them in the sand. It's not as luxurious, but no less reliable. You can do the same with granite or other similar stones. It is important that at least one edge is relatively flat. You put this flat part up, and bury the rest. The work is not easy, but you can not only walk on the path, but also drive.
Different types of pebble paths
Large pebbles do not require so much time to lay Beautiful pebble paths in the garden
Large natural stones can be used to pave good corners
Available materials. Country paths are made from old tires and bottles.
There are also paved paths: gravel or crushed stone. Their peculiarity is that with a small layer of 2-3 cm and sufficient compaction, it is comfortable to walk on them. If the layer is slightly larger, unevenness will form when walking, and such walking will be tiring. Therefore, as you have seen in many photographs, gravel and crushed stone are used as backfill, into which rigid elements made of other materials are laid. When done correctly, this is convenient: gravel conducts water well and puddles do not form. Those who don’t like the gray color can be advised to paint it: many designers do this when organizing rockeries.
Example of a gravel path
Paving paving slabs
In terms of reliability and durability, tiled stitch is not inferior to concrete stitch. There are 2 nuances: the material will be more expensive and requires proper installation. Therefore, ceramic bricks, either used or left over after construction, are often used instead of tiles.
Having prepared the base of the garden path (the method is described above), lay bricks or paving slabs using the following technology:
- Make a dry cement-sand mixture (prance) in a ratio of 1:4 and lay it on top of the compacted gravel backfill with a layer of 2-3 cm. At this stage, provide a slight slope for water drainage from the coating, leveling the prance with the rule.
- Lay the tiles close together, stone to stone, tapping them level with a rubber mallet. Check the horizontal level with a building level after paving each row.
- Carefully fill the joints between the tiles with grout. Try to compact the mixture so that grass does not grow through the seams.
If you need to lay out a site in front of a garage or in another place with increased load on the coating, you should use cement mortar. Decorating a sidewalk like this is easy: buy tiles of different colors and shapes. More information about the technology of paving tiled paths is described in the following video:
Framing the garden path.
A DIY path will look neater if you take care of the curb. Most often, rebrik is used for this purpose - concrete bars, which are laid using the same technology as tiles. For garden paths made of plastic, the same polished stones are suitable, the main thing is to choose the optimal thickness. To lay the border, a garter is often used, as already mentioned, cement + sand.
Now you can start making garden paths. Good luck!
dachniymir.ru
DIY garden path made of concrete: step-by-step mosaic
For those who don’t like simple and boring options, we have prepared an amazing step-by-step master class on creating a unique and inimitable step-by-step path with your own hands! It’s not at all difficult to create such beauty, but at the same time, no one in the area will have such an amazing path. A very skilled craftswoman made this step-by-step concrete path with her own hands and shared her project online. Now, thanks to her detailed instructions, anyone can create such a miracle! And most importantly, to make such a path, you don’t need to mix concrete all day or make any effort. Just use your imagination a little, and then you will get a unique masterpiece that will give any store-bought tiles a run for their money!
So, to create a concrete path with mosaics, she needed:
- non-stick baking tray (any shape, preferably round)
- petrolatum
- adhesive paper
- old plates
- pebbles and unnecessary jewelry
- glass
- concrete
- mesh for reinforcement
The author described all stages of the work in step-by-step instructions. At the end of the work, the master advised to coat the finished parts with varnish. Then we lay step-by-step slabs as in previous master classes.
This version of a step-by-step concrete garden path will appeal to those who love a creative approach in everything!
Photo source intimateweddings.com
Purpose and types of formwork for garden paths
Since landscape design is rapidly gaining popularity, formwork for garden paths is not uncommon in the construction market. With their help, an ordinary garden path will become a source of pride for the owner of the site. You can buy ready-made formwork (fortunately, their cost is more than affordable), or you can make it yourself, which guarantees the uniqueness of the design.
The mold can be made of metal, wood or plastic. Each material has its pros and cons. For example, a metal structure is highly durable and reliable, but its price can offset these advantages. Most often, metal formwork is used by construction companies; for a one-time use it is not practical to purchase it.
Wood is most often used to create molds for DIY walkways. However, creating a complex pattern from wooden blocks is quite difficult, and, moreover, when interacting with concrete, the form quickly collapses. Most often, formwork for one slab is made from wood. By combining the resulting slabs, you can get an interesting and original design.
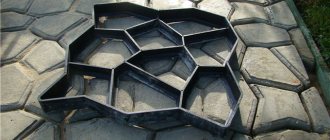
Plastic is the most popular material for creating formwork. With its help, you can recreate a pattern of any complexity, and low adhesion to concrete allows you to use the form repeatedly, without damage or deformation. It is from plastic that multi-sector reusable forms are made. Adding special components allows
- increase the strength of the formwork, use it for the manufacture of slabs of a larger area;
- make plastic resistant to low temperatures;
- reduce adhesion to concrete;
- increase plasticity, so you can create the most complex patterns.
Application of formwork for garden paths
A plastic mold is the most practical solution. If you want to show your imagination, you can make wooden formwork with your own hands.
Formwork shape options for garden paths
The most convenient for arranging paths with your own hands are plastic forms with dimensions of 80*60 or 60*60 cm. Such formwork does not take up much space, is lightweight, and easy to transport.
The height of the sides is 6 cm, this is enough for the road slab to be durable and not crumble after a couple of months. In this case, a layer of concrete of such a height will harden quickly and evenly, without the formation of voids and pockets.
The following types of formwork are popular:
- rectangular shapes with imitation clinker stone;
- irregularly shaped formwork imitating round stone;
- rectangular shapes divided into triangular segments;
- forms broken down into abstract segments of various configurations.
When choosing formwork, you should focus not only on taste preferences, but also on the topography of the site. If the path is winding, it is not advisable to buy a rectangular shape. To arrange long straight paths, it is better to rent long metal formworks, which are offered for rent by many construction companies.
Tile installation
After preparing the soil, sand is poured in an even layer; it will increase the strength of the sidewalk and will also serve as a drainage system. Water is carefully poured onto the laid and leveled layer of sand until puddles form on its surface. Two pipes are laid along the edges of the base, at a selected distance from each other. Sand is poured between them and leveled with a channel. The result is a smooth sandy surface.
The tiles are laid strictly according to the level of the stretched string. Its installation begins from itself. The tiles must be placed close to each other. Such actions will prevent the increase in seams between them. You can use crosses, then the distance between the tiles will be 2 mm everywhere. Its level is adjusted by adding or removing sand from under its layer with a trowel. The path is leveled with a mallet and checked with a building level. The resulting seams are covered with a layer of mixture, the components of which are cement and sand, and then watered with water.
Features of vibrocast tiles
After pouring the concrete solution into the molds, they are placed on a vibrating surface. As a result of vibrations, the solution shakes out and gets rid of excess air. After this, the forms are dried for several days. Final drying occurs after removing the tiles from the mold.
As a rule, such tiles are quite cheap, low-cost to produce, and are used for work on private households.
Beautiful ideas for the yard
Practice shows that original hand-made tiles often look more advantageous than factory-made ones. Solving this problem yourself is quite simple:
- Tiles in the form of leaves. The creation of such elements involves the use of a combination of gravel, sand and cement in a ratio of 3: 3: 1. To obtain such slabs, you can use any large leaves (optionally, burdock, zucchini or horseradish), carefully pressing their back side into the solution. Next, you need to put the tiles in the shade and spray them periodically. As soon as the solution has hardened by half, the leaves should be separated and the slabs should be left to dry.
- Concrete circles. Typically, such elements are placed surrounded by crushed stone or pebbles. Molds for round tiles are most often made from cut plastic buckets.
- Patterned tiles. The material of this decor is DSP, into the surface of which decorating elements are pressed - pebbles and shells, keys and coins, pieces of colored glass and much more.
Finally, it remains to be stated that laying paving slabs in a dacha is a relatively cheap and at the same time effective way to improve a garden plot. To make paths from such material with your own hands, you do not need to contact specialists or purchase expensive equipment. It is enough to adhere to the recommendations listed above, which will allow you to solve this problem with the least amount of time and effort.
In the next video, watch a master class on making paving slabs with your own hands
Materials
When constructing concrete paths, ready-made stones can be used. All materials for paving the path can also be made by hand. This approach will help save money, since purchasing components for preparing the solution separately is always cheaper.
Finished tiles
When constructing concrete paths, ready-made artificial stone can always be used. This category includes paving stones, vibratory stones and vibropressed slabs. Ready-made tiles are sold in a large assortment in construction stores. You can always buy paving stones, mosaics, textured tiles with patterns. Slabs imitating wood or expensive stones are in great demand.
Pouring into molds
Ready-made forms allow you to create materials that imitate natural stone and paving stones. A little imagination will allow you to create original paving slabs. Ready-made forms purchased in the store will ensure quick completion of the work. Time savings are achieved by eliminating the need to wait for concrete poured into forms to harden. Formwork forms can be made independently. To do this, you need to connect the slats in the shape of rectangles or other shapes. The concrete solution is poured into this form and quickly takes on its shape. To simplify the excavation, special handles are made. The oil-treated surface easily peels off from the concrete.
Monolith
The main advantage of such a path is durability. Compliance with the pouring rules ensures long-term operation of the structure. The surface can remain flat. Decorative cutting will create an imitation of paving.
Stamped concrete
When making such a track, special stamp molds are used. Ready-made models are sold in regular stores; the assortment is characterized by great diversity. The principle of their use is based on the imprint on the surface of a recently laid concrete mortar of a pattern simulating stone, paving stones and other materials. After removing the mold, an imprint remains on the surface of the track.
Colored concrete
Adding color to the concrete solution allows you to create a path of any shade. The finished track is resistant to ultraviolet rays and abrasion resistance. The concrete coating retains its original appearance throughout its operation. Dividing the work into two stages will allow you to save on color. First, regular concrete is poured, and a colored solution is poured on top. Colored concrete can also be decorated if necessary. It can be placed into molds, used for stamping, etc.
DIY tiles
Concrete slabs can also be made by hand. Tin is used to make molds. Pre-crumpled metal becomes like torn stone. Timber is inserted around the perimeter to create formwork. Tiles made in this way can take on a variety of shapes. In the manufacture of original tiles, scrap materials are used. The most commonly used cuts are wood, boards, large logs, and polyethylene. A material with a clear texture is used to make the bottom of the mold. Bars and films are used to create its walls. The burdock can be placed on the bottom and covered with film on top. The film must be pulled up and sand placed around the perimeter to the required height. Reinforced filling allows you to obtain tiles of the required strength. All elements differ in shape and size.
Which tile to choose?
Pedestrian paths are important objects in the country, ensuring free movement within the site. Paving slabs are most often used to organize them. This material has a number of important advantages, such as:
- environmental friendliness,
- reliability;
- durability.
Important! To lay such a path, the area must have a sufficient amount of free space.
This is a very important point, since in a limited area it is much more difficult to install a path, and its appearance will be less attractive. Experienced craftsmen do not recommend installation in rainy weather.
Variety of tile paths
How to choose a tile? When choosing this building material, you need to pay attention to the purpose of the future path. If this area is exclusively pedestrian, then for its construction you can use products whose thickness is 40 mm
Larger tiles can be used to lay out paths for vehicles to pass through.
You also need to pay attention to the shape of the tiles. The complexity of its installation depends on this factor.
Rectangular-shaped products are the most appropriate, since they are the easiest to make a path from.
Features of vibropressed tiles
During its production, everything is done the same as during the production of vibrating casting, only the solution is additionally compressed with special presses. This gives durability and greater strength at the end.
The drying process does not take place in an open space, but in a special chamber. This type of tile requires certain equipment for production.
Rules and tips
When buying tiles, the site owner should take into account that some of the material will turn into waste. First of all, this is explained by the cutting of paving slabs, which depends on the shape and dimensions of the elements used, as well as the method of their installation.
In addition, it is advisable to consider the following points:
- It is not recommended to build paths at a distance of up to 70 cm from trees. As the root system of the latter develops, it can seriously damage the created surfaces.
- If the traffic intensity on the paths is average, then in most cases a width of 0.8 m is sufficient.
- In situations where the owner of the site plans to use paths for transporting luggage in wheelbarrows or moving a large number of people, the width of the created coating must be increased by at least 20 cm.
- To ensure that subsequent work is carried out with the least difficulty, it is advisable to mark the outlines of future paths using a thin cord stretched between the pegs.
It should also be noted that paths laid out on a dry mixture or mortar on a crushed stone bed can support the weight of a passenger car. If you lay the materials on a base that is reinforced 1.5 times, you can get a path that even a medium-sized truck will not be afraid of.
Path layout and layout
Making a paving stone path begins with its layout on the ground. The approximate width of the building depends on your desire, and the exact width and length depend on the size of the tile itself.
When constructing this sidewalk path, ordinary gray paving stones with dimensions of 200X100X70 mm and curb stone (sidewalk curb) with dimensions of 1000X200X80 mm were used. The total width, taking into account the curb stone, was 76 cm.
Related publications
- Floor on the terrace: wood, plastic, ceramic, paving, other tiles. Pros, cons 12/17/2021
- How to make a foundation for a path from paving slabs - paving stones: diagram, layers, implementation 09/22/2017
Required tools:
- bayonet shovel;
- shovel;
- level - 2 pcs. (2m and 1m);
- rubber hammer;
- stakes with twine;
- log for compacting earth;
- watering can (hose with water);
- leveling devices - 2 pcs.;
- container for mixing concrete;
- a brush with stiff bristles;
- Bulgarian.
When you have determined the width of your future garden path, you can move on to planning the area. Before starting the main work, clear the work area from foreign objects and dense vegetation.
Drive two pegs at the beginning of the path and two at the end. Stretch the twine between the pegs, ensuring that the tension is strong. When adjusting the height of the strings, keep in mind that the plane between the strings is the plane of your future path!
Use a building level to align both strings at the same level in two planes (lengthwise and crosswise).
The distance between the strings is equal to the width of the planned path (the width of the laid tiles and two borders) plus 15 - 20 cm (a distance from the borders of 7 - 10 cm on each side).
Design of paths made of paving slabs ↑
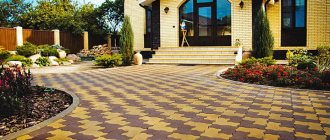
Even from identical squares you can lay out beautiful garden paths from paving slabs. And if you use different colors, sizes, shapes and layouts, then the number of design options increases to infinity.
Square shapes are laid seam-to-seam (for example, a two-color checkerboard layout), offset, or diamond-shaped. For garden paths made of paving stones, popular laying patterns are herringbone, wicker, and brick bond.
There are a lot of options for paving garden paths with paving slabs. If desired, you can lay out any complex ornament. The main thing is not to forget about the basic landscape design style of the site. Modern materials are not always appropriate; in some cases, products aged using special techniques are needed.
Decoration of steps with inserts of luminous LED elements
Concrete preparation and mixing
Based on the calculations, a mixture of cement, sand and crushed stone is prepared, to which water and plasticizers are added. The composition is mixed and brought to a homogeneous creamy consistency of medium viscosity.
Crushed stone is used in medium fractions, 10-20 mm in size. When constructing paths with increased load, it is recommended to use crushed stone with a fraction of 40 mm.
It is advisable to mix the mixture using a concrete mixer, especially for large volumes of work. If you don’t have a concrete mixer, you will have to make the solution manually. To do this, all the components are poured into the container and thoroughly mixed with a shovel, after which water is poured into the mixture and mixed again until a homogeneous mass is obtained.
Mixing the solution.
It is advisable to use plasticizers in small quantities in order to make it more convenient to distribute the fill throughout the trench. Too much additives can reduce the strength of the concrete grade.
The simplest plasticizer additive can be prepared independently using the following starting materials:
- silicate glue;
- slaked lime;
- PVA;
- any detergent.
Instead of silicate glue, you can use liquid glass, and washing powder or laundry soap is suitable as a detergent.
If the paths are planned to be colored, then pigment dyes of the required color must be diluted with the concrete mixture.
Pouring the path with concrete
Pouring concrete is another way to beautifully design a path in your summer cottage. The process includes the following stages:
- Marking the area allocated for the path.
- Soil preparation.
- Installation of formwork.
- Forming a pillow.
- Installation of reinforcing elements.
- Direct pouring of concrete.
First you need to prepare all the necessary tools and materials, such as:
- crushed stone;
- sand (river);
- concrete;
- cord and pegs;
- container for stirring the solution;
- roofing felt;
- bucket;
- a shovel with a pointed end;
- Master OK;
- reinforcement (recommended thickness - 12 mm.)
- plywood or formwork boards.
When all the necessary tools have been collected and prepared, you can proceed directly to the manufacturing process.
First you need to mix the solution in the required proportions, consisting of sand (3 buckets), cement (1 bucket) and crushed stone (1 bucket). It is best to mix in a concrete mixer, as it is difficult to achieve the result by hand.
First of all, water is added to the concrete mixer. Then sand and gradually, in small portions, cement. When the sand is evenly distributed throughout the entire mass, the solution is considered ready. Then they start pouring.
Filling takes place in several stages. The first and simplest is marking. You need to determine in advance where the path will go, what the length and width will be, what you plan to use it for, what loads it will have to withstand. Then pegs are driven into the ground, between which a rope is driven.
Now you need to prepare the ground. To do this, remove the top layer of turf, 7-8 centimeters, remove all plant roots and other unnecessary elements. If they are not removed, then the process of decay will begin in these places and voids will form in which water will accumulate. In cold weather, it will freeze and, expanding, press on the concrete, it will begin to crack. The final stage is the installation of formwork made of plywood or boards.
Then a cushion is installed, which is designed to serve as drainage and allows you to evenly distribute the load on the surface. It is made from sand and crushed stone. These materials do not retain water, and in winter there will be no problems with freezing and expansion.
But there is one point: over time, the sand sinks below the crushed stone, and to avoid this, waterproofing materials such as roofing felt, geotextile or agrofibre are laid on the ground. The last two options allow water to pass through, but do not rot. After the pillow is laid, it is well compacted.
An important point: dry sand must first be soaked, due to this it will be compacted, and the appearance of voids can be avoided. But you need to carefully ensure that the layer lies evenly.
Next, you need to lay the reinforcement or mesh on a path previously covered with plastic film. The film is spread to avoid premature drying of the concrete mixture. Now you can fill. If a pedestrian zone is planned here, the cushion and concrete should form a layer that is 5 cm or more thick. If you plan to use the road for other purposes, for example, for driving a car or other types of equipment, then the recommended thickness increases to 7.5 centimeters.
Cement is poured in portions, when the mixture dries, it is leveled with a spatula. If your imagination runs wild, you can also add decorative elements. Next, the cement is covered with a film and the humidity level is maintained by periodically watering. If you plan to pour cement in parts, then the intervals between pours should not be more than 1 day. Otherwise, there is a risk that the bottom and top layers will not stick together. Then they wait about three days and remove the formwork. After another three days you can use the finished path.
Classic concrete path
Monolithic concrete covering is the most reliable and relatively inexpensive option. If you follow the technology when pouring, the structure will last at least 30 years. The main disadvantages are the labor intensity and length of the process, because the concrete mixture hardens within 4 weeks. During the hardening period, the path cannot be used. Therefore, do not rush to plant flowers near the future path, where you will have to arrange a temporary passage.
To pour concrete paths with your own hands, you need to prepare the base, as described in the previous section. Then proceed in the following order:
- Install curbs or assemble wooden formwork for laying concrete.
- Prepare the tools - a building level, a trowel and a rule made according to the width of the monolith.
- Tie a mesh of reinforcement Ø8-12 mm with cell dimensions 150 x 150 mm and install it on top of the crushed stone bedding, using stands 3-5 cm high.
- Mix 1 part of cement grade 400 with 2.5 parts of sand and 4.2 parts of crushed stone with a particle size of up to 20 mm. After mixing the mixture with water, you get concrete M 200.
- Place the mortar in the formwork to a height of 12-15 cm, leveling it using the rule. The task is to make a flat surface with a slight slope on one side, ensuring the drainage of water from precipitation.
- Divide the reinforced concrete monolith into slabs using expansion joints at intervals of 2-2.5 m, installing transverse boards.
- Wait 7 days and dismantle the formwork. Final hardening will occur after 28 days.
You can beautifully design a concrete path at the pouring stage, using special plastic molds that imitate natural stone. The decoration is simple: a form (preferably several) is immersed in fresh concrete and pulled out after initial setting. In order not to buy ready-made frames, savvy craftsmen have adapted to making homemade items from metal; the technology is shown in the video:
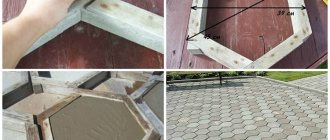
How to make wooden formwork for garden paths yourself?
Making formwork with your own hands is not difficult. The best material to use is pine boards; this wood is quite soft and can be processed well. For the base of future formwork, it is optimal to use a sheet of laminated plywood.
The algorithm for making formwork is as follows:
- boards with a thickness of at least 25 mm and a height of 50 mm are attached to the plywood around the perimeter;
- internal division into segments is done either with thin boards or plywood, the latter is preferable because will reduce concrete adhesion;
- the elements are attached to each other, it is better to use grooved connections;
- it is advisable to treat the boards with formwork impregnation (emulsol) or cover them with linoleum;
- if necessary, fix the shape by driving in fixing pegs along the outer perimeter.
You can make several formworks of various shapes with your own hands without dividing them into sections. Thus, work on the formwork will be reduced to a minimum, but the construction of the path may be delayed.
Laying concrete mortar into formwork for a garden path
The optimal solution is a multi-sectional form, with internal division into rectangular segments of different sizes. The resulting road slab will look neat and stylish.
Creating tiles for a garden path
When building a garden path with your own hands, you can go the simplest route and buy a ready-made solution for paving slabs. However, making your own solution is not at all difficult; for this you will need:
- cement-sand mixture;
- plasticizing additives (increasing the mobility of the solution and reducing cracking);
- coloring pigments with which you can create multi-colored tiles;
- crushed stone, pieces of tiles, stones to create a mosaic.
The tile mixture is prepared as follows. Pigments and plasticizer are dissolved in water and added to the mixture. The resulting solution is thoroughly mixed and water is added if necessary.
Decorative elements are laid out at the bottom of the formwork (if provided for by the design of the path) and filled with the resulting solution. When laying the form, you need to shake it a little so that the solution is compacted and does not form voids.
In summer, the slab will be ready in 3-5 days, depending on the thickness. In winter, this time will double.
PoFundamenty.ru
Economy option - embankment paths
Although simple, compacted stone stitches offer the following benefits:
- cheap construction;
- absence of puddles on the surface - water goes through the gravel into the ground;
- a correctly laid embankment has an attractive appearance, which is reflected in the photo.
Nice gravel path near a pond
It is difficult to build a crushed stone path on a slope, so for a sloping landscape it is worth choosing a different solution. The second disadvantage is the need for constant care. Needs backfilling, leveling, removal of overgrown grass
These works are carried out annually, usually in the spring, after the snow melts. To implement this inexpensive option, you will need fine crushed stone or gravel, geotextiles and sand.
Foundation construction step by step
To begin, mark the paths on the site in any convenient way - using twine and pegs or sprinkling with lime. Then remove the turf and proceed to laying the base according to the instructions:
- Dig a hole at least 150-200 mm deep along the marking lines and compact the bottom with a tamper.
- Cover the dug profile with geotextile fabric and install borders along the edges.
- Fill the sand cushion to a height of 7-10 cm (a mixture of gravel and sand will also work). Tamp down thoroughly and water.
- Make a base of coarse crushed stone 80-100 mm thick, level and compact. It is allowed to use broken bricks and various natural stones. Large boulders should be broken.
Making the finishing fill
In order for the path to serve for a long time and not sag under load, it must be covered with an even layer of fine crushed stone and compacted thoroughly. Perform the operation in several stages, achieving maximum coating density. Mechanization tools - a manual roller and a vibrating plate - will be very helpful.
There are no more tricks in the construction of embankment paths. Homeowners often lay similar stitches between the beds in their vegetable gardens to ensure they can walk comfortably in wet weather. When laying in a country yard, there is a way to bring beauty: combine a gravel embankment with flat stones or decorative slabs, as done in the photo.
Preparing the base for a garden path
The beginning of the preparatory work for the path with your own hands is to create a trough. You will need a shovel; using it, carefully remove the plant layer (about 15 cm) along the entire expected width of the future path. When the trough is ready, we proceed to the second stage - pour a layer of small crushed stone and compact it into the ground using improvised means or by hand. An important point in the manufacture of garden paths, on which the service life of the structure depends, is drainage. To prevent water from washing away the frame, pour a layer of crushed stone (strictly from 10 mm to 40 mm in diameter) 5-7 cm thick. And finally, the last thing: a sand cushion. Pour a 5 cm layer of dense sand. Don't be discouraged if the frame of the path is not as smooth as you would like, the main thing is that the thickness of the trough is the same everywhere.