Author: Yuriy Fedorovich Kolesnikov, thermal power engineer
How to build an outdoor stove with your own hands is a relevant question both for residents of non-gasified regions and for inhabitants of completely civilized places. The first are interested in the opportunity to cook food in the warm season using waste fuel (dead wood, dead wood, construction chips) - a home heating and cooking stove in the summer is not very economical, and it makes the house very hot while cooking dinner. Secondly, the opportunity to sit by the fire in the gazebo or on the lawn in a relaxation corner at the dacha or on your own property, while at the same time preparing shish kebab or barbecue ribs, without shelling out a mind-boggling amount for a turnkey branded garden stove. Both are also attracted by the opportunity to receive home-smoked products that are obviously not adulterated and are much cheaper than store-bought ones.
What do we want to get from the oven?
The construction of a street fireplace solves many simple routine tasks that seem incomprehensible and irrelevant to an urban person from the outside. With the help of an open-air stove, you can do everything: cook food for yourself and your pets, do canning, bake bread and dry mushrooms, quickly heat water and, in the end, just burn some garbage, old branches.
There are a great variety of options for garden and outdoor fireplaces - these are barbecues and barbecues, fireplaces and analogues of potbelly stoves, tandoors and smokehouses, cauldron and cooking stoves. They all have their own purpose and their own characteristics.
Next we will talk about the brick cooking stove, as the most versatile. It is clear that it must be practical and functional, safe and durable, compact and prefabricated, and at the same time, also budget-friendly.
Pros and cons of brick stoves
Brick kilns have a lot of advantages:
- Reliable heat storage.
- Long-term temperature retention.
- As the oven cools, it absorbs the steam that was released when it was heated.
- Brick kilns are economical.
- The surface of the oven does not get very hot, which makes it safe.
As for the downsides, there are some. A stove with a large area will have to warm up for a long time. The stove itself takes up a lot of space, and malfunctions in the design of the stove can cause improper functioning.
Where to begin
It is best if, before starting any work, you draw up a detailed drawing (order) with the exact location of each structural element, and first develop an action plan. Decide on the location, design, purpose, and size of the stove. In fact, such a painstaking approach will save you time and help you calculate the exact amount of building material needed.
To build a stove, ideally you need to use a new heat-resistant brick, without damage, with clear geometric dimensions. This allows masonry to be done with a minimum layer of clay mortar, which is an important unwritten rule for a “seasoned” stove maker. To save money, of course, you can use used bricks, but they must be clean, smooth and certainly fireproof.
One of the most important issues that needs to be resolved is preparing the correct solution. The main thing is that it is not very greasy, but moderately plastic. An excessively fatty solution will crack when drying; a thin solution will not have sufficient strength.
Much depends on the characteristics of the clay available to you. There is one that is suitable for masonry without filler; fatty clays are mixed with sand (preferably not river sand) in various proportions (most often 1:1, 1:1.5, 1:2).
There are many ways to check the characteristics of the solution, the simplest is to prepare samples of different proportions, mold them into balls and throw them onto the floor from a height of 1 meter; if the ball crumbles or cracks appear on it, then the solution contains too much sand. Experiment by changing the percentage of filler, you will definitely find a happy medium.
The clay must be soaked in advance (2-3 days in advance) in a suitable container, then, adding sand little by little, knead it using feet or a tamper so that there are no lumps left and the solution becomes homogeneous. Be sure to feel it with your hands for the presence of unnecessary impurities, clots, and pebbles.
Experienced stove makers recommend sifting or grinding all the ingredients and the finished mixture through a sieve. Do not doubt that you will make up for this time when laying, especially since for a hundred bricks you only need about three buckets of mortar.
In construction supermarkets you can purchase ready-made dry mixtures for laying stoves. Convenient, but expensive - not suitable (we have a budget option).
Handy tools
A set of necessary tools is also collected in advance. It should consist of:
- Angle grinders 230;
- Angle grinders 125 (not necessary, but preferable so as not to rearrange the wheel and cup);
- extension cord with a tee (so as not to switch sockets);
- level 80 cm;
- level 30 cm;
- metal ruler 1 m;
- tape measures 3m;
- masonry trowel;
- regular and rubber hammer;
- a mixer with a nozzle for preparing a solution or a drill with adjustable speed;
- buckets for mixing the solution;
- containers for soaking bricks;
- hand and brick rags;
- concrete mixers (although you can mix by hand);
- shovels.
Types of outdoor stoves
Today there are many different options for stoves that can be used outdoors. From the simplest ones, which even a person without much experience can build, to complex complexes. They all differ in their purpose, functionality and capabilities.
Simple outdoor stove
This is a classic model with a hob in the form of a solid plate or with burners. The construction of such a structure is not particularly difficult and is accessible to an inexperienced craftsman with minimal knowledge of the basic technologies for manufacturing stove structures, installing mortar and laying bricks.
A simple outdoor stove is small in size - usually not much larger than a hob, which is installed at a height of a meter from the ground. The length of the chimney is 3-4 m, this is quite enough to create normal draft.
You are unlikely to cook gourmet dishes on such a stove, but it will perform its main function. In addition, its construction will cost very little, which is a determining factor for many.
Classical
This is the simplest and easiest option for making a stove. Moreover, this design is unpretentious, and almost any material can be used as fuel for it: wood, coal or dry branches collected on or around the site. Among other features, in addition to versatility in the choice of fuel, note:
- simple model making;
- small sizes;
- economical design, since no more than 200-250 bricks are used;
- unpretentiousness to weather conditions (it can be used constantly).
A classic stove consists of the following parts:
- the foundation is at the very bottom;
- ash pit (installed after the foundation);
- smoke channel;
- firebox;
- hob for cooking (basically a metal plate);
- It is possible to install an additional tabletop.
This structure is quite bulky, but the dimensions themselves are small. However, with the help of such an oven you can cook a variety of foods. The average height of a classic stove is no more than 1.5 meters, taking into account the height of the chimney, the dimensions of which vary within 40 centimeters. This is enough to ensure good traction in the design.
The firebox and ash pit are located at a height of two or three bricks from the level of the foundation. The dimensions of such a structure are determined depending on the purposes of its use, as well as on the desired efficiency indicators (efficiency).
Brazier/grill
The barbecue oven is the most common element of a brick barbecue complex. Serves for cooking vegetables, meat and fish on the heat of smoldering coals obtained by burning wood or using ready-made ones. In this case, the product is prepared not only due to the influence of thermal radiation, but also the flow of hot air. Dishes are fried in their own juices, so they do not contain excess fat and there is no carcinogenic effect of oil.
We recommend: How to install electricity on a site: light on a summer cottage, what documents are needed for connection, without a house, private housing construction
In barbecue complexes, the barbecue and grill are one and the same element, differing only in the method of cooking food over coals:
- in the barbecue, a skewer is used - a metal rod in the form of a long knife, with a pointed end on one side and a twisted end on the other;
- In a grill, the working equipment is a grate located directly above the coals, or a double-sided wire mesh, between which the product is clamped.
By design, a stationary outdoor brick grill can be of an open or closed type, allowing combustion products and odors to be removed outside.
Fryer/Teppan
This small frying surface is usually installed in a barbecue on a specially prepared stone tray. It has a smooth metal surface used for frying foods. There is a small groove around the perimeter to remove excess fat and juices.
Smokehouse
The smokehouse is rarely installed separately and is usually built into a barbecue complex. However, this is not the best solution. The fact is that the temperature in the chamber must be maintained at a certain level:
- for hot smoking - up to 85-120 °C;
- for semi-hot - 60-70 °C;
- for cold - 35 °C.
It will be quite difficult to accurately regulate the temperature using a firebox that is designed to emit thermal radiation. The stove is not the best smoke generator. Therefore, if possible, it is better to arrange the smokehouse separately. If not, you can use alternative options - build it into a complex, oven or barbecue. In this case, it will be necessary to accurately calculate the length of the gas duct in order to obtain the required temperature regime.
As is clear, the smokehouse is a rather capricious design. You will have to adapt to it. In addition, it is unacceptable to use the smokehouse in high humidity, wind and subzero temperatures. In this case, acidic dew may form on the surfaces of the chimney and hood, destroying the materials.
Smokehouse built into the barbecue complex
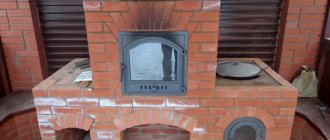
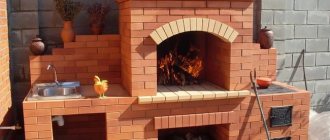
B-B-Q
A popular type of garden stove. In the classic version, it is created from fire-resistant red brick; inexpensive ones are made from metal and heat-resistant mixtures.
A mandatory element of such a structure is an arch or other ceiling rising above the steel slab. It protects food and fire from environmental influences.
Photo: barbecue oven made of blocks
It is possible to supply communications to the barbecue, install a cutting table, sink, and cabinets for kitchen utensils.
The optimal dimensions of this type of oven are:
- length – 1.8 m;
- width – 0.9–1 m;
- height with chimney – up to 1.85 m;
- number of rows in height – 27.
Main details:
- firebox;
- grate;
- blower;
- chimney and adjacent channels;
- platform for dishes;
- arched vault;
- metal rod for smoking (installed in the chimney at the discretion of the owners).
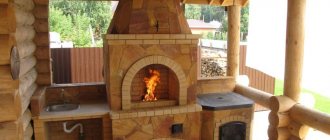
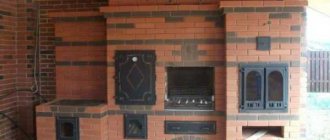
Oven with hob
A simple and inexpensive product for the garden - compact. Works on any solid fuel. The construction is based on a rough oven. A cast iron or steel plate is installed on top, which can be:
- Whole. Avoids cooking over an open fire. Used for stewing and simmering foods.
- With burner holes. With the lid open, the food will turn out to be fried over a fire; with the lid closed, it will cook slowly.
Photo: homemade cooking stove
The minimum dimensions of the slab are 40x40 cm. It is mounted on the fourth or fifth row of bricks above the firebox. The height of the device with a chimney is 1.2 m–1.5 m.
Fireplace
This unusual design for heating a room can also be used in the yard. An outdoor fireplace is a universal combined version of a barbecue and grill, with a grate and a spit. It takes up little space, so it can be installed even in a small summer cottage. You can cook meat or fish in it. Unlike other stove designs, it has a wide firebox.
Stone fireplace
Factory fireplaces are made from heat- and moisture-resistant materials. They can be easily painted in the desired color and have a fireproof cladding.
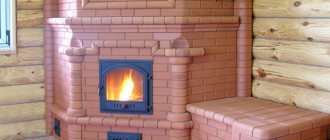
Russian stove
The street version is intended only for cooking. The side walls are additionally insulated, which reduces fuel consumption and allows the structure to be used even during the first frosts. The firebox together with the hearth are placed strictly horizontally. If necessary, it is equipped with a stove for a cauldron and an oven.
A Russian oven will produce delicious pastries, bread, meat and stewed vegetables. Decoration in the national style will make it the highlight of the estate, the pride of the owners.
Dutch
The Dutch analogue is an excellent option for a seasonal dacha. The duct design is simple, installation is simple, and it can be used to heat several rooms. The classic option is a mini brick oven.
Classic Dutch
Compared to the Russian one, this product is significantly smaller in size, which is a definite plus, especially for small houses. She will not block the passages. Minimum dimensions – 50x50cm.
Dutch ovens are considered budget-friendly because their construction requires less material and significantly less fuel for heating. The design channel feature of the Dutch oven allows it to warm up in a short time, showing good efficiency indicators.
The thin-walled partitions of these models, combined with their small dimensions, make the Dutch one light in weight, therefore it can be erected not only on the first floors, like a Russian one, but also on the second.
The disadvantages include:
- demands on building materials for heating the furnace;
- use of dry, high-quality firewood;
- when the view is open, reverse thrust is sometimes observed;
- They use smoldering mode for heating, and this is unsafe.
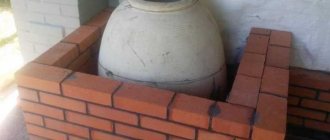
How to use tandoor
The tandoor has a chimney and a smoke collector. Above the truncated firebox there is a hood with a door into which fuel is loaded. It burns on the grate. Products are placed inside, raw, on the walls directly above the neck of the device. You can bake round cakes, meat or fish.
Photo: stationary tandoor made of stone
The materials used are clay ceramic bricks and stone blocks.
The bricks are laid vertically or horizontally, but in the latter case the walls of the tandoor will retain heat longer. Can be placed in the garden, near the gazebo.
Tandoor
The idea was taken from our neighbors in Asia. The brick or stone is laid in a row: horizontally or vertically (if the rows are horizontal, the heat lasts longer) so that the stove looks like a truncated cone. A very simplified option would be a barrel, the surface of which is coated with heat-resistant clay.
The flame is lit at the bottom of the oven. The heat rises, uniformly heating the walls. You can cook up to three dishes at the same time: shashlik, flatbreads, vegetables, fish, and also make traditional desserts from Asia (gogal and baklava). A cauldron is placed on top of the summer stove, where you can cook pilaf.
The tandoor has an advantage over the barbecue: the food is baked inside the oven, remaining juicy and without burning. Portable ceramic tandoors are available for sale. Their capacity reaches 8 kg.
Swede
A Swedish stove is a compact stove for cooking food and heating your home. It is similar to the Dutch one because it has similar dimensions, also starts up quickly and quickly begins to give off heat.
Swede
The presence of a brewing compartment in this design adds its own peculiarity. With the help of a Swedish stove, you can warm several rooms, as well as cook food. It does not have an oven, but the hob is enough for basic needs.
We recommend: Garage dimensions: standard garage parameters for a passenger car, what should be the minimum width, optimal size
Heating of several rooms occurs due to the specific placement of the Swede - the location of the stove in two adjacent rooms at once. The front side of the stove, where there is a hob, faces the kitchen, and the back heating side faces the other room.
The disadvantages are similar to the Dutch one - requirements for building materials, fuel, rapid cooling, smoldering mode.
With oven
An outdoor stove for cooking can also be built with an oven. This is one of the most difficult options for building an outdoor stove, and it is recommended to entrust such work to professionals rather than installing it yourself. The difficulty lies in the fact that the oven is installed during the construction of the oven itself. You can also make an oven out of brick, but in this case it must be equipped with a hermetically sealed door, which is a difficult task. Then such a design has the right to be called a stove with an oven.
The dimensions of such an oven differ depending on the dimensions of the oven. The parameters of the entire oven may vary. The width is about 1.2 meters, the length is about 1.6, and the height including the chimney is 2 meters. This design differs from other structures in that it does not have space for cooking on a stove or open fire. The building is equipped only with a built-in oven.
Finnish
It's a barbecue oven. Furnaces of this type are used very widely. Below there is a place for building a fireplace, above it there is a “shelf” for a cauldron, and above it there are special nests-protrusions for skewers and grates.
The advantage of this type is compactness.
Note! Finnish stoves are installed in small garden plots and even in covered gazebos. In the latter case, a hood should be installed in the canopy above the stove.
Potbelly stove
A regular small wood-burning stove made of metal is the simplest stove option for cooking outdoors. This can be an ordinary potbelly stove or a full-fledged stove with a cooking surface and even an oven with temperature sensors. They are unpretentious in relation to fuel - firewood, coal, and pellets are used.
Other possible options
Entire furnace complexes are available for sale, which can be equipped with the following:
- barbecue;
- two or more fireboxes;
- stove;
- washing;
- smoking device;
- lockers;
- section for baking pizza;
- spit.
Lighting and water supply can be supplied to the complex.
Gas stove in the country
If your dacha is located on a gasified area, then you can choose a gas-powered stove for heating. However, it is absolutely impossible to say that it is the best option. Unless you are at the dacha only in winter and then extremely rarely.
A gas stove can be used as a heating and cooking stove, but it is more suitable for cooking rather than for heating a room. Therefore, if you are interested in the option of heating rooms with gas, then it is better to choose a fireplace, which we have already talked about.
Welcome to visit
After completing the construction of the stove, you can invite guests, but for this you need to arrange a recreation area around it. the area around the stove with tiles . If the dining table is not located in the gazebo, then it is worth considering what the patio will be like: laid out from the same tiles or made from decking boards. You can also make tables and benches yourself. Photos and detailed descriptions of the works can be found in large quantities on the Internet. The base columns for benches and tables can be made from leftover bricks, because after building a garden stove out of brick yourself, this will not cause much difficulty.
Folded strictly according to the design, in accordance with the order and using high-quality materials, the stove will serve faithfully for many years, gathering all your family and friends at your hospitable table. Many people make stoves in the garden with their own hands; there is no need to be afraid of difficulties.
Types of garden stoves
Criterias of choice
You need to select equipment for heating your home in such a way that it provides complete heating of the existing room, based on its area. A wood-burning stove, for example, is a fairly simple and economical device that quickly solves the problem of warming the inhabitants of a country house.
The following features are important when choosing:
- compactness and simplicity of design, especially if the house is small;
- safe operation in houses made of any material, tightness of the chimney, compliance with draft parameters;
- resistance to natural factors during periods when the stove is not in use;
- quick kindling, quick heating of the room, heat retention for a long period of time;
- the presence of a convenient door that allows you to use the device as a fireplace;
- arrangement of the hob;
- preferred fuel for heating – it is advisable to opt for more versatile models;
- mobility, ability to move if necessary;
- built-in units for connecting the hot water system in the house.
Selection of location
Drawing up a project begins with linking the hearth to a place on the site. The best option is to place it next to a previously built gazebo, canopy or terrace. If the yard is being developed from scratch, the stove should be assembled as far as possible from the house to eliminate the possibility of smoke and fire.
The fireplace must be located at a distance of at least 1 m from the fence, barn, garage and other combustible buildings. There should be no trees or bushes nearby, and no underground utilities under the stove. If possible, you should build the fireplace downwind of the house. It is also recommended to provide for the future availability of space for a platform, tables, benches and chairs.
Making a stove with your own hands
Regardless of the type of structure chosen, construction includes five stages:
- Preparation of the project and drawings.
- Choosing a place where the stove will be located on the site, taking into account its dimensions and maximum fire hazard.
- Providing the necessary materials and tools.
- Premature preparation of the site for construction.
- Pouring the foundation.
- Construction of the furnace.
Materials and tools
The stage of selecting materials and tools is important, and they must be selected carefully. It is necessary to understand that the impact of various factors on the finished structure will be not only from the inside, but also from the outside (rain, snow, etc.). Required materials for purchase are:
fireclay - used for areas that are exposed to open fire;
- facing brick - for the construction of all visible walls of the stove;
- for the foundation it is necessary to make concrete from sand, cement and crushed stone;
- clay;
- metal grate;
- to reinforce the foundation or create a smokehouse, you will need reinforcement;
- ash door and firebox itself;
- hob.
Essential tools are considered:
- buckets - for garbage and water;
- hammer;
- shovel;
- drill with a set of drills.
Preparing the necessary tools
Next, we begin to prepare the tools.
The following will be required:
- Rule for leveling surfaces.
- Hammer-pick for cutting bricks.
- Veselka for grinding the solution.
- Kiln hammer for splitting bricks.
- Broom for cleaning the channel from dirt.
- Level to control the evenness of the rows.
- Marking rod.
- Plumb bob for checking vertical surfaces.
- Pliers, rasp, chisel, containers, sieve and construction angle.
Preliminary site preparation
At this stage you won’t have to spend a lot of time, but, on the other hand, you need to do a fair amount of work. The main actions will be:
- removal of unnecessary objects on the site, trees, bushes, etc.;
- cleaning up all rubbish;
- surface leveling;
- preparing a pit for pouring the foundation.
Choosing a place for the stove
Although installing a stove does not require a huge area, you still need to pay special attention to the choice of the place where it will be located, because your safety primarily depends on it. When creating a construction plan, it is worth considering the following factors: (See also: Do-it-yourself brick oven)
- the smoke channel is considered one of the most fire-hazardous places in the stove, so it should be located at a distance of 37 centimeters from any wooden structures along the perimeter of the site;
- due to the fact that for normal operation of the stove it needs good draft, during construction the chimney must be placed so that it rises half a meter from the ridge, so be sure to take this into account when choosing a location;
- try not to combine the foundation of the furnace with a common residential building.
A homemade outdoor stove can perform several functions, so before creating a drawing and diagram, you should decide what exactly you want. In general, whether it will be a means of heating or a “cooking stove” will not have much significance for the drawings; you will just have to make some adjustments, but when purchasing material you need to be more careful. Having chosen the type of stove, accurately calculate the number of bricks that will be needed so as not to end up in an unpleasant situation later. (See also: How to make a chimney for a potbelly stove with your own hands)
Installation of the structure
In addition to preparing the area for construction, an outdoor summer stove requires careful and high-quality construction. Anyone can clear a place of debris and even pour a foundation, but only a master can lay a brick correctly and evenly. The construction of the stove includes the following steps:
- Preparing concrete and pouring the foundation.
- Laying the first row of bricks.
- Installation of blower and smoke ducts.
- Installation of the firebox and metal grate directly.
- Attaching the hob.
- Construction of a chimney and hood.
We recommend: How to close vents in the foundation for the winter
The foundation must be very strong. This determines not only how well it will withstand the structure, but also whether the structure will be subject to destruction due to soil landslides. It is prepared this way:
- First you need to dig a pit to fill it. The depth is approximately 30 centimeters or a spade bayonet. The width and length should extend 40 centimeters beyond the corresponding dimensions indicated in the drawing.
- The pit is filled with a 15-centimeter layer of sand to create a cushion.
- Then a 15-centimeter layer of crushed stone is added and the pit is leveled with the ground.
- Install formwork 8-15 centimeters high. The foundation is poured last and reinforced.
After laying each row of bricks, it is necessary to treat the surface with a solution of clay or fireclay to avoid cracking when heated. The order of laying bricks depends on the element being installed. During installation, after each installed brick level, the level is checked. If a bevel is detected, it must be leveled before the solution hardens.
We must not forget about the emergence of possible difficulties during masonry. For example, the solution may take a long time to harden or crack. To avoid this problem, it is necessary to create an optimal temperature by gradually heating the structure.
If the chimney is placed incorrectly, there may be no draft in it. When a problem is discovered after construction is completed, the only option is to completely dismantle the structure.
Foundation
Under a large complex, you will have to make a reliable foundation , with a depth below the freezing point of the soil (it is different for each region, you can check it with familiar builders). The foundation must be reinforced. On soils with heaving soils, it should have a trapezoidal shape.
If the garden stove is small, then an ordinary slab 10-15 cm thick is sufficient. To construct it, the fertile layer is removed, a hole 40-60 cm deep is dug, 10-15 cm of sand is filled in, compacted, after 30-40 cm of gravel. The formwork is being exposed. Reinforcing mesh is placed in it and everything is filled with concrete. It is better if the foundation is 50-100 mm above ground level.
How to protect the oven from moisture
Protecting the stove from rain is also of great importance, because unfavorable weather can not only ruin your plans, but also worsen the condition of the stove. The best way in this situation is considered to be a small roof. It’s up to you to decide what to construct it from; the most important thing is that the material must be resistant to natural influences and completely cover the device. If desired, the roof can be extended, then it will perform a protective function not only for the stove, but you will also be able to hide there from bad weather.
Also a good, but rather labor-intensive remedy for rain is the construction of a protective block. This issue must be addressed even before the construction and design of the furnace itself, because there are many points to consider here related to fire safety and proper operation of the furnace. This design will take up more space, but will be much more reliable; in addition, inside the block you can organize a place for rest and storage of firewood. When designing, do not forget that the material used must be fire resistant.
You can build a stove outdoors with your own hands in a couple of days at most, and use it for a long time. After completing construction, start finishing the device, because the design can be anything. Starting with regular whitewashing, ending with jointing and plastering. The first option, although considered outdated, is the fastest and most economical, while the second method involves decorative finishing of the stove, which will give it a stately appearance. Moreover, you can purchase additional elements, such as niches, shelves, canopies, using which you will make the structure not only beautiful, but also more practical, because there will be a place for things.
Finishing
After the work with the brick is completed, you can inspect the brickwork again and open the seams additionally. Typically, DIY garden stoves are not plastered or lined with stone. If desired, this can be done if the design idea requires it or when a modern building is very different from the surrounding environment of the old dacha. Next to a small whitewashed house, a plastered stove decorated with paintings or tiles will look more harmonious. A stove in the depths of the garden, lined with natural stone, will look original, but if it stands on a lightweight foundation, this should not be done.
Pipe installation features
The chimney is made from a galvanized pipe installed on the back wall and a metal strip, with a diameter of 150 mm and a height of 3 meters. The junction of the chimney with the stone base is insulated with wet asbestos, covered with bricks, and lightly plastered. We fix the top of the pipe with diagonal spacers from the CD profile.
We put a deflector (cap, fungus) on the head of the chimney. It provides protection from rainwater entering the stove and from gusts of wind that disrupt the smoke flow.
The chimney is unfastened from the roof
It often makes sense to install a spark arrester on the pipe - a wire mesh with a fine mesh.
In places where a chimney is located close to wooden structures, it is necessary to use thermal insulating gaskets made of asbestos sheets.
Using a grinder, at a height of 2 meters, we make a slot in a metal pipe for installing a valve (gate). It serves to regulate stove draft by blocking the smoke channel.
Stainless steel pipes specially designed for chimney installations are available for sale. They are durable and have a beautiful appearance, but their price is a little bit high.
Calculation of basic parameters
Before choosing a working design for a heating device, it is necessary to make a preliminary calculation according to the parameters of a particular room. The most accurate method is to determine the dimensions based on the heat output of the furnace. In order not to go into complex calculations, for well-insulated houses they use a simplified calculation scheme proposed by I.V. Kuznetsov. This method uses the average thermal power removed from one square meter of the surface of the unit (TMEP). For a conventional firebox, take the value 0.5 kW/sq. m, and if intensive heating is necessary, which occurs during severe cold weather - up to 0.76 kW/sq. m.
In principle, these values are enough to select a suitable project from those that can be found in the public domain. If the available options are not suitable for any reason, then you will need to calculate the parameters of the main elements of the furnace and design your own design.
Firebox
The dimensions of the firebox are determined based on the maximum volume of the fuel fill. In this case, the amount of combustible materials is calculated using their calorific value and specific gravity, focusing on the required power. The volume of the firebox should be 2–3 times larger than the obtained value, which will allow the stove to be reheated at extremely low temperatures. When calculating the size of the combustion chamber, it is necessary to take into account that the maximum filling should not exceed 2/3 of the volume of the combustion chamber. In addition, the dimensions of the firebox and all its components must be adjusted to the size of the bricks used for laying the stove. In your calculations, you can use special tables designed taking into account the need to heat rooms of various sizes.
Calculation table for the main elements of a brick kiln
Ash pan
The height of the ash pan depends on the type of fuel used. For low-ash combustible materials such as coal or peat briquettes, this value is taken equal to 1/3 of the height of the firebox. If the stove is heated with wood or pellets, then the height of the ash chamber must be reduced to 1/5.
Chimney
When calculating the chimney, it should be taken into account that the place of its installation must comply with SNiP
Unlike gas heating equipment, wood stoves do not require much draft, so the best shape for the smoke channel would be a rectangle. When calculating the chimney, it is taken into account that the cross-section of the blower should not exceed the area of its flue, and all values are adjusted to the dimensions of a standard brick. Since accurate design requires operating with a lot of data and parameters, it is best to use one of the special programs. However, for the most common cases (no kinks in the smoke channel, vertical stroke, rectangular cross-section, height from 4 to 12 m), you can use average values for furnaces with a power of up to 14 kW:
- Less than 3.5 kW - 140x140 mm.
- 5 – 5.2 kW – 140x200 mm.
- From 5.2 to 7.2 kW - 140x270 mm.
- From 7.2 to 10.5 kW - 200x200 kW.
- 5 – 14 kW – 200x270 mm.
To calculate the amount of material required, it is best to use special tables. Below is one of them.
Calculation of the number of bricks
Recommendations for selection
When purchasing heating devices, the choice must be made based on the conditions in which they will operate and what function they must perform. If you are thinking about purchasing a stove to heat the house in which you plan to live permanently, we recommend that you familiarize yourself with the rating of the best wood stoves for heating a home.
If we are talking about a dacha, then the main criteria for choosing country wood stoves include:
- Power. The heat transfer should be sufficient to fully warm the room. So, per 1 kW there should be about 9 m2 of area + 10% of the reserve.
- Additional functions. When selecting this criterion, it is necessary to find out whether convection ribs, a hob, or an oven are needed.
- Supports combustion of various types of fuel. If you plan to use coal or sawdust briquettes in addition to firewood, it is better to clarify this point in advance before purchasing, since many models only operate on wood.
- Dimensions. If the area of the room is small, then it is necessary to take into account the dimensions to be able to install the stove at a safe distance from the walls.
It is better to prepare for the purchase in advance, and be ready to name such indicators as: room area, fuel, desired functionality.
When you go shopping for a potbelly stove, you need to know exactly whether you need a hob or not. Models without a hob usually cost several times less
Don’t want to spend money on buying a potbelly stove for your dacha, but prefer to make a device from scrap materials? In this case, we recommend that you read the detailed instructions for making a homemade potbelly stove and a chimney for it.
Possible problems
During construction, several mistakes can be made.
Connection of foundations - due to different loads, differences in subsidence are possible, which is why the furnace may warp in the future.
If you take river sand instead of quarry sand, the masonry mortar will not be strong enough due to the smoothness of the sand grains and their poor adhesion.
Hewn and cut bricks collapse faster, so when laying it you should try to install it with the cut side inside the seam.
When laying a chimney, it is necessary to use a special plug so that the mortar does not remain on the internal walls, and the surface of the masonry is cleaned of mortar every 4-5 rows.
If you do not make a cleaning hole in those places where the chimney changes direction, soot will accumulate in it. When installing dampers and doors, we must not forget about the property of metal to expand - masonry cannot be done without a small gap.
These and other mistakes can be avoided if you consult with an experienced craftsman before starting work.