The development of any private territory begins with the installation of a fence. There is a wide choice on the building materials market for installing fences, but despite this, wood does not lose its position. In appearance, a carved wooden fence is in no way inferior to its forged counterparts. Wood is affordable for people of different categories; it can be easily processed. This material is perfect for making a fence.
Harmony of style
Methods and technologies
To make a carved wooden picket fence, it is advisable to select simple technologies and simple designs. Certain carving techniques require special tools, the price of which is quite expensive. However, they may require relevant knowledge.
Carved wooden fences for a summer residence are easiest to make using the following technologies:
- Lace carving. Fencing made using this technology looks quite beautiful and looks very light. This carving option is the simplest, since you can use a regular jigsaw and a pattern to cut out designs. First, you need to apply a pattern to the tree. When a hole has been made that is sufficient for the saw to pass through, the pattern is cut out along the marked contour.
- Contour carving. If you need to make a three-dimensional pattern, it can be cut out using a regular chisel. To begin with, the outline of the image should be applied to the surface of the material. After this, blind holes are made. To increase the volume of the carving, the protrusions of the pattern can be painted in a light tone.
- Geometric carving. A rather beautiful pattern can be made from geometric shapes: dots, lines, circles, squares. The DIY technology is quite labor-intensive, but feasible even for novice builders. Why you can find a special laser on sale that is used for wood carving.
A template with drawings is prepared in advance and mounted on the installed fence so as not to damage the three-dimensional pattern with fastenings. As a rule, wooden elements are additional parts of the decor of the future fence.
More visual examples of the construction of the structure can be seen in the photo of the carved picket fence, which are located below.
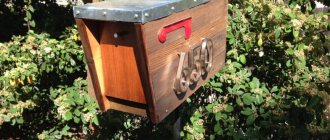
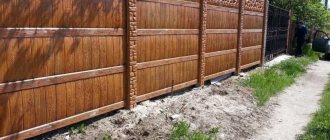
Wooden carved picket fence
Features of choosing a tree
The cheapest base for fencing is considered to be a plywood sheet. For this, it is advisable to choose a file with small teeth. You can also use a hacksaw for metal. The smaller the saw teeth, the cleaner the cut in the material, and then there is no need to sand the edge.
If it is necessary for the design of a carved fence to look refined and expensive, it is advisable to choose expensive wood. All types of wood have their own qualities. For example, maple or cherry trees have buds that look like a “bird’s eye.” Oak products have a finely speckled pattern.
Carved picket fence
an original and attractive fence based on an ordinary wooden picket fence , for which it is enough to decorate it with carvings.
Many owners may be attracted by a wooden picket fence. Photos of such structures only confirm how appropriate they are in the country. Recent Entries
Chainsaw or electric saw - what to choose for the garden? 4 mistakes when growing tomatoes in pots that almost all housewives make Secrets of growing seedlings from the Japanese, who are very sensitive to the soil
This idea can be implemented in the following ways:
- You can decorate the picket fence with carvings even before it is installed. Most often, contour and geometric threads are used;
- A similar idea can be realized by installing carved boards on the finished fence. As a result, you won't have to put in any effort to make your picket fence look the way you want.
Lace thread
Among the existing methods of creating carvings, the most difficult is the lace technique . It is based on cutting out patterns on a wooden base using a template. It is best to use pear or ebony wood to create such carvings.
By building a fence based on a carved picket fence, you will get a true masterpiece at your summer cottage. However, remember that your fence may be damaged as a result of precipitation, so the finished structure must be treated with varnish or paint.
Types of wooden fences
There are several main types of wooden structures:
- classic fence; lattice; ladder; chess; vertical picket fence.
The first option is the most popular in Russia.
This structure is assembled from longitudinal logs and vertical pillars. The slats are firmly attached to the joists at the required distance. Some people make a solid fence with tightly pressed posts, while others are satisfied with a “hole” fence.
A lattice fence looks like a fence assembled from sections.
The design can have either a rectangular or square frame, onto which slats are attached at a special angle. After this, perpendicular pillars are fixed in the second row, which form a lattice. This type of fence looks quite attractive, in addition to everything, it is well ventilated.
Ladder is a type of double-sided fence. Its design is quite simple. Vertical logs are attached to the longitudinal logs, and boards are installed on them, overlapping each other.
The checkerboard type of fencing is similar to the classic one, only the sheathing is installed on the longitudinal logs not in a row, but in a checkerboard pattern. Such a fence is perfectly ventilated and at the same time hides the area from prying eyes.
The picket fence is most often used to mark out the internal territory, as well as to protect flower beds from encroachment by domestic animals. The picket fence is usually made low and sparse. It can only be called a fence formally.
Tips for arranging supports
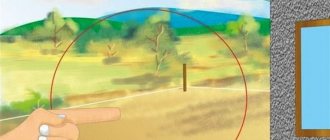
Along the perimeter of the future fence, you need to install stakes in place of the supports and pull the rope. The placement of pegs must be strictly aligned. The distance between the pillars is up to 3 m, and for heavy structures no more than 2.5 m. For extreme, corner supports, pipes of larger diameter are selected. This will ensure the stability of the structure before loading.
First you need to sequentially install the corner posts and check their height matching using a level. Twine is pulled from below and above between the pillars. It will help you position the intermediate supports evenly.
Installation will be more difficult if the height difference in the area is more than 250 mm. In this case, you need to install additional supports and arrange a stepped structure. In areas of the fence where it is planned to install a wicket or gate, it is necessary to install additional posts for greater reliability.
It is mandatory to check the structure vertically with a level. This way you will get the correct fence, as shown in the photo of the fence posts. Fastening the fence itself should begin no earlier than 3-5 days from the moment of concreting.
If you are faced with a groundwater problem, then you need to dig a trench or drill a hole deeper, i.e. lower relative to the water level. In this case, you will need to prepare a significantly larger volume of solution. Experts also recommend constructing a high-quality drainage pad. Crushed stone with expanded clay is placed in the pits in a layer of at least 200 mm. Then a pillar is placed, and the gap between the pit is filled with crushed stone. But not completely, but with a shortfall of 150 mm. Concrete is poured from above the pillow to ground level. You can install fencing on the territory of a country house yourself. To do this, you need to select supports that match the fence material, and then install them, following our simple instructions.
Types of picket fence
Picket fences can be classified according to the type of material used in manufacturing, as well as the method of fastening the strips:
Based on the type of material used, the following types of picket fence can be distinguished:
- Wooden
- Metal (from corrugated sheets or sheet iron)
- Plastic
The first type is common due to the availability and environmental friendliness of wood. A wooden picket fence is easy to install, but it needs to be looked after periodically - coated with protective agents against wood decay, painted.
Metal pickets are strong, durable, and are an excellent means of protecting an area from intruders, especially if the fence is high. However, if the metal is not galvanized, it will have to be treated with anti-corrosion agents or paint.
Plastic picket fence is aesthetically attractive and not subject to any harmful influences, be it precipitation, temperature changes, ultraviolet radiation or insects. There is a wide variety of colors of PVC picket fence. The only drawback is the insufficient strength of such a fence compared to metal or wood.
The type of arrangement of the slats can be: classic vertical, horizontal (to create a fence in a country or ranch style), diagonal, lattice.
View of a picket fence in landscape design with photo
Climbing plants are used for the interior decoration of a decorative wooden fence. Wood serves as a good support for vines; interesting compositions can be created. But even without the greenery, the fence looks very presentable.
To decorate the fence, unpretentious climbing plants are used: hops, clematis or virgin grapes
When carved planks are used for a white fence, the result is an airy, but quite durable structure. Such a fence is appropriate for a house made of sand-lime brick or buildings made of concrete blocks. The dacha plot will seem spacious and bright.
A beautiful fence with carved planks will be a worthy decoration for the front garden of a private house
The lattice, which forms cells in the form of squares or diamonds, has good light transmittance, creates partial shade, and does not interfere with the growth of flowers and vegetables. By the way, with the help of a cellular structure you can visually stretch or expand the spans fixed between the supports.
The lattice fence looks quite attractive, although it does not block the area from the views of random passers-by
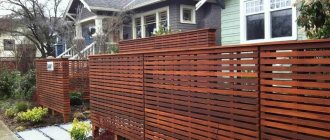
A horizontal fence has a noble appearance, even if commercial trim (slab) with bark residues and uneven edges is used as a picket fence. With the modern choice of moisture-repellent impregnations, such a structure will last for many years, maintaining its aesthetics.
The horizontal slab can be placed with gaps or a solid wall
It's amazing what beauty people create using ordinary wooden planks or planks. Picket fences mounted on metal supports will last a long time if you periodically care for the wood and renew the protective coating.
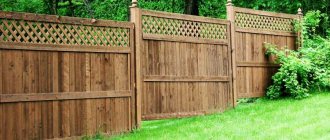
Pros and cons of wooden fencing
In addition to naturalness and environmental friendliness, it is worth mentioning other advantages:
- Easy installation. You can do all the work yourself.
- Availability of materials. You can buy wood in all regions of the country.
- Simple repair. Old elements can be easily replaced with new ones without harm to the entire structure.
- The light weight of a wooden fence allows you to avoid making a massive foundation. Excavation work is simplified.
- Convenient transportation.
- There is no need to use special equipment or rent equipment.
- Reliability and long service life. Treated wood will last 10–20 years without requiring repairs.
- Choice of shapes, types of lumber, sizes.
- The tree looks beautiful even without additional decoration.
Among the disadvantages of a wooden fence:
- Exposure to moisture. When there is an excess of it, the tree begins to rot.
- Damage by insects.
- Flammability of raw materials.
- The need for periodic care. If this is not done, the service life of the fence will be reduced significantly.
But all these disadvantages are eliminated with the help of protective equipment.
Composition and production of decking boards
The second name for WPC is thermowood, and it has become a worthy replacement for products made from natural wood. The noble appearance of such a fence is given by its natural composition, and its artificial origin provides excellent wear resistance and the ability to give the product almost any shape. Decking consists of three main components:
- Wood flour or cellulose fibers. The percentage of natural component can vary from 40 to 80%.
- Thermoplastic polymers. Can be of synthetic or organic origin - 20 - 60%.
- Various chemical additives – 5%.
To produce decking boards, equipment is used that is used in the production of plastic products.
The following stages can be distinguished in the manufacture of products from WPC:
- grinding wood into flour;
- drying of processed wood;
- compiling the proportions of polymer components and wood flour;
- mixing components;
- board pressing;
- cutting material.
Preparation of tools and material
When choosing contour or geometric carving, you should be aware that only hardwood is suitable for it. Almost any wood is suitable for lace carving, even hard coniferous species. The main thing is that the surface is smooth, without obvious flaws. Before performing work, it is necessary to carefully prepare the surface for drawing. If the wood is light, its preparation is reduced to processing with a plane; if it is dark, tinting is carried out. To create a shiny surface, black varnish is applied, which, after drying, is treated with polish.
If desired, you can use another method: wipe the planed surface with liquid wood glue or PVA, and then sand it using fine sandpaper. The procedure is repeated several times. This primer is sufficient for uniform application of black ink, and after it dries, varnish, which is also polished after drying.
It is much easier for beginners to work on a black shiny surface, since the results of work are immediately visible on such a canvas, and the whole process of work becomes much clearer.
The composition of the ornament should be as clear as possible. The method of its translation depends on the color of the base. If the color is light, choose purple or black copy paper; if the color is dark, choose red, yellow or green. The drawing can also be applied by drawing it with a pencil or transferring it through paper onto a board, tracing the drawing firmly with a ballpoint pen.
To prepare and process wood, it is necessary to ensure the availability of abrasive materials with the most suitable grain size for the selected wood species. If possible, buy an electric drill equipped with an emery disc, which will significantly speed up the whole process.
You can carry out the carving with a specially sharpened home knife, but when it comes to a fence, it is still worth buying several tools, since the convenience of the process is very important for such a volume of work. Of course, the choice of tools depends on the complexity of the ornament and the type of carving
For a geometric, contour and lace look, it is enough to purchase:
Of course, the choice of tools depends on the complexity of the ornament and the type of carving. For a geometric, contour and lace look, it is enough to purchase:
- cutter (used to carry out the main work - cutting out contours);
- straight chisels (level and clean flat surfaces);
- round chisels (for creating small rounded elements);
- jigsaw (necessary when cutting out lace thread elements).
Such a modest set is quite sufficient for the implementation of the studied methods. The size of all tools is selected depending on the size of the ornament.
Advantages of carved wooden fencing
These include:
- manual or electric jigsaw;
- sharpened knife;
- cutter;
- straight, semicircular chisels.
The cutter is good for outlining the contours of the future pattern. Chisels are convenient for cutting out individual small parts. A jigsaw is necessary when using the lace method.
It is important to adhere to safety requirements. When working with a jigsaw or grinding wheels, you should wear safety glasses and gloves.
The board or picket fence is tightly fastened on a flat surface, and if there is a workbench, it is fixed in clamps. During operation, the knife is held in one hand, and the other hand sets the direction of the blade along the line of the pattern.
There is no need to sand finished drawings.
Span template
Sketches of structures
Installation of a decking fence
WPC fencing can be either horizontal or vertical. With a fence height of 2 m or more, it is better to place the boards horizontally for structural reliability.
To reduce the penetration of external noise into the area, soundproofing material is laid between the boards, and the boards are installed in two layers.
Fence installation
- Perimeter marking. Determining the location of the support pillars - the approximate step between them is from 0.5 to 3 m.
- Preparation of wells for supports. Depending on the height, it is customary to deepen the column by approximately 1/3 of its length. A drainage layer of sand and crushed stone of about 15-20 cm is poured into the drilled holes.
- Installation of pillars. Supports are installed in the wells. The verticality of the pillars is checked using a building level. The evenness of the supports in height is controlled using a rope stretched from above. The pit is filled with crushed stone with broken bricks, periodically compacting the layers with a crowbar and controlling the verticality of the support. Approximately 15 - 20 cm above the ground is left to fill the hole with concrete.
- Concreting of supports. Pits filled with crushed stone are filled with cement. It should be of sufficiently liquid consistency so that the solution penetrates to the bottom of the pit and between the stones. The mixture is left to dry for several days.
If the ground allows and the fence is planned to be light and low, the support post can be installed into the ground by screwing or driving without concreting.
- Installation of the support profile. The WPC support profile is mounted on the pillars from below.
- Installation of railings. First, holes are drilled in the profiles, after which they can be fastened to the posts using special bolts.
- Attaching a picket fence from decking. Boards made of composite material are fixed to the railings.
Picket fence installation options
Fencing is an element of a suburban area that becomes the object of attention in the first place. Slats made from various tree species will help give the fence a unique aesthetic appearance. The compositional solution for decorating land boundaries with lumber depends on the taste of the property owner. There are various technologies for fixing wooden picket fences to crossbars. Span fragments are made of various lengths, from 1.5 to 3 meters.
Based on the specific type of wood, you can make both simple and original fencing with a unique design
Traditionally, planks are installed vertically, but this is far from the only option for creating fences. The wood is pliable, bends without breaking, and can be weaved. A picket fence, made with imagination, will pleasantly stand out from other fences. Such a fence will not cost much; all kinds of stains and paints and varnishes are used for color decoration.
The picket fence can be combined with other materials, such as brick or stone pillars
To protect wooden barriers located near highways from exhaust gases and splashes from passing vehicles, green hedges of unpretentious bladderwort and densely growing barberry are planted.
There are many ideas for decorating a wooden picket fence.
Laying picket fences in a checkerboard pattern
When making a blind “checkerboard” fence, the slats are nailed inside and out with the same frequency, offset relative to each other. The gap formed by the outer pickets is bridged by the inner strip. The checkerboard fence looks the same from the street and the site. Solid and span structures are made from chessboard.
Checkerboard fence with sparse arrangement of wooden slats
Solid fencing made of wooden picket fence fixed with an overlap
Solid aesthetic fences have good sound insulation and protect the site:
- from street dirt;
- entry of domestic animals;
- curious glances from passers-by and neighbors.
The only negative is that such hedges create shade for green spaces.
For contrast, the inner picket fence is treated with a dark stain, the outer row with a light stain, or vice versa.
Horizontal installation
Wooden fences with horizontally placed slats visually correct the area and appear much lower than they actually are. The design was borrowed from Canadian cattle breeders and is called a “ranch”. It is made of a long picket fence mounted on vertical supports.
Horizontal laying of a picket fence on a fence with wooden posts
Fence with a concrete base made of horizontal picket fence
Simple American Ranch Style Fencing
A horizontal wooden fence is an economical option for creating a rustic feel. With a small consumption of boards, it is possible to create a durable structure that can withstand wind and snow loads. The density of laying pickets varies; for production, a picket fence of medium width up to 1.5 cm thick is used.
Wood will be less susceptible to rotting if the ends of the boards are well treated. It has been noticed that putrefactive bacteria spread faster along the fibers rather than across them. This is explained by the peculiarities of the structure of the tree.
High-quality processing of the ends greatly extends the life of the wooden picket fence
Carved fence
Palisades with carved fences are mentioned in songs; craftsmen create intricate ligature. To make a figured picket fence, various types of thread are used:
- geometric is formed by a combination of shapes: a drop, a circle, a rhombus, a triangle; it is enough to process the edges of the fence boards with an electric saw according to a stencil;
- contouring is done with a chisel, a profile or pattern is created on the surface of the pickets;
- lace is possible on thin boards or plywood strips; the design is cut out with a jigsaw along the intended contour.
You can make a carved fence with simple decor yourself
Carved picket fence can be varnished or painted
With a little imagination and skill, you can create a unique decor
The fastening of the slats is usually standard, vertical. Laying is done with a certain frequency and density. A carved fence, made using any technique, looks unusually elegant and attractive. For noise and dust insulation, protection from plants, such structures are sewn up from the side with a strip of cellular polycarbonate. The decorative quality of the outer surface does not suffer from this.
Attach a carved picket fence at a height of 15–20 cm from the ground surface. To protect against animals, a strip of galvanized mesh is fixed from below using staples.
Fence in the form of blinds
A fence of a specific design with slats located at a certain angle was named for its external resemblance to window blinds. There are no rotating structures for the wooden shutter fence; the slats are fixed to the supports with reliable hardware. The tilt angle can be directed up or down. The latter option better ensures the privacy of residents of suburban real estate.
A fence in the form of blinds made of horizontal boards mounted on brick pillars
There are several ways to attach planks:
- the lamellas are fixed on flanges attached to the supports in advance;
- they are nailed to the ends of the racks with a long nail;
- assembled into span sections using special devices, and then installed on supports.
The distance between the picket fence varies depending on the width of the board used. If protection from the street is required, no gaps are provided at all. The boards are laid tightly, forming a blind fence.
The photo shows an example of a blank fence made of wooden slats, reliably covering the area from prying eyes
Wooden shutter fences can be purchased ready-made or ordered to a specific size, delivered to the site disassembled or in spans.
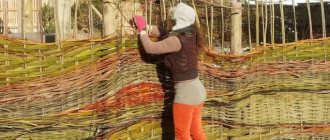
Wicker fence
The main distinguishing feature of a wicker fence made from boards is its elegance. This attractive-looking hedge is a true example of the embodiment of the traditions of classicism. Popular weaving is universal. This fence is beautiful at any height of the structure. Will decorate a plot with a comfortable cottage and a small country house.
Wicker fence with horizontal boards
A wicker fence made of boards has other poetic names - Austrian fence or Alpine wicker. The technology of weaving from boards is the same as when creating baskets from willow and twigs. For intermediate supports, metal rods are used, for posts - a metal shaped profile of square or rectangular cross-section. The weaving of spans is made vertical and horizontal. Such a structure cannot be called a solid fence; the “wicker” will not save you from noise, and partially from dust. The site and its inhabitants will be well hidden from prying eyes.
Wicker fence made of larch with a vertical picket fence
For laying between the supports, use boards with a moisture content of at least 25% to prevent fractures. The finished look of the fence is given by the strips that hold the protruding edges of the curved pickets.
When the posts for the wicker are installed, it is important to make sure that the supporting elements are of the same height, then the fence will turn out neat. To protect against rotting, a base of brick or concrete is made in the lower part of the spans, isolating the wood from contact with the ground surface.
How to make it yourself
Construction is divided into several successive stages:
- selection, quantity calculation, preparation of materials;
- installation of supports;
- installation of logs;
- planking.
The variety of wooden fences complicates the initial stage of construction. Here it is necessary to determine all the design features, draw up a sketch, and mark the territory.
Quantity calculation
To correctly calculate the amount of lumber, all dimensional nuances are taken into account. For example, if a 60-meter fence is planned from boards 10 cm wide, the length should be divided by the overall dimensions of one plank (6000 cm/10 cm = 600 pieces). If there is a gap between the stacks (let's say 5 cm), the calculation takes the form 6000 cm/(10+5 cm) = 400 pieces.
Important! Having received the estimated amount of lumber for the fence, you need to make a 5-10% reserve, which is necessary to cover possible design changes, design errors, and rejected boards. Don't forget about ongoing repairs.
Standard practice in the lumber market involves the sale of fresh wood, which requires preliminary natural drying
If the preparatory procedure is not followed, there is a significant risk of bending and cracking of the slats in the finished fence
Standard practice in the lumber market involves the sale of fresh wood, which requires preliminary natural drying. If the preparatory procedure is not followed, there is a significant risk of bending and cracking of the slats in the finished fence.
Installation of supports
Installation of pillars is a key point in construction, on which the geometric accuracy of the structure depends. A simple option does not require a strip foundation. Optimal for wooden fences that are made by hand.
Step-by-step instruction:
- level the area;
- mark with pointed pegs (height 60-70 cm), installed in support areas at a distance of 2-2.5 meters from each other;
- connect the tops of the pegs together with a stretched rope;
- determine the evenness and accuracy of the markings, if necessary, make adjustments;
- pull out the outermost peg, dig (drill) a hole to install the first post. The depth of recess should be the same - 0.5 m for a low decorative picket fence, 1 m for medium fences, 1.5 m for a strong external fence;
- repeat the procedure for each peg.
- pull a level rope between the supports to finally level their height (small nails are driven into the ends for tying).
Interior of a country house: unusual ideas with photos When arranging a country house, it is worth thinking about its decor and design. A beautiful design will help you relax after making a decision...
For pillars, timber 10x10 cm, 10x15 cm, 15x15 cm is suitable. It is better not to use concreting, which will not allow you to quickly replace a broken or rotten support without first pulling the frozen lump out of the ground. The backing technology, which involves alternately compacting the base of the column with wet sand, crushed stone, and soil, has proven itself well. Concrete pouring is focused on metal posts with an increased service life.
Installation of logs
Wooden crossbars are nailed to the supports at 1/3 and 2/3 of the picket height. It is possible to install additional logs between them to increase resistance to weight and wind loads. When choosing the size of nails, take into account the overall thickness of the supporting strips and posts, so as not to use fasteners that are too short (does not hold well) or too long (risk of splitting). If metal logs are used, through holes must be drilled in them.
Boarding
A routine procedure, provided that the level rope is correctly tensioned, the height of which corresponds to the upper end of the picket fence. For faster work, it is recommended to use a measuring bar 50-60 cm long with a gap width between the slats and several times thicker than them. It is enough to apply the block to the end of the nailed board to immediately determine the location of the next one. In addition, the lag is pressed against the back side with a block for more stable nailing without unnecessary vibrations.
Preparation of materials
Before you begin manufacturing and subsequent installation of a wooden picket fence, you need to decide on the final design of the fence.
The final decision must be made taking into account the requirements of the overall design of the site. The appearance of the fence should echo the exterior of the house.
- A house built of red brick will initially look impressive as an organic architectural ensemble, with a fence where the pillars are made of the same material and the inserts are made of wooden picket fences. A wooden dwelling made of timber usually involves the use of a completely wooden fence. A building with a stone foundation based on rubble is not bad looks good with a fence that has a similar base.
You can choose from the following options:
- completely wooden fencing; metal posts and logs in combination with a wooden picket fence; stone or brick posts with a wooden picket fence.
Having decided on your preference, you can accurately calculate the amount of building material required. Knowing the outer perimeter of the site, we accept the distance between the pillars as 3 meters. Based on the chosen design, we calculate the need for the number of components.
Regardless of what the pillars in the structure are, the length is calculated this way.
To the height of the fence we add the desired distance between the lower end of the picket fence and the ground and plus 1.3 meters on which supports will be buried. Typically, such a recess is necessary to ensure high strength of the entire structure. Preparing wooden poles for installation usually comes down to treating them with antiseptics, especially the underground part.
The total length of the logs to which the picket fence is usually attached for a wooden fence is equal to two spans between the posts. The veins may not have a rectangular profile, but a round one with a transverse diameter ranging from 6 to 10 centimeters.
All wooden products are inevitably planed before installation. Treated surfaces are easier to finish with impregnation, painting, and varnishing. Metal parts are cleaned of rust and a penetrating primer is applied to the outer surface.
Care Tips
Beautiful wooden fences last a long time if you provide minimal protection, careful treatment, and regular maintenance.
When installing wooden supports in the ground, it is better to saturate the base with resin, bitumen, and waste oil. For the ends located on the surface, it is advisable to provide galvanized or polymer caps (a common option is the bottom of a plastic bottle). Joists and planks must be coated with impregnation or primer (for painting).
The timing of renewal of paint and varnish material is established visually. In practice, the standard schedule for applying new paint is once every 2-4 years.
Stages of making a carved wooden fence with your own hands
The construction technology is in many ways similar to the creation of standard wooden fences.
Materials and tools you will need:
- pegs, cord;
- level;
- drill or bayonet shovel;
- electric drill;
- hammer;
- roulette;
- pencil;
- hacksaw;
- nails;
- planed timber (for supports);
- crushed stone;
- cement;
- sand;
- water and a container for preparing the solution.
It is best to assemble a carved fence step by step.
Users often search for:
Installation of poles
Using the markings, holes for supports are prepared. They are drilled or dug with a shovel. The depth depends on the freezing point of the soil and the height of the fence. They are installed in several ways (concreting, driving into the ground, butting). Which one to choose is determined by the owner.
What is a carved fence
A carved fence is a type of wooden fence in which the filling details of the canvas are richly decorated with decorative elements.
There may be different decor options:
- changing the configuration of the picket fence, made so that each element becomes part of a repeating pattern;
- making holes inside the pickets, with outlines of different shapes;
- mixed decor option.
In addition to special processing of the picket fence itself or supporting structures, additional decorative elements of the overhead type can be used. They are made separately and attached to the fence elements in a certain order. At the same time, the picket fence strips themselves may not have any decorations and represent standard fencing elements.
Pros and cons of decking fencing
WPC fences are attractive due to their high resistance to atmospheric and chemical influences, the absence of corrosive processes, as well as their low maintenance requirements. The following advantages speak in favor of using decking as a fence:
Option for decorating and constructing a relief fence from decking
- Durability. The service life is at least 15 - 25 years.
- Ability to withstand a wide range of temperatures - from - 60 to + 80 degrees, good resistance to temperature expansion.
- Moisture resistance. Unlike natural wood, decking boards are not afraid of moisture.
- Simple installation and ease of processing. The composite is very easy to work with. Such a fence does not require a complex, expensive foundation.
- UV resistance. During operation, the material practically does not fade and has excellent color fastness.
- Resistance to fungus, mold and rot. The decking board is resistant to various types of biological damage.
- Practical and easy to care for. The fence does not require additional maintenance, painting or complex care.
- Environmental friendliness. The material does not contain lead components and does not emit formaldehyde.
- Attractive and natural look. A decking fence conveys all the beauty of natural material, and at the same time does not lose its aesthetics over time.
- Variety of design solutions.
- Affordable fence price.
The disadvantages of wood-polymer composite include:
- Possibility of mechanical damage. WPC is a fairly strong material for its composition, but very rough mechanical action may leave scratches on it.
- Minor temperature deformations. It is recommended to install a composite fence freely or with small gaps of 1 - 5 mm.
Advantages and disadvantages of carved fences
The advantages of a carved fence include:
- high decorative capabilities, attractive and original appearance;
- a large number of styles, design options and decorative designs;
- the opportunity to show imagination and creativity;
- wood is a relatively inexpensive and accessible material;
- working with wood is familiar to most users and can be done with their own hands;
- from a mechanical point of view, the design of a wooden carved fence is quite simple and does not require the use of special techniques when performing installation work;
- you can change the color of the fence if any changes have occurred to the material;
- If the wood has an attractive texture, there is no need to perform finishing (only a protective transparent coating or impregnation).
Flaws:
- wood is fire hazardous and does not tolerate contact with moisture;
- the material is prone to warping and cracking;
- the wood is subject to infestation by harmful insects, and there is also a risk of fungus and mold;
- to replace failed elements, an exact copy will have to be made;
- The specific properties of wood require constant monitoring and care of the fence, and the implementation of preventive and protective measures.
Despite a lot of shortcomings, homeowners are increasingly interested in carved wooden fences. Too many fences made of metal or concrete materials have made once common types of fences rare and have relegated them to the category of exotic.
The opportunity to stand out and decorate your homestead in a fairly simple and effective way is attracting an increasing number of users.
Installation of a fence with wooden supports
The principle of installation of wooden fence posts is as follows:
- The installation site is cleared of the fruiting layer, plant rhizomes are removed for ease of work;
- Dig a hole with a garden drill of a suitable diameter or call in special equipment;
- A cushion of crushed stone and sand is poured onto the bottom;
- Lower the support into the hole;
- Fill the soil back and compact it thoroughly.
Several methods for convenient installation of supports and fences are based on this principle.
Method 1. Working with finished products
The first method involves using ready-made pillars as a support. It is necessary to purchase a set of cut wooden logs, treat the underground part with antiseptic and waterproofing, and immerse the pillar in the ground in a hole prepared using the basic method.
Quick installation and no labor costs for making supports save time, but not money.
Method 2. Installing supports in the standard way
This installation method is good because it repeats the basic plan algorithm, but has several distinctive features:
- Using geotextiles to filter water and stabilize the soil layer. By the way, this is one of the ways to dig a wooden pole into the ground so that it does not rot;
- The pit can be filled not with soil, but with rubble or large crushed stone. Such support is more reliable than ground support, and also drains the soil from groundwater. When soil heaves, the column will not be forced out of the hole due to the work of large particles.
Method 3. Eliminate rotting
Another way to protect wooden posts in the ground from rotting is concreting. We use it to replace backfilling of soil. How to carry out the process:
- The pit is prepared in the usual way: drilling, installation of a sand and gravel cushion.
- The walls of the pit need to be paved with 1-2 layers of roofing felt. It will protect the concrete from water and act as a formwork for the mortar.
- The treated log is inserted into the hole and secured with wire strapping in a strictly vertical position.
- The concrete solution is poured and compacted with a submersible vibrator.
This method of installing wooden poles has several advantages:
- The lack of contact between wood and soil prevents rotting of the latter;
- The supports significantly increase their service life compared to conventional buried ones. Heavier fencing can be mounted on posts;
- Such a foundation does not require maintenance; if the construction technology is followed correctly, the pillars practically do not change their position.
Method 4. Combined pillars
This method differs from others by the participation of one more component - a metal or asbestos-cement pipe. It will work as an insulator of the log from the ground for the same purpose - excluding direct contact between the ground and wood to maintain the strength of the support. How to install:
- 1) A pipe at least 1 meter long is buried in such a way that about 15 cm remains above the ground surface.
- 2) The soil is poured back into the hole along the outer diameter of the pipe and thoroughly compacted.
- 3) The log is selected so that its diameter is slightly larger than the diameter of the pipe. At the base of the post, make a cut 30-40 cm long, cutting out a diameter that is 5-10 mm smaller than that of the pipe. The work requires high precision and accuracy. The result is a support with a lower base narrowed to fit the inner diameter of the pipe.
- 4) The cut area is soaked in antiseptic or drying oil and allowed to dry.
- 5) After the drying oil has dried, the end of the column is covered with hot tar and inserted into the pipe. If there are gaps left, they are also filled with this polymer.
The connection between the pipe and the pole can be done before burying, there is not much difference, the issue is the ease of implementation of the actions.
Wood selection
The most inexpensive base for a carved fence is multilayer plywood. For plywood, it is best to use a file with fine teeth; a regular hacksaw will also work. The finer the saw teeth, the cleaner the cut will be, and no additional grinding of the cuts will be required.
To make a carved fence look more expensive and sophisticated, you should use valuable wood. Each type of tree has its own characteristics. For example, maple, ash and poplar have buds that form a bird's eye pattern. Oak or beech has a finely speckled pattern.
Ready-to-install carved fence panels
Due to the natural curvature of the trunks, a particularly pronounced curvilinear pattern is present in walnut, ash, and elm. It should also be taken into account that to make lace carving you can use plywood and any type of wood, including very hard coniferous species. But the technique of geometric and contour carving requires deciduous wood so that the surface of the board is uniform, smooth, and without inclusions.