The pergola is an invention with southern roots. Light supports for climbing plants were installed in parks, gardens or near houses. They protected from the scorching sun, maintaining life-giving coolness. Hot summers are no longer uncommon in our climate, so such structures are extremely popular in suburban construction. Read our article about how to make a pergola with your own hands.
General recommendations
The design of a pergola is very similar to a lightweight canopy or gazebo. Its characteristic features are repeating sections connected by horizontal beams. Another type of garden and park galleries, where the ceilings have an arched shape, is called berso. But often they are united by a general concept without specific distinctions.
The pergola can be free-standing or adjacent to the building. Wood, metal or combinations thereof are used for manufacturing. Since the structure is quite light and has low windage, an excessive strength resource is not required. Materials such as brick, concrete or stone are used for large structures with large spans.
What it is
Literally translated as an extension, a canopy.
Standard design includes:
To ensure that the canopy blends harmoniously with nature, climbing plants are planted around the perimeter.
In addition to creating shade, the base for weaving plants performs a number of other functions:
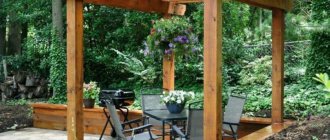
A pergola is erected as an extension of the terrace of the house or as a separate building.
Pergola in landscape design
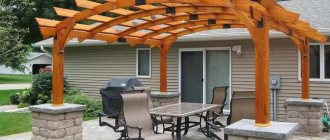
An arched canopy, entwined with lush greenery, is a spectacular decoration for a personal plot or summer cottage. In combination with flowering flower beds, stylish gazebos, and openwork swings, it looks very picturesque and attractive.
With the help of a pergola, you can conditionally divide the site into zones, add it to the entrance area, a place of rest, or a gazebo with a barbecue. Under a lattice canopy, the area near the pool or children's playground will become more comfortable and protected.
Garden furniture, textiles, and lighting are used to decorate pergolas. You can arrange a small pond with a waterfall or fountain nearby.
The pergola can be designed in different styles:
- Japanese - laconic form, calm colors;
- eastern - an abundance of details, bright patterns, rich shades of green and red;
- hi-tech - “high technology”, clear geometry, predominance of metal and plastic;
- country - closeness to nature, simplicity, natural materials and colors.
You can support the pergola design concept with the surrounding landscape or, conversely, make it a bright, expressive spot against a calmer background.
Choosing a pergola option
There are many types, shapes and designs of arched canopies, so when choosing you need to consider:
- size and shape;
- location on the site;
- features of materials for manufacturing;
- possibility to equip with an awning;
- will it serve as a support for plants or be used as a light canopy;
- preferred style and design.
Dimensions and shape
The structure can be very compact, designed to create shade over a bench or swing. In this case, it is made in the form of a lightweight lattice structure and mounted on supports made of timber or metal profile pipes.
On large areas, pergolas of impressive size are installed, with powerful pillars and floor beams. Brick, stone and concrete can be used for construction as materials with a high margin of safety. The shape of a pergola is usually simple - square or rectangular. This is dictated by the features of the almost transparent structure, consisting of pillars and crossbars. The ceiling can be flat, pitched or arched.
The best place
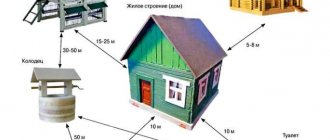
The location of the pergola must correspond to the task assigned to it. It can serve as a shelter for a recreation area, be used for zoning, or simply decorate the area as a decorative object. In any case, it is advisable to install a canopy:
- on a flat or slightly elevated place with a beautiful view;
- away from highways;
- away from cesspools, toilets, compost heaps and other sources of unpleasant odors.
If the arched structure will be added to the house, you need to pay attention to drainage from the roof during rain or melting snow. For a pergola for grapes, keep in mind that this vine loves the sun, and there should not be tall trees nearby.
Plant support
Pergolas or herbaceous plants are often planted around pergolas:
- grape;
- lemongrass;
- actinidia;
- clematis;
- honeysuckle;
- roses;
- ivy.
In temperate climates, for the winter, some plants are removed from their supports and placed on the ground nearby under cover. In the southern regions, plantings remain to winter in the open air.
A pergola can be used as a light canopy even without plants. It creates openwork partial shade, and for protection from bad weather it is equipped with a folding awning.
The purpose of these buildings on dacha and personal plots
The history of the creation of pergolas goes back to ancient times. Most sources point to the Roman origin of the structure. The abundance of grapes in this climate zone required vertical supports for the vines. At first they were just wooden posts with crossbars. Then they began to use structures with stone main elements. Later, metal arches for grapes appeared. At the same time, the simplest options were used - thick ropes between the trees.
Pergolas can serve as a barrier and also zone space
The purpose of pergolas has remained virtually unchanged for many decades. They are erected when it is necessary to create conditions for climbing plants to develop. Ceiling-free structures can serve as barriers to separate areas from the winds or divide the garden area into zones. It is possible to create a green corridor between individual buildings located on the land plot.
Almost from the moment of their appearance, pergolas have been decorative structures, therefore they are often used as recreation areas. In such cases, they are complemented with garden furniture. The main purpose of pergolas can be considered:
- maintaining climbing plants;
- protection from winds and sunlight;
- creating transitions between areas and buildings;
The pergola can be used as an outdoor seating area
- shading of alleys;
- zoning of the site;
- creation of landscape design;
- design of outdoor recreation areas.
Pergola materials
Since the structure is operated outdoors, all materials must be resistant to humidity, temperature fluctuations and solar radiation. The choice of components depends on the design and size of the structure, floor loads, and architectural design.
Tree
This is the most common material for making lightweight arched canopies. It is easy to process, inexpensive, and you can assemble a pergola from it with your own hands very quickly.
For construction use:
- timber for supports with a cross section from 50x50 mm to 150x150 mm;
- board 25-50 mm thick;
- thin slats for gratings;
- galvanized fasteners.
Brick, blocks, and monolithic reinforced concrete can be used as a foundation. All wood must be treated to prevent rotting. Decorative and protective finishing is carried out using wood paints and varnishes for exterior use.
Thermowood
A type of natural material is thermowood. It is produced by holding for 48-60 hours at temperatures up to 180-210° and slight excess pressure. As a result of thermal modification, excess moisture evaporates, resin (tar) is melted, and the wood becomes compacted, acquires geometric stability, and resistance to biological and atmospheric influences.
Pergolas made of thermowood are extremely durable, their service life increases significantly. This material does not require regular treatment to prevent rotting, retains its decorative effect for many years, but is somewhat more expensive than ordinary wood.
Metal
The steel frame is strong and durable. Profile pipes are the easiest to use. They can be welded together or bolted together.
The section of the racks is selected based on the size of the pergola and the expected loads. The structure itself is light, its own weight is small, and by definition it does not experience snow loads. But climbing plants require a margin of safety, since the mass of greenery can reach several tens of kg per square meter, and the windage capacity of a structure entwined with greenery increases significantly. If the support fails, the pillars may become skewed, deformed, and even cause the pergola to collapse.
The recommended minimum cross-section of pipes for racks is 30x30 cm. The ceiling can be made of either metal or wood. To protect against corrosion, steel is periodically painted.
Main nodes
Despite the fact that the design is simple, it is necessary to correctly assess the load that plants can create. For our country, the pressure of snow should not be taken off the scale. Especially after the plants entwine the structure. Therefore, all connections and fastenings are made reliable; it is better to play it safe and install corners than to dismantle a blockage of plants and a collapsed arch. In this regard, the supporting columns and beams of the arch must be strong and reliable.
If you plan to build from wood, support posts for a medium-sized pergola use at least 200*200 mm. Beams are made of boards of at least 40 mm thickness. Be sure to make stops and jibs: they will add rigidity. If you build support pillars from brick or stone, they are placed around a pipe - round or square - your choice, but there must be one.
Dimensions
A little about the sizes of pergolas. They must be proportional to the site. If it is small, then the distance between the posts can be one and a half meters. There is no need to do less: taking into account the foliage, only one person will pass through such a passage. For larger areas, a larger width is required - too narrow will appear short.
The standard height of a garden pergola is 2.2-2.4 meters. Then the whole structure is harmonious, and the foliage and flowers will not crush.
How to connect the parts at the top
When building an arch, special attention should be paid to the joints. See the photo for how to make them.
A simple way to connect posts to main beams
For those who are not very good at carpentry, it can be difficult to cut recesses for installing beams. There is a simple and reliable way to do without this work: connect the posts and main beams using a decorative buttress. This is not only a decoration, but also a way to make the connection more reliable.
A beam is placed on top of the support post (rack) and nailed through with nails or long self-tapping screws. However, with lateral forces they can turn out. To eliminate this, after the auxiliary beams have been laid and secured, a decorative buttress is nailed. It holds together three elements into a single whole. Even greater rigidity of the structure is given by a spacer placed diagonally, which is often called a jib.
In the simplest case, a pergola is four posts connected by main and auxiliary beams.
The simplest pergola design
Beam edge decoration
You can slightly diversify the appearance by different designs of the ends of the auxiliary and main beams. Several ways to wash it down are shown in the photo below. So that they all turn out the same, make a template from a small piece. Then you apply it to the workpiece, trace it with a finely sharpened pencil as close as possible to the template. Cut along this outline.
How to make the edges of beams
Cheaper design
The timber for the columns must be of large cross-section, and this is not cheap. The main beams must be no smaller in size, which further increases the cost of the structure. But you can save money if you nail two thick boards on both sides to the racks at the top. How it looks from above, see the following figure.
To reduce the cost, you can use two boards as the main beams
They can be connected with nails and screws, or with bolts. This is even more reliable: bolted connections can be tightened if necessary. Look at the photo to see what such a structure looks like “live”.
Pergola with double boards instead of main beams
Read how to build a wooden gazebo here.
Pergola foundation
In order for a structure to serve for a long time, the foundation must be strong and resistant to rotting. These conditions correspond to monolithic concrete columns, which are poured into wells drilled in the ground. Gravel and sand are added to the bottom for drainage. This option is well suited for metal racks. When concreting, they are immersed in the holes, and after the concrete has hardened, the pillars are ready.
On loose or wet soils, you can use cuttings of asbestos pipes or line the walls of the well with roofing material, etc. These materials will play the role of formwork and waterproofing when pouring the monolith. Foundation columns can be made of brick, blocks or rubble stone. The metal stand is placed inside and secured.
If the posts are wooden, the base should not be in contact with the ground. To prevent timber buried in the soil from rotting after 2-3 years, you can do the following:
- burn the lower part on fire;
- saturate the base of the tree with hot bitumen mastic;
- secure the posts above the ground to the finished concrete foundation.
The immersion depth of the pergola posts is calculated based on the amount of pinching, which ensures the perception of lateral load. It must be at least 1/4 of the height of the column. It is considered optimal to deepen the foundation by 0.7-1.2 m.
Style
The wooden pergola has a very flexible structure stylistically and technically, but suffers functionally from improper execution; primarily in the psychological and prestigious aspect. There are few styles of pergolas, but in order to choose the right one for yourself, you will have to dive into its history. By the way, this is a rather rare case when, based on archaeological data, oral and written sources, the path of evolution of a structure can be more or less accurately restored from primitive times to the present.
Story
Pergolas appeared where delicious wild grapes grow and conditions for their cultivation are favorable: in the Northern Mediterranean and the mountainous regions of Central China. Overripe grapes begin to ferment right in the grapevine and do not taste disgusting, so the local aborigines became acquainted with the joyful effects of fermented grape juice back in cave times. In a short, but dank, little snow and slushy winter without the Internet or even writing, it was just right.
The ancients were very observant and immediately noticed that the clusters on the vines that managed to spread horizontally under the sun were larger, and the berries on them were larger and tastier. It is impossible to reshape a woody vine, but for a young planted one, you can dig poles with flyers into the ground, tie them at the top for strength with thinner poles and lay them on the top platform of sticks at intervals. The grapes on such a support receive maximum insolation, and it is convenient to harvest from below, and the berries are not easily accessible to parasites: birds, wasps. At the same time, its collection from a unit of land area is greater than from vines on primitive single-plane trellises.
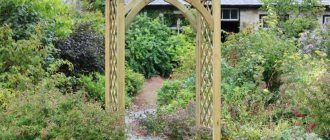
This is how the pergola appeared. When they began to live in houses, its psychological effect was also revealed; At first, of course, it was explained by the fact that some household deities or spirits lived in the pergola. In fact, a pergola is a contour (skeletonized) model of a residential building. The visitor, passing under the entrance pergola (see below), subconsciously understood: that’s it, there are different owners here and we must accept their rules: you don’t go to someone else’s monastery with your own rules. And our own people, relaxing in the garden pergola, realized that they were not cut off from their fortress. Which was by no means out of place in a time when there was constant war, packs of bandits roamed around with impunity for years, and even slave traders could steal a person and sell him.
The pergola, of course, did not protect the poor from ancient misfortunes in any way. The owner of the site, who installed a pergola, thereby declared that he not only has what, but also how and how to protect it. Thus, the pergola acquired prestigious significance, but a roof over it never appeared: in the places where pergolas were created, the climate is either Mediterranean with dry sunny summers, or monsoon, where in the warm season there is a park and an open building under the lightest roof. And in case of sudden rain and wind, which happens almost every day in a monsoon climate, the eastern pergola structure (see below) was adapted for the quick installation of a temporary roof, see fig. at the beginning on the right.
Stylistics
In terms of stylistics, i.e. methods of developing styles of artistic and decorative execution and design, the pergola and the front garden are somewhat antipodes. In order to properly lay out a front garden, which ideally should look like natural growth, you need to know and quite strictly follow quite a lot of rules and restrictions. The style of the pergola is extremely democratic: it is enough not to make a few gross mistakes (see below), and the pergola will work.
Styles of artistic and decorative execution of pergolas
The rustic style pergola generally replicates the ancient supports for cultivating grapes. In modern conditions, it looks both naked (pos. 1 in the figure) and entwined with living plants, pos. 2. A pergola of the same design made of treated lumber (item 3) is itself extra-left, because its aesthetic and prestigious effects are entirely determined by the plants entwining the frame.
Rustic pergola with bench
Note: a rustic pergola is especially impressive with a bench, see fig. on right.
The Gallic, or barbarian, pergola is already aesthetically self-sufficient, because comes from the Roman, fully verified in this regard, see below. A distinctive feature of the Gallic pergola (item 4) is a strong, massive structure that can withstand heavy snow loads. In ancient Roman times, winters on the territory of present-day France were quiet, snowy and cold, so for the winter the Gauls covered the upper platform of the pergola with reeds, and the structure was used for household needs, for example, as a firewood shed. In the current climate, a Gallic pergola can be built without compromising all its qualities with a less massive one from cheaper lumber, see video below.
Video: garden pergola made from simple materials
The Roman pergola (item 5) is strict, like Roman morals. Do not grin when you think of Clodius, Caligula, Messalina or Elagabalus - not morals, but morals. Until the fall of Rome and even later, every free homeowner under his own roof was considered a sovereign master who had the right to control even the life and death of visitors (uninvited guests) and disobedient household members. The Greek pergola (item 6) is more humane and more tolerant of other people's habits, which is emphasized by the slight bending of the beams of the upper platform.
Note: a Greek pergola, unlike a Roman one, can stand very close to a house or fence, as long as it does not come into contact with them and is not mechanically connected.
Eastern subtleties
The style of the eastern pergola is thinner than the western ones, but is still determined by the climate. The monsoon winter can be cold, but there is always little snow. In summer, the roof is subject to heavy rain loads. And almost all year, except for short off-seasons, strong winds blow. There is little quality timber such as pine or oak in areas with a monsoon climate. But there are enough materials for a durable, moisture-resistant soft roof: sericulture has been known for a long time, and a properly woven mat made from rice straw will not be damaged even by a heavy downpour. Look carefully at least at Kurosawa's "Seven Samurai": peasants in rags made of rice mats and straw hats splash through the mud in the rain, and go under the roof, take them off - their shirts and pants are dry.
Therefore, the corner supports of the original eastern pergola (item 7 in the figure) are not thick pillars, but rigid lattice structures. At the top they are also connected by lattice panels like architraves. The upper platform is a shallow but durable grille (see below). Everything together is designed for free ventilation and the ability to bear sudden alternating loads.
Stylistic errors
As stated above, you can make few mistakes when building a pergola. But they have a very strong influence on its prestige, and a significant impact on the psychological effect.
The most common of them are massive, conspicuous jibs, pos. 1 in Fig. Technically, they are not needed: for normal climatic conditions, the overall rigidity of the pergola is already more than sufficient. But for a guest in such a pergola, the owner’s respect is subconsciously associated with something primitive, like a club raised over his, the guest’s, head: “Well, respect it right now, or else I’ll give it to you!”
Style errors in the appearance of pergolas
The second mistake is obvious - steel fasteners are visible, pos. 2. It aesthetically does not fit with the history, ideology, or functionality of the pergola. The mistake is not so serious, but it greatly reduces both the respect and recreation of the pergola - its adjoining to the house, pos. 3. Pergola - a separate “house” with a psychological microclimate, invisibly connected with the home. And if it’s visible, it acts, simply put, like air-suspension cables stretched across an area.
And finally, a very serious mistake - the great redundancy of the monumentality of the entrance pergola in comparison with the structure visible behind it, pos. 4. Such a pergola “says” to the visitor not “Hello. Come on in. I'm listening" or "Welcome! We are always glad to see you!”, and something like: “What do you need, dude?”
How to make a pergola with your own hands: instructions for a summer resident
You can quickly make a light garden pergola for your favorite climbing flowers yourself. Required:
- block 50x50 mm;
- slats 40x20 and 40x10 mm;
- galvanized perforated corner for fastenings;
- galvanized wood screws.
We assemble a frame for the future pergola from a block and slats in three parts. They are like stairs. We fasten the parts using self-tapping screws and corners.
All parts are treated with impregnation. You can use wood tinting with moisture-resistant compounds. We fix the structures in the form of the letter P.
We install it vertically on the finished platform. We fasten with anchors. We decorate a wooden pergola with hanging baskets or flower pots.
In this way you can decorate paths to the garden, entrance area or porch.
Color
The color of the building is dictated by the general appearance of the landscape and the color scheme of other buildings on the site. Next, it is important to determine whether the pergola will be a bright, outstanding object, an accent in the garden. Or it should harmonize with the overall picture, fitting into the image. An organic wooden arch or a snow-white festive one depends on the design project.
The use of two materials entails the possibility of combining several colors, but no more than two in total.
Pergola trellis
Using this simple design, you can zone the area, fence off not very attractive places and create a small vertical flower garden. To work you will need:
- timber 50x50 cm;
- board 25x15 cm;
- self-tapping screws
Instead of timber for racks, you can use a profile pipe.
We spread the boards into 50 mm wide slats.
We cover the entire tree with an antiseptic. For decorative purposes and greater resistance to rotting, lumber can be burned with a blowtorch.
If the slats are going to be painted, it is better to do this in 2 stages - before installation and after. This way we will ensure that water entering the gaps does not cause rapid rotting of the wood.
We assemble a frame of the desired size from a block. Now you need to calculate the distances between the slats of the oblique lattice and mark them with a pencil on the frame.
We first lay the slats in one direction and fasten them to the frame with self-tapping screws. You can nail it, but then the strength of the joints is much worse. There is a risk that when humidity fluctuates, the wood will dry out and the fasteners will become loose.
Now we attach the slats in the other direction. You can install them vertically or at an angle, the main thing is to maintain the angle and equal distances between the elements.
About construction technology
A pergola, even on a stone podium, fully displays its qualities only if the concrete supports of the pillars do not stick out. A pergola on the ground should be foundationless not only to save on materials and work, but also for aesthetics. Pergolas are rarely painted - the texture of natural wood is very advantageous for them. You can make a wooden pergola durable on any soil, except marshy and other water-logged soils in the following way:
- Beams for corner posts or boards to imitate them are cut with a length margin of 25-35 cm.
- The beams (boards) are dried in hot, dry weather under a ventilated canopy for at least 2-3 weeks.
- Etch with natural (mineral, not polymer) stain to the desired tone.
- Dry for another week under the same conditions.
- The holes (wells) are tamped with 15-20 cm of sand (anti-heaving cushion) and the same amount of small crushed stone (damping backfill).
- The lower ends of the pillars to a height of 15-25 cm above the ground are generously impregnated with a hot (70-90 degrees) 7-12% solution of boric acid. You cannot use iron utensils, so the solution is prepared in parts in enamel or glass containers and poured into a plastic barrel with a heat resistance of 110-120 degrees (PVC for external use, propylene). The pillars are placed in the solution and left in it overnight.
- The entire pillars are impregnated 2-3 times with a water-polymer emulsion.
- Under the pillars, holes are dug or wells are drilled to the standard freezing depth (NFD) + 30-40 cm; in the south of the Russian Federation or in Central Russia - by 90-100 cm.
- The pillars are placed, aligned vertically and reinforced with temporary braces. The lower ends of the struts are fixed in the ground with pegs.
- Add crushed stone to the pits to 3/4 depth in layers of 15-20 cm. Each layer is compacted with a narrow tamper. Before compacting each layer, check the verticality of the pillars.
- The rest of the holes are filled with the excavated soil with a tamper and a mountain in anticipation of further shrinkage.
- The posts are cut to size according to height.
- A crown (upper trim) is made from timber. The bars of the crown are connected in half a tree. The connections are fastened with diagonal pairs of self-tapping screws. The offsets of the crown beams are 40-70 cm.
- The crown is placed on the pillars and is also attached to them with diagonal pairs of self-tapping screws, oriented perpendicular to the first.
- Quarters are selected in the cross bars of the upper platform. The beams are laid on the crown and attached to the top with self-tapping screws. The stems are the same as those of the crown.
- They pave the area under the pergola or build a podium on it.
There are no visible connections in a pergola built in this way. If all the beams were stained in the dark tone of old oak or walnut, then such a pergola takes on a special monumentality and is suitable as a prestigious one for a large, rich household.
In a middle- and low-income household, an overly monumental pergola is inappropriate. In this case, the upper platform is assembled from boards, as shown at the top left of the trace. rice. Below there are profiles of shaped (curly) cuts for the overhangs of the boards. When built in this way, a small but prestigious Roman pergola will fit in place on a plot of 6-10 acres, see, for example, next. video clip.
Video: example of building a Roman pergola
Note: the area of the eastern pergola and the pergola for continuous landscaping is covered with a sheathing of shingles and small timber, the structure of which is shown in Fig.
Techniques for constructing a pergola
Pergola swing
This option is more difficult to manufacture, and more materials will be required. The frame must be strong to support the weight of the swing. It needs to be well strengthened, since it will have to withstand not only static, but also dynamic loads.
To make a pergola with a swing you will need:
- timber 100x100 mm;
- board 50x150 for load-bearing beams;
- slats for gratings 20x40 mm;
- bolts and screws for wood;
- waterproofing mastic;
- waterproof paint;
- concrete for the foundation.
The work is carried out in several stages:
- We dig or drill holes 70-80 cm deep.
- Add crushed stone to the bottom and compact it.
- We treat the wooden post at the base with liquid mastic and wait for it to dry.
- We level the stand into the well, fix it and pour concrete.
- We cut nests in the floor beams for cross boards.
- We lift the beams and fasten them to the posts with bolts.
- We strengthen the upper belt with braces. To do this, we cut the boards at 45° and fasten one end to the pillars and the other to the floor beams.
- We assemble the grilles from slats and install them in the side openings.
You can make a swing yourself or buy ready-made ones. For fastening, we screw a special hanger for the swing to the supporting beams, not to the cross boards, as they may not hold up. We pass the chains through the fasteners and hang the swing. We put soft pillows on the seat - and a comfortable pergola with a swing is ready. This design is a great place to relax for all those who like to swing. You can install it near a gazebo, swimming pool, barbecue area and enjoy the results of your labor in the lap of nature.
Possible types of created garden structures
Pergolas have large and small sizes, they can be free-standing, attached to a building, adjacent to two objects and forming a kind of corridor. Based on the shape and presence of an upper ceiling, structures can be divided into the following types:
- pergolas without overlap - trellises;
- pergolas with an arched top;
- pergolas with a flat top cover.
One of the design types is pergolas with an arched top.
Pergolas-trellises used as screens
The shapes of these decorative structures can be very diverse: often rectangular, square, triangular, sometimes zigzag, round, and can have several levels. If the purpose of this structure is only to create conditions for the growth of climbing plants, then a trellis is the most suitable type. This is a convenient option for annual vines. The grating fabric is made from thin bars, slats, and pipes, which are attached to stronger vertical supports.
Such lightweight structures are used, for example, for annual plants: morning glory and sweet pea. Flowers reach 2.5–3 meters per season, develop well in the vertical direction, decorate and shade the area. Sometimes collapsible structures are made for such plants, which are dismantled for the winter and brought into a storage room, and displayed in the spring.
Often this type of pergola is used for clematis. The flower is perennial, the maximum length of shoots is on average three meters. The result is not only comfortable support, but also a beautiful blooming “wall”. It’s easy to make a pergola for clematis with your own hands. This plant blooms profusely.
If the structure is needed solely to support plants, then you can install a pergola-trellis
It is advisable to make the cells at least 25 cm to ensure sufficient ventilation. Photos of pergolas for clematis with your own hands demonstrate a variety of designs, among which you will certainly have the opportunity to choose the appropriate option.
Pergolas for various types of climbing flowers
Pergolas for roses are widely used. More often these are structures with overlap and fairly powerful supports. This plant has many shoots, greenery, and flowers. It is better to make the cells of the sheathing small, no more than 25 cm, so that the rose weaves along the outside. This is of particular importance if the pergola is covered, especially if it will be used as a recreation area.
Helpful advice! When making a pergola for a climbing rose with your own hands, you should choose the right thickness and shape of the sheathing. This plant does not have tenacious tendrils, so the shoots must be fixed so that they are not blown off by the wind and fall.
A pergola for supporting climbing flowers should have ceilings and massive supports
The difficulty in choosing a suitable design is that it is necessary to maintain a combination of decorativeness and functionality. Photos of pergolas for roses with your own hands will help you make the right choice, allowing you to realize your desire and get the expected result.
Pergolas for grapes: optimal shape and material strength
Cultivated grapes, which can often be found on personal plots, in addition to the ability to use their vines for shading and decoration, also produce fruit. The best pergola for grapes is an arch. This shape lengthens the structure, giving more opportunity for the development of shoots.
Support for grapes is usually made of metal, since the vine with fruits is quite heavy. Wooden supports and metal sheathing are successfully combined.
To support grapes, it is better to use arched pergolas
Cultivated grapes need care - proper pruning. Sometimes part of the shoot is removed, which violates the integrity of the green cover. If you want to be in an area completely covered with greenery, it is better to use wild grapes, which will tightly cover even the top ceiling. The photo of do-it-yourself grape arches shows different design options, combinations of materials, and methods of laying vines.
Helpful advice! When planning to make an arch for grapes with your own hands, you need to choose a durable material that will not require constant maintenance. Removing a vine is difficult and is only possible at a time of year when weather conditions do not allow painting or applying other protective measures to the material.