Building a country toilet with your own hands does not require serious construction experience or professional equipment.
It is recommended that before starting the procedure, you carefully study all the information provided about the design and installation of the toilet, as well as understand the drawings and diagrams of the future design.
This article will help you decide on the appropriate material for making a cubicle, learn about the main differences between a sewer system with and without a cesspool, and also provide complete instructions for building a country toilet.
Sanitary and hygienic standards for country toilets
Before starting installation work on the independent construction of a toilet in the country, you should carefully study the regulations that govern the construction procedure. There are certain requirements that must be met:
- check that the toilet does not disturb the neighbors. Otherwise, they have the right to complain to the appropriate authority and there is a possibility that the building will need to be moved;
- choose a location, taking into account all the standards and regulations for placement. If this is not done, the result will be a serious deterioration of the ecological situation in the area, contamination of the soil and nearby reservoirs and water sources. The owner of the site will have to pay fines, and health may also be affected due to environmental pollution;
- when designing, you need to take care of the issue of removing waste from the cesspool;
- When selecting a suitable design, it is important to take into account the characteristics of the site, in particular the water horizon. If groundwater is located close to the surface, you need to opt for a completely sealed system.
Attention! Following these requirements will help prevent a variety of operational problems in the future.
Conclusions and useful video on the topic
An educational video telling about the important nuances of the construction process.
The presence of a building such as a toilet on a summer cottage makes the life of hacienda owners more comfortable. If you approach the construction of a structure taking into account all the nuances of its use in the country, you can build a structure that is doubly useful.
Carefully thought out and compiled drawings will help you create a “need” of an original design. In the end, a country landscape is also a goal for a gardener’s imagination.
Tell us about how you built a toilet on your summer cottage, what option and what scheme you used in the construction. Leave posts and photos with the construction process in the block below. Ask questions, share information that will be useful to site visitors.
Features of drawing construction
A country toilet is not such a simple design as many novice builders tend to think. There are a number of features that are important to consider when developing a project and drawing drawings.
According to sanitary standards, a country toilet should not be located closer than 12 m from a residential building and 8 m from a well or borehole
Toilet installation rules:
- Dimensions. Consider the size of the restroom interior. The minimum allowable area is 1 x 1 m. If you save money and make the booth smaller, it will be inconvenient to use. Also, special attention should be paid to the choice of a country toilet.
- Height. There is also a height limitation. It is not advisable to build a toilet less than 2 m in height. You will soon get tired of entering it bent over.
- Roof slope. When installing a pitched roof, the rear wall is designed slightly lower than the front. This is done to form the slope of the roof and drain rainwater behind the building.
- Lighting. If you do not plan to install electric lighting, ensure that daylight enters your toilet even when the door is closed. If you don't want to bother with windows, cut at least a small hole in the top of the door.
- Ventilation. The country toilet is a poorly ventilated building. To fix this, a ventilation pipe is run along the back wall.
- Shadow. To keep your country toilet from being stuffy in the summer, place it in a shady place.
- Place on site. Another tip for choosing a construction site: avoid the proximity of a septic tank or cesspool to water intake sources, wells, and boreholes. This is done for sanitary and hygienic reasons.
If you take all these recommendations into account, it will be much easier to design a country toilet yourself.
Based on the type of waste disposal, free-standing toilets are divided into storage and portable. Cumulative options involve discharging waste products into a cesspool, septic tank or storage tank.
Toilets with a cesspool are installed at a distance from houses, water supplies and the boundaries of neighboring plots.
Remote dry toilets are plumbing devices with a small storage tank that do not require a sewerage system. The waste is collected and composted in a small container located directly in the plumbing, which needs to be emptied regularly. The pavilion for the dry closet can be located in any convenient place.
It is advisable to connect a building that combines a toilet and a shower stall to one storage tank. In this case, regular pumping of wastewater will be required as the reservoir accumulates.
A sealed storage tank, the wastewater from which is regularly pumped out, can be located 5 m from the dwelling. This method of waste collection does not threaten the environment and groundwater.
It would be wiser to build a toilet in a dacha, visited periodically only in the summer, above a cesspool without pumping. Such pits are filled in as they are filled, and trees are planted on top. The house built above it is simply moved to a new location.
The volume of the cesspool, as well as the volume of the storage tank, is selected in accordance with the number of residents and the intensity of visits.
Classification by type of waste disposal
We have considered the structures of the above-ground part of a country toilet, which are most suitable for a private household or a summer cottage, but there is one more criterion, mentioned at the beginning of the article, by which toilets can be classified - according to the type of waste disposal.
Depending on the method of arranging a useful volume for collecting waste products of the human body, country toilets can be:
- based on a cesspool (the most common);
- backlash closet (more modern design);
- powder closet (for infrequent use of the toilet);
- dry closet
Pit toilet
The simplest option, which has a history probably equal to the history of mankind. Since the time when people learned to build cities and improve them, making them more convenient for life, simple forms of a “latrine” based on a pit with a wooden ceiling have been known to mankind. It’s amazing how durable this simple design turned out to be: this method is still widely used in rural areas, and, as in the old days, a hole filled over the years is often simply filled up, and the toilet is moved to another place where a new hole is dug.
Basic sanitary standards
The peculiarity of cesspools is their contact with the ground, so special sanitary standards have been developed to make the use of an outdoor toilet safe for others. Thus, the location of the cesspool must be designed in such a way as to maintain certain distances to nearby objects: to any sources of water - at least 25 m, to residential buildings - 12 m, household buildings - 4 m; there should be at least 1 m to the boundary line with a neighboring household or summer cottage, and the same to the nearest bush, but trees can be planted no closer than 4 m to the cesspool.
The most important condition is the height of groundwater: if it is closer than 2.5 m to the ground surface, then it is allowed to equip only isolated cesspools in the form of a large-capacity plastic tank. Otherwise, there are no restrictions and you can build a regular pit - sealed or with a filter bottom.
Construction of a cesspool
It is better to dig a hole for a country toilet manually with a shovel: in this way you can form smooth edges and give the hole a neat shape in the form of a square or rectangle. Sometimes they make a round hole. Depth - no more than 3 meters.
There is no need to dig a cesspool that is too large, as it will be more difficult to cover it later: just limit yourself to dimensions of 1.5x1.5 m, 1x1.5m or even 1x1m. A rectangular cross-section in many cases is preferable, since it allows you to organize an opening hatch on the outside of the booth (usually at the back) for pumping out sewage with a sewage truck (consider in advance the possibility of vehicle access, taking into account the length of the hose - the standard is 10-15 m, and the depth of the pit).
Whether to make a sealed cesspool or one with a filter bottom is your choice, but the second option is contrary to sanitary standards. At the same time, the cost of calling a sewer truck is significantly reduced, since part of the liquid waste (up to 40% per month) is simply absorbed into the soil. It is important that the soil is sufficiently loose and sandy, then the hole can be made not very large, especially if the toilet is not used very intensively. Conversely, dense and clayey soil with a low absorption coefficient is itself capable of retaining sewage, so the pit will have to be cleaned more often.
When the pit is ready, you need to take care of strengthening its walls. There are several most common methods:
- line the walls with red brick (silicate brick is not suitable for this purpose);
- concrete the walls;
- decorate the pit using reinforced concrete rings.
Read also How to make paths in the garden with your own hands. Practical advice, proven solutions, photos
For a sealed cesspool, the bottom is first concreted, which is first compacted, then a 15-centimeter sand cushion is poured, compacted, and then reinforcement from wire-tied metal rods is laid on evenly spaced pieces of red brick. All this is poured with concrete with crushed stone up to 15 cm thick and allowed to harden for several (up to 10) days.
With concrete rings it may be simpler: just buy a “blind” bottom ring with a cast bottom. They also install it on a compacted sand cushion, then lay the required number of rings on top, exactly along the end. Each end connection is laid with a thin layer of concrete mortar to achieve a high level of sealing. The rings themselves, in order to avoid their shifting, are fixed with metal brackets.
Concrete walls are considered the most labor-intensive and require special skills and experience, which is probably not suitable for our purposes. Therefore, we will lay them out with bricks. There will be no difficulties here; no one will make any complaints about the quality of the masonry. Afterwards, all the seams are sealed with concrete mortar or the walls are completely plastered, if you have the time and desire to tinker for an extra half day.
Important note: if you decide to leave the bottom unsealed, a small strip foundation (around the perimeter of the pit) will be required for the brickwork. The bottom, in addition to the compacted sand cushion, is covered with an equal thickness layer of coarse crushed stone or pebbles.
Reliable flooring is an important point of safety, therefore, if you do not have a ready-made reinforced concrete slab at your disposal, use thick, pre-treated boards for this purpose. For greater strength, two metal pipes or concrete beams can be laid across the boards from below.
Toilets without pit cesspool
If high groundwater or the co-location of buildings, plantings and a well on the site does not allow organizing a regular, cesspool-based country toilet, and in some cases, if you plan to visit it frankly rarely, you will have to build one of the “isolated” types of toilet: backlash closet, powder closet or purchase a modern dry closet.
Backlash closet
A backlash closet is a stall with a toilet without a water plug and a sealed container located at a distance, which reduces the contact of waste products of the human body with the environment to zero. This design even makes it possible to install a toilet inside the house, and place a waste collection container outside the foundation of the house.
An important element of a backlash closet is a good ventilation system. In the presented diagrams we see various implementations of a toilet based on the backlash-closet principle.
An option for connecting the ventilation pipe to the drain channel, allowing you to get rid of unpleasant odors as much as possible
Option with water reservoir for cistern
Powder closet
A powder closet is a toilet that does not have a stationary container for collecting waste in the soil, so there is no need to dig the ground.
The whole essence of a powder closet lies in a container in the form of a special box or an ordinary bucket, installed under the toilet seat and into which this same waste is collected, after each use, poured into the so-called. “powder” - a loose composition of sifted earth, dry peat chips, ash or a similar material (necessarily natural!), which has good absorbent characteristics.
A container filled to a certain level will have to be periodically taken out and shaken out onto the compost heap.
Reliable ventilation is a necessary element of a powder closet, which goes without saying. As well as the fact that, say, for a large family and active use of the toilet, this option is of little use, and the responsibility of cleaning the receiving container is not the most pleasant.
Dry toilet
A dry closet is an isolated industrial toilet, in many ways similar to a powder closet.
To quickly decompose feces, special biological cultures or chemical components are used here, which are saturated with the peat mixture in the receiving tank.
Features of the installation and operation of a dry closet are contained in the instructions for each specific model, but the entire installation can be placed in any of the types of toilet stalls presented above.
To summarize all of the above, I would like to note that building a country toilet is, in fact, not a very complicated process; it is enough to have some skills in handling tools and materials, a desire to make a useful and beautiful thing with your own hands, and then be proud of the results of your work and creative messages, and also not to be afraid of physical labor. You can easily use the drawings presented in this article as a clear guide to action or a source of inspiration and ideas, as well as photographic examples of ready-made toilets.
Cabin with sump tank
Very often they create a similar structure at the dacha. The principle of its construction is that a waste pit is built directly under the house.
This is not an entirely comfortable structure, but the simplicity of the design and small financial investments in construction make this model in demand and popular.
When the pit is 2/3 full, it is pumped out. There are some disadvantages of this structure: unpleasant odors in warm weather; soil pollution.
Important! When bottom water is near the surface, the waste pit must be completely sealed to prevent contamination.
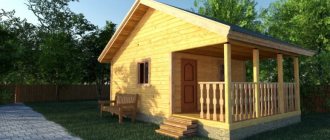
Warm restroom
Using a toilet with a single plank wall in the summer is quite comfortable. But not all dachas are visited only in the warm season. For the autumn-spring period, at least some kind of insulation is necessary to block drafts.
In this case, the design of the toilet is no different. Just increase the dimensions by 5-10 cm more: the skin will be double - outside and inside, and insulation is laid between the skin. The doors will also need to be insulated - double doors are too heavy for such a building, but from the inside they can be covered with a piece of linoleum, dermantine and other easily washable material.
Where is the best place to place a country toilet?
The optimal place is the corner of a summer cottage. It's good if it's shaded. The toilet must be located at least 1 m from the property boundaries. There are also sanitary and hygienic requirements that must be strictly observed. A toilet with a cesspool should be located 10-12 m from residential buildings, 25 m from a source of drinking water, or even further. Other minimum distances:
- 1.5 m - from berry bushes;
- 4 m - from fruit trees;
- 8 m - from the bathhouse, summer shower.
It is necessary to take into account even those objects that are located in neighboring areas. If the project provides for a sealed septic tank, it is necessary to ensure the possibility of unhindered access for a sewer truck. The wind rose is also taken into account, otherwise the smells wafting from the bathroom can greatly spoil the mood of the owners, their guests and neighbors.
Choosing the location of the toilet
The main factor that you need to focus on when choosing a location is the type of building used. It is especially important whether there is a storage pit for waste, and whether the container where it will be stored will be completely sealed.
To make a toilet in the country with your own hands, it is important to know about some features of finding a suitable place:
- It is imperative to take into account the depth of the groundwater of the land plot. If the groundwater level is more than 2.5-3 meters, then the construction of a cesspool cannot be carried out. In such a situation, as a rule, a powder room is erected. This type involves the treatment of toilet waste with a special composition in the form of a powder;
- it is necessary to take into account the convenience of neighbors and residents of the house. In most cases, a toilet in a country house is built away from other structures;
- It is imperative to take into account sanitary and hygienic standards. For example, installation cannot be carried out closer than 12 meters from the house, 20 meters from drinking wells and other water sources, 1.5 meters from the fence separating the plots;
- when constructing a latrine with a drainage pit, it is important to immediately provide access to special sewage disposal equipment;
- It is advisable to take into account the terrain of the area. During operation, at the lowest point of the site, the building will be flooded in spring and autumn. When constructing a country wooden toilet at the highest point, the person using the structure will be disturbed by constant winds and drafts.
Shapes of toilets
It is necessary to select a suitable material in advance, and after this stage, do the project yourself or look for a suitable ready-made drawing.
There is a wide variety of types of wooden models. The most popular form of toilet is the “birdhouse”, but there are others that vary in the complexity of construction:
Hut house
This cabin is compact and economical. Its simple geometric shape impresses with its ease of construction, and its drawing is also elementary. The side walls double as roof slopes; construction of the above-ground part of the toilet takes only a few hours. Roofing material (for example, soft tiles) is laid on the side walls. The façade and rear wall of the structure require finishing.
Toilet-teremok
It has a diamond shape, which makes the job a little more difficult. To give a fabulous look, various carved decorations are used. The frame is lined with round timber sawn in half, ordinary overlapping boards, block house or thick lining.
Toilet combined with shower
In this case, the drawing of such a structure is the addition of a second similar diagram on one side. If necessary, the size of this cabin can be slightly increased.
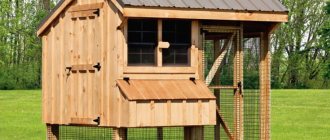
Birdhouse
But those craftsmen who choose projects of maximum simplicity during construction will certainly like a wooden birdhouse. The easiest way to build it on the site with your own hands is. The pitched roof and primitive design help reduce the consumption of building materials. In addition, the roof of the country toilet makes it possible to easily place a pressure tank - a useful thing if you plan to build a toilet with a toilet.
But the design has many shortcomings. First of all, the building turns out to be shaky. In addition, it is easily blown by the wind. Finally, with heavy rainfall, moisture will likely seep inside, which will also not add comfort.
Sheathing
The restroom can be covered on the inside with PVC panels; they are convenient, environmentally friendly, and easy to maintain. For maximum comfort, light is provided into the restroom for night visits, especially if people live on the site until late autumn.
The process of covering the frame of an outdoor toilet
Subtleties of choosing building materials
Once the decision on the type of toilet structure has been made, you need to select the material that will be used in construction. The choice of building material is important even at the stage of drawing development.
Most often used:
- tree;
- brick;
- metal.
These are familiar materials for summer residents, which almost everyone knows how to handle.
The most common option for constructing a toilet house in a country house involves the use of frame technology.
The frame is constructed from lumber or rolled metal; the walls of the building can be solid or with ventilation gaps in the upper part.
Most often, the frames of country toilets, built from timber, are sheathed with edged boards, clapboard or block house.
The use of corrugated sheeting, which works perfectly in tandem with both a wooden and a metal frame, allows you to quickly finish finishing the frame.
The finishing of a frame building with cellular polycarbonate and plastic slate looks interesting and works excellent.
A log house looks great, but its construction will require greater expenses compared to a frame structure. Such a toilet does not need to be insulated for use in winter. Brick toilets require a massive foundation. They are not erected over cesspools due to their impressive weight.
The construction of a toilet from foam concrete blocks is much faster than using bricks. This type, like the brick one, requires a foundation and involves installing a dry closet or discharging wastewater into a storage tank.
Wood
When it comes to country house construction, the first thing that comes to mind is all kinds of buildings made of wood.
Boards and beams made from inexpensive, but quite strong and durable coniferous wood are easy to obtain, and the work does not require complex equipment. In extreme cases, you can work with wood even without the use of power tools.
Depending on how you design your toilet, you can build completely different restrooms from the same drawing. One of the options is to decorate the walls with a block house or clapboard
If you want to make a toilet not just practical and functional, but also a full-fledged decorative element at your dacha, try building it from a log house. It will take a lot longer, but the result is worth it.
A country toilet is not the most favorable environment. Wood can rot and collapse if it is not treated with special means. Impregnation with an antiseptic is a mandatory condition when constructing a latrine from lumber.
The construction of a toilet house using frame technology includes a number of traditional stages:
- Stage 1: Installation of the frame on foam concrete supports
- Stage 2: Cutting a hole above the cesspool
- Stage 3: Sheathing the frame according to the plank pattern
- Stage 4: Laying the roof covering
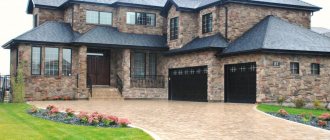
From bricks
The advantages of brick buildings over wooden ones are known to everyone from the fairy tale about the three little pigs.
In addition to strength, a brick toilet has low thermal conductivity, which is important if you go to the country in the cold season. A brick country toilet looks like a house with a single or gable roof. Windows can be designed.
It is not necessary to use ordinary brick. More modern block materials such as foam concrete, cinder block, aerated concrete will be an excellent alternative
The design of such a toilet includes not only a drawing of the above-ground part of the toilet, but also the foundation. In this case, it will not be possible to do without a foundation, since the dead weight of the brick building is quite large.
Without support, the soil will soon become compacted and sag, which will cause cracks in the walls of the toilet.
Made of metal
Metal is a material with a high thermal conductivity coefficient. A closet made of metal sheets will be unbearably hot in summer and very cold in winter.
Without the use of thermal insulation materials, an iron toilet in a country house can only be a temporary project - until the construction of the main toilet.
Most often, corrugated sheets are used, sewn onto a metal profile frame. In this embodiment, a profiled sheet of metal is used. Polycarbonate roof on a metal frame
It is difficult to achieve tightness at the joints of such a thin and flexible material. There will be cracks in the corners through which the wind will blow through the house, which also does not add comfort.
If you apply modern technologies and use sandwich panels as wall materials, you can get a completely comfortable restroom. Polystyrene foam or mineral wool is used as insulation.
Material selection
Another important point is to determine the material that will be used for the exterior, as well as the type of cabin itself. A do-it-yourself toilet in the country can be made from:
- metal profile. The base is made of wood or profile metal pipes, which are connected to each other by welding. Then the base is covered with sheets of metal. This material is also coated with a special compound that protects the country toilet from the negative effects of high humidity. The main advantage of using corrugated sheets is the possibility of quick construction;
- brick. Such toilets can be used for a long period, but require quite labor-intensive and expensive installation. The structure has a large mass and can only be installed on a foundation, so you will need to make a strip or columnar base.
- boards are the most common option for a toilet in the country. The main advantages are accessibility and low cost, the ability to implement various types of design, and mobility. The only disadvantage is the exposure of the boards to the negative effects of moisture, but today there are many ways to reduce this disadvantage to a minimum. For example, the service life can be significantly increased by applying a primer and painting. If the owner does not want to spoil the natural appearance of the wood, then there are numerous transparent compounds that repel moisture.
Drawings of wooden toilets for a summer residence
In order to make a wooden toilet in the country, at the very beginning you need to create a project drawing. It is necessary in order to calculate as accurately as possible the required amount of building material, clarify the dimensions of the toilet cubicle at the location and determine the sewer drainage scheme (if required).
The plan drawing of the outdoor toilet “Birdhouse” is presented below.
Plan drawing of the outdoor toilet "Izbushka":
Plan drawing of the outdoor toilet "House":
Plan drawing of the outdoor toilet "Shalash":
Schemes and drawings
Creating a schematic drawing of the building is one of the most important stages, allowing not only to build the structure correctly, but also to calculate as competently as possible the amount of all the building material needed for the manufacture of a country toilet.
Drawing of a country toilet Teremok
Scheme of a rectangular outdoor toilet
The main task of the created drawing-project of a country street toilet is to detail the design, indicating the size, shape and type of the building being built.
You can develop a schematic drawing of the building yourself or take as a basis a ready-made detailed design of an outdoor toilet from the Internet.
It is impossible to live in a dacha without a restroom. Warm toilet in the country - construction technologies are described in the article.
You will find options for country toilets and a comparison of different types of models in this review.
You will find everything about the pros and cons of electric dry closets in this publication.
Dimensions of a wooden toilet for a summer residence
To determine the exact size of the toilet, you must first select the type of stall and the method of organizing the sewer drain.
For all types of toilet cubicle design, there are different size standards, which is explained by the specific features of their shape. For example, for the toilet design “House” and “Birdhouse”, taking into account the height of the toilet seat from the floor, this is 1.5 m (recess) and approximately 1.2 m (width at the base). For the design of the “Izbushka” and “Shalash” cabins, taking into account the toilet seat pedestal, these standards are 1.5 m (recess) and from 0.9 m (base width).
According to the construction rules in the “Shalash” toilet stall, the distance from the “guest’s” head to the side walls of the room should be at least 40-45 cm (if the person is standing). This fact should be fundamental when designing the angle of the inclined walls and the width of the base of the structure. As an average option, the height of the dome point of the “Shalash” cabin is 2.0-2.2 m (above the pedestal - 1.90 m), and the height of the side of the toilet seat is 0.5 m from the floor level.
Toilet cubicle
As we wrote earlier, it is better to build a house from wood. This is the most accessible and inexpensive material, with proper processing and care, the design will be durable and attractive.
A selection of different designs and design options for toilet cubicles for the garden
Option for finishing a toilet cubicle made of wood
This is the most advantageous material for building this structure. The cabin is assembled from bars and boards.
How to properly build a wooden toilet in the country with your own hands
The simplest, classic type of wooden toilet for a dacha, made with your own hands, is the Birdhouse toilet cubicle. It is a low building with a sloping pitched roof, a door and a ventilation window. This type of construction is easy to implement and quite economical. In addition, such an outdoor closet can be easily moved to a new location if necessary.
Technical characteristics of the traditional outdoor toilet “Skvorechnik”:
- front wall (height) – 2.3 m;
- rear wall (height) – 2.0 m;
- width of the front and rear walls – from 1.0 m;
- booth base – 1.0 by 1.0 m (standard, but more is possible);
- The roof slope angle is 25-35 degrees.
To build a wooden Birdhouse cabin, you may need the following materials:
- wooden beam;
- edged board;
- wooden lining;
- Chipboard, OSB sheets or plywood;
- board shield;
- slate (classic or plastic);
- roofing felt;
- steel metal profile.
When building a toilet in a country house with your own hands, you need to follow the following rules:
- When creating a drawing of a future stall, it is necessary to take into account the dimensions of the interior space so that using the toilet is convenient and safe.
- The height of the toilet house must be at least 2.0 m. A low doorway is inconvenient, since you will have to bend down before entering each time.
- When building a Birdhouse type cabin, the front part of the roof is higher than the back. This is necessary to ensure that rain or melt water drains behind the building.
- If electric lighting is not planned inside the toilet cabin, then you need to take care of natural lighting of the cabin through a small window in the upper part of the building or in the door.
- To ventilate the toilet, an open window or exhaust pipe should be provided. This is an important point that should not be forgotten.
- To prevent the toilet stall from becoming too stuffy in the summer, it is better to build it in the most shady area.
- When choosing a place for a toilet house in the country, you should avoid proximity to wells, boreholes, natural and artificial reservoirs.
The process of building an outdoor toilet “Birdhouse” with a cesspool:
- First you need to dig a hole with a volume of 2.0-2.5 m³. The pit should extend from the perimeter of the toilet stall (see drawing of the “Birdhouse” above). It is better to make the lower level of the pit with a slight slope towards the cesspool. To seal biological waste, line the bottom and walls of the pit with brick, cinder block, or concrete sarcophagus.
- Use a wooden beam (at least 10.0 cm thick) to assemble a base for the toilet stall. For this purpose, you can use concrete blocks, curbs or cinder blocks - this will increase the life of the toilet superstructure. Cover the part of the pit intended for cesspooling with wooden flooring (shield). Its lid must be treated with bitumen and covered with roofing felt to protect against moisture penetration into the pit.
- The second part of the pit is intended to place a wooden house above it. Assemble the frame of the Birdhouse booth according to the diagram.
- Then it can be sheathed with edged boards, clapboard, wooden panels or any other finishing material. Mount a toilet seat with a hole of the desired shape and size inside the booth.
- Cover the roof of the toilet with any roofing material, install a door in the front part, and cut out a ventilation window. Place the finished wooden cabin on a foundation with a hole and secure it on all sides. Close to the back wall of the toilet house, in the wooden flooring, cut a hole for a plastic ventilation pipe (diameter 10.0 cm). Insert it into this hole and secure it to the toilet wall with clamps. The lower end of the pipe should be buried 20.0 cm into the hole, and the upper end should be at least 70.0 cm from the level of the flooring (put on a protective cap).
After the toilet structure is installed, all wooden surfaces of the stall must be treated with impregnation, covered with stain, varnish or oil paint. This treatment will slow down the aging process of wood and give the building a beautiful aesthetic appearance. Following a special technology, a country wooden toilet can be tiled from the inside.
Using the same principle, you can build and install wooden toilet stalls of a different design on your summer cottage.
Do-it-yourself outdoor toilet for a summer house made of OSB boards - photos and drawings
Perhaps the easiest way to build a country toilet that is convenient enough for summer use is to use OSB boards. They are cheap, easy to process, and adjusting them to the size of a specific building is not difficult.
A foundation on solid soil can generally be neglected, and if it is built, it will be the simplest, columnar or on bricks.
First of all, the frame is assembled. To do this, you need to take a strong beam - preferably with a cross-section of 40x40 mm or more. A square measuring from 120×120 to 140×140 cm is placed in the base. The beams can be fastened together using nails or self-tapping screws. If the cesspool is large and is located almost under the entire area of the toilet, it makes sense to make a sheathing - add a few more beams in the middle of the square.
A vertical beam 200 cm high is attached to the base. In the upper part, another square is assembled in area exactly matching the base - an additional stiffening belt. The base for the future roof - a classic triangle - should be attached to it at an angle.
The frame is ready. All that remains is to cover it with sheets of OSB boards. Cutting out a suitable shape and size using a hacksaw or jigsaw is not difficult. The roof can also be made of OSB boards, but for waterproofing it should be protected with pieces of roofing felt or slate. The first can be fused or secured with small nails, and the second with screws.
Video
Step-by-step instructions for arranging a toilet with a cesspool
The most ideal option in the country is to build a toilet with a cesspool. Despite the fact that it needs to be dug out, concreted and periodically pumped out, this type of toilet is preferred by almost all summer residents. The above-ground part of the toilet can be built from any material (metal, brick, old pallets). In this article we will focus on the construction of a wooden toilet.
What you need for work
To build an outdoor toilet made of wood, the following materials are needed:
- wood;
- concrete;
- sand;
- crushed stone;
- screws or nails;
- roofing materials;
- antiseptic and impregnation that increases fire safety;
- paints and varnishes;
Tools you will need:
- jigsaw;
- sander;
- hammer;
- building level;
- shovel and drill (for excavation work);
- Bulgarian.
Optimal cabin sizes
For convenient use of an outdoor toilet, it is enough to make a stall of the following dimensions:
- height 2.2 m – 2.4 m;
- width – 1.4 m – 1.8 m;
- depth – 1.2 m-1.4 m.
Drawing of a country toilet with a cesspool
Before starting the work process, you will need to make a sketch of the future building. It is necessary to indicate the exact dimensions of the building itself and the cesspool. Having a detailed drawing will help avoid gross mistakes during construction, which will not only simplify the construction of the toilet, but also save consumables and free time.
Procedure for construction
How to build a toilet quickly, efficiently and inexpensively? To do this, follow the following procedure:
- Prepare the site for construction (clear the area of debris, stones, stumps).
- Make markings for construction.
- Dig a hole and concrete it.
- Build a shallow strip foundation, since the tree is light in weight.
- Make a floor and sheathing for installing a toilet.
- Build a frame and cover it with boards.
- Arrange the roof.
- The final stage is interior and exterior decorative finishing. Since the tree is beautiful in itself, it is better to leave it both outside and inside the building. The only thing is that the wood can be covered with stain and varnish.
As you can see, building a toilet in a country house with your own hands is quite possible. The main thing is to stock up on free time, materials, tools, and prepare a detailed drawing. Having little skills in the construction industry, almost every man is able to build a street toilet from any materials that is strong, reliable and durable.
Construction of a toilet house: step by step
The simplest, most common and affordable option is the traditional wooden outdoor toilet. This design can, if necessary, be easily moved to a new location.
To cover the erected frame, boards, lining, chipboard sheets or sheet plywood are used. The most common option would be a closet made from planks.
Outdoor toilet house
Particularly popular among summer residents is the simple wooden birdhouse model with a pitched roof, which has a rear wall height of 200 cm, a front wall of 230 cm and a width of at least 100 cm. The standard size of the base is 100x100 cm.
During installation, horizontal and vertical surfaces must be controlled using a building level.
Technology for constructing an outdoor toilet in a country house in stages:
- installation of a concrete curb slab as a foundation base with a distance of approximately 18-20 cm from the edges of the cesspool;
- laying waterproofing on the concrete curb in the form of three or four layers of roofing material;
- construction of a wooden frame base;
- frame covering.
The most common option for outdoor toilets in the country and in a private house is a wooden toilet. A wooden toilet for a summer residence can be erected quickly and easily, this explains the popularity of this particular design.
You can read about how to build and equip a two-room country house with a toilet and shower in this article.
At the final stage, a toilet hole up to 28-30 cm in diameter is cut out, and a door is installed. Roofing material, slate or profile steel sheet can be used as roofing material.
When independently arranging a wooden country toilet, you should not neglect the installation of simple ventilation, the purpose of which is to remove air from the cesspool into the atmosphere. The wooden structure can be painted or varnished, which will make it durable and attractive in appearance.
Wooden toilet without cesspool
Arranging a cesspool with your own hands is the simplest and most effective way to implement a sewer system. However, this cannot be done if the following conditions are met:
- shale or limestone type soil;
- The water level in the ground is more than 3 meters;
- The dacha is visited by a large number of people, therefore, a significant workload is planned.
In such a situation, the only way out would be to build an outdoor country toilet without a drainage pit. There are the following varieties of this type:
- powder-closet;
- backlash-closet;
- dry closet
In most cases, a powder closet is installed when there is a high groundwater level on the site. As a rule, the tank is located under the toilet and has a small volume (up to 18-20 l).
The basic principle of operation: the wastewater is coated with a powdery composition (most often with peat mass), which prevents the appearance and spread of an unpleasant odor. After such treatment, the sewage is transferred to the compost.
The main advantage of this type of outdoor toilet without a cesspool is its simplicity of structure and low construction costs.
- Viewing window.
- Seat cover.
- toilet seat
- Storage capacity.
- Entrance door
- Lining for support joists
- cesspool
- Ventilation window
The backlash closet is characterized by a completely sealed container where sewage and waste water are located. The wastewater in such a toilet does not enter the soil, and therefore is not capable of polluting the environment.
It will be necessary to ensure periodic cleaning by calling in special sewer equipment. The structure of the backlash closet suggests that the main storage tank can be located at some distance from the upper cabin, so such a toilet is often placed in the building.
The disadvantage is the inability to use the building in winter, because... The drains freeze and are difficult to pump out. The solution is to install a special heating system.
Dry toilets are often installed in the countryside. Their operating principle is similar to the work of powders - a closet; waste treatment is also carried out with peat. In some cases, biological preparations containing microorganisms that speed up processing or chemical agents are used.
When using a chemical toilet, it is important to use only safe products.
Peat toilet
A powder closet or peat toilet differs from the previous type in the absence of a cesspool. Instead, a waterproof container is attached under the toilet seat, which must be cleaned as it is filled. This type resembles an ordinary home toilet, and is the predecessor of the bio-toilets familiar to urban residents, only the role of water in the flush cistern here is played by peat, and the sewer pipes are replaced by a sealed container. This toilet can be installed even in the house.
About ventilation
When building a toilet for a summer house, do not forget about ventilation. The latrine should be equipped with:
- Supply ventilation. It is a small hole at the bottom of the toilet. Only done in stone toilets. Covered with a grill or mosquito net.
- Exhaust ventilation from the top of the pit. If the cesspool is planned to be covered with a concrete floor slab, then at the stage of assembling the formwork for the ventilation pipe, a mortgage is left. Asbestos-cement and sewer pipes are the most commonly used material for ventilation. They are run along the back of the cabin (outside) and secured to the casing with clamps. To improve natural draft, the pipe is placed on the sunny side and painted black. The head is raised 70-80 cm above the roof.
- Exhaust ventilation from the top of the cabin. In order not to make another head, the pipe is connected to the ventilation of the cesspool.
Interesting! A homemade deflector made from an old bucket without a bottom and a cap attached to the bucket with staples will help to increase the draft in the toilet ventilation pipe. The diagram of this original design is shown in the figure below. 1 – cap made of galvanized sheet, 2 – bucket without bottom, 3 – staples (8 pcs.), 4 – clamp, 5 – fasteners, 6 – ventilation pipe.
The first thing an owner does when building a house is build a toilet. Without this structure, even minimal comfort becomes an unattainable dream. We hope that the information and sketches presented will help you make your own country toilet project. If you have your own ideas, or find errors in the text or pictures, then please write to us. We invite theorists and practitioners to the discussion.
Foundation or supports
A simple house can be assembled as soon as the pit for the remains is completely ready. There is nothing extra natural in the installation process if there is a project:
- The building has a small specific gravity, and therefore it will be enough to deepen 4 supports made of metal pipes. If it is not there, then it is allowed to make pillars from brick. Existing options for arranging a foundation for an outdoor toilet
- A skeleton is built from 5x5 cm bars. First, put together two rectangles the size of the toilet, and then connect them together with 4 vertical bars, the two rear posts should be lower than the front ones, by the amount of the roof slope.
- The supports are secured by mounting a gusset made of timber to give strength to the structure.
- A toilet seat is mounted at a height of 50 cm; it is worth nailing two bars across the frame.
The process of assembling the frame of the toilet Final finishing of the outdoor toilet - A sheathing is made on top, the pitch of which will depend on the choice of roofing material. When it is planned to cover the roof with a sheet of slate, then auxiliary lathing is not required. The process of covering the toilet frame with boards
- If you have, say, soft tiles left over from building a house, then you first need to lay a sheet of OSB, then waterproof it, and only after that install the tiles.
The process of tiling a toilet frame - Place two supports, auxiliary in the place where the wooden carved door is attached.
- Place the prepared frame on the frame placed on the base and proceed to the sheathing.
Watch the video on how to quickly make a foundation for a country toilet.
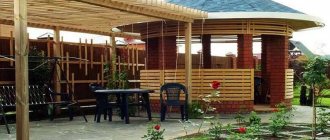
Combined shower-toilet
The second most necessary building at the dacha is a shower. And if so, then why build two separate structures if they can be built under one roof. Several drawings of country toilets with a shower for self-construction are published below.
Some people attach a shower or toilet to their country house. Of course, it’s much more comfortable and you don’t have to walk outside in the cold. But this method also has its own characteristics. Often an extension needs to be legalized. You can read all about this in more detail here.
As you guessed, the structure is simply doubled in width. If you want, you can create your own project, according to your desires and needs. The drawing of a utility room with a toilet will be exactly like this. You may need to make one of the rooms a little larger. Just provide for this when planning and manufacturing supports for construction.
Drawings of hut-type toilets
Summer residents practice the construction of toilets, which to some extent resemble the construction of a hut. These are the so-called “huts on chicken legs” or “birdhouses”.
The projects are copies of the mentioned buildings, covered with a pitched roof. Characteristic features of the birdhouse drawings include steep, high roof slopes and low walls.
The advantage of such a building is that with the same dimensions as the “hut”, you can get more free space inside.
Externally, the structure looks no less attractive than a triangular prism. Often the walls of such country toilets are built from small-diameter logs - a log house is made
The result is a beautiful building that fits well into the natural landscape of the summer cottage.
Related projects for hut toilet. Also quite original structures from the “hut on chicken legs” and “birdhouse” series. By adding a triangular prism with a base in the shape of a truncated parallelepiped, the usable internal area increases
The drawings of such country toilets have minor differences from the drawings of hut-type toilets. Therefore, the technology for installing bathrooms is almost identical to the options described above.
It will only be necessary to slightly increase the material base and supplement the set of construction tools. Often, projects of such buildings contain windows and vents, natural or forced ventilation.
An interesting and practical solution for arranging a summer cottage is a structure that includes a toilet with a shower. Our recommended article will introduce you to the rules for designing and implementing a project.
Warm country toilet for the winter
In winter, running to the toilet in the middle of the night, even if built with love with your own hands, is not a pleasure for everyone. Therefore, many people dream of a warm toilet.
Here we should immediately make a reservation - it will only be warm conditionally. At best, being in a building, you will be protected from snow and wind. It won't be warm here. Unless you are going to connect the toilet to the heating system of the house, install an electric heater in it, or install a potbelly stove, which you will constantly feed with fuel. So, we will try to make do with a minimum of amenities.
The main thing is to insulate the toilet. This can be done in both wooden and brick buildings. Various thermal insulation materials will work, but the easiest way is to use simple polystyrene foam. It has many advantages:
- low cost,
- light weight,
- ease of processing and adjustment,
- high thermal insulation.
The toilet is lined with foam plastic from the inside. To do this, the material is cut into pieces of a suitable shape and size - the easiest way to do this is with a simple hacksaw. If necessary, the edges can be sanded with coarse sandpaper or sandpaper. They must be even so that there are no gaps left when adjusting. The foam is attached to the walls using self-tapping screws and washers - the latter will reduce the pressure on the fragile insulation. By the way, you don’t need to tighten them too much at all - thanks to the lightness of the material, just a couple of screws can easily hold a sheet of several square meters in area. You need to insulate the walls, the door and especially the roof - heat rises and the roof accounts for the lion's share of heat loss.
When the do-it-yourself cladding is completed, for greater attractiveness the toilet is also lined with plywood from the inside. It hides the foam and reduces the risk of accidental damage. The same screws are used as fasteners.
If you want a warm toilet for your dacha, then there are certain ideas for this case too. For example, installing infrared lamps would be a good choice. They consume relatively little energy and at the same time are able to quickly increase the temperature in a small building to more or less comfortable.
Designing a brick toilet with drawings
The foundation for a brick toilet can be a reinforced concrete curb buried in the ground, or concrete blocks located at the corners of the structure.
A standard small cabin with a wall area of 8 square meters will require about 300 bricks to build. The calculation is approximate and very exaggerated, but for a general understanding of the process this information is enough.
Sequence of actions when laying bonded and treaded rows of brickwork. The walls of the toilet must be strong, because the building will be used for many years
For such a volume of masonry, you need to design about 60 kg of cement to prepare the mortar. The dimensions of a brick country toilet can be taken from the drawing of a birdhouse toilet.
If the wooden walls are made separately, then the brick outhouse is laid out in rows along the entire perimeter.
Cement mortar takes time to gain strength. If you lay out all the rows of masonry at once, the lower ones will bear a large load, under the influence of which the unset mortar will simply be squeezed out of all the seams.
To prevent this from happening, the laying is carried out in several stages. Optimally – 4-5 rows per day. Construction will be delayed, but the result will be much better.
Openings must be shown on the drawing in advance so that during the laying process you are not distracted by unnecessary calculations and adjustments
The roof can be pitched, as in the case of a wooden country birdhouse-latrine, or gable. Depending on this, the layout of the rafter mesh changes. The toilet is covered with the same slate, corrugated sheeting or other covering materials.
In addition to the listed types of closets, our website has an article on how to design and build a toilet with a shower. This is especially true if the territory of the summer cottage is not too large.
We build a toilet on a summer cottage from corrugated sheets
The process of making a country toilet from corrugated sheets is similar to the technology of making a cabin covered with boards.
The difference is that for the manufacture of the frame, a metal profile with a cross-sectional size of 40 by 40, 20 by 20 and 40 by 20 mm is most often used. The thickness of the pipe material is 2 mm.
The manufacturing process is as follows:
Step 1. The frame elements are cut to size and welded together. To ensure sufficient rigidity and strength, gussets are welded in the corners; In the absence of a welding machine, a bolted connection is acceptable. The frame is primed and painted;
Step 2. The assembled frame is installed on a pre-prepared base and sheathed with sheets of corrugated sheets;
Step 3. Floorboards of suitable thickness are laid;
Step 4. A gable roof is formed. To do this, the sheathing is first installed, and then the selected roofing material is attached;
Step 5. The gables are sewn up with polycarbonate. They will be used as windows. The base is covered with flat slate.
Advice! The interior space can be lined with clapboard or OSB, which will make the room more comfortable.
Choosing a location on the site
When talking about the construction of a sanitary facility in a country house, we mean a building separate from the house, not connected to a centralized sewer system
Latrines are usually installed in a remote corner of the territory to avoid unpleasant odors of waste. When choosing space on the site, you should understand how the collection and disposal of sewage will be carried out.
Most often, deep cesspools are dug for such buildings, but the following are also used:
- Septic tanks and powder toilets. They are located no closer than 15–20 m to other buildings
- Dry toilets . They dig into the ground in an area near the road so that a sewage truck can drive close and pump out sewage.
- Backlash closets. Insulated storage tanks for collecting waste through a pipe. The drainage hole is located on the side
General rules for choosing a site for a sanitary facility:
- At a distance of 10 m from residential buildings and structures
- No closer than 15 m from the habitats or keeping of animals
- 1 m from green spaces
- 1.5–2 m away from the neighbor’s fence
How to make insulation
The choice of a suitable insulation option must be determined in advance. Much depends on whether you plan to insulate the internal or external parts of the structure.
When planning work on the interior, remember that space is limited. Choose a material that will not take up much space during installation
It is important that it reliably protects against frost, cold and wind. Another thing that speaks in favor of insulation from the inside is that this type of material installation will require less money.
However, each case is individual.
When choosing external insulation, be prepared for more painstaking work. Due to limited space, buy thermal insulation materials whose width does not exceed 75 mm. The ideal option would be to install mineral wool sheets. To attach it, buy rectangular metal slats.
Due to limited space, buy thermal insulation materials whose width does not exceed 75 mm.
- For waterproofing you will need a film, and for cladding - plasterboard. It is best to opt for moisture-resistant sheets.
- Buy screws and profiles. They will be needed in order to make a high-quality fastening.
- To putty the joints between the sheets, buy putty.
To select the right amount of material, it is necessary to take into account the dimensions of the building. Installation of insulation consists of the following stages:
- Take wooden slats. Make the lathing by placing it on the walls in 50 cm increments.
- Lay down sheets of insulation. Secure them with self-tapping screws and attach them to the sheathing. The material should be placed on the walls, do not forget about the ceiling.
- Place a film on the insulation; it is required to protect the mineral wool from moisture. Secure the film with tape.
- Cover the insulation with moisture-resistant plasterboard. They are attached to self-tapping screws and mounted on a metal profile.
- Seal the joints of the sheets with putty.
If you want, you can stick wallpaper or tiles onto the drywall.
You can build a toilet by hiring a construction team, or you can buy a ready-made one.
- The cost of a “Hut” or “Birdhouse” starts from 6,500 rubles.
- A utility block with a toilet – from 12 to 18 thousand rubles.
- Delivery is possible, its cost depends on the destination and region.
How to choose an autonomous sewer system in a private house, we’ll figure it out here.
Everything about connecting to the city water supply network in a private house: documentation, work, prices, sample documents.
House for installing a dry toilet
For a country house, the best choice is a dry toilet. This construction option will not only provide the life of summer residents with an extremely necessary building, but will also provide those who like to grow vegetables and fruits with good quality fertilizers. Installing a dry closet does not require significant physical strength.
When setting up a hut-type country toilet, land owners often choose drawings for dry closets. This option is considered as the most rational for personal plots
The dry closet has increased functionality - it opens the way to the production of fertilizers.
Frame assembly instructions
If possible, it is recommended to use planed lumber for the construction of the hut structure itself and the details of the country dry closet.
As a last resort, if the boards and bars have a rough surface, you need to process them with a plane. In practice, it has been observed that planed lumber is much less likely to be attacked by various types of insects.
Sequence of builder steps:
- Along the perimeter of the base (1.2 x 1.0 m) make a small (100-150 mm) recess into the ground.
- Cover the bottom of the recess with crushed stone (backfill height 50-70 mm), compact it well.
- Cover the compacted surface with roofing felt (waterproofing).
- Pour a layer of sand (20-30 mm), distribute evenly on the surface.
- Place a second layer of roofing material with some margin along the perimeter boundaries.
- At the perimeter boundaries, lay a beam (150 x 150 mm) on top of the roofing material.
After completing these works, the foundation is ready for the construction of a hut for a country toilet according to the drawing. Next, you need to assemble the floor of the toilet from tongue-and-groove boards and fasten it along the edges with bars located around the perimeter. This can be done, for example, using metal corners cut to size.
The construction of a hut toilet usually begins with the construction of a common frame and the assembly of the floor. Of course, a different sequence of work cannot be ruled out.
The main task is to build a reliable, durable structure, especially when a permanent structure is being built.
The next step is to begin assembling the frame of the hut for the country toilet, as indicated in the drawing. Take two bars 50 x 50 mm, install them vertically and perpendicular to the base. The lower ends of the small bars are attached to the base bars, and their upper ends are combined with cuts one to the other and are also fastened.
Thus, several rafter elements are formed every 200 mm. The ridge part is additionally strengthened by inserting a beam passed from below. They also install reinforcing jumpers between the rafters in different places, both on the short side and on the long side. The frame of the future dacha “outhouse” is ready.
Hull plating and finishing
Having completed the assembly of the hut frame, they begin to assemble the base of the dry closet. At a level of 350-400 mm from the floor, a jumper is attached between the two rear rafters of the hut. Having made an indentation of 400-450 mm from it to the front part, a second lintel is attached at the same level.
Below the second lintel, at floor level, a third lintel is placed. These will be the base beams of the dry closet, on which the sheathing will lie. Next, the upper lintels are reinforced with stop posts and all the voids are sheathed with boards, cutting them to size. They make sections for the toilet container and for peat storage.
They are equipped with lids (for the toilet section + seat with a hole). Roofing material is laid on the pitched roof of the hut. They make a door in the plane of the facade wall. At this point the assembly can be considered complete.
Options for installing hut-type country toilet doors. View from outside as well as from inside. The technology for assembling the canvases is simple - a set of tongue-and-groove boards, fastened with a “Z”-type rack plate. Door hinges are usually fitted with overhead
This is roughly what the simplest design of a toilet for a summer house, made like a hut, looks like. It is small-sized and somewhat inconvenient due to the limited space inside. But at the same time, it occupies a small part of the territory of the dacha plot, where every square meter is usually registered.
For better stability and reliability of the structure, metal pipes are driven into the ground at the corners of the timber base (150 x 150), close to it, and the supporting part of the building is attached to them. Gutters are installed under the roof slopes to collect and drain water. It is also advisable to lay a blind area around the outer perimeter.
Finishing a country toilet inside - photo
The choice of materials that can be used when finishing a country toilet is huge. Today you can use this:
- Styrofoam,
- PVC panels,
- plywood,
- clapboard
This is not a complete list of options - by visiting a suitable hardware store, it is easy to find a number of other materials, each of which has a number of advantages that make them the best choice for a particular user.
When choosing, you need to pay attention not only to the cost, but also to the ease of installation. For example, it is much easier to cover walls with polystyrene foam or plywood with your own hands. But for lining or panels it is often necessary to arrange lathing - the exception is cases when the walls are already flat.
Powder closet: design and construction features
This DIY restroom can be built within a day . To do this you need:
- Choose a place for the powder closet.
- Build a toilet house, which should be 25-30 cm wider than the building with a cesspool.
- Prepare containers for waste and peat.
- Make a hinged lid for the toilet seat.
- Install a waste tank and a box with peat.
The toilet can now be used. Just don’t forget to “powder” the waste after visiting it and empty the container after filling it.
Photos of country toilets with your own hands
Step-by-step instructions for building a house
Scheme of constructing a toilet in the form of a hut
An option for building a toilet available to a beginner in the construction business is a cesspool and a “Hut” type structure made of wood.
Necessary materials
Wood is the most common material for constructing a country bathroom
To build a simple but convenient sanitary house on a summer cottage, you will need:
- Dry wood bars and boards
- Self-tapping screws and screwdriver
- Hammer and nails
- Glue
- Polystyrene foam as insulation
- Slate or roofing felt for roofing
- Fiberboard or plywood for interior finishing work
- Metal corners
- Accessories (plastic or wooden handle, hook for locking)
- Set of seat with cover
Equipment for pits made of large diameter concrete rings
Arranging a cesspool will require purchasing costs:
- Rubble
- Fine river sand
- Cement (any brand and model)
- Metal mesh with small cells to strengthen the walls
- Reinforcing lattice or pieces of reinforcement to increase the strength of the foundation
The following tools will be required:
- bayonet and shovel
- drill and hammer drill (if the soil is rocky, clayey)
- grinder with discs for working with metal and stone
- jigsaw
- square
- yardstick
- building level
Shovels
If there is a financial opportunity, then a cesspool can be equipped from three concrete rings placed on top of each other. The first 2 serve as a kind of settling tanks, and the lower one filters sewage before it enters the soil.
In cases where the budget is very limited, old tires from truck wheels are used.
How to dig a cesspool
The work begins with marking the site. Next, perform the following steps:
1 Dig (drill) a square or round hole in the soil to a depth of 2 m. The soil is selected, drainage is poured onto the bottom - a mixture of crushed stone and sand
2 The walls are reinforced with a mesh, and cement mortar is poured on top, leveling the surface
Reinforcing mesh strengthens the walls of the ditch
2 The dried cement is plastered and allowed to dry.
Plastered concrete walls of a cesspool
3 Wooden boards treated with an antiseptic compound are installed across the hole of the pit into the ground on the edge at a short distance. They serve as the basis for pouring the foundation
4 Along the edges of the ditch, formwork is made to the height of the future foundation. The hole is covered with plastic film and covered with a reinforcing grid on top
5 Leave 2 holes in the film - for installing the toilet and for the cesspool technical exit
6 The space inside the formwork is filled with cement mortar, leveled, guided by the beacons or the building level
Pouring the foundation of the pit
7 The completely dry foundation is ready for installation of the above-ground part. Before this, the cesspool hole is closed with a special hatch.
Construction work order
Next, they move on to the construction of the structural part of the bathroom - a wooden house in the form of a hut. It is recommended to follow these instructions:
1 Begin by installing the lower base of the frame from 5x5 cm beams. Square formwork is knocked down from the parts, and flooring from boards is laid on top
Hole for seat installation
2 A hole for the toilet seat and a technological opening for the cesspool hatch are cut out in the floor
3 The wooden base is coated with antiseptic impregnations
4 The front and back parts of the structure are assembled from beams according to pre-prepared diagrams. The finished parts look like isosceles triangles with three bars along them, spaced apart. The inside of both blanks is finished with fiberboard strips
Assembly diagrams for the front and back parts
5 The front and back are attached to the base with self-tapping screws and reinforced with metal corners
6 Next, the roof is installed (it also serves as side walls) from boards 1.8–2 m long, roofing material is laid and the ridge is installed. A ventilation hole and pipe are provided on top
The roof is covered with roofing felt, slate or metal tiles
7 A door is installed on the facade, a pedestal for a seat is mounted inside
Seat pedestal
8 The wood is primed and varnished, and optionally treated with stain
9 Lastly, install the handle, toilet seat, hook for closing the door
Dry toilet
Design of the seat and waste tank in a dry closet
A dry toilet is a compact toilet that is connected to a miniature storage system. Waste is processed using biological products or peat mixture.
It is quite difficult to make a dry toilet on your own, so it is recommended to install it in cases where it is not possible to arrange a latrine yourself.
The main disadvantage of this design is that the tank with already processed waste needs to be emptied every 10-12 days, which is impractical for summer residents.